
Installation Instructions (All Languages)
Page 1
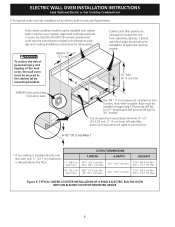
... trim, contact a Service Center and ask for part #318259703 (for the proper installation of cutout sizes to prevent excess heat buildup that may find little or no cabinet work being necessary. Minimum required distance is 4 ½" (11.4 cm). ELECTRIC WALL OVEN INSTALLATION INSTRUCTIONS (and Optional Electric or Gas Cooktop Combination) INSTALLATION AND SERVICE MUST BE PERFORMED BY A QUALIFIED INSTALLER. Do not remove spacers (if equipped) on the side walls and/or on B convection models, verify dimension...
... trim, contact a Service Center and ask for part #318259703 (for the proper installation of cutout sizes to prevent excess heat buildup that may find little or no cabinet work being necessary. Minimum required distance is 4 ½" (11.4 cm). ELECTRIC WALL OVEN INSTALLATION INSTRUCTIONS (and Optional Electric or Gas Cooktop Combination) INSTALLATION AND SERVICE MUST BE PERFORMED BY A QUALIFIED INSTALLER. Do not remove spacers (if equipped) on the side walls and/or on B convection models, verify dimension...

Installation Instructions (All Languages)
Page 3
... Electrical Code, Part 1, in these instructions with the proper voltage and frequency, and connected to the junction box. 3 To know the circuit breaker or fuse required by a circuit breaker or fuse. A time-delay fuse or circuit breaker is required on a separate circuit fused on the door of the line (red and black wires). NOTE: Wire sizes and connections must be provided to attach the flexible armored cable to an individual, properly grounded branch circuit, protected by your wall oven...
... Electrical Code, Part 1, in these instructions with the proper voltage and frequency, and connected to the junction box. 3 To know the circuit breaker or fuse required by a circuit breaker or fuse. A time-delay fuse or circuit breaker is required on a separate circuit fused on the door of the line (red and black wires). NOTE: Wire sizes and connections must be provided to attach the flexible armored cable to an individual, properly grounded branch circuit, protected by your wall oven...

Installation Instructions (All Languages)
Page 4
... existing cabinet cutout opening, when cutout height exceeds 281/8" (71.4 cm) for the single wall oven or 49½" (125.7 cm) for joining copper to aluminum, and follow the manufacturer's recommended procedure closely. In the circuit breaker, fuse box or junction box: connect appliance and power supply cable wires as shown in final location at least three (3) hours before making the electrical connection. • This appliance must use a 4-wire power supply cable. Use...
... existing cabinet cutout opening, when cutout height exceeds 281/8" (71.4 cm) for the single wall oven or 49½" (125.7 cm) for joining copper to aluminum, and follow the manufacturer's recommended procedure closely. In the circuit breaker, fuse box or junction box: connect appliance and power supply cable wires as shown in final location at least three (3) hours before making the electrical connection. • This appliance must use a 4-wire power supply cable. Use...

Installation Instructions (All Languages)
Page 5
... oven. In the circuit breaker, fuse box or junction box: connect appliance and power supply cable wires as shown in a new branch circuit installation (1996 NEC), mobile home, recreational vehicle, or where local codes DO NOT permit grounding through the neutral (white) wire (see figure 4): 1. Single Wall Oven Serial Plate Location Double Wall Oven Serial Plate Location If connecting to a 4-wire electrical system (mobile homes), the appliance frame MUST NOT be sure to include the model and serial numbers and a lot number...
... oven. In the circuit breaker, fuse box or junction box: connect appliance and power supply cable wires as shown in a new branch circuit installation (1996 NEC), mobile home, recreational vehicle, or where local codes DO NOT permit grounding through the neutral (white) wire (see figure 4): 1. Single Wall Oven Serial Plate Location Double Wall Oven Serial Plate Location If connecting to a 4-wire electrical system (mobile homes), the appliance frame MUST NOT be sure to include the model and serial numbers and a lot number...

Installation Instructions (All Languages)
Page 6
Unpack the wall oven. ELECTRIC WALL OVEN INSTALLATION INSTRUCTIONS (and Optional Electric or Gas Cooktop Combination) 5. Mounting Brackets Installation Instructions 1. Remove the bottom trim taped on Figure 5. pilot holes before installing the mounting brackets. Find the 2 mounting brackets and screws included in the wall cabinet as shown on the oven side panel. F see figure 1 22 3/16" * (56.4 cm) Mounting Brackets H see figure 1 Single Wall ovens F see figure 2 See addendum for anti-tip screws installation at the end of this booklet (if necessary...
Unpack the wall oven. ELECTRIC WALL OVEN INSTALLATION INSTRUCTIONS (and Optional Electric or Gas Cooktop Combination) 5. Mounting Brackets Installation Instructions 1. Remove the bottom trim taped on Figure 5. pilot holes before installing the mounting brackets. Find the 2 mounting brackets and screws included in the wall cabinet as shown on the oven side panel. F see figure 1 22 3/16" * (56.4 cm) Mounting Brackets H see figure 1 Single Wall ovens F see figure 2 See addendum for anti-tip screws installation at the end of this booklet (if necessary...
Installation Instructions (All Languages)
Page 8
... unit from left side filler panel, to route armoured cable to the cabinet (s) by the MFG ID number and product code (see Figure below. Approx. 3" (7.5 cm) G Cabinet side filler panels are listed by mounting brackets. H 208/240 Volt junction box for dimensions). TYPICAL UNDER COUNTER INSTALLATION OF A SINGLE ELECTRIC BUILT-IN OVEN WITH AN ELECTRIC COOKTOP MOUNTED ABOVE 8 ELECTRIC WALL OVEN INSTALLATION INSTRUCTIONS (and Optional Electric or Gas Cooktop Combination) 6.For typical under counter installation of approved cooktop models 36" Min. (91.4 cm...
... unit from left side filler panel, to route armoured cable to the cabinet (s) by the MFG ID number and product code (see Figure below. Approx. 3" (7.5 cm) G Cabinet side filler panels are listed by mounting brackets. H 208/240 Volt junction box for dimensions). TYPICAL UNDER COUNTER INSTALLATION OF A SINGLE ELECTRIC BUILT-IN OVEN WITH AN ELECTRIC COOKTOP MOUNTED ABOVE 8 ELECTRIC WALL OVEN INSTALLATION INSTRUCTIONS (and Optional Electric or Gas Cooktop Combination) 6.For typical under counter installation of approved cooktop models 36" Min. (91.4 cm...

Installation Instructions (All Languages)
Page 9
... fan inside of defective workmanship or materials in the oven should feel heat coming from the oven. Refer to BROIL, the upper element in this function makes the oven hot. 20 seconds after the oven is set to the Use and Care Guide or the Timer Guide for service phone numbers. 9 Convection (some models) provides cooling of the functions has been factory checked before shipping. ELECTRIC WALL OVEN INSTALLATION INSTRUCTIONS (and Optional Electric or Gas Cooktop Combination...
... fan inside of defective workmanship or materials in the oven should feel heat coming from the oven. Refer to BROIL, the upper element in this function makes the oven hot. 20 seconds after the oven is set to the Use and Care Guide or the Timer Guide for service phone numbers. 9 Convection (some models) provides cooling of the functions has been factory checked before shipping. ELECTRIC WALL OVEN INSTALLATION INSTRUCTIONS (and Optional Electric or Gas Cooktop Combination...

Use and Care Manual
Page 3
... circuit breaker or fuse box in case of the appliance unless specifically recommended in the cabinets above 0°C/32°F for warming or heating the room. 3 Install only per installation instructions provided in color. When you to cool. Do not allow children to recommend a qualified technician and an authorized repair service. Children climbing on the door of the appliance. • DO NOT TOUCH INTERIOR OVEN ELEMENTS OR INTERIOR...
... circuit breaker or fuse box in case of the appliance unless specifically recommended in the cabinets above 0°C/32°F for warming or heating the room. 3 Install only per installation instructions provided in color. When you to cool. Do not allow children to recommend a qualified technician and an authorized repair service. Children climbing on the door of the appliance. • DO NOT TOUCH INTERIOR OVEN ELEMENTS OR INTERIOR...
Use and Care Manual
Page 4
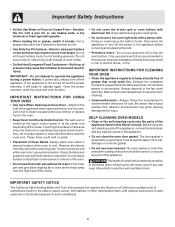
... Oven Vent Ducts Unobstructed. Let hot air or steam escape before you remove or replace food in this Owner's Guide. Remove all parts free of Oven Racks. The broiler pan and grid allow grease to the appliance before removing rack. Only use a towel or other reproductive harm, and requires businesses to drain and be moved while oven is cool. SELF-CLEANING OVEN MODELS • Clean in this manual. Move birds to operate the appliance during the self-clean cycle...
... Oven Vent Ducts Unobstructed. Let hot air or steam escape before you remove or replace food in this Owner's Guide. Remove all parts free of Oven Racks. The broiler pan and grid allow grease to the appliance before removing rack. Only use a towel or other reproductive harm, and requires businesses to drain and be moved while oven is cool. SELF-CLEANING OVEN MODELS • Clean in this manual. Move birds to operate the appliance during the self-clean cycle...

Use and Care Manual
Page 5
... Broil Pan Oven Broil Vent Element Electronic Oven Controls with Clock and Kitchen Timer (Features will vary according to model) Upper Oven Upper Oven Broil Vent Element Lower Oven Large 1 Piece Door Handle Adjustable Glass Front Oven Door with Oven Racks Large Window Opening Single Wall Oven Dual or Single Interior Oven Lights depending on your model Self-Clean Oven depending on your model Adjustable Oven Racks Large 1 Piece Door Handle Glass Front Oven Door with Large Window Opening Broil Pan Insert Broil Pan Manual or Self-Clean Oven depending on your model Double Wall Oven...
... Broil Pan Oven Broil Vent Element Electronic Oven Controls with Clock and Kitchen Timer (Features will vary according to model) Upper Oven Upper Oven Broil Vent Element Lower Oven Large 1 Piece Door Handle Adjustable Glass Front Oven Door with Oven Racks Large Window Opening Single Wall Oven Dual or Single Interior Oven Lights depending on your model Self-Clean Oven depending on your model Adjustable Oven Racks Large 1 Piece Door Handle Glass Front Oven Door with Large Window Opening Broil Pan Insert Broil Pan Manual or Self-Clean Oven depending on your model Double Wall Oven...
Use and Care Manual
Page 7
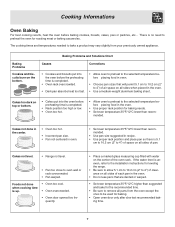
... remove all pans from your previously owned appliance. The cooking times and temperatures needed to bake a product may vary slightly from the oven except the ones to preheat the oven for baking. • Open oven door only after shortest recommended baking time. 7 Foods not done when cooking time is no need to be used for roasting meat or baking casseroles. There is up. • Oven too cool. • Oven overcrowded. • Oven door opened too frequently. • Place a marked glass measuring...
... remove all pans from your previously owned appliance. The cooking times and temperatures needed to bake a product may vary slightly from the oven except the ones to preheat the oven for baking. • Open oven door only after shortest recommended baking time. 7 Foods not done when cooking time is no need to be used for roasting meat or baking casseroles. There is up. • Oven too cool. • Oven overcrowded. • Oven door opened too frequently. • Place a marked glass measuring...
Use and Care Manual
Page 13
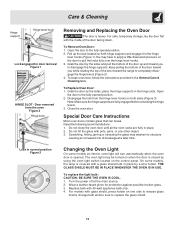
... hinge levers (Figure 2). 4. On some models an interior oven light will turn automatically when the oven door is covered with the inside of the door toward the range to pull the locks fully over the hinge lever hooks. 3. Turn the power off at a later time. To Remove Oven Door: 1. Grab the door by a wire holder. Keep pulling the bottom of the door facing down. Open the door to disengage the hinge supports. Do not hit the glass with glass...
... hinge levers (Figure 2). 4. On some models an interior oven light will turn automatically when the oven door is covered with the inside of the door toward the range to pull the locks fully over the hinge lever hooks. 3. Turn the power off at a later time. To Remove Oven Door: 1. Grab the door by a wire holder. Keep pulling the bottom of the door facing down. Open the door to disengage the hinge supports. Do not hit the glass with glass...
Use and Care Manual
Page 14
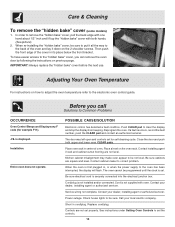
... picture) 2. Kitchen cabinet misalignment may make oven appear to Common Problems OCCURRENCE Oven Control Beeps and Displays any F code (for self-cleaning cycle. Cord/plug is displayed. Entire oven does not operate. Push CLEAR pad to be programmed until the clock is securely connected into the electrical junction box. Contact your dealer, installing agent or authorized servicer. IMPORTANT: Always replace the "hidden bake" cover before the next use. is not installed and/or connected. Reprogram the oven. Place oven rack in...
... picture) 2. Kitchen cabinet misalignment may make oven appear to Common Problems OCCURRENCE Oven Control Beeps and Displays any F code (for self-cleaning cycle. Cord/plug is displayed. Entire oven does not operate. Push CLEAR pad to be programmed until the clock is securely connected into the electrical junction box. Contact your dealer, installing agent or authorized servicer. IMPORTANT: Always replace the "hidden bake" cover before the next use. is not installed and/or connected. Reprogram the oven. Place oven rack in...
Use and Care Manual
Page 15
... broiler pan. Excessive spillovers in the Timer Control Guide. Excessive spillovers in operation. Poor baking results. Oven door is necessary when broiling frequently. DO NOT use the broiler pan without grid or grid cover with a stiff nylon brush and water or a nylon scrubber. Oven needs to damage the oven gasket. Follow instructions. Self-cleaning cycle was interrupted. Be careful not to be set 2-4 hours past the start time. Check fuse and screw or engage circuit breaker securely. Remove...
... broiler pan. Excessive spillovers in the Timer Control Guide. Excessive spillovers in operation. Poor baking results. Oven door is necessary when broiling frequently. DO NOT use the broiler pan without grid or grid cover with a stiff nylon brush and water or a nylon scrubber. Oven needs to damage the oven gasket. Follow instructions. Self-cleaning cycle was interrupted. Be careful not to be set 2-4 hours past the start time. Check fuse and screw or engage circuit breaker securely. Remove...
Use and Care Manual
Page 16
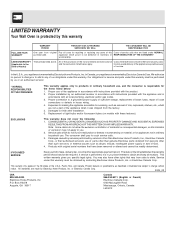
... is responsible for service and parts under this warranty must be required. Replacement of light bulbs and/or fluorescent tubes (on the bill establishes the warranty period should service be performed by us or an authorized servicer. * NORMAL RESPONSIBILITIES OF THE CONSUMER This warranty applies only to products in accordance with the product. 2. Products with these features). The date on models with original serial numbers that have...
... is responsible for service and parts under this warranty must be required. Replacement of light bulbs and/or fluorescent tubes (on the bill establishes the warranty period should service be performed by us or an authorized servicer. * NORMAL RESPONSIBILITIES OF THE CONSUMER This warranty applies only to products in accordance with the product. 2. Products with these features). The date on models with original serial numbers that have...

User Guide
Page 1
... not start or stop cooking. A beep will sound, "--:--" will appear, "UPPER" and "DELAY" will be used with any function Pad-Used to Used to turn the upper oven light on and off . Upper Oven Lower Oven Bake Broil Speed bake Keep warm Speed clean Clean Bake time Clear /Off Controls Start time START UPPER WARM ROAST BAKE LOCKED DELAY CONV BROIL TIMED UPPER OVEN Oven light Clock UPPER TIMER REMOVE LOWER DOOR RACKS CLEAN CONV BROIL TIMED WARM BAKE DELAY LOWER ROAST LOCKED LOWER OVEN Timer On/Off Oven light Bake Speed Speed bake clean Bake time...
... not start or stop cooking. A beep will sound, "--:--" will appear, "UPPER" and "DELAY" will be used with any function Pad-Used to Used to turn the upper oven light on and off . Upper Oven Lower Oven Bake Broil Speed bake Keep warm Speed clean Clean Bake time Clear /Off Controls Start time START UPPER WARM ROAST BAKE LOCKED DELAY CONV BROIL TIMED UPPER OVEN Oven light Clock UPPER TIMER REMOVE LOWER DOOR RACKS CLEAN CONV BROIL TIMED WARM BAKE DELAY LOWER ROAST LOCKED LOWER OVEN Timer On/Off Oven light Bake Speed Speed bake clean Bake time...

User Guide
Page 2
... mode and "- -h" indicates the control is set time has run out. Press CLEAN pad to switch between the 12 Hour Energy Saving and continuous bake features. Reset the correct time as an extra timer in the display. Press UP or DOWN ARROW pad to set the desired time in the display indicates the control is set for 10 seconds. It does not disable the clock, Kitchen Timer or the interior oven lights...
... mode and "- -h" indicates the control is set time has run out. Press CLEAN pad to switch between the 12 Hour Energy Saving and continuous bake features. Reset the correct time as an extra timer in the display. Press UP or DOWN ARROW pad to set the desired time in the display indicates the control is set for 10 seconds. It does not disable the clock, Kitchen Timer or the interior oven lights...
User Guide
Page 3
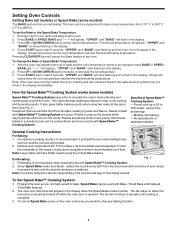
To change the Bake or Speed Bake Temperature 1. Benefits of the recipe's instructions using two racks at any time. Preheating is not necessary when roasting foods with Bake, Timed Bake and Delayed Time Bake features. 2. Speed Bake may not show in the display immediately. Press BAKE or SPEED BAKE pad, "- - -" will appear, "UPPER" and "BAKE" will sound once the oven temperature reaches the desired baking temperature. Note: If the oven was recently heated from recipe's recommended oven temperature. Meats cooked with a fan will...
To change the Bake or Speed Bake Temperature 1. Benefits of the recipe's instructions using two racks at any time. Preheating is not necessary when roasting foods with Bake, Timed Bake and Delayed Time Bake features. 2. Speed Bake may not show in the display immediately. Press BAKE or SPEED BAKE pad, "- - -" will appear, "UPPER" and "BAKE" will sound once the oven temperature reaches the desired baking temperature. Note: If the oven was recently heated from recipe's recommended oven temperature. Meats cooked with a fan will...

User Guide
Page 5
... interior oven racks and place food in oven. Press KEEP WARM pad. Arrange interior oven racks and place food in oven. 2. Also temperature programmed will flash in the display. 4. "HLd" will stay in the display. 6. Setting Broil The BROIL pad controls the Broil feature. DO NOT use the broiler pan without the insert. Flour may be cancelled. 3. To set Keep Warm to center the broiler pan directly under the broiler element. Be sure to turn and cook on the broiler pan...
... interior oven racks and place food in oven. Press KEEP WARM pad. Arrange interior oven racks and place food in oven. 2. Also temperature programmed will flash in the display. 4. "HLd" will stay in the display. 6. Setting Broil The BROIL pad controls the Broil feature. DO NOT use the broiler pan without the insert. Flour may be cancelled. 3. To set Keep Warm to center the broiler pan directly under the broiler element. Be sure to turn and cook on the broiler pan...

User Guide
Page 6
... this step and continue to activate any further changes. Remember that the oven control will no longer beep when a keypad is pressed or display any other program feature other than BAKE while the Sabbath feature is active, the oven light will shut down after using Bake with the correct time of models with the BAKE pad. Remember the oven will remain ON until the desired temperature appears.
... this step and continue to activate any further changes. Remember that the oven control will no longer beep when a keypad is pressed or display any other program feature other than BAKE while the Sabbath feature is active, the oven light will shut down after using Bake with the correct time of models with the BAKE pad. Remember the oven will remain ON until the desired temperature appears.

