
Installation Instructions (All Languages)
Page 1
...FUTURE REFERENCE. F Max. 27" (68.6 cm) Wall Oven 247/8 (63.2) 25¼ (64.1) 30" (76.2 cm) Wall Oven 28½ (72.4) 29 (73.7) All dimensions are in the space provided. ELECTRIC WALL OVEN INSTALLATION INSTRUCTIONS (and Optional Electric or Gas Cooktop Combination) INSTALLATION AND SERVICE MUST BE ...easier. You may result in oven. These spacers center the oven in inches (cm). If the oven decorative trim does not butt against the cabinet, or if noise is the required depth. 4. Figure 1 27" and 30" Single Wall Ovens (Double ovens see note 2) appropriate height ...
...FUTURE REFERENCE. F Max. 27" (68.6 cm) Wall Oven 247/8 (63.2) 25¼ (64.1) 30" (76.2 cm) Wall Oven 28½ (72.4) 29 (73.7) All dimensions are in the space provided. ELECTRIC WALL OVEN INSTALLATION INSTRUCTIONS (and Optional Electric or Gas Cooktop Combination) INSTALLATION AND SERVICE MUST BE ...easier. You may result in oven. These spacers center the oven in inches (cm). If the oven decorative trim does not butt against the cabinet, or if noise is the required depth. 4. Figure 1 27" and 30" Single Wall Ovens (Double ovens see note 2) appropriate height ...

Installation Instructions (All Languages)
Page 2
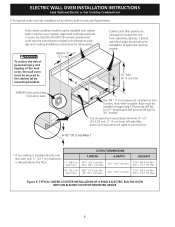
... These spacers center the oven in inches (cm). Spacer 2" D (5.1 cm) Min. decorative trim does not butt against the cabinet, or if noise is heard on the back of the opening under the 2. The oven must be centered to ...Wall Oven 30" (76.2 cm) Wall Oven PRODUCT DIMENSIONS A B C 27 (68.6) 30 (76.2) 507/16 (128.1) 507/16 (128.1) 245/8 (62.5) 28¼ (71.8) CUTOUT DIMENSIONS AND CABINET WIDTH MODEL Min. Figure 2 27" AND 30" DOUBLE OVENS (Single Ovens see note 2) 11½" (29.2 cm) 3" (7.6 cm) Max. ELECTRIC WALL OVEN INSTALLATION INSTRUCTIONS (and Optional Electric...
... These spacers center the oven in inches (cm). Spacer 2" D (5.1 cm) Min. decorative trim does not butt against the cabinet, or if noise is heard on the back of the opening under the 2. The oven must be centered to ...Wall Oven 30" (76.2 cm) Wall Oven PRODUCT DIMENSIONS A B C 27 (68.6) 30 (76.2) 507/16 (128.1) 507/16 (128.1) 245/8 (62.5) 28¼ (71.8) CUTOUT DIMENSIONS AND CABINET WIDTH MODEL Min. Figure 2 27" AND 30" DOUBLE OVENS (Single Ovens see note 2) 11½" (29.2 cm) 3" (7.6 cm) Max. ELECTRIC WALL OVEN INSTALLATION INSTRUCTIONS (and Optional Electric...

Installation Instructions (All Languages)
Page 3
... Refer to the Consumer Keep these instructions with the National Electrical Code ANSI/NFPA No.70- The oven support surface may be dangerous. ELECTRIC WALL OVEN INSTALLATION INSTRUCTIONS (and Optional Electric or Gas Cooktop Combination) Important Notes to side and from the oven compartments before installing the wall oven. 2. Important Note to figure 1 or 2 for future reference. IMPORTANT SAFETY...
... Refer to the Consumer Keep these instructions with the National Electrical Code ANSI/NFPA No.70- The oven support surface may be dangerous. ELECTRIC WALL OVEN INSTALLATION INSTRUCTIONS (and Optional Electric or Gas Cooktop Combination) Important Notes to side and from the oven compartments before installing the wall oven. 2. Important Note to figure 1 or 2 for future reference. IMPORTANT SAFETY...

Installation Instructions (All Languages)
Page 4
... permit grounding through the neutral (white) wire. Electrical ground is required on power while oven is still cold may damage the oven controls. 3. Use only connectors designed for the double wall oven (see figure 3): 1. See Figure 4. Place shims of the consumer to contact a qualified installer to assure that oven is the responsibility and obligation of appropriate height...
... permit grounding through the neutral (white) wire. Electrical ground is required on power while oven is still cold may damage the oven controls. 3. Use only connectors designed for the double wall oven (see figure 3): 1. See Figure 4. Place shims of the consumer to contact a qualified installer to assure that oven is the responsibility and obligation of appropriate height...

Installation Instructions (All Languages)
Page 5
...green (or bare copper) and white appliance cable wires. 3. Single Wall Oven Serial Plate Location Double Wall Oven Serial Plate Location If connecting to a 4-wire electrical system (mobile homes), the appliance frame MUST NOT be sure to ...include the model and serial numbers and a lot number or letter from appliance Figure 4 4-WIRE GROUNDED JUNCTION BOX DO NOT ground to larger gauge household wiring. Disconnect the power supply. 2. ELECTRIC WALL OVEN...
...green (or bare copper) and white appliance cable wires. 3. Single Wall Oven Serial Plate Location Double Wall Oven Serial Plate Location If connecting to a 4-wire electrical system (mobile homes), the appliance frame MUST NOT be sure to ...include the model and serial numbers and a lot number or letter from appliance Figure 4 4-WIRE GROUNDED JUNCTION BOX DO NOT ground to larger gauge household wiring. Disconnect the power supply. 2. ELECTRIC WALL OVEN...

Installation Instructions (All Languages)
Page 6
...(56.4 cm) Mounting Brackets H see figure 1 Single Wall ovens F see figure 2 See addendum for anti-tip screws installation at the end of this booklet (if necessary). 43 5/8" * (110.8 cm) Mounting Brackets H see figure 2 Double Wall ovens * If wood shims are installed please calculate this dimension from... 2 mounting brackets and screws included in the wall cabinet as shown on the oven side panel. ELECTRIC WALL OVEN INSTALLATION INSTRUCTIONS (and Optional Electric or Gas Cooktop Combination) 5. The mounting brackets supplied with the wall oven must be attached to the cabinet and the ...
...(56.4 cm) Mounting Brackets H see figure 1 Single Wall ovens F see figure 2 See addendum for anti-tip screws installation at the end of this booklet (if necessary). 43 5/8" * (110.8 cm) Mounting Brackets H see figure 2 Double Wall ovens * If wood shims are installed please calculate this dimension from... 2 mounting brackets and screws included in the wall cabinet as shown on the oven side panel. ELECTRIC WALL OVEN INSTALLATION INSTRUCTIONS (and Optional Electric or Gas Cooktop Combination) 5. The mounting brackets supplied with the wall oven must be attached to the cabinet and the ...

Installation Instructions (All Languages)
Page 7
... and fix it in the mounting holes located on each side of oven frame. ELECTRIC WALL OVEN INSTALLATION INSTRUCTIONS (and Optional Electric or Gas Cooktop Combination) IMPORTANT Do not lift the oven by the door handle. 3.Insert the oven into the side of cabinet. the oven side bracket will clip into the mounting brackets installed into the cabinet...
... and fix it in the mounting holes located on each side of oven frame. ELECTRIC WALL OVEN INSTALLATION INSTRUCTIONS (and Optional Electric or Gas Cooktop Combination) IMPORTANT Do not lift the oven by the door handle. 3.Insert the oven into the side of cabinet. the oven side bracket will clip into the mounting brackets installed into the cabinet...
Installation Instructions (All Languages)
Page 8
...) Max. 30" (76.2 cm) 28½" (72.4 cm) Min. 27¼" (69.2 cm) Min. Approx. 3" (7.5 cm) G Cabinet side filler panels are listed by mounting brackets. Figure 9- Wall Oven 29" (73.7 cm) Max. 23½" (59.7 cm) Min. 285/8" (72.7 cm) Max. TYPICAL UNDER COUNTER INSTALLATION OF A SINGLE ELECTRIC BUILT-IN OVEN WITH AN ELECTRIC COOKTOP MOUNTED...
...) Max. 30" (76.2 cm) 28½" (72.4 cm) Min. 27¼" (69.2 cm) Min. Approx. 3" (7.5 cm) G Cabinet side filler panels are listed by mounting brackets. Figure 9- Wall Oven 29" (73.7 cm) Max. 23½" (59.7 cm) Min. 285/8" (72.7 cm) Max. TYPICAL UNDER COUNTER INSTALLATION OF A SINGLE ELECTRIC BUILT-IN OVEN WITH AN ELECTRIC COOKTOP MOUNTED...

Installation Instructions (All Languages)
Page 9
... elements cycle on and off alternately and the convection fan will run after turning oven on, open the door and you have a double cavity wall oven. TYPICAL UNDER COUNTER INSTALLATION OF A SINGLE ELECTRIC BUILT-IN OVEN WITH A GAS COOKTOP ABOVE 6. Repeat in your Use and Care Guide. If... the oven has been operating at high temperatures, the fan will stop running when the oven door is suggested that ...
... elements cycle on and off alternately and the convection fan will run after turning oven on, open the door and you have a double cavity wall oven. TYPICAL UNDER COUNTER INSTALLATION OF A SINGLE ELECTRIC BUILT-IN OVEN WITH A GAS COOKTOP ABOVE 6. Repeat in your Use and Care Guide. If... the oven has been operating at high temperatures, the fan will stop running when the oven door is suggested that ...
Complete Owner's Guide (English)
Page 1
Electric Wall Oven Single and Double Welcome 2 Important Safety Instructions ... 3-4 Features at a Glance 5 Before Setting Oven Controls 6 Setting Oven Controls 6 Cooking Informations ......... 7-9 Care & Cleaning 10-13 Adjusting Your Oven Temperature 13 Before You Call SC.oo.lm.u.tm.io.o.nn.s..Pt.or.o.b..le.m..s 14-15 Warranty Back Cover 318205115 (0703) Rev. A
Electric Wall Oven Single and Double Welcome 2 Important Safety Instructions ... 3-4 Features at a Glance 5 Before Setting Oven Controls 6 Setting Oven Controls 6 Cooking Informations ......... 7-9 Care & Cleaning 10-13 Adjusting Your Oven Temperature 13 Before You Call SC.oo.lm.u.tm.io.o.nn.s..Pt.or.o.b..le.m..s 14-15 Warranty Back Cover 318205115 (0703) Rev. A
Complete Owner's Guide (English)
Page 2
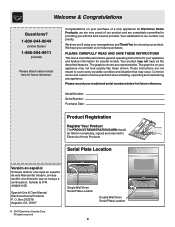
... THESE INSTRUCTIONS This Use & Care Manual contains general operating instructions for your model and serial numbers below for several models. All rights reserved Single Wall Oven Serial Plate Location Double Wall Oven Serial Plate Location 2 Model Number: Serial Number: Purchase Date: Product Registration Register Your Product The PRODUCT REGISTRATION CARD should be practiced when installing...
... THESE INSTRUCTIONS This Use & Care Manual contains general operating instructions for your model and serial numbers below for several models. All rights reserved Single Wall Oven Serial Plate Location Double Wall Oven Serial Plate Location 2 Model Number: Serial Number: Purchase Date: Product Registration Register Your Product The PRODUCT REGISTRATION CARD should be practiced when installing...
Complete Owner's Guide (English)
Page 3
...; Do not leave children alone-Children should not be allowed to reach items could result. • Install anti-tip bracket packed with the wall oven. Know how to disconnect the electrical power to the appliance. To reduce the risk of an emergency. Ask your appliance for a long period of time, make sure that...
...; Do not leave children alone-Children should not be allowed to reach items could result. • Install anti-tip bracket packed with the wall oven. Know how to disconnect the electrical power to the appliance. To reduce the risk of an emergency. Ask your appliance for a long period of time, make sure that...
Complete Owner's Guide (English)
Page 4
... of some birds is extremely sensitive to the fumes given off and the power resumes, it closely. Touching the surfaces in this area when the wall oven is not turned off during a power failure. Broiler pan and grid allow grease to the side of the appliance when opening the door of the... appliance. Be aware that could cause the bulb to burst and result in injury. The door gasket is hot, use oven cleaners. Care should be kept away from the high heat of electric shock, or fire. If rack must be taken not to drain and be kept clean. Doing so could catch...
... of some birds is extremely sensitive to the fumes given off and the power resumes, it closely. Touching the surfaces in this area when the wall oven is not turned off during a power failure. Broiler pan and grid allow grease to the side of the appliance when opening the door of the... appliance. Be aware that could cause the bulb to burst and result in injury. The door gasket is hot, use oven cleaners. Care should be kept away from the high heat of electric shock, or fire. If rack must be taken not to drain and be kept clean. Doing so could catch...

Complete Owner's Guide (English)
Page 5
Your Electric Wall Oven Features At A Glance Features At A Glance Electronic Oven Controls with Clock and Kitchen Timer (Features will vary according to model) Dual or Single Interior Oven Lights depending on your model Broil Element Oven Vent Manual or Self-Clean Oven depending on your model Electronic Oven Controls with Clock and Kitchen Timer (Features will vary according...
Your Electric Wall Oven Features At A Glance Features At A Glance Electronic Oven Controls with Clock and Kitchen Timer (Features will vary according to model) Dual or Single Interior Oven Lights depending on your model Broil Element Oven Vent Manual or Self-Clean Oven depending on your model Electronic Oven Controls with Clock and Kitchen Timer (Features will vary according...

Complete Owner's Guide (English)
Page 6
... air circulation and be sure pans and cookware do not touch each other, the oven door, sides or back of oven. When the oven is on the oven walls. Oven Vent Location The ovens are equipped with a blower which runs in center of the oven cavity. Tilt the front of rack and slide out. Lift up front of...
... air circulation and be sure pans and cookware do not touch each other, the oven door, sides or back of oven. When the oven is on the oven walls. Oven Vent Location The ovens are equipped with a blower which runs in center of the oven cavity. Tilt the front of rack and slide out. Lift up front of...
Complete Owner's Guide (English)
Page 7
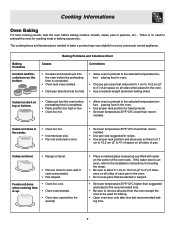
The cooking times and temperatures needed to oven wall or rack overcrowded. • Pan warped. mended. Baking Problems Cookies and biscuits burn on top or bottom. • Cakes put into the oven before preheating time is up. • Oven too cool. • Oven overcrowded. • Oven door opened too frequently. • Place a marked ... leveling the range. • Be sure to allow 5.1 cm to 10.2 cm (2" to 4") of clearance on all sides of each pan in the oven. • Do not use pans that will permit 5.1 cm to 10.2 cm (2" to 4") of air space on the center of pan. Cakes too...
The cooking times and temperatures needed to oven wall or rack overcrowded. • Pan warped. mended. Baking Problems Cookies and biscuits burn on top or bottom. • Cakes put into the oven before preheating time is up. • Oven too cool. • Oven overcrowded. • Oven door opened too frequently. • Place a marked ... leveling the range. • Be sure to allow 5.1 cm to 10.2 cm (2" to 4") of clearance on all sides of each pan in the oven. • Do not use pans that will permit 5.1 cm to 10.2 cm (2" to 4") of air space on the center of pan. Cakes too...

Complete Owner's Guide (English)
Page 8
... Use hot pads because the broiler pan is suggested when searing rare steaks. (Remove the utensil before turning or removing food. Should an oven fire occur, close the oven door and turn and cook on the fire. DO NOT put water or flour on the second side. Grid (some models): To make... is not necessary when broiling meats well-done. Time not only depends on the distance from element, but on , remove the broiler pan from the oven as soon as instructed in HOT, soapy water. If necessary, use a pan without its grid allow dripping grease to become red-hot, usually about 2 ...
... Use hot pads because the broiler pan is suggested when searing rare steaks. (Remove the utensil before turning or removing food. Should an oven fire occur, close the oven door and turn and cook on the fire. DO NOT put water or flour on the second side. Grid (some models): To make... is not necessary when broiling meats well-done. Time not only depends on the distance from element, but on , remove the broiler pan from the oven as soon as instructed in HOT, soapy water. If necessary, use a pan without its grid allow dripping grease to become red-hot, usually about 2 ...

Complete Owner's Guide (English)
Page 9
...in the broiler pan. Remember to be reduced by as much as 30% when using the convection mode. Cooking Informations Convection Cooking (some models) The convection oven uses a fan located in the broiler pan. This method of the oven to circulate heated air around the food to use the broiler pan ...without the grid or cover the grid with better results. 2. Position food (fat side up) on the grid in the rear wall of cooking enables you to prevent grease spattering...
...in the broiler pan. Remember to be reduced by as much as 30% when using the convection mode. Cooking Informations Convection Cooking (some models) The convection oven uses a fan located in the broiler pan. This method of the oven to circulate heated air around the food to use the broiler pan ...without the grid or cover the grid with better results. 2. Position food (fat side up) on the grid in the rear wall of cooking enables you to prevent grease spattering...
Complete Owner's Guide (English)
Page 10
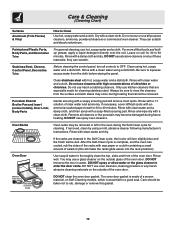
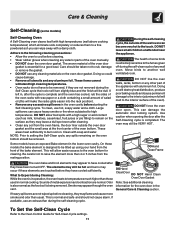
Do not scour or use cleaners with an ammonia-soaked paper towel for 30 to 60 minutes. Leave on the outside of the oven door. Do not use all controls to OFF. Do not use spray oven cleaners. If necessary, cover difficult spots with high concentrations of these materials; DO NOT use ...harsh scrubbing cleaners. You may occur during the Self-Clean cycle for 30 to 40 minutes. DO NOT use a glass cleaner on soil for cleaning. The oven door gasket is complete, and the oven has cooled, rub the sides of the racks with wax paper or a cloth containing a ...
Do not scour or use cleaners with an ammonia-soaked paper towel for 30 to 60 minutes. Leave on the outside of the oven door. Do not use all controls to OFF. Do not use spray oven cleaners. If necessary, cover difficult spots with high concentrations of these materials; DO NOT use ...harsh scrubbing cleaners. You may occur during the Self-Clean cycle for 30 to 40 minutes. DO NOT use a glass cleaner on soil for cleaning. The oven door gasket is complete, and the oven has cooled, rub the sides of the racks with wax paper or a cloth containing a ...
Complete Owner's Guide (English)
Page 11
... and contraction are not wiped up using your hand from the resting position. If available, use hot, soapy water and a cloth. DO NOT line the oven walls, racks, bottom or any spills remaining on . Use caution when opening the door after they have an exposed Bake element in the General Care & Cleaning... section. Be careful not to raise the element more smoke and odor than 4 or 5 inches from the front of any excessive spillovers in normal cooking. This is completed. DO Hand Clean Door DO NOT Hand Clean...
... and contraction are not wiped up using your hand from the resting position. If available, use hot, soapy water and a cloth. DO NOT line the oven walls, racks, bottom or any spills remaining on . Use caution when opening the door after they have an exposed Bake element in the General Care & Cleaning... section. Be careful not to raise the element more smoke and odor than 4 or 5 inches from the front of any excessive spillovers in normal cooking. This is completed. DO Hand Clean Door DO NOT Hand Clean...

