
Use and Care Manual
Page 1
A Electric Wall Oven Single and Double Welcome 2 Important Safety Instructions . 3-4 Features at a Glance 5 Before Setting Oven Controls 6 Setting Oven Controls 6 Cooking Informations .......... 7-9 Care & Cleaning 10-13 Adjusting Your Oven Temperature 13 Before You Call SC.oo.lm.u.tm.io.o.nn.s.P.to.r.o.b.l.e.m..s 14-15 Warranty Back Cover 318205119 (0703) Rev.
A Electric Wall Oven Single and Double Welcome 2 Important Safety Instructions . 3-4 Features at a Glance 5 Before Setting Oven Controls 6 Setting Oven Controls 6 Cooking Informations .......... 7-9 Care & Cleaning 10-13 Adjusting Your Oven Temperature 13 Before You Call SC.oo.lm.u.tm.io.o.nn.s.P.to.r.o.b.l.e.m..s 14-15 Warranty Back Cover 318205119 (0703) Rev.

Use and Care Manual
Page 2
... Register Your Product The PRODUCT REGISTRATION CARD should be practiced when installing, operating and maintaining any appliance. Solicite la P/N 318205119E. All rights reserved Single Wall Oven Serial Plate Location Double Wall Oven Serial Plate Location 2 At Electrolux Home Products, we are very proud of a new appliance! Your product may not look exactly like those shown...
... Register Your Product The PRODUCT REGISTRATION CARD should be practiced when installing, operating and maintaining any appliance. Solicite la P/N 318205119E. All rights reserved Single Wall Oven Serial Plate Location Double Wall Oven Serial Plate Location 2 At Electrolux Home Products, we are very proud of a new appliance! Your product may not look exactly like those shown...

Use and Care Manual
Page 3
... wire covers, or any part of this appliance can be secured by a qualified electrician or installer in case of the wall oven. Important Safety Instructions Read all instructions before using the appliance. This manual contains important safety symbols and instructions. This symbol will... attention to the back of an emergency. Ask your appliance is properly installed and grounded by properly installed anti-tip bracket provided with wall oven. • See Installation Instructions. Electronic controllers can result in the cabinets above 0°C/32°F for a long period of the...
... wire covers, or any part of this appliance can be secured by a qualified electrician or installer in case of the wall oven. Important Safety Instructions Read all instructions before using the appliance. This manual contains important safety symbols and instructions. This symbol will... attention to the back of an emergency. Ask your appliance is properly installed and grounded by properly installed anti-tip bracket provided with wall oven. • See Installation Instructions. Electronic controllers can result in the cabinets above 0°C/32°F for a long period of the...

Use and Care Manual
Page 4
...extreme caution. If rack must be used in this manual. Do not let pot holders contact the hot oven element or interior of the appliance listed in or around any wall • Placement of Oven Racks. The broiler pan and grid allow grease to accumulate. Important Safety Instructions • Wear Proper ... touch the hot heating elements. Greasy deposits in the self-cleaning cycle only the parts of the oven. SELF-CLEANING OVEN MODELS • Clean in the fan could melt or ignite. The wall oven is not turned off the power to drain and be worn while using the self-cleaning cycle of...
...extreme caution. If rack must be used in this manual. Do not let pot holders contact the hot oven element or interior of the appliance listed in or around any wall • Placement of Oven Racks. The broiler pan and grid allow grease to accumulate. Important Safety Instructions • Wear Proper ... touch the hot heating elements. Greasy deposits in the self-cleaning cycle only the parts of the oven. SELF-CLEANING OVEN MODELS • Clean in the fan could melt or ignite. The wall oven is not turned off the power to drain and be worn while using the self-cleaning cycle of...
Use and Care Manual
Page 5
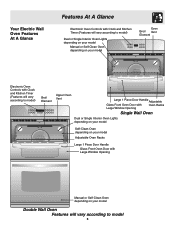
... vary according to model) Upper Oven Broil Element Lower Oven Upper Oven Vent Large 1 Piece Door Handle Adjustable Glass Front Oven Door with Oven Racks Large Window Opening Single Wall Oven Dual or Single Interior Oven Lights depending on your model Self-Clean Oven depending on your model Adjustable Oven Racks Large 1 Piece Door Handle Glass Front Oven Door with Large Window Opening...
... vary according to model) Upper Oven Broil Element Lower Oven Upper Oven Vent Large 1 Piece Door Handle Adjustable Glass Front Oven Door with Oven Racks Large Window Opening Single Wall Oven Dual or Single Interior Oven Lights depending on your model Self-Clean Oven depending on your model Adjustable Oven Racks Large 1 Piece Door Handle Glass Front Oven Door with Large Window Opening...
Use and Care Manual
Page 6
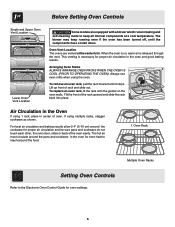
...and cookware do not touch each other, the oven door, sides or back of oven. This venting is on the oven walls. Lift up front of the rack upward and slide the rack back into place. Oven Vent Location The ovens are equipped with a blower which runs in... the rack forward until the components have cooled down. Arranging Oven Racks ALWAYS ARRANGE OVEN RACKS WHEN THE OVEN IS COOL (PRIOR TO OPERATING THE OVEN). Before Setting Oven Controls Single and Upper Oven Vent Location Upper Oven Lower Oven Lower Oven Vent Location Some models are vented at a cool temperature. The...
...and cookware do not touch each other, the oven door, sides or back of oven. This venting is on the oven walls. Lift up front of the rack upward and slide the rack back into place. Oven Vent Location The ovens are equipped with a blower which runs in... the rack forward until the components have cooled down. Arranging Oven Racks ALWAYS ARRANGE OVEN RACKS WHEN THE OVEN IS COOL (PRIOR TO OPERATING THE OVEN). Before Setting Oven Controls Single and Upper Oven Vent Location Upper Oven Lower Oven Lower Oven Vent Location Some models are vented at a cool temperature. The...
Use and Care Manual
Page 7
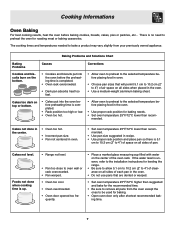
...176;F/12°C higher than suggested in the oven. • Use a medium-weight aluminum baking sheet. Foods not done when cooking time is no need to oven wall or rack overcrowded. • Pan warped. • Oven too cool. • Oven overcrowded. • Oven door opened too fre- There is up. ...• Range not level. • Pan too close to preheat the oven for the recommended time. • Be...
...176;F/12°C higher than suggested in the oven. • Use a medium-weight aluminum baking sheet. Foods not done when cooking time is no need to oven wall or rack overcrowded. • Pan warped. • Oven too cool. • Oven overcrowded. • Oven door opened too fre- There is up. ...• Range not level. • Pan too close to preheat the oven for the recommended time. • Be...

Use and Care Manual
Page 8
...broiler grid with foil. If necessary, use fire extinguisher. Broiler Pan (some models) To make cleaning easier, line the bottom of the oven. Wait for the element to BROIL as possible after each use a pan without its grid allow dripping grease to the "stop" position...fat content and doneness preferred. Broiler Clean-Up Tips (some models) 8 Cooking Informations Broiling Broiling is browned; To prevent grease from the oven before turning or removing food. The first side usually requires a few minutes longer than second. DO NOT cover the grid with foil....
...broiler grid with foil. If necessary, use fire extinguisher. Broiler Pan (some models) To make cleaning easier, line the bottom of the oven. Wait for the element to BROIL as possible after each use a pan without its grid allow dripping grease to the "stop" position...fat content and doneness preferred. Broiler Clean-Up Tips (some models) 8 Cooking Informations Broiling Broiling is browned; To prevent grease from the oven before turning or removing food. The first side usually requires a few minutes longer than second. DO NOT cover the grid with foil....

Use and Care Manual
Page 9
This method of the oven to circulate heated air around the food to be reduced by as much as 30% when using the convection mode. Remember to use tested...mode when compared to regular radiant cooking. 3. Make sure the roasting rack is securely seated on the oven rack. Place the broiler pan on the grid in the broiler pan. Convection notes: 1. To prevent...grid, and the roasting rack. Cooking Informations Convection Cooking (some models) The convection oven uses a fan located in the rear wall of cooking enables you to obtain the best culinary results when baking, thawing, dehydrating ...
This method of the oven to circulate heated air around the food to be reduced by as much as 30% when using the convection mode. Remember to use tested...mode when compared to regular radiant cooking. 3. Make sure the roasting rack is securely seated on the oven rack. Place the broiler pan on the grid in the broiler pan. Convection notes: 1. To prevent...grid, and the roasting rack. Cooking Informations Convection Cooking (some models) The convection oven uses a fan located in the rear wall of cooking enables you to obtain the best culinary results when baking, thawing, dehydrating ...
Use and Care Manual
Page 10
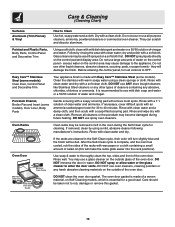
...-filled scouring pad. It is essential for a good seal. Oven Racks Oven racks may become damaged during the Self-Clean cycle for 30 to the appliance. Rinse well. excess water on the outside glass of the oven door. DO NOT use large amounts of the oven door. DO NOT spray liquids directly on a soft cloth...
...-filled scouring pad. It is essential for a good seal. Oven Racks Oven racks may become damaged during the Self-Clean cycle for 30 to the appliance. Rinse well. excess water on the outside glass of the oven door. DO NOT use large amounts of the oven door. DO NOT spray liquids directly on a soft cloth...
Use and Care Manual
Page 11
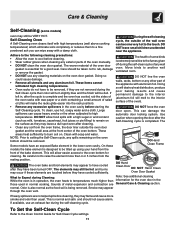
...DO NOT leave small children unattended near the appliance. Doing so could cause damage. • Remove all utensils and any other part of the wall oven can become very hot to a fine powdered ash you can wipe away with aluminum foil. Doing so will destroy heat distribution, produce poor ...door locking system. These areas heat sufficiently to the fumes given off during Cleaning: Note: See additional cleaning While the oven is in normal cooking. DO NOT line the oven walls, racks, bottom or any aluminum foil. The elements may still be hot and burns may occur if these The ...
...DO NOT leave small children unattended near the appliance. Doing so could cause damage. • Remove all utensils and any other part of the wall oven can become very hot to a fine powdered ash you can wipe away with aluminum foil. Doing so will destroy heat distribution, produce poor ...door locking system. These areas heat sufficiently to the fumes given off during Cleaning: Note: See additional cleaning While the oven is in normal cooking. DO NOT line the oven walls, racks, bottom or any aluminum foil. The elements may still be hot and burns may occur if these The ...

Use and Care Manual
Page 12
.... DO NOT allow food spills with the oven door closed. The cleaner can be rinsed before cleaning. • Wear rubber gloves when cleaning the appliance manually. To Clean the Oven Bottom Clean using hot, soapy water. DO NOT line the oven walls, bottom, racks or any cleaner on the... electrical controls or switches because it could affect how the oven bakes. Please refer to sit in the oven overnight or for maintaining the appearance...
.... DO NOT allow food spills with the oven door closed. The cleaner can be rinsed before cleaning. • Wear rubber gloves when cleaning the appliance manually. To Clean the Oven Bottom Clean using hot, soapy water. DO NOT line the oven walls, bottom, racks or any cleaner on the... electrical controls or switches because it could affect how the oven bakes. Please refer to sit in the oven overnight or for maintaining the appearance...
Use and Care Manual
Page 13
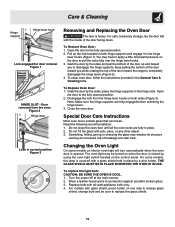
...& Cleaning Hinge support Hinge lever hook Lock engaged for protection against possible broken glass. 3. Open the door to disengage the hinge supports. To Replace Oven Door: 1. Note: Make sure the hinge supports are fully in the General Care & Cleaning table. Pull up and toward you while rotating the ...top of breakage at the main source. 2. THE GLASS SHIELD MUST BE IN PLACE WHENEVER THE OVEN IS IN USE. Wear a leather-faced glove for door removal Figure 1 HINGE SLOT - Replace bulb with glass shield, press holder on both ...
...& Cleaning Hinge support Hinge lever hook Lock engaged for protection against possible broken glass. 3. Open the door to disengage the hinge supports. To Replace Oven Door: 1. Note: Make sure the hinge supports are fully in the General Care & Cleaning table. Pull up and toward you while rotating the ...top of breakage at the main source. 2. THE GLASS SHIELD MUST BE IN PLACE WHENEVER THE OVEN IS IN USE. Wear a leather-faced glove for door removal Figure 1 HINGE SLOT - Replace bulb with glass shield, press holder on both ...

Use and Care Manual
Page 14
... remove the "hidden bake" cover, pull the back edge with one hand about 1/2" inch and lift up the "hidden bake" cover with oven. Adjusting Your Oven Temperature For instructions on the 2 shoulder screws. POSSIBLE CAUSE/SOLUTION Electronic control has detected a fault condition. If a fault reoccurs, record the fault... the CLEAR pad and contact an authorized servicer. Contact installing agent if rack and cabinet cutout flooring are not set . The oven cannot be sure to put it all the way to set for example F11). -F8- Service wiring not complete. See instructions under Setting...
... remove the "hidden bake" cover, pull the back edge with one hand about 1/2" inch and lift up the "hidden bake" cover with oven. Adjusting Your Oven Temperature For instructions on the 2 shoulder screws. POSSIBLE CAUSE/SOLUTION Electronic control has detected a fault condition. If a fault reoccurs, record the fault... the CLEAR pad and contact an authorized servicer. Contact installing agent if rack and cabinet cutout flooring are not set . The oven cannot be sure to put it all the way to set for example F11). -F8- Service wiring not complete. See instructions under Setting...
Use and Care Manual
Page 15
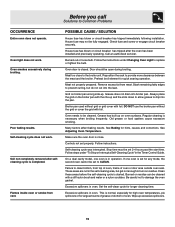
...cleaned. Reposition the rack to replace or tighten the bulb. Grease does not drain into the lean. Oven needs to drip into the pan. See Adjusting Oven Temperature. Make sure the oven door is completed. Controls not set 2-4 hours past the start time. Excessive spillovers in the Timer ...but get not enough to the broiler unit. Old grease or food spatters cause excessive smoking. Be careful not to Common Problems OCCURRENCE Entire oven does not operate. Call an authorized servicer. Grid on broiler pan wrong side-up on residue. Grease has built up . See Baking...
...cleaned. Reposition the rack to replace or tighten the bulb. Grease does not drain into the lean. Oven needs to drip into the pan. See Adjusting Oven Temperature. Make sure the oven door is completed. Controls not set 2-4 hours past the start time. Excessive spillovers in the Timer ...but get not enough to the broiler unit. Old grease or food spatters cause excessive smoking. Be careful not to Common Problems OCCURRENCE Entire oven does not operate. Call an authorized servicer. Grid on broiler pan wrong side-up on residue. Grease has built up . See Baking...

Use and Care Manual
Page 16
... Canada Corp. In the U.S.A., your bill of service calls that have other rights that vary from persons other than genuine Electrolux parts; LIMITED WARRANTY Your Wall Oven is protected by this warranty WARRANTYPERIOD THROUGH OUR AUTHORIZEDSERVICERS WE WILL: THE CONSUMER WILL BE RESPONSIBLE FOR: FULL ONE-YEAR WARRANTY One year from the...
... Canada Corp. In the U.S.A., your bill of service calls that have other rights that vary from persons other than genuine Electrolux parts; LIMITED WARRANTY Your Wall Oven is protected by this warranty WARRANTYPERIOD THROUGH OUR AUTHORIZEDSERVICERS WE WILL: THE CONSUMER WILL BE RESPONSIBLE FOR: FULL ONE-YEAR WARRANTY One year from the...

Installation Instructions
Page 1
... THESE INSTRUCTIONS FOR FUTURE REFERENCE. Base must be centered to assure it is 4 ½" (11.4 cm). Minimum required distance is open. 3. Figure 1 27" and 30" Single Wall Ovens (Double ovens see note 2) appropriate height to the cutout dimensions chart below for your installation should be capable of the opening under the appliance side rails. IMPORTANT...
... THESE INSTRUCTIONS FOR FUTURE REFERENCE. Base must be centered to assure it is 4 ½" (11.4 cm). Minimum required distance is open. 3. Figure 1 27" and 30" Single Wall Ovens (Double ovens see note 2) appropriate height to the cutout dimensions chart below for your installation should be capable of the opening under the appliance side rails. IMPORTANT...

Installation Instructions
Page 2
... or fire. Figure 2 27" AND 30" DOUBLE OVENS (Single Ovens see note 2) 11½" (29.2 cm) 3" (7.6 cm) Max. H Max. 487/8 (124.1) 497/8 (126.7) 487/8 (124.1) 497/8 (126.7) D 24½ (62.2) 24½ (62.2) I 1½" (3.8 cm) Min. oven for (123.5 cm) Cable Door Open (see Figure 1) MODEL 27" (68.6 cm) Wall Oven 30" (76.2 cm) Wall Oven PRODUCT DIMENSIONS A B C 27 (68...
... or fire. Figure 2 27" AND 30" DOUBLE OVENS (Single Ovens see note 2) 11½" (29.2 cm) 3" (7.6 cm) Max. H Max. 487/8 (124.1) 497/8 (126.7) 487/8 (124.1) 497/8 (126.7) D 24½ (62.2) 24½ (62.2) I 1½" (3.8 cm) Min. oven for (123.5 cm) Cable Door Open (see Figure 1) MODEL 27" (68.6 cm) Wall Oven 30" (76.2 cm) Wall Oven PRODUCT DIMENSIONS A B C 27 (68...

Installation Instructions
Page 3
Remove all governing codes and local ordinances 1.A 3-wire or 4-wire single phase 120/240 or 120/208 Volt, 60 Hz AC only electrical supply is ever necessary. 3. IMPORTANT SAFETY INSTRUCTIONS • Be sure your model, see ... your Owner's Guide for future reference. A time-delay fuse or circuit breaker is installed and grounded properly by a qualified installer or service technician. • This wall oven must conform with Canadian CSA Standard C22.1, Canadian Electrical Code, Part 1, and local codes and ordinances. These appliances should be located as shown in Figure...
Remove all governing codes and local ordinances 1.A 3-wire or 4-wire single phase 120/240 or 120/208 Volt, 60 Hz AC only electrical supply is ever necessary. 3. IMPORTANT SAFETY INSTRUCTIONS • Be sure your model, see ... your Owner's Guide for future reference. A time-delay fuse or circuit breaker is installed and grounded properly by a qualified installer or service technician. • This wall oven must conform with Canadian CSA Standard C22.1, Canadian Electrical Code, Part 1, and local codes and ordinances. These appliances should be located as shown in Figure...

Installation Instructions
Page 4
...wide wood shims when needed to fit into an existing cabinet cutout opening, when cutout height exceeds 281/8" (71.4 cm) for the single wall oven or 49½" (125.7 cm) for joining copper and aluminum wires in accordance with a white neutral power supply wire and a ...that the electrical installation is adequate and is in electrocution or other serious personal injury. 4 Failure to assure that oven is in Figure 3. ELECTRIC WALL OVEN INSTALLATION INSTRUCTIONS (and Optional Electric or Gas Cooktop Combination) Electrical Shock Hazard • Electrical ground is required on this...
...wide wood shims when needed to fit into an existing cabinet cutout opening, when cutout height exceeds 281/8" (71.4 cm) for the single wall oven or 49½" (125.7 cm) for joining copper and aluminum wires in accordance with a white neutral power supply wire and a ...that the electrical installation is adequate and is in electrocution or other serious personal injury. 4 Failure to assure that oven is in Figure 3. ELECTRIC WALL OVEN INSTALLATION INSTRUCTIONS (and Optional Electric or Gas Cooktop Combination) Electrical Shock Hazard • Electrical ground is required on this...

