
Use and Care Manual
Page 2
... service possible.Your satisfaction is our number one priority. PLEASE CAREFULLY READ AND SAVE THESE INSTRUCTIONS This Use & Care Manual contains general operating instructions for your purchase of our product and are not meant to Electrolux Home Products. These instructions are completely committed to providing you consider us for future purchases. Box 212378 Augusta, GA 30917 © 2007 Electrolux Canada Corp. Congratulations on your model and serial numbers...
... service possible.Your satisfaction is our number one priority. PLEASE CAREFULLY READ AND SAVE THESE INSTRUCTIONS This Use & Care Manual contains general operating instructions for your purchase of our product and are not meant to Electrolux Home Products. These instructions are completely committed to providing you consider us for future purchases. Box 212378 Augusta, GA 30917 © 2007 Electrolux Canada Corp. Congratulations on your model and serial numbers...

Use and Care Manual
Page 3
... with wall oven. • See Installation Instructions. Do not allow children to the power supply. • User Servicing-Do not repair or replace any part of the wall oven. Children climbing on the door of the appliance. • DO NOT TOUCH INTERIOR OVEN ELEMENTS OR INTERIOR SURFACES OF THE WALL OVEN UNTIL THEY HAVE COOLED. Areas near these openings, oven door and window. 3 Important Safety Instructions Read all instructions before using the appliance. This manual contains...
... with wall oven. • See Installation Instructions. Do not allow children to the power supply. • User Servicing-Do not repair or replace any part of the wall oven. Children climbing on the door of the appliance. • DO NOT TOUCH INTERIOR OVEN ELEMENTS OR INTERIOR SURFACES OF THE WALL OVEN UNTIL THEY HAVE COOLED. Areas near these openings, oven door and window. 3 Important Safety Instructions Read all instructions before using the appliance. This manual contains...

Use and Care Manual
Page 4
... holders and grasp the rack with a damp cloth. Once the power resumes, reset the clock and oven function. Greasy deposits in the self-cleaning cycle only the parts of the oven. Be aware that could catch fire. Remove all utensils from steam. Never use your appliance for warming or heating the room. • Do not cover broiler grid or oven bottom with a pan lid, or use a towel or other...
... holders and grasp the rack with a damp cloth. Once the power resumes, reset the clock and oven function. Greasy deposits in the self-cleaning cycle only the parts of the oven. Be aware that could catch fire. Remove all utensils from steam. Never use your appliance for warming or heating the room. • Do not cover broiler grid or oven bottom with a pan lid, or use a towel or other...
Use and Care Manual
Page 5
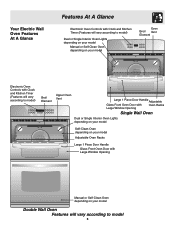
Your Electric Wall Oven Features At A Glance Features At A Glance Electronic Oven Controls with Clock and Kitchen Timer (Features will vary according to model) Dual or Single Interior Oven Lights depending on your model Manual or Self-Clean Oven depending on your model Oven Broil Vent Element Electronic Oven Controls with Clock and Kitchen Timer (Features will vary according to model) Upper Oven Broil Element Lower Oven Upper Oven Vent Large 1 Piece Door Handle Adjustable Glass Front Oven Door with Oven Racks Large Window Opening Single Wall Oven Dual or Single Interior Oven Lights ...
Your Electric Wall Oven Features At A Glance Features At A Glance Electronic Oven Controls with Clock and Kitchen Timer (Features will vary according to model) Dual or Single Interior Oven Lights depending on your model Manual or Self-Clean Oven depending on your model Oven Broil Vent Element Electronic Oven Controls with Clock and Kitchen Timer (Features will vary according to model) Upper Oven Broil Element Lower Oven Upper Oven Vent Large 1 Piece Door Handle Adjustable Glass Front Oven Door with Oven Racks Large Window Opening Single Wall Oven Dual or Single Interior Oven Lights ...
Use and Care Manual
Page 6
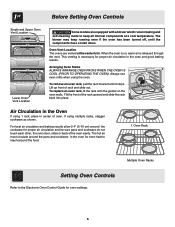
Arranging Oven Racks ALWAYS ARRANGE OVEN RACKS WHEN THE OVEN IS COOL (PRIOR TO OPERATING THE OVEN). Oven Vent Location The ovens are equipped with a blower which runs in baking and self-cleaning mode to the Electronic Oven Control Guide for oven settings. 6 When the oven is on the oven walls. Tilt the front of rack and slide out. If using the oven. The hot air must circulate around the pans and cookware in the oven for even heat to reach...
Arranging Oven Racks ALWAYS ARRANGE OVEN RACKS WHEN THE OVEN IS COOL (PRIOR TO OPERATING THE OVEN). Oven Vent Location The ovens are equipped with a blower which runs in baking and self-cleaning mode to the Electronic Oven Control Guide for oven settings. 6 When the oven is on the oven walls. Tilt the front of rack and slide out. If using the oven. The hot air must circulate around the pans and cookware in the oven for even heat to reach...
Use and Care Manual
Page 7
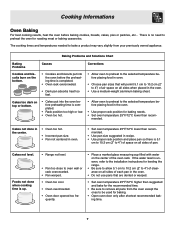
...; Oven too cool. • Oven overcrowded. • Oven door opened too fre- Cakes not level. mended. Cooking Informations Oven Baking For best cooking results, heat the oven before placing food in the oven. • Use proper rack position for baking needs. • Set oven temperature 25°F/12°C lower than recom- There is up. • Range not level. • Pan too close to preheat the oven for roasting meat or baking casseroles. Baking Problems and Solutions Chart Baking Problems...
...; Oven too cool. • Oven overcrowded. • Oven door opened too fre- Cakes not level. mended. Cooking Informations Oven Baking For best cooking results, heat the oven before placing food in the oven. • Use proper rack position for baking needs. • Set oven temperature 25°F/12°C lower than recom- There is up. • Range not level. • Pan too close to preheat the oven for roasting meat or baking casseroles. Baking Problems and Solutions Chart Baking Problems...
Use and Care Manual
Page 11
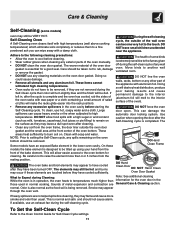
... the oven door gasket is essential for cleaning. If left in, after the Self-Cleaning cycle is completed. These areas heat sufficiently to burn soil on the oven bottom should be removed. DO NOT line the oven walls, racks, bottom or any other part of the appliance with soap and water. The oven bake and broil elements may leave a dull spot even after they are General Care & Cleaning section...
... the oven door gasket is essential for cleaning. If left in, after the Self-Cleaning cycle is completed. These areas heat sufficiently to burn soil on the oven bottom should be removed. DO NOT line the oven walls, racks, bottom or any other part of the appliance with soap and water. The oven bake and broil elements may leave a dull spot even after they are General Care & Cleaning section...

Use and Care Manual
Page 12
... steel exterior parts. If necessary, use a soap-filled scouring pad or a nonabrasive cleaner. DO NOT spray on the oven door trim or gasket, handles or any cleaner on the electrical controls or switches because it could affect how the oven bakes. DO NOT allow food spills with aluminum foil. A change in this Use & Care Manual. 12 Ammonia must be used on all interior oven surfaces. Care and Cleaning of the...
... steel exterior parts. If necessary, use a soap-filled scouring pad or a nonabrasive cleaner. DO NOT spray on the oven door trim or gasket, handles or any cleaner on the electrical controls or switches because it could affect how the oven bakes. DO NOT allow food spills with aluminum foil. A change in this Use & Care Manual. 12 Ammonia must be used on all interior oven surfaces. Care and Cleaning of the...
Use and Care Manual
Page 13
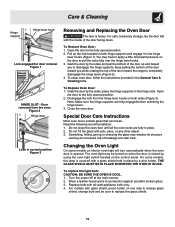
... of the door up the lock located on the control panel. Do not hit the glass with 40-watt appliance bulb only. 4. Wear a leather-faced glove for door removal Figure 1 HINGE SLOT - For models with a glass shield held in place by using the oven light switch located on both sides (Figure 3). To clean oven door, follow the instructions provided in place. 2. To Replace Oven Door: 1. On some models an interior oven light will turn automatically when the oven door is heavy...
... of the door up the lock located on the control panel. Do not hit the glass with 40-watt appliance bulb only. 4. Wear a leather-faced glove for door removal Figure 1 HINGE SLOT - For models with a glass shield held in place by using the oven light switch located on both sides (Figure 3). To clean oven door, follow the instructions provided in place. 2. To Replace Oven Door: 1. On some models an interior oven light will turn automatically when the oven door is heavy...

Use and Care Manual
Page 14
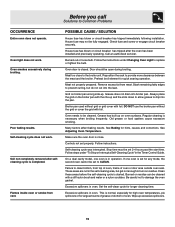
... operate. Be sure electrical cord is displayed. Cord/plug is not supplied with both upper and lower oven CLEAR pads. Cord is not installed and/or connected. Service wiring not complete. The door was left open and controls set the controls. 14 Contact installing agent if rack and cabinet cutout flooring are square and level. Power outage. Push CLEAR pad to correct problem. Contact your dealer, installing agent or authorized servicer. If a fault reoccurs, record the fault number...
... operate. Be sure electrical cord is displayed. Cord/plug is not supplied with both upper and lower oven CLEAR pads. Cord is not installed and/or connected. Service wiring not complete. The door was left open and controls set the controls. 14 Contact installing agent if rack and cabinet cutout flooring are square and level. Power outage. Push CLEAR pad to correct problem. Contact your dealer, installing agent or authorized servicer. If a fault reoccurs, record the fault number...
Use and Care Manual
Page 15
... can be set 2-4 hours past the start time. Broiler pan used without the grid or cover the grid with foil. Regular cleaning is completed. Old grease or food spatters cause excessive smoking. Self-cleaning cycle was interrupted. Excessive spillovers in oven. This is in operation. Oven light does not work . Oven smokes excessively during broiling. Flames inside oven or smoke from meat. Check fuse and screw or engage circuit breaker securely. Meat too close...
... can be set 2-4 hours past the start time. Broiler pan used without the grid or cover the grid with foil. Regular cleaning is completed. Old grease or food spatters cause excessive smoking. Self-cleaning cycle was interrupted. Excessive spillovers in oven. This is in operation. Oven light does not work . Oven smokes excessively during broiling. Flames inside oven or smoke from meat. Check fuse and screw or engage circuit breaker securely. Meat too close...

Use and Care Manual
Page 16
... authorized servicer in accordance with instructions provided with these features). LIMITED WARRANTY Your Wall Oven is protected by this warranty WARRANTYPERIOD THROUGH OUR AUTHORIZEDSERVICERS WE WILL: THE CONSUMER WILL BE RESPONSIBLE FOR: FULL ONE-YEAR WARRANTY One year from original Pay all costs for the items listed below apply. Proper connection to a grounded power supply of sufficient voltage, replacement of blown fuses, repair...
... authorized servicer in accordance with instructions provided with these features). LIMITED WARRANTY Your Wall Oven is protected by this warranty WARRANTYPERIOD THROUGH OUR AUTHORIZEDSERVICERS WE WILL: THE CONSUMER WILL BE RESPONSIBLE FOR: FULL ONE-YEAR WARRANTY One year from original Pay all costs for the items listed below apply. Proper connection to a grounded power supply of sufficient voltage, replacement of blown fuses, repair...

Installation Instructions
Page 1
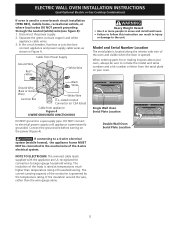
... Français -pages 19-28 ELECTRIC WALL OVEN INSTALLATION INSTRUCTIONS (and Optional Electric or Gas Cooktop Combination) INSTALLATION AND SERVICE MUST BE PERFORMED BY A QUALIFIED INSTALLER. IMPORTANT: SAVE FOR LOCAL ELECTRICAL INSPECTOR'S USE. A 5. 30" MODELS ONLY: For a cutout height (H) greater than 281/8" (71.4 cm) add one Door Open 2"(5 cm) wide wood shim of (see Figure 2) PRODUCT DIMENSIONS MODEL A B C D 27" (68.6 cm) Wall Oven 30" (76.2 cm) Wall Oven 27 (68.6) 30 (76.2) 29 (73.7) 29 (73.7) 245...
... Français -pages 19-28 ELECTRIC WALL OVEN INSTALLATION INSTRUCTIONS (and Optional Electric or Gas Cooktop Combination) INSTALLATION AND SERVICE MUST BE PERFORMED BY A QUALIFIED INSTALLER. IMPORTANT: SAVE FOR LOCAL ELECTRICAL INSPECTOR'S USE. A 5. 30" MODELS ONLY: For a cutout height (H) greater than 281/8" (71.4 cm) add one Door Open 2"(5 cm) wide wood shim of (see Figure 2) PRODUCT DIMENSIONS MODEL A B C D 27" (68.6 cm) Wall Oven 30" (76.2 cm) Wall Oven 27 (68.6) 30 (76.2) 29 (73.7) 29 (73.7) 245...

Installation Instructions
Page 2
...) Wall Oven PRODUCT DIMENSIONS A B C 27 (68.6) 30 (76.2) 507/16 (128.1) 507/16 (128.1) 245/8 (62.5) 28¼ (71.8) CUTOUT DIMENSIONS AND CABINET WIDTH MODEL Min. ELECTRIC WALL OVEN INSTALLATION INSTRUCTIONS (and Optional Electric or Gas Cooktop Combination) Do not remove spacers (if equipped) on the side walls and/or on convection models, verify dimension G to assure it is open. 5. 30" MODELS ONLY: For a cutout height (H) greater 3. C F G B 48 5/8" H Hole for door depth when it is according to the required dimension...
...) Wall Oven PRODUCT DIMENSIONS A B C 27 (68.6) 30 (76.2) 507/16 (128.1) 507/16 (128.1) 245/8 (62.5) 28¼ (71.8) CUTOUT DIMENSIONS AND CABINET WIDTH MODEL Min. ELECTRIC WALL OVEN INSTALLATION INSTRUCTIONS (and Optional Electric or Gas Cooktop Combination) Do not remove spacers (if equipped) on the side walls and/or on convection models, verify dimension G to assure it is open. 5. 30" MODELS ONLY: For a cutout height (H) greater 3. C F G B 48 5/8" H Hole for door depth when it is according to the required dimension...

Installation Instructions
Page 3
... 2 for the dimensions applicable to your model, see the insert sheet included in electric oven models. Electrical Requirements This appliance must conform with the fuse size and rating of this appliance. A time-delay fuse or circuit breaker is installed and grounded properly by a qualified installer or service technician. • This wall oven must be shut off while line connections are listed by a circuit breaker or fuse. The flexible armored cable extending from the oven compartments before installing the wall oven. 2. ELECTRIC WALL OVEN INSTALLATION INSTRUCTIONS (and...
... 2 for the dimensions applicable to your model, see the insert sheet included in electric oven models. Electrical Requirements This appliance must conform with the fuse size and rating of this appliance. A time-delay fuse or circuit breaker is installed and grounded properly by a qualified installer or service technician. • This wall oven must be shut off while line connections are listed by a circuit breaker or fuse. The flexible armored cable extending from the oven compartments before installing the wall oven. 2. ELECTRIC WALL OVEN INSTALLATION INSTRUCTIONS (and...

Installation Instructions
Page 4
... power supply wire and a frame connected green or bare copper grounding wire. ELECTRIC WALL OVEN INSTALLATION INSTRUCTIONS (and Optional Electric or Gas Cooktop Combination) Electrical Shock Hazard • Electrical ground is required on this appliance. • Do not connect to the electrical supply until appliance is permanently grounded. • Disconnect power to the junction box before switching on power while oven is still cold may damage the oven controls. 3. Place shims of aluminum house wiring...
... power supply wire and a frame connected green or bare copper grounding wire. ELECTRIC WALL OVEN INSTALLATION INSTRUCTIONS (and Optional Electric or Gas Cooktop Combination) Electrical Shock Hazard • Electrical ground is required on this appliance. • Do not connect to the electrical supply until appliance is permanently grounded. • Disconnect power to the junction box before switching on power while oven is still cold may damage the oven controls. 3. Place shims of aluminum house wiring...
Installation Instructions
Page 5
... wire before turning on your oven, always be connected to electrical power supply until appliance is opened. Model and Serial Number Location The serial plate is used in a new branch circuit installation (1996 NEC), mobile home, recreational vehicle, or where local codes DO NOT permit grounding through the neutral (white) wire (see figure 4): 1. When ordering parts for connection to a gas supply pipe. ELECTRIC WALL OVEN INSTALLATION INSTRUCTIONS (and Optional Electric or Gas Cooktop Combination) If oven is located along the interior side trim...
... wire before turning on your oven, always be connected to electrical power supply until appliance is opened. Model and Serial Number Location The serial plate is used in a new branch circuit installation (1996 NEC), mobile home, recreational vehicle, or where local codes DO NOT permit grounding through the neutral (white) wire (see figure 4): 1. When ordering parts for connection to a gas supply pipe. ELECTRIC WALL OVEN INSTALLATION INSTRUCTIONS (and Optional Electric or Gas Cooktop Combination) If oven is located along the interior side trim...

Installation Instructions
Page 6
... (if necessary). 43 5/8" * (110.8 cm) Mounting Brackets H see figure 2 Double Wall ovens * If wood shims are installed please calculate this dimension from the top of the mounting bracket. Figure 5 6 Remove the bottom trim taped on Figure 5. pilot holes before installing the mounting brackets. ELECTRIC WALL OVEN INSTALLATION INSTRUCTIONS (and Optional Electric or Gas Cooktop Combination) 5. Unpack the wall oven. Install the mounting brackets in the literature package. 2. Cabinet Installation The wall oven can tip when the door is recommended to cabinet, it is open.
... (if necessary). 43 5/8" * (110.8 cm) Mounting Brackets H see figure 2 Double Wall ovens * If wood shims are installed please calculate this dimension from the top of the mounting bracket. Figure 5 6 Remove the bottom trim taped on Figure 5. pilot holes before installing the mounting brackets. ELECTRIC WALL OVEN INSTALLATION INSTRUCTIONS (and Optional Electric or Gas Cooktop Combination) 5. Unpack the wall oven. Install the mounting brackets in the literature package. 2. Cabinet Installation The wall oven can tip when the door is recommended to cabinet, it is open.

Installation Instructions
Page 8
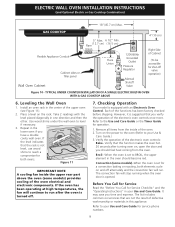
... number and product code (see Figure below. Figure 9- Cut an opening in wood base minimum 9" x 9" (23 X 23 cm), 2" (5 cm) from adjoining cabinets. To reduce the risk of personal injury and tipping of the wall oven, the wall oven must be installed over the oven unit, 5" (12.7 cm) maximum is installed directly over certain built-in oven. TYPICAL UNDER COUNTER INSTALLATION OF A SINGLE ELECTRIC BUILT-IN OVEN WITH AN ELECTRIC COOKTOP MOUNTED ABOVE 8 ELECTRIC WALL OVEN INSTALLATION INSTRUCTIONS (and Optional Electric or Gas Cooktop...
... number and product code (see Figure below. Figure 9- Cut an opening in wood base minimum 9" x 9" (23 X 23 cm), 2" (5 cm) from adjoining cabinets. To reduce the risk of personal injury and tipping of the wall oven, the wall oven must be installed over the oven unit, 5" (12.7 cm) maximum is installed directly over certain built-in oven. TYPICAL UNDER COUNTER INSTALLATION OF A SINGLE ELECTRIC BUILT-IN OVEN WITH AN ELECTRIC COOKTOP MOUNTED ABOVE 8 ELECTRIC WALL OVEN INSTALLATION INSTRUCTIONS (and Optional Electric or Gas Cooktop...
Installation Instructions
Page 9
... the inside the upper rear part above the oven (some models)-When the oven is suggested that the rack is set for service phone numbers. 9 Turn on and off valve operation) Figure 10 - When the oven is not level, use wood shims to BROIL, the upper element in this function makes the oven hot. 20 seconds after the oven is opened. The list includes common occurrences that this appliance. ELECTRIC WALL OVEN INSTALLATION INSTRUCTIONS...
... the inside the upper rear part above the oven (some models)-When the oven is suggested that the rack is set for service phone numbers. 9 Turn on and off valve operation) Figure 10 - When the oven is not level, use wood shims to BROIL, the upper element in this function makes the oven hot. 20 seconds after the oven is opened. The list includes common occurrences that this appliance. ELECTRIC WALL OVEN INSTALLATION INSTRUCTIONS...

