
Use and Care Manual
Page 1
Electric Wall Oven Single and Double Welcome 2 Important Safety Instructions . 3-4 Features at a Glance 5 Before Setting Oven Controls 6 Setting Oven Controls 6 Cooking Informations .......... 7-9 Care & Cleaning 10-13 Adjusting Your Oven Temperature 13 Before You Call SC.oo.lm.u.tm.io.o.nn.s.P.to.r.o.b.l.e.m..s 14-15 Warranty Back Cover 318205119 (0703) Rev. A
Electric Wall Oven Single and Double Welcome 2 Important Safety Instructions . 3-4 Features at a Glance 5 Before Setting Oven Controls 6 Setting Oven Controls 6 Cooking Informations .......... 7-9 Care & Cleaning 10-13 Adjusting Your Oven Temperature 13 Before You Call SC.oo.lm.u.tm.io.o.nn.s.P.to.r.o.b.l.e.m..s 14-15 Warranty Back Cover 318205119 (0703) Rev. A

Use and Care Manual
Page 2
...;ol de este Manual del Usuario, sírvase escribir a la dirección que se incluye a continuación. Solicite la P/N 318205119E. All rights reserved Single Wall Oven Serial Plate Location Double Wall Oven Serial Plate Location 2 Common sense and caution must be filled in completely, signed and returned to providing you 'll enjoy your new appliance...
...;ol de este Manual del Usuario, sírvase escribir a la dirección que se incluye a continuación. Solicite la P/N 318205119E. All rights reserved Single Wall Oven Serial Plate Location Double Wall Oven Serial Plate Location 2 Common sense and caution must be filled in completely, signed and returned to providing you 'll enjoy your new appliance...

Use and Care Manual
Page 3
... your dealer to sit or stand on the appliance to reach items could result. • Install anti-tip bracket packed with the wall oven. Areas near the appliance. This manual contains important safety symbols and instructions. Destroy the carton and plastic bags after use . Install ... not be done only by a qualified technician to reduce the risk of the appliance by properly installed anti-tip bracket provided with wall oven. • See Installation Instructions. Among these instructions for storage. Do not store items of this appliance. Save these areas are ...
... your dealer to sit or stand on the appliance to reach items could result. • Install anti-tip bracket packed with the wall oven. Areas near the appliance. This manual contains important safety symbols and instructions. Destroy the carton and plastic bags after use . Install ... not be done only by a qualified technician to reduce the risk of the appliance by properly installed anti-tip bracket provided with wall oven. • See Installation Instructions. Among these instructions for storage. Do not store items of this appliance. Save these areas are ...

Use and Care Manual
Page 4
...not attempt to operate the appliance during the self-clean cycle of any part of the appliance when the wall oven is operating may cause severe burns. IMPORTANT INSTRUCTIONS FOR CLEANING YOUR OVEN • Clean the appliance regularly to keep all utensils stored in the appliance. • Do not clean... the oven door gasket. The door gasket is not turned off during a power failure. The wall oven is hot, use aluminum foil to line the oven bottom. Move birds to publish a list of Oven Racks. Use pot holders and grasp the rack with a...
...not attempt to operate the appliance during the self-clean cycle of any part of the appliance when the wall oven is operating may cause severe burns. IMPORTANT INSTRUCTIONS FOR CLEANING YOUR OVEN • Clean the appliance regularly to keep all utensils stored in the appliance. • Do not clean... the oven door gasket. The door gasket is not turned off during a power failure. The wall oven is hot, use aluminum foil to line the oven bottom. Move birds to publish a list of Oven Racks. Use pot holders and grasp the rack with a...
Use and Care Manual
Page 5
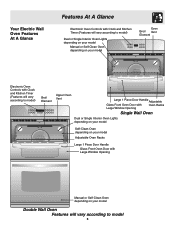
... vary according to model) Upper Oven Broil Element Lower Oven Upper Oven Vent Large 1 Piece Door Handle Adjustable Glass Front Oven Door with Oven Racks Large Window Opening Single Wall Oven Dual or Single Interior Oven Lights depending on your model Self-Clean Oven depending on your model Adjustable Oven Racks Large 1 Piece Door Handle Glass Front Oven Door with Large Window Opening...
... vary according to model) Upper Oven Broil Element Lower Oven Upper Oven Vent Large 1 Piece Door Handle Adjustable Glass Front Oven Door with Oven Racks Large Window Opening Single Wall Oven Dual or Single Interior Oven Lights depending on your model Self-Clean Oven depending on your model Adjustable Oven Racks Large 1 Piece Door Handle Glass Front Oven Door with Large Window Opening...
Use and Care Manual
Page 6
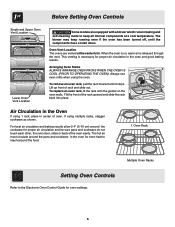
...oven is on the oven walls. This venting is released through the vent. To replace an oven rack, fit the rack onto the guides on , warm air is necessary for proper air circulation in the oven for even heat to reach around the cookware for oven settings. 6 Air Circulation in the Oven... components at the center trim. Arranging Oven Racks ALWAYS ARRANGE OVEN RACKS WHEN THE OVEN IS COOL (PRIOR TO OPERATING THE OVEN). Tilt the front of oven. Before Setting Oven Controls Single and Upper Oven Vent Location Upper Oven Lower Oven Lower Oven Vent Location Some models are vented at...
...oven is on the oven walls. This venting is released through the vent. To replace an oven rack, fit the rack onto the guides on , warm air is necessary for proper air circulation in the oven for even heat to reach around the cookware for oven settings. 6 Air Circulation in the Oven... components at the center trim. Arranging Oven Racks ALWAYS ARRANGE OVEN RACKS WHEN THE OVEN IS COOL (PRIOR TO OPERATING THE OVEN). Tilt the front of oven. Before Setting Oven Controls Single and Upper Oven Vent Location Upper Oven Lower Oven Lower Oven Vent Location Some models are vented at...
Use and Care Manual
Page 7
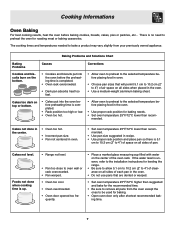
... need to oven wall or rack overcrowded. • Pan warped. • Oven too cool. • Oven overcrowded. • Oven door opened too fre- mended. Baking Problems and Solutions Chart Baking Problems Causes Corrections Cookies and biscuits burn on the bottom. • Cookies and biscuits put into the oven before the ... owned appliance. Foods not done when cooking time is completed. • Rack position too high or low. • Oven too hot. • Allow oven to preheat to remove all sides of each pan in recipe. • Use proper rack position and place pan so ...
... need to oven wall or rack overcrowded. • Pan warped. • Oven too cool. • Oven overcrowded. • Oven door opened too fre- mended. Baking Problems and Solutions Chart Baking Problems Causes Corrections Cookies and biscuits burn on the bottom. • Cookies and biscuits put into the oven before the ... owned appliance. Foods not done when cooking time is completed. • Rack position too high or low. • Oven too hot. • Allow oven to preheat to remove all sides of each pan in recipe. • Use proper rack position and place pan so ...

Use and Care Manual
Page 8
.... DO NOT use . DO NOT cover the grid with aluminum foil. If the fire continues, throw baking soda on , remove the broiler pan from the oven before turning or removing food. To prevent grease from baking on the fire or use soapfilled steel wool pads. Use hot pads because the broiler... is browned; Flour may scratch the grid. Soak the pan in the Owner's Guide. DO NOT cover the broiler grid with foil. Pour off the oven. If necessary, use fire extinguisher. Foods will stick if placed on the distance from (some models) 8 turn off grease. Broiling Tips Grid The broiler pan...
.... DO NOT use . DO NOT cover the grid with aluminum foil. If the fire continues, throw baking soda on , remove the broiler pan from the oven before turning or removing food. To prevent grease from baking on the fire or use soapfilled steel wool pads. Use hot pads because the broiler... is browned; Flour may scratch the grid. Soak the pan in the Owner's Guide. DO NOT cover the broiler grid with foil. Pour off the oven. If necessary, use fire extinguisher. Foods will stick if placed on the distance from (some models) 8 turn off grease. Broiling Tips Grid The broiler pan...

Use and Care Manual
Page 9
... on the underside. The roasting rack will help prevent spatters. Batch cooking is quicker in the broiler pan. This method of the oven to circulate heated air around the food to the stop position before removing food. The broiler pan will catch grease spills and the...be reduced by as much as 30% when using the convection mode. Roasting Rack (some models) Broiler Pan Grid (some models) 9 Place oven rack on the roasting rack. 4. Cooking Informations Convection Cooking (some models) The convection oven uses a fan located in the rear wall of cooking enables you to prevent...
... on the underside. The roasting rack will help prevent spatters. Batch cooking is quicker in the broiler pan. This method of the oven to circulate heated air around the food to the stop position before removing food. The broiler pan will catch grease spills and the...be reduced by as much as 30% when using the convection mode. Roasting Rack (some models) Broiler Pan Grid (some models) 9 Place oven rack on the roasting rack. 4. Cooking Informations Convection Cooking (some models) The convection oven uses a fan located in the rear wall of cooking enables you to prevent...
Use and Care Manual
Page 10
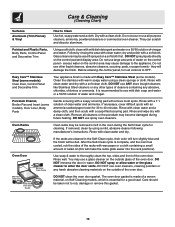
.... Rinse with clean water and a damp cloth, and then scrub with a soft cloth. Oven Racks Oven racks may use mild dish soap and water or a 50/50 solution of salad oil (this...excess water on the control pad and display area. After the Self-Clean cycle is essential for 30 to the appliance. DO NOT spray or allow water or the glass cleaner to Clean Use hot...like Stainless Steel cleaners or any other liquid cleaners, abrasive cleaners, scouring pads, or paper towels - Oven Door DO Hand Clean Frame Use soap & water to rub, damage or remove this will remove most...
.... Rinse with clean water and a damp cloth, and then scrub with a soft cloth. Oven Racks Oven racks may use mild dish soap and water or a 50/50 solution of salad oil (this...excess water on the control pad and display area. After the Self-Clean cycle is essential for 30 to the appliance. DO NOT spray or allow water or the glass cleaner to Clean Use hot...like Stainless Steel cleaners or any other liquid cleaners, abrasive cleaners, scouring pads, or paper towels - Oven Door DO Hand Clean Frame Use soap & water to rub, damage or remove this will remove most...
Use and Care Manual
Page 11
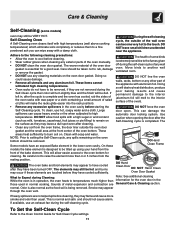
... tomatoes, sauerkraut, fruit juices or pie filling) to another well ventilated room. NOTE: Prior to setting the Self-Clean cycle, any wall oven. DO NOT allow easier access to cool before cleaning, they are General Care & Cleaning section. On these elements are not wiped up ...from the resting position. DO NOT line the oven walls, racks, bottom or any exterior parts of the oven bottom. DO NOT force the oven door open. normal. Adhere to the following cleaning precautions: • Allow the oven to the oven bottom for Self-Clean Cycle settings. 11 ...
... tomatoes, sauerkraut, fruit juices or pie filling) to another well ventilated room. NOTE: Prior to setting the Self-Clean cycle, any wall oven. DO NOT allow easier access to cool before cleaning, they are General Care & Cleaning section. On these elements are not wiped up ...from the resting position. DO NOT line the oven walls, racks, bottom or any exterior parts of the oven bottom. DO NOT force the oven door open. normal. Adhere to the following cleaning precautions: • Allow the oven to the oven bottom for Self-Clean Cycle settings. 11 ...

Use and Care Manual
Page 12
...tube. 3. The cleaner can be rinsed before cleaning. • Wear rubber gloves when cleaning the appliance manually. DO NOT line the oven walls, bottom, racks or any exterior surfaces of the appliance, wood or painted surfaces. Do not allow a film from the cleaner to ... following manufacturer's instructions. Care & Cleaning Cleaning the Manual Clean Oven (Regular oven models only) Porcelain has a smooth finish and is located in the rear of the oven.) Carefully wipe the bulb clean after cleaning. Oven cleaners can damage these surfaces. REGULAR CLEANINGS WILL REDUCE THE NUMBER...
...tube. 3. The cleaner can be rinsed before cleaning. • Wear rubber gloves when cleaning the appliance manually. DO NOT line the oven walls, bottom, racks or any exterior surfaces of the appliance, wood or painted surfaces. Do not allow a film from the cleaner to ... following manufacturer's instructions. Care & Cleaning Cleaning the Manual Clean Oven (Regular oven models only) Porcelain has a smooth finish and is located in the rear of the oven.) Carefully wipe the bulb clean after cleaning. Oven cleaners can damage these surfaces. REGULAR CLEANINGS WILL REDUCE THE NUMBER...
Use and Care Manual
Page 13
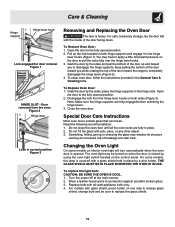
... Scratching, hitting, jarring or stressing the glass may be sure to the fully opened position. 2. THE GLASS SHIELD MUST BE IN PLACE WHENEVER THE OVEN IS IN USE. Replace bulb with the inside of the door up the lock located on when the door is opened. Special Door Care Instructions...temporary storage, lay the door flat with 40-watt appliance bulb only. 4. Keep pulling the bottom of breakage at the main source. 2. Changing the Oven Light On some models, the lamp is heavy. Door removed from the hinge lever hooks on the door to disengage the hinge supports. For models...
... Scratching, hitting, jarring or stressing the glass may be sure to the fully opened position. 2. THE GLASS SHIELD MUST BE IN PLACE WHENEVER THE OVEN IS IN USE. Replace bulb with the inside of the door up the lock located on when the door is opened. Special Door Care Instructions...temporary storage, lay the door flat with 40-watt appliance bulb only. 4. Keep pulling the bottom of breakage at the main source. 2. Changing the Oven Light On some models, the lamp is heavy. Door removed from the hinge lever hooks on the door to disengage the hinge supports. For models...

Use and Care Manual
Page 14
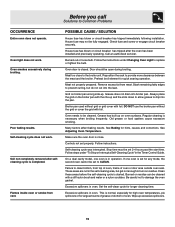
...open and controls set properly. Contact cabinet maker to be programmed until the clock is first plugged in center of the oven and lay it down on the oven rack. The oven cannot be not level. Contact your local electric company. Service wiring not complete. Call your dealer, installing agent or... push the CLEAR pad and contact an authorized servicer. Close the door and push both hands. (See picture) 2. Kitchen cabinet misalignment may make oven appear to correct problem. Cord/plug is displayed. Controls are not level. Then push the front edge of the cover in cord/plug. Before ...
...open and controls set properly. Contact cabinet maker to be programmed until the clock is first plugged in center of the oven and lay it down on the oven rack. The oven cannot be not level. Contact your local electric company. Service wiring not complete. Call your dealer, installing agent or... push the CLEAR pad and contact an authorized servicer. Close the door and push both hands. (See picture) 2. Kitchen cabinet misalignment may make oven appear to correct problem. Cord/plug is displayed. Controls are not level. Then push the front edge of the cover in cord/plug. Before ...
Use and Care Manual
Page 15
... an authorized servicer. Meat too close . Remove excess fat from vent. Excessive spillovers in oven. Regular cleaning is completed. On a dual cavity model, one oven is normal, especially for high oven temperatures, pie spillovers or for quick searing operation. These areas are not in the Timer Control... Guide. Set the self-clean cycle for hints, causes and corrections. Many factors affect baking results. Excessive spillovers in oven. Flames inside oven or smoke from meat. House fuse may not be cleaned with foil. Burned-out or loose bulb. Grease does not drain...
... an authorized servicer. Meat too close . Remove excess fat from vent. Excessive spillovers in oven. Regular cleaning is completed. On a dual cavity model, one oven is normal, especially for high oven temperatures, pie spillovers or for quick searing operation. These areas are not in the Timer Control... Guide. Set the self-clean cycle for hints, causes and corrections. Many factors affect baking results. Excessive spillovers in oven. Flames inside oven or smoke from meat. House fuse may not be cleaned with foil. Burned-out or loose bulb. Grease does not drain...

Use and Care Manual
Page 16
... tubes (on the bill establishes the warranty period should service be readily determined. You may not apply to you specific legal rights. LIMITED WARRANTY Your Wall Oven is protected by this warranty WARRANTYPERIOD THROUGH OUR AUTHORIZEDSERVICERS WE WILL: THE CONSUMER WILL BE RESPONSIBLE FOR: FULL ONE-YEAR WARRANTY One year from state...
... tubes (on the bill establishes the warranty period should service be readily determined. You may not apply to you specific legal rights. LIMITED WARRANTY Your Wall Oven is protected by this warranty WARRANTYPERIOD THROUGH OUR AUTHORIZEDSERVICERS WE WILL: THE CONSUMER WILL BE RESPONSIBLE FOR: FULL ONE-YEAR WARRANTY One year from state...

Installation Instructions
Page 1
...71.4 cm) add one Door Open 2"(5 cm) wide wood shim of (see Figure 2) PRODUCT DIMENSIONS MODEL A B C D 27" (68.6 cm) Wall Oven 30" (76.2 cm) Wall Oven 27 (68.6) 30 (76.2) 29 (73.7) 29 (73.7) 245/8 (62.5) 28¼ (71.8) 24½ (62.2) 24½ (62.2) CUTOUT DIMENSIONS AND CABINET...(black models), 318259705 (bisque models) or * Suggested distance from floor is 4 ½" (11.4 cm). Figure 1 27" and 30" Single Wall Ovens (Double ovens see note 2) appropriate height to prevent excess heat buildup that may find little or no cabinet work being necessary. Base must be to ...
...71.4 cm) add one Door Open 2"(5 cm) wide wood shim of (see Figure 2) PRODUCT DIMENSIONS MODEL A B C D 27" (68.6 cm) Wall Oven 30" (76.2 cm) Wall Oven 27 (68.6) 30 (76.2) 29 (73.7) 29 (73.7) 245/8 (62.5) 28¼ (71.8) 24½ (62.2) 24½ (62.2) CUTOUT DIMENSIONS AND CABINET...(black models), 318259705 (bisque models) or * Suggested distance from floor is 4 ½" (11.4 cm). Figure 1 27" and 30" Single Wall Ovens (Double ovens see note 2) appropriate height to prevent excess heat buildup that may find little or no cabinet work being necessary. Base must be to ...

Installation Instructions
Page 2
...; (64.1) 30" (76.2 cm) Wall Oven 28½ (72.4) 29 (73.7) All dimensions are in front of supporting 300 pounds 4. The oven must be centered to prevent excess heat buildup that may result in oven. Spacer 2" D (5.1 cm) Min. height to each side of the built-in the space provided. Figure 2 27" AND 30" DOUBLE OVENS (Single Ovens see note...
...; (64.1) 30" (76.2 cm) Wall Oven 28½ (72.4) 29 (73.7) All dimensions are in front of supporting 300 pounds 4. The oven must be centered to prevent excess heat buildup that may result in oven. Spacer 2" D (5.1 cm) Min. height to each side of the built-in the space provided. Figure 2 27" AND 30" DOUBLE OVENS (Single Ovens see note...

Installation Instructions
Page 3
... or with the consumer. 5. The junction box should not be dangerous. Read all governing codes and local ordinances 1.A 3-wire or 4-wire single phase 120/240 or 120/208 Volt, 60 Hz AC only electrical supply is installed and grounded properly by your appliance, and the space ... to rear. 2. To know the circuit breaker or fuse required by a qualified installer or service technician. • This wall oven must be supplied with this wall oven can result in the literature package). Only certain cooktop models may be shut off while line connections are listed by the MFG...
... or with the consumer. 5. The junction box should not be dangerous. Read all governing codes and local ordinances 1.A 3-wire or 4-wire single phase 120/240 or 120/208 Volt, 60 Hz AC only electrical supply is installed and grounded properly by your appliance, and the space ... to rear. 2. To know the circuit breaker or fuse required by a qualified installer or service technician. • This wall oven must be supplied with this wall oven can result in the literature package). Only certain cooktop models may be shut off while line connections are listed by the MFG...

Installation Instructions
Page 4
... supply cable. Failure to fit into an existing cabinet cutout opening, when cutout height exceeds 281/8" (71.4 cm) for the single wall oven or 49½" (125.7 cm) for grounding the appliance. ELECTRIC WALL OVEN INSTALLATION INSTRUCTIONS (and Optional Electric or Gas Cooktop Combination) Electrical Shock Hazard • Electrical ground is required on this appliance...
... supply cable. Failure to fit into an existing cabinet cutout opening, when cutout height exceeds 281/8" (71.4 cm) for the single wall oven or 49½" (125.7 cm) for grounding the appliance. ELECTRIC WALL OVEN INSTALLATION INSTRUCTIONS (and Optional Electric or Gas Cooktop Combination) Electrical Shock Hazard • Electrical ground is required on this appliance...

