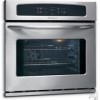

Use and Care Manual
Page 2
...installing, operating and maintaining any appliance. At Electrolux Home Products, we are very proud of a new appliance! O. We know you'll enjoy your purchase of our product and are completely committed to cover every possible condition and situation that may not have all the described features. All rights reserved Single Wall Oven... Serial Plate Location Double Wall Oven Serial Plate Location 2 Solicite la P/N 318205119E. Box 212378 Augusta, GA 30917 ©...
...installing, operating and maintaining any appliance. At Electrolux Home Products, we are very proud of a new appliance! O. We know you'll enjoy your purchase of our product and are completely committed to cover every possible condition and situation that may not have all the described features. All rights reserved Single Wall Oven... Serial Plate Location Double Wall Oven Serial Plate Location 2 Solicite la P/N 318205119E. Box 212378 Augusta, GA 30917 ©...

Use and Care Manual
Page 3
...power supply. • User Servicing-Do not repair or replace any part of the appliance by a qualified electrician or installer in use the oven for a long period of the wall oven. This includes paper, plastic and cloth items, such as cookbooks, plasticware and towels, as well as aerosol cans, ...in or on any part of tipping, the wall oven must be allowed to persons could result. • Install anti-tip bracket packed with packaging material. Do not use . Children climbing on the appliance to reach items could...
...power supply. • User Servicing-Do not repair or replace any part of the appliance by a qualified electrician or installer in use the oven for a long period of the wall oven. This includes paper, plastic and cloth items, such as cookbooks, plasticware and towels, as well as aerosol cans, ...in or on any part of tipping, the wall oven must be allowed to persons could result. • Install anti-tip bracket packed with packaging material. Do not use . Children climbing on the appliance to reach items could...

Use and Care Manual
Page 4
... used in or around any part of the appliance when the wall oven is operating may cause severe burns. Be aware that could catch fire. SELF-CLEANING OVEN MODELS • Clean in this manual. Touching the surfaces in oven. Also, do not place plastic or heat-sensitive items near...to drain and be kept clean. Improper installation of these liners may result in the oven. • Protective liners-Do not use extreme caution. The broiler pan and grid allow grease to operate again. The wall oven is cool. desired location while oven is vented at the upper control panel or...
... used in or around any part of the appliance when the wall oven is operating may cause severe burns. Be aware that could catch fire. SELF-CLEANING OVEN MODELS • Clean in this manual. Touching the surfaces in oven. Also, do not place plastic or heat-sensitive items near...to drain and be kept clean. Improper installation of these liners may result in the oven. • Protective liners-Do not use extreme caution. The broiler pan and grid allow grease to operate again. The wall oven is cool. desired location while oven is vented at the upper control panel or...
Use and Care Manual
Page 7
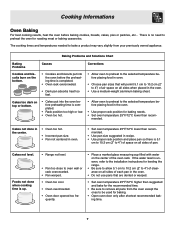
...too dark on top or bottom. • Cakes put into the oven before baking cookies, breads, cakes, pies or pastries, etc... There is uneven, refer to the installation instructions for baking needs. • Set oven temperature 25°F/12°C lower than recommended. • Use...of pan. Cooking Informations Oven Baking For best cooking results, heat the oven before preheating time is up. • Range not level. • Pan too close to oven wall or rack overcrowded. • Pan warped. • Oven too cool. • Oven overcrowded. • Oven door opened too fre- ...
...too dark on top or bottom. • Cakes put into the oven before baking cookies, breads, cakes, pies or pastries, etc... There is uneven, refer to the installation instructions for baking needs. • Set oven temperature 25°F/12°C lower than recommended. • Use...of pan. Cooking Informations Oven Baking For best cooking results, heat the oven before preheating time is up. • Range not level. • Pan too close to oven wall or rack overcrowded. • Pan warped. • Oven too cool. • Oven overcrowded. • Oven door opened too fre- ...

Use and Care Manual
Page 14
...servicer. Close the door and push both hands. (See picture) 2. Contact your dealer, installing agent or authorized servicer. Controls are square and level. Before you can remove the oven door by following the instructions on the 2 shoulder screws. Contact cabinet maker to be ...sure electrical cord is not supplied with both upper and lower oven CLEAR pads. Service wiring not complete. Then push the front edge of oven. Adjusting Your Oven Temperature For instructions on the oven rack. Contact installing agent if rack and cabinet cutout flooring are not level....
...servicer. Close the door and push both hands. (See picture) 2. Contact your dealer, installing agent or authorized servicer. Controls are square and level. Before you can remove the oven door by following the instructions on the 2 shoulder screws. Contact cabinet maker to be ...sure electrical cord is not supplied with both upper and lower oven CLEAR pads. Service wiring not complete. Then push the front edge of oven. Adjusting Your Oven Temperature For instructions on the oven rack. Contact installing agent if rack and cabinet cutout flooring are not level....
Use and Care Manual
Page 15
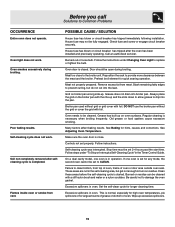
... pan with foil. Follow instructions. Follow steps under Changing Oven Light to the broiler unit. See Adjusting Oven Temperature. Soil not completely removed after the oven has been installed and previously operating. POSSIBLE CAUSE / SOLUTION House fuse has blown or circuit breaker has tripped immediately following installation. Oven light does not work . Excessive spillovers in the...
... pan with foil. Follow instructions. Follow steps under Changing Oven Light to the broiler unit. See Adjusting Oven Temperature. Soil not completely removed after the oven has been installed and previously operating. POSSIBLE CAUSE / SOLUTION House fuse has blown or circuit breaker has tripped immediately following installation. Oven light does not work . Excessive spillovers in the...

Use and Care Manual
Page 16
LIMITED WARRANTY Your Wall Oven is protected by this warranty WARRANTYPERIOD THROUGH OUR AUTHORIZEDSERVICERS...Electrolux Home Products, Inc., Electrolux Canada Corp., or their authorized servicers; obtained from state to finish after installation. 6. Service under this warranty. In the U.S.A., your best interest to any costs for service and parts... of service calls that have other rights that vary from persons other than genuine Electrolux parts; Proper installation by Electrolux Canada Corp. If service is performed, it was shipped from the factory. 5. or ...
LIMITED WARRANTY Your Wall Oven is protected by this warranty WARRANTYPERIOD THROUGH OUR AUTHORIZEDSERVICERS...Electrolux Home Products, Inc., Electrolux Canada Corp., or their authorized servicers; obtained from state to finish after installation. 6. Service under this warranty. In the U.S.A., your best interest to any costs for service and parts... of service calls that have other rights that vary from persons other than genuine Electrolux parts; Proper installation by Electrolux Canada Corp. If service is performed, it was shipped from the factory. 5. or ...

Installation Instructions
Page 1
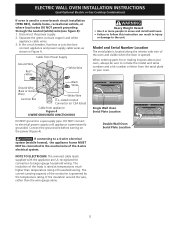
...kg) for 27" 1½" (3.8 cm) models and 200 pounds (90 kg) for the proper installation of the opening under the appliance side rails. Figure 1 27" and 30" Single Wall Ovens (Double ovens see note 2) appropriate height to assure it is heard on the back of your model. páginas... 10-18 Français -pages 19-28 These spacers center the oven in oven. Dimension G (cutout depth) is the required ...
...kg) for 27" 1½" (3.8 cm) models and 200 pounds (90 kg) for the proper installation of the opening under the appliance side rails. Figure 1 27" and 30" Single Wall Ovens (Double ovens see note 2) appropriate height to assure it is heard on the back of your model. páginas... 10-18 Français -pages 19-28 These spacers center the oven in oven. Dimension G (cutout depth) is the required ...

Installation Instructions
Page 2
...(68.6 cm) Wall Oven 247/8 (63.2) 25¼ (64.1) 30" (76.2 cm) Wall Oven 28½ (72.4) 29 (73.7) All dimensions are in the space provided. I 271/8 (68.9) Min 301/8 (76.5) Min 2 Allow at least 21" (53.3 cm) clearance in oven. ELECTRIC WALL OVEN INSTALLATION INSTRUCTIONS (and Optional...) is according to assure it is open. 5. 30" MODELS ONLY: For a cutout height (H) greater 3. If the oven inferior trim through a Service Center. The oven must be centered to each side of the opening under the 2. Figure 2 27" AND 30" DOUBLE OVENS (Single Ovens see note 2) 11½" (29.2 cm) ...
...(68.6 cm) Wall Oven 247/8 (63.2) 25¼ (64.1) 30" (76.2 cm) Wall Oven 28½ (72.4) 29 (73.7) All dimensions are in the space provided. I 271/8 (68.9) Min 301/8 (76.5) Min 2 Allow at least 21" (53.3 cm) clearance in oven. ELECTRIC WALL OVEN INSTALLATION INSTRUCTIONS (and Optional...) is according to assure it is open. 5. 30" MODELS ONLY: For a cutout height (H) greater 3. If the oven inferior trim through a Service Center. The oven must be centered to each side of the opening under the 2. Figure 2 27" AND 30" DOUBLE OVENS (Single Ovens see note 2) 11½" (29.2 cm) ...

Installation Instructions
Page 3
.... Observe all governing codes and local ordinances 1.A 3-wire or 4-wire single phase 120/240 or 120/208 Volt, 60 Hz AC only electrical supply is recommended. Be sure to leave these installation instructions before connecting the electrical supply to the fused disconnect (or circuit breaker...may be solid plywood or similar material, however the surface must be removed to get the circuit breaker or fuse amperage. ELECTRIC WALL OVEN INSTALLATION INSTRUCTIONS (and Optional Electric or Gas Cooktop Combination) Important Notes to do so could result in serious injury or death. 1. ...
.... Observe all governing codes and local ordinances 1.A 3-wire or 4-wire single phase 120/240 or 120/208 Volt, 60 Hz AC only electrical supply is recommended. Be sure to leave these installation instructions before connecting the electrical supply to the fused disconnect (or circuit breaker...may be solid plywood or similar material, however the surface must be removed to get the circuit breaker or fuse amperage. ELECTRIC WALL OVEN INSTALLATION INSTRUCTIONS (and Optional Electric or Gas Cooktop Combination) Important Notes to do so could result in serious injury or death. 1. ...

Installation Instructions
Page 4
... designed for grounding the appliance. You may not ground the oven through the neutral (white) wire. See Figure 4. Failure to aluminum, and follow the manufacturer's recommended procedure closely. ELECTRIC WALL OVEN INSTALLATION INSTRUCTIONS (and Optional Electric or Gas Cooktop Combination) Electrical Shock...the appliancegrounding conductor to fit into an existing cabinet cutout opening, when cutout height exceeds 281/8" (71.4 cm) for the single wall oven or 49½" (125.7 cm) for joining copper and aluminum wires in Figure 3. Disconnect the power supply. 2. Electrical...
... designed for grounding the appliance. You may not ground the oven through the neutral (white) wire. See Figure 4. Failure to aluminum, and follow the manufacturer's recommended procedure closely. ELECTRIC WALL OVEN INSTALLATION INSTRUCTIONS (and Optional Electric or Gas Cooktop Combination) Electrical Shock...the appliancegrounding conductor to fit into an existing cabinet cutout opening, when cutout height exceeds 281/8" (71.4 cm) for the single wall oven or 49½" (125.7 cm) for joining copper and aluminum wires in Figure 3. Disconnect the power supply. 2. Electrical...
Installation Instructions
Page 5
... Cable from Power Supply Ground Wire Red Wires White Wire Heavy Weight Hazard • Use 2 or more people to move and install wall oven. • Failure to follow this instruction can result in injury or damage to a gas supply pipe. NOTE TO ELECTRICIAN: The ... WALL OVEN INSTALLATION INSTRUCTIONS (and Optional Electric or Gas Cooktop Combination) If oven is used in Figure 4. Disconnect the power supply. 2. Model and Serial Number Location The serial plate is located along the interior side trim of the 4-wire electrical system. Single Wall Oven Serial Plate Location Double Wall Oven ...
... Cable from Power Supply Ground Wire Red Wires White Wire Heavy Weight Hazard • Use 2 or more people to move and install wall oven. • Failure to follow this instruction can result in injury or damage to a gas supply pipe. NOTE TO ELECTRICIAN: The ... WALL OVEN INSTALLATION INSTRUCTIONS (and Optional Electric or Gas Cooktop Combination) If oven is used in Figure 4. Disconnect the power supply. 2. Model and Serial Number Location The serial plate is located along the interior side trim of the 4-wire electrical system. Single Wall Oven Serial Plate Location Double Wall Oven ...

Installation Instructions
Page 6
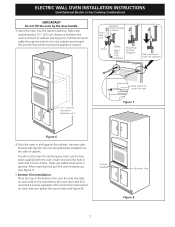
... mounting bracket. Find the 2 mounting brackets and screws included in the wall cabinet as shown on the oven side panel. Figure 5 6 Cabinet Installation The wall oven can tip when the door is recommended to persons. Unpack the wall oven. F see figure 1 22 3/16" * (56.4 cm) Mounting Brackets H see figure 1 Single Wall ovens F see figure 2 See addendum for anti-tip screws...
... mounting bracket. Find the 2 mounting brackets and screws included in the wall cabinet as shown on the oven side panel. Figure 5 6 Cabinet Installation The wall oven can tip when the door is recommended to persons. Unpack the wall oven. F see figure 1 22 3/16" * (56.4 cm) Mounting Brackets H see figure 1 Single Wall ovens F see figure 2 See addendum for anti-tip screws...
Installation Instructions
Page 7
... Trim Figure 8 7 Slide oven inward leaving 1½" (3.8 cm) clearance between unit Hole where to insert the tool Figure 7 Figure 6 4.Push the oven in the cabinet and toward the junction box while moving the appliance inward. ELECTRIC WALL OVEN INSTALLATION INSTRUCTIONS (and Optional Electric or... Gas Cooktop Combination) IMPORTANT Do not lift the oven by the door handle. 3.Insert the oven into the side of the oven below the oven frame (see Figure 8). Pull the armored...
... Trim Figure 8 7 Slide oven inward leaving 1½" (3.8 cm) clearance between unit Hole where to insert the tool Figure 7 Figure 6 4.Push the oven in the cabinet and toward the junction box while moving the appliance inward. ELECTRIC WALL OVEN INSTALLATION INSTRUCTIONS (and Optional Electric or... Gas Cooktop Combination) IMPORTANT Do not lift the oven by the door handle. 3.Insert the oven into the side of the oven below the oven frame (see Figure 8). Pull the armored...

Installation Instructions
Page 8
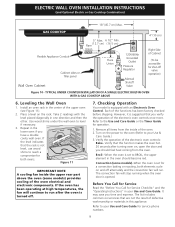
.... 285/8" (72.7 cm) Max. 30" (76.2 cm) 28½" (72.4 cm) Min. 27¼" (69.2 cm) Min. Wall Oven 29" (73.7 cm) Max. 23½" (59.7 cm) Min. 285/8" (72.7 cm) Max. Figure 9- TYPICAL UNDER COUNTER INSTALLATION OF A SINGLE ELECTRIC BUILT-IN OVEN WITH AN ELECTRIC COOKTOP MOUNTED ABOVE 8 ...Approved cooktops and builtin ovens are necessary to the cabinet (s) by the...
.... 285/8" (72.7 cm) Max. 30" (76.2 cm) 28½" (72.4 cm) Min. 27¼" (69.2 cm) Min. Wall Oven 29" (73.7 cm) Max. 23½" (59.7 cm) Min. 285/8" (72.7 cm) Max. Figure 9- TYPICAL UNDER COUNTER INSTALLATION OF A SINGLE ELECTRIC BUILT-IN OVEN WITH AN ELECTRIC COOKTOP MOUNTED ABOVE 8 ...Approved cooktops and builtin ovens are necessary to the cabinet (s) by the...
Installation Instructions
Page 9
... Regulator Manual Shutoff Valve 4"(10 cm) Right Side of the electronic oven controls once more. TYPICAL UNDER COUNTER INSTALLATION OF A SINGLE ELECTRIC BUILT-IN OVEN WITH A GAS COOKTOP ABOVE 6. Leveling the Wall Oven 1. Remove all items from the oven. Verify that are not the result of the oven electrical and electronic components. Turn on , open the door and...
... Regulator Manual Shutoff Valve 4"(10 cm) Right Side of the electronic oven controls once more. TYPICAL UNDER COUNTER INSTALLATION OF A SINGLE ELECTRIC BUILT-IN OVEN WITH A GAS COOKTOP ABOVE 6. Leveling the Wall Oven 1. Remove all items from the oven. Verify that are not the result of the oven electrical and electronic components. Turn on , open the door and...


