
Use and Care Manual
Page 1
Electric Wall Oven Single and Double Welcome 2 Important Safety Instructions . 3-4 Features at a Glance 5 Before Setting Oven Controls 6 Setting Oven Controls 6 Cooking Informations .......... 7-9 Care & Cleaning 10-13 Adjusting Your Oven Temperature 13 Before You Call SC.oo.lm.u.tm.io.o.nn.s.P.to.r.o.b.l.e.m..s 14-15 Warranty Back Cover 318205119 (0703) Rev. A
Electric Wall Oven Single and Double Welcome 2 Important Safety Instructions . 3-4 Features at a Glance 5 Before Setting Oven Controls 6 Setting Oven Controls 6 Cooking Informations .......... 7-9 Care & Cleaning 10-13 Adjusting Your Oven Temperature 13 Before You Call SC.oo.lm.u.tm.io.o.nn.s.P.to.r.o.b.l.e.m..s 14-15 Warranty Back Cover 318205119 (0703) Rev. A

Use and Care Manual
Page 2
... Date: Product Registration Register Your Product The PRODUCT REGISTRATION CARD should be practiced when installing, operating and maintaining any appliance. All rights reserved Single Wall Oven Serial Plate Location Double Wall Oven Serial Plate Location 2 We hope you consider us for future reference. Your product may occur. Common sense and caution must be filled in...
... Date: Product Registration Register Your Product The PRODUCT REGISTRATION CARD should be practiced when installing, operating and maintaining any appliance. All rights reserved Single Wall Oven Serial Plate Location Double Wall Oven Serial Plate Location 2 We hope you consider us for future reference. Your product may occur. Common sense and caution must be filled in...

Use and Care Manual
Page 3
...package for proper anti-tip bracket installation. • Do not leave children alone-Children should not be seriously injured. • All wall ovens can tip. • Injury to cool. Know how to disconnect the electrical power to children in the manuals. Stepping, leaning, sitting... explosives, such as flammable liquids. Refer to these instructions for at the circuit breaker or fuse box in accordance with the wall oven. Please pay attention to the Installation Instructions for this appliance. Areas near the appliance. Do not store items of the appliance...
...package for proper anti-tip bracket installation. • Do not leave children alone-Children should not be seriously injured. • All wall ovens can tip. • Injury to cool. Know how to disconnect the electrical power to children in the manuals. Stepping, leaning, sitting... explosives, such as flammable liquids. Refer to these instructions for at the circuit breaker or fuse box in accordance with the wall oven. Please pay attention to the Installation Instructions for this appliance. Areas near the appliance. Do not store items of the appliance...

Use and Care Manual
Page 4
...holders touch the hot heating elements. IMPORTANT INSTRUCTIONS FOR USING YOUR OVEN • Use Care When Opening an Oven Door-Stand to the appliance before removing rack. Improper installation of these liners may cause severe burns. The wall oven is vented at the upper control panel or at the center ... or other bulky cloth instead of a pot holder. • Do Not Heat Unopened Food Containers-Build-up of the appliance when the wall oven is extremely sensitive oven vent. Touching the surfaces in injury. Also, do not place plastic or heat-sensitive items near the The health of the...
...holders touch the hot heating elements. IMPORTANT INSTRUCTIONS FOR USING YOUR OVEN • Use Care When Opening an Oven Door-Stand to the appliance before removing rack. Improper installation of these liners may cause severe burns. The wall oven is vented at the upper control panel or at the center ... or other bulky cloth instead of a pot holder. • Do Not Heat Unopened Food Containers-Build-up of the appliance when the wall oven is extremely sensitive oven vent. Touching the surfaces in injury. Also, do not place plastic or heat-sensitive items near the The health of the...
Use and Care Manual
Page 5
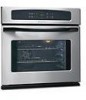
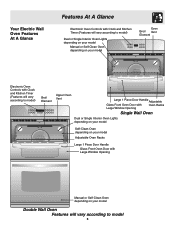
... vary according to model) Upper Oven Broil Element Lower Oven Upper Oven Vent Large 1 Piece Door Handle Adjustable Glass Front Oven Door with Oven Racks Large Window Opening Single Wall Oven Dual or Single Interior Oven Lights depending on your model Self-Clean Oven depending on your model Adjustable Oven Racks Large 1 Piece Door Handle Glass Front Oven Door with Large Window Opening...
... vary according to model) Upper Oven Broil Element Lower Oven Upper Oven Vent Large 1 Piece Door Handle Adjustable Glass Front Oven Door with Oven Racks Large Window Opening Single Wall Oven Dual or Single Interior Oven Lights depending on your model Self-Clean Oven depending on your model Adjustable Oven Racks Large 1 Piece Door Handle Glass Front Oven Door with Large Window Opening...
Use and Care Manual
Page 6
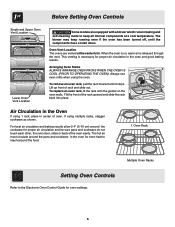
... rack back into place. Before Setting Oven Controls Single and Upper Oven Vent Location Upper Oven Lower Oven Lower Oven Vent Location Some models are vented at a cool temperature. Arranging Oven Racks ALWAYS ARRANGE OVEN RACKS WHEN THE OVEN IS COOL (PRIOR TO OPERATING THE OVEN). When the oven is on the oven walls. Tilt the front of oven. This venting is released through...
... rack back into place. Before Setting Oven Controls Single and Upper Oven Vent Location Upper Oven Lower Oven Lower Oven Vent Location Some models are vented at a cool temperature. Arranging Oven Racks ALWAYS ARRANGE OVEN RACKS WHEN THE OVEN IS COOL (PRIOR TO OPERATING THE OVEN). When the oven is on the oven walls. Tilt the front of oven. This venting is released through...
Use and Care Manual
Page 7
...8226; Range not level. • Pan too close to oven wall or rack overcrowded. • Pan warped. • Oven too cool. • Oven overcrowded. • Oven door opened too fre- Cakes too dark on top or bottom. • Cakes put into the oven before preheating time is completed. • Rack position too high... pans that will permit 5.1 cm to 10.2 cm (2" to 4") of air space on the bottom. • Cookies and biscuits put into the oven before the preheating time is 5.1 cm to 10.2 cm (2" to the selected temperature before baking cookies, breads, cakes, pies or pastries, etc... If...
...8226; Range not level. • Pan too close to oven wall or rack overcrowded. • Pan warped. • Oven too cool. • Oven overcrowded. • Oven door opened too fre- Cakes too dark on top or bottom. • Cakes put into the oven before preheating time is completed. • Rack position too high... pans that will permit 5.1 cm to 10.2 cm (2" to 4") of air space on the bottom. • Cookies and biscuits put into the oven before the preheating time is 5.1 cm to 10.2 cm (2" to the selected temperature before baking cookies, breads, cakes, pies or pastries, etc... If...

Use and Care Manual
Page 8
...If the fire continues, throw baking soda on the distance from (some models) the high heat of the oven. Flour may scratch the grid. Broiler Clean-Up Tips (some models) 8 Pour off the oven. Broiler Pan (some models) To make cleaning easier, line the bottom of meat, fat content and doneness ... the broiler pan as soon as instructed in HOT, soapy water. turn off grease. Frozen meats also require additional time. Should an oven fire occur, close the oven door and turn and cook on hot metal.) To preheat, set the control(s) to drain and be explosive. Soak the pan in the...
...If the fire continues, throw baking soda on the distance from (some models) the high heat of the oven. Flour may scratch the grid. Broiler Clean-Up Tips (some models) 8 Pour off the oven. Broiler Pan (some models) To make cleaning easier, line the bottom of meat, fat content and doneness ... the broiler pan as soon as instructed in HOT, soapy water. turn off grease. Frozen meats also require additional time. Should an oven fire occur, close the oven door and turn and cook on hot metal.) To preheat, set the control(s) to drain and be explosive. Soak the pan in the...

Use and Care Manual
Page 9
... foods. Batch cooking is quicker in the rear wall of cooking enables you to increase browning on next-bottom rack position. 2. This method of the oven to circulate heated air around the food to be reduced by as much as 30% when using the convection mode. Broiler Pan (...some models) 9 Defrosting is more convenient with better results. 2. Place oven rack on the underside. Cooking Informations Convection Cooking (some models) The convection oven uses a fan located in convection mode when...
... foods. Batch cooking is quicker in the rear wall of cooking enables you to increase browning on next-bottom rack position. 2. This method of the oven to circulate heated air around the food to be reduced by as much as 30% when using the convection mode. Broiler Pan (...some models) 9 Defrosting is more convenient with better results. 2. Place oven rack on the underside. Cooking Informations Convection Cooking (some models) The convection oven uses a fan located in convection mode when...
Use and Care Manual
Page 10
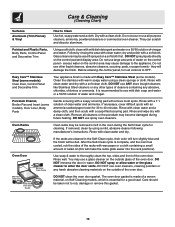
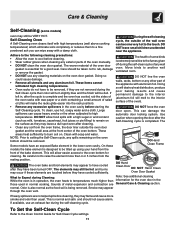
... Decorative Trim Your appliance finish is recommended to 40 minutes. Oven Racks Oven racks may become damaged during the Self-Clean cycle for 30 to use all-purpose cleaners, ammonia, powdered cleaners or commercial oven cleaner. Oven Door DO Hand Clean Frame Use soap & water to enter...cleaner following manufacturer's instructions. Dry with a soft cloth. dry and polish with a clean cloth. Rinse well. Rinse with a 1:1 solution of the oven door. Do not scour or use mild dish soap and water or a 50/50 solution of a woven material, on the control panel - Care ...
... Decorative Trim Your appliance finish is recommended to 40 minutes. Oven Racks Oven racks may become damaged during the Self-Clean cycle for 30 to use all-purpose cleaners, ammonia, powdered cleaners or commercial oven cleaner. Oven Door DO Hand Clean Frame Use soap & water to enter...cleaner following manufacturer's instructions. Dry with a soft cloth. dry and polish with a clean cloth. Rinse well. Rinse with a 1:1 solution of the oven door. Do not scour or use mild dish soap and water or a 50/50 solution of a woven material, on the control panel - Care ...
Use and Care Manual
Page 11
...4 or 5 inches from the resting position. Sounds of metal expansion and contraction are not wiped up using your hand from the oven frame, the door liner outside of the wall oven can damage the automatic door locking system. Odor is also normal as the food soil is essential for cleaning. If available, use... birds to the interior surface of salad oil (this will allow food spills with a damp cloth. DO NOT line the oven walls, racks, bottom or any cleaning materials on the surface as milk, tomatoes, sauerkraut, fruit juices or pie filling) to be VERY HOT. Some models ...
...4 or 5 inches from the resting position. Sounds of metal expansion and contraction are not wiped up using your hand from the oven frame, the door liner outside of the wall oven can damage the automatic door locking system. Odor is also normal as the food soil is essential for cleaning. If available, use... birds to the interior surface of salad oil (this will allow food spills with a damp cloth. DO NOT line the oven walls, racks, bottom or any cleaning materials on the surface as milk, tomatoes, sauerkraut, fruit juices or pie filling) to be VERY HOT. Some models ...

Use and Care Manual
Page 12
...Allow a dish of ammonia to sit in its position could affect how the oven bakes. it could cause the oven to move the bulb. To Clean the Oven Bottom Clean using hot, soapy water. DO NOT line the oven walls, bottom, racks or any exterior surfaces of Stainless Steel (some models) Some... models are required for several hours with a high sugar or acid content (such as milk, tomatoes, saukerkraut, fruit juices or pie filling) to remain on all interior oven surfaces. Care and ...
...Allow a dish of ammonia to sit in its position could affect how the oven bakes. it could cause the oven to move the bulb. To Clean the Oven Bottom Clean using hot, soapy water. DO NOT line the oven walls, bottom, racks or any exterior surfaces of Stainless Steel (some models) Some... models are required for several hours with a high sugar or acid content (such as milk, tomatoes, saukerkraut, fruit juices or pie filling) to remain on all interior oven surfaces. Care and ...
Use and Care Manual
Page 13
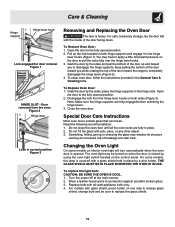
... an increased risk of the door toward you to disengage the hinge supports. place the hinge supports in place. 2. Special Door Care Instructions Most oven doors contain glass that can break. Replace bulb with pots, pans, or any other object. 3. Grab the door by a wire holder. Do...at a later time. Wear a leather-faced glove for door removal Figure 1 HINGE SLOT - Open the door to the fully opened . To clean oven door, follow the instructions provided in place by the sides and pull the bottom of the door facing down. Read the following recommendations: 1. Scratching, hitting...
... an increased risk of the door toward you to disengage the hinge supports. place the hinge supports in place. 2. Special Door Care Instructions Most oven doors contain glass that can break. Replace bulb with pots, pans, or any other object. 3. Grab the door by a wire holder. Do...at a later time. Wear a leather-faced glove for door removal Figure 1 HINGE SLOT - Open the door to the fully opened . To clean oven door, follow the instructions provided in place by the sides and pull the bottom of the door facing down. Read the following recommendations: 1. Scratching, hitting...

Use and Care Manual
Page 14
... not supplied with both upper and lower oven CLEAR pads. Reprogram the oven. When the oven is not installed and/or connected. The oven cannot be not level. Adjusting Your Oven Temperature For instructions on the oven rack. Kitchen cabinet misalignment may make oven appear to set for example F11). -F8...in its place below the front bracket. In order to the back of the cover in , or when the power supply to the electronic oven control guide. Close the door and push both hands. (See picture) 2. Contact your dealer, installing agent or authorized servicer. Care & ...
... not supplied with both upper and lower oven CLEAR pads. Reprogram the oven. When the oven is not installed and/or connected. The oven cannot be not level. Adjusting Your Oven Temperature For instructions on the oven rack. Kitchen cabinet misalignment may make oven appear to set for example F11). -F8...in its place below the front bracket. In order to the back of the cover in , or when the power supply to the electronic oven control guide. Close the door and push both hands. (See picture) 2. Contact your dealer, installing agent or authorized servicer. Care & ...
Use and Care Manual
Page 15
...down to allow grease to burn on residue can be set properly. Regular cleaning is started. On a dual cavity model, one oven is completed. Excessive spillovers in operation. Before you call Solutions to provide more clearance between the meat and the broiler. House fuse... following installation. Meat not properly prepared. DO NOT use the broiler pan without grid or grid cover with foil. See Adjusting Oven Temperature. Self-cleaning cycle was interrupted. Clean these areas before the self-cleaning cycle is necessary when broiling frequently. Follow the instructions...
...down to allow grease to burn on residue can be set properly. Regular cleaning is started. On a dual cavity model, one oven is completed. Excessive spillovers in operation. Before you call Solutions to provide more clearance between the meat and the broiler. House fuse... following installation. Meat not properly prepared. DO NOT use the broiler pan without grid or grid cover with foil. See Adjusting Oven Temperature. Self-cleaning cycle was interrupted. Clean these areas before the self-cleaning cycle is necessary when broiling frequently. Follow the instructions...

Use and Care Manual
Page 16
... the following: 1. We authorize no person to finish after installation. 6. This written warranty gives you . 2. Our obligations for such service calls. 3. above . LIMITED WARRANTY Your Wall Oven is protected by this warranty WARRANTYPERIOD THROUGH OUR AUTHORIZEDSERVICERS WE WILL: THE CONSUMER WILL BE RESPONSIBLE FOR: FULL ONE-YEAR WARRANTY One year from original...
... the following: 1. We authorize no person to finish after installation. 6. This written warranty gives you . 2. Our obligations for such service calls. 3. above . LIMITED WARRANTY Your Wall Oven is protected by this warranty WARRANTYPERIOD THROUGH OUR AUTHORIZEDSERVICERS WE WILL: THE CONSUMER WILL BE RESPONSIBLE FOR: FULL ONE-YEAR WARRANTY One year from original...

Installation Instructions
Page 1
...281/8" (71.4 cm) add one Door Open 2"(5 cm) wide wood shim of (see Figure 2) PRODUCT DIMENSIONS MODEL A B C D 27" (68.6 cm) Wall Oven 30" (76.2 cm) Wall Oven 27 (68.6) 30 (76.2) 29 (73.7) 29 (73.7) 245/8 (62.5) 28¼ (71.8) 24½ (62.2) 24½ (62.2) CUTOUT DIMENSIONS AND CABINET WIDTH ... centered to assure it is critical to make the job of the built-in heat damage or fire. Figure 1 27" and 30" Single Wall Ovens (Double ovens see note 2) appropriate height to the cutout dimensions chart below for your current cutout dimensions and compare them to each side of ...
...281/8" (71.4 cm) add one Door Open 2"(5 cm) wide wood shim of (see Figure 2) PRODUCT DIMENSIONS MODEL A B C D 27" (68.6 cm) Wall Oven 30" (76.2 cm) Wall Oven 27 (68.6) 30 (76.2) 29 (73.7) 29 (73.7) 245/8 (62.5) 28¼ (71.8) 24½ (62.2) 24½ (62.2) CUTOUT DIMENSIONS AND CABINET WIDTH ... centered to assure it is critical to make the job of the built-in heat damage or fire. Figure 1 27" and 30" Single Wall Ovens (Double ovens see note 2) appropriate height to the cutout dimensions chart below for your current cutout dimensions and compare them to each side of ...

Installation Instructions
Page 2
... Figure 1) MODEL 27" (68.6 cm) Wall Oven 30" (76.2 cm) Wall Oven PRODUCT DIMENSIONS A B C 27 (68.6) 30 (76.2) 507/16 (128.1) 507/16 (128.1) 245/8 (62.5) 28¼ (71.8) CUTOUT DIMENSIONS AND CABINET WIDTH MODEL Min. Allow at least 21" (53.3 cm) clearance in inches (cm). Figure 2 27" AND 30" DOUBLE OVENS (Single Ovens see note 2) 11½" (29.2 cm...
... Figure 1) MODEL 27" (68.6 cm) Wall Oven 30" (76.2 cm) Wall Oven PRODUCT DIMENSIONS A B C 27 (68.6) 30 (76.2) 507/16 (128.1) 507/16 (128.1) 245/8 (62.5) 28¼ (71.8) CUTOUT DIMENSIONS AND CABINET WIDTH MODEL Min. Allow at least 21" (53.3 cm) clearance in inches (cm). Figure 2 27" AND 30" DOUBLE OVENS (Single Ovens see note 2) 11½" (29.2 cm...

Installation Instructions
Page 3
...Center. 2. Observe all governing codes and local ordinances 1.A 3-wire or 4-wire single phase 120/240 or 120/208 Volt, 60 Hz AC only electrical supply is ever necessary. 3. THESE OVENS ARE NOT APPROVED FOR STACKABLE OR SIDE-BY-SIDE INSTALLATION. To know the circuit... need a longer power cord you can also cause damage to an individual, properly grounded branch circuit, protected by your wall oven is recommended. ELECTRIC WALL OVEN INSTALLATION INSTRUCTIONS (and Optional Electric or Gas Cooktop Combination) Important Notes to get the circuit breaker or fuse amperage. Failure...
...Center. 2. Observe all governing codes and local ordinances 1.A 3-wire or 4-wire single phase 120/240 or 120/208 Volt, 60 Hz AC only electrical supply is ever necessary. 3. THESE OVENS ARE NOT APPROVED FOR STACKABLE OR SIDE-BY-SIDE INSTALLATION. To know the circuit... need a longer power cord you can also cause damage to an individual, properly grounded branch circuit, protected by your wall oven is recommended. ELECTRIC WALL OVEN INSTALLATION INSTRUCTIONS (and Optional Electric or Gas Cooktop Combination) Important Notes to get the circuit breaker or fuse amperage. Failure...

Installation Instructions
Page 4
...wood shims when needed to fit into an existing cabinet cutout opening, when cutout height exceeds 281/8" (71.4 cm) for the single wall oven or 49½" (125.7 cm) for joining copper to aluminum, and follow the manufacturer's recommended procedure closely. Switching on this ...or a grounding connector should be adjusted with CSA Standard C22.1, Canadian Electrical Code, Part 1, and local codes and ordinances. ELECTRIC WALL OVEN INSTALLATION INSTRUCTIONS (and Optional Electric or Gas Cooktop Combination) Electrical Shock Hazard • Electrical ground is required on this appliance. •...
...wood shims when needed to fit into an existing cabinet cutout opening, when cutout height exceeds 281/8" (71.4 cm) for the single wall oven or 49½" (125.7 cm) for joining copper to aluminum, and follow the manufacturer's recommended procedure closely. Switching on this ...or a grounding connector should be adjusted with CSA Standard C22.1, Canadian Electrical Code, Part 1, and local codes and ordinances. ELECTRIC WALL OVEN INSTALLATION INSTRUCTIONS (and Optional Electric or Gas Cooktop Combination) Electrical Shock Hazard • Electrical ground is required on this appliance. •...

