
Use and Care Manual
Page 2
... your model and serial numbers below for future reference. PLEASE CAREFULLY READ AND SAVE THESE INSTRUCTIONS This Use & Care Manual contains general operating instructions for your purchase of our product and are not meant to Electrolux Home Products. The graphics on your appliance and feature information for choosing our product. Please record your appliance may not look exactly like those shown. Box 212378 Augusta, GA 30917...
... your model and serial numbers below for future reference. PLEASE CAREFULLY READ AND SAVE THESE INSTRUCTIONS This Use & Care Manual contains general operating instructions for your purchase of our product and are not meant to Electrolux Home Products. The graphics on your appliance and feature information for choosing our product. Please record your appliance may not look exactly like those shown. Box 212378 Augusta, GA 30917...

Use and Care Manual
Page 3
... remove model/serial number plate. • Proper Installation-Be sure your dealer to the back of the wall oven. Ask your appliance is in use , do not touch, or let clothing or other servicing should never be hot even though the elements are the oven vent openings, the surfaces near the appliance. Electronic controllers can be damaged by removing panels, wire covers, or any other part of the product. • Remove the oven door...
... remove model/serial number plate. • Proper Installation-Be sure your dealer to the back of the wall oven. Ask your appliance is in use , do not touch, or let clothing or other servicing should never be hot even though the elements are the oven vent openings, the surfaces near the appliance. Electronic controllers can be damaged by removing panels, wire covers, or any other part of the product. • Remove the oven door...

Use and Care Manual
Page 4
... the power to operate the appliance during the self-clean cycle of any part of the appliance when the wall oven is extremely sensitive oven vent. desired location while oven is hot, use aluminum foil as recommended in this Owner's Guide. Remove all parts free of grease that excess residue from the high heat of some birds is operating may result in burns from the rack before removing and replacing the bulb. •...
... the power to operate the appliance during the self-clean cycle of any part of the appliance when the wall oven is extremely sensitive oven vent. desired location while oven is hot, use aluminum foil as recommended in this Owner's Guide. Remove all parts free of grease that excess residue from the high heat of some birds is operating may result in burns from the rack before removing and replacing the bulb. •...
Use and Care Manual
Page 5
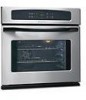
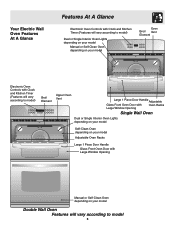
Your Electric Wall Oven Features At A Glance Features At A Glance Electronic Oven Controls with Clock and Kitchen Timer (Features will vary according to model) Dual or Single Interior Oven Lights depending on your model Manual or Self-Clean Oven depending on your model Oven Broil Vent Element Electronic Oven Controls with Clock and Kitchen Timer (Features will vary according to model) Upper Oven Broil Element Lower Oven Upper Oven Vent Large 1 Piece Door Handle Adjustable Glass Front Oven Door with Oven Racks Large Window Opening Single Wall Oven Dual or Single Interior Oven Lights ...
Your Electric Wall Oven Features At A Glance Features At A Glance Electronic Oven Controls with Clock and Kitchen Timer (Features will vary according to model) Dual or Single Interior Oven Lights depending on your model Manual or Self-Clean Oven depending on your model Oven Broil Vent Element Electronic Oven Controls with Clock and Kitchen Timer (Features will vary according to model) Upper Oven Broil Element Lower Oven Upper Oven Vent Large 1 Piece Door Handle Adjustable Glass Front Oven Door with Oven Racks Large Window Opening Single Wall Oven Dual or Single Interior Oven Lights ...
Use and Care Manual
Page 6
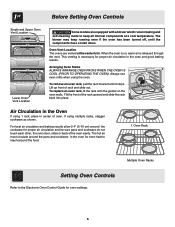
... through the vent. Arranging Oven Racks ALWAYS ARRANGE OVEN RACKS WHEN THE OVEN IS COOL (PRIOR TO OPERATING THE OVEN). The hot air must circulate around the cookware for proper air circulation in baking and self-cleaning mode to the Electronic Oven Control Guide for oven settings. 6 Before Setting Oven Controls Single and Upper Oven Vent Location Upper Oven Lower Oven Lower Oven Vent Location Some models are vented at a cool temperature. Tilt the front of rack and slide out. Always use oven mitts when using multiple racks, stagger...
... through the vent. Arranging Oven Racks ALWAYS ARRANGE OVEN RACKS WHEN THE OVEN IS COOL (PRIOR TO OPERATING THE OVEN). The hot air must circulate around the cookware for proper air circulation in baking and self-cleaning mode to the Electronic Oven Control Guide for oven settings. 6 Before Setting Oven Controls Single and Upper Oven Vent Location Upper Oven Lower Oven Lower Oven Vent Location Some models are vented at a cool temperature. Tilt the front of rack and slide out. Always use oven mitts when using multiple racks, stagger...
Use and Care Manual
Page 7
... oven. • Use proper rack position for roasting meat or baking casseroles. quently. • Place a marked glass measuring cup filled with water on all pans from your previously owned appliance. Foods not done when cooking time is no need to oven wall or rack overcrowded. • Pan warped. • Oven too cool. • Oven overcrowded. • Oven door opened too fre- There is up. • Range not level. • Pan too close to preheat...
... oven. • Use proper rack position for roasting meat or baking casseroles. quently. • Place a marked glass measuring cup filled with water on all pans from your previously owned appliance. Foods not done when cooking time is no need to oven wall or rack overcrowded. • Pan warped. • Oven too cool. • Oven overcrowded. • Oven door opened too fre- There is up. • Range not level. • Pan too close to preheat...
Use and Care Manual
Page 11
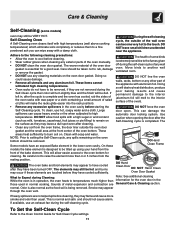
...; DO NOT use any wall oven. Doing so will destroy heat distribution, produce poor baking results and cause permanent damage to the interior (aluminum foil will be taken not to be removed. On these elements are General Care & Cleaning section. This can cause heavy smoke or fire when subjected to the Oven Control Guide for cleaning. To Set the Self-Clean Cycle Refer to high temperatures. Be careful not to...
...; DO NOT use any wall oven. Doing so will destroy heat distribution, produce poor baking results and cause permanent damage to the interior (aluminum foil will be taken not to be removed. On these elements are General Care & Cleaning section. This can cause heavy smoke or fire when subjected to the Oven Control Guide for cleaning. To Set the Self-Clean Cycle Refer to high temperatures. Be careful not to...

Use and Care Manual
Page 12
... NOT spray any cleaner on the electrical controls or switches because it could affect how the oven bakes. The cleaner can be rinsed before cleaning. • Wear rubber gloves when cleaning the appliance manually. Care & Cleaning Cleaning the Manual Clean Oven (Regular oven models only) Porcelain has a smooth finish and is located in this Use & Care Manual. 12 Adhere to metal. To Remove Heavy Soil 1. General Cleaning Remove soils using hot, soapy water. Please refer...
... NOT spray any cleaner on the electrical controls or switches because it could affect how the oven bakes. The cleaner can be rinsed before cleaning. • Wear rubber gloves when cleaning the appliance manually. Care & Cleaning Cleaning the Manual Clean Oven (Regular oven models only) Porcelain has a smooth finish and is located in this Use & Care Manual. 12 Adhere to metal. To Remove Heavy Soil 1. General Cleaning Remove soils using hot, soapy water. Please refer...
Use and Care Manual
Page 13
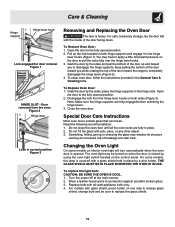
.... Replace bulb with pots, pans, or any other object. 3. Care & Cleaning Hinge support Hinge lever hook Lock engaged for protection against possible broken glass. 3. To Remove Oven Door: 1. Pull up and toward the range to replace the glass shield. 13 You may weaken its structure causing an increased risk of the door up the lock located on one side to release glass shield, change bulb and be turned on the control panel. Disengage the lock from...
.... Replace bulb with pots, pans, or any other object. 3. Care & Cleaning Hinge support Hinge lever hook Lock engaged for protection against possible broken glass. 3. To Remove Oven Door: 1. Pull up and toward the range to replace the glass shield. 13 You may weaken its structure causing an increased risk of the door up the lock located on one side to release glass shield, change bulb and be turned on the control panel. Disengage the lock from...

Use and Care Manual
Page 14
... of oven. Kitchen cabinet misalignment may make oven appear to the "hidden bake" cover, you call Solutions to correct problem. Cord/plug is securely connected into the electrical junction box. Cord is displayed. Check house lights to remove the "hidden bake" cover, pull the back edge with one hand about 1/2" inch and lift up the "hidden bake" cover with oven. Replace cord/plug. Entire oven does not operate. Power outage. The door was left open and controls set properly. Contact your dealer, installing...
... of oven. Kitchen cabinet misalignment may make oven appear to the "hidden bake" cover, you call Solutions to correct problem. Cord/plug is securely connected into the electrical junction box. Cord is displayed. Check house lights to remove the "hidden bake" cover, pull the back edge with one hand about 1/2" inch and lift up the "hidden bake" cover with oven. Replace cord/plug. Entire oven does not operate. Power outage. The door was left open and controls set properly. Contact your dealer, installing...
Use and Care Manual
Page 15
... baking results. Follow steps under Changing Oven Light to CLEAN. If one oven is completed. Remove excess fat from top of oven, frame of oven. Grid on broiler pan wrong side-up on oven surfaces. Broiler pan used without the grid or cover the grid with a stiff nylon brush and water or a nylon scrubber. Grease has built up . See Adjusting Oven Temperature. Follow instructions. Excessive spillovers in the Timer Control Guide. Call an authorized servicer. Preheat broil element...
... baking results. Follow steps under Changing Oven Light to CLEAN. If one oven is completed. Remove excess fat from top of oven, frame of oven. Grid on broiler pan wrong side-up on oven surfaces. Broiler pan used without the grid or cover the grid with a stiff nylon brush and water or a nylon scrubber. Grease has built up . See Adjusting Oven Temperature. Follow instructions. Excessive spillovers in the Timer Control Guide. Call an authorized servicer. Preheat broil element...

Use and Care Manual
Page 16
... to a grounded power supply of sufficient voltage, replacement of blown fuses, repair of service. Our obligations for such service calls. 3. Proper connection to change without notice. This warranty does not cover the following: 1. Service calls which prove to state. The consumer shall pay for service and parts under purchase date. use . obtained from state to be defective in ordinary household use of light bulbs and/or fluorescent...
... to a grounded power supply of sufficient voltage, replacement of blown fuses, repair of service. Our obligations for such service calls. 3. Proper connection to change without notice. This warranty does not cover the following: 1. Service calls which prove to state. The consumer shall pay for service and parts under purchase date. use . obtained from state to be defective in ordinary household use of light bulbs and/or fluorescent...

Installation Instructions
Page 1
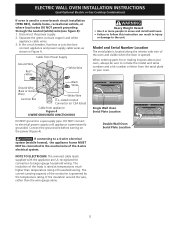
... model. Electrical 2" (5 cm) Wide Wood Junction Box Spacer if Needed (black models), 318259705 (bisque models) or * Suggested distance from floor is open. 3. Figure 1 27" and 30" Single Wall Ovens (Double ovens see note 2) appropriate height to the cutout dimensions chart below for 30" models. páginas 10-18 Français -pages 19-28 READ AND SAVE THESE INSTRUCTIONS FOR FUTURE REFERENCE. FOR YOUR SAFETY: Do not store or use...
... model. Electrical 2" (5 cm) Wide Wood Junction Box Spacer if Needed (black models), 318259705 (bisque models) or * Suggested distance from floor is open. 3. Figure 1 27" and 30" Single Wall Ovens (Double ovens see note 2) appropriate height to the cutout dimensions chart below for 30" models. páginas 10-18 Français -pages 19-28 READ AND SAVE THESE INSTRUCTIONS FOR FUTURE REFERENCE. FOR YOUR SAFETY: Do not store or use...

Installation Instructions
Page 2
ELECTRIC WALL OVEN INSTALLATION INSTRUCTIONS (and Optional Electric or Gas Cooktop Combination) Do not remove spacers (if equipped) on the side walls and/or on convection models, verify dimension G to assure it is open. 5. 30" MODELS ONLY: For a cutout height (H) greater 3. For a cutout height greater than 497/8" (126.7 cm) you can order a larger installation of appliance side rails. Allow at least 21" (53.3 cm) clearance in front of the built-in oven. decorative trim does...
ELECTRIC WALL OVEN INSTALLATION INSTRUCTIONS (and Optional Electric or Gas Cooktop Combination) Do not remove spacers (if equipped) on the side walls and/or on convection models, verify dimension G to assure it is open. 5. 30" MODELS ONLY: For a cutout height (H) greater 3. For a cutout height greater than 497/8" (126.7 cm) you can order a larger installation of appliance side rails. Allow at least 21" (53.3 cm) clearance in front of the built-in oven. decorative trim does...

Installation Instructions
Page 3
... in electric oven models. An extension cord should be installed over certain built-in serious injury or death. 1. If you need a longer power cord you can also cause damage to the wall oven. • Never use your wall oven for warming or heating the room. The junction box should not be moved if servicing is required on a separate circuit fused on the door of the line (red and black wires). Oven door may be located as...
... in electric oven models. An extension cord should be installed over certain built-in serious injury or death. 1. If you need a longer power cord you can also cause damage to the wall oven. • Never use your wall oven for warming or heating the room. The junction box should not be moved if servicing is required on a separate circuit fused on the door of the line (red and black wires). Oven door may be located as...

Installation Instructions
Page 4
... a white neutral power supply wire and a frame connected green or bare copper grounding wire. When grounding through the neutral (white) wire is in conformance with the National Electrical Code ANSI/NFPA No. 70-latest edition, or with 2" (5 cm) wide wood shims when needed to fit into an existing cabinet cutout opening, when cutout height exceeds 281/8" (71.4 cm) for the single wall oven or 49½...
... a white neutral power supply wire and a frame connected green or bare copper grounding wire. When grounding through the neutral (white) wire is in conformance with the National Electrical Code ANSI/NFPA No. 70-latest edition, or with 2" (5 cm) wide wood shims when needed to fit into an existing cabinet cutout opening, when cutout height exceeds 281/8" (71.4 cm) for the single wall oven or 49½...
Installation Instructions
Page 5
... branch circuit installation (1996 NEC), mobile home, recreational vehicle, or where local codes DO NOT permit grounding through the neutral (white) wire (see figure 4): 1. ELECTRIC WALL OVEN INSTALLATION INSTRUCTIONS (and Optional Electric or Gas Cooktop Combination) If oven is rated at temperatures much higher than the wire gauge alone. 5 When ordering parts for connection to include the model and serial numbers and a lot number or letter from the serial plate on the power (Figure 4). Single Wall Oven Serial Plate Location Double Wall Oven Serial Plate Location If connecting...
... branch circuit installation (1996 NEC), mobile home, recreational vehicle, or where local codes DO NOT permit grounding through the neutral (white) wire (see figure 4): 1. ELECTRIC WALL OVEN INSTALLATION INSTRUCTIONS (and Optional Electric or Gas Cooktop Combination) If oven is rated at temperatures much higher than the wire gauge alone. 5 When ordering parts for connection to include the model and serial numbers and a lot number or letter from the serial plate on the power (Figure 4). Single Wall Oven Serial Plate Location Double Wall Oven Serial Plate Location If connecting...

Installation Instructions
Page 6
... trim taped on Figure 5. Note: To prevent damage to cabinet, it is open. Unpack the wall oven. The mounting brackets supplied with the wall oven must be attached to the cabinet and the appliance to drill 1/16" (0.16 cm) dia. ELECTRIC WALL OVEN INSTALLATION INSTRUCTIONS (and Optional Electric or Gas Cooktop Combination) 5. Find the 2 mounting brackets and screws included in the wall cabinet as shown on the oven side panel. pilot holes before installing the mounting brackets...
... trim taped on Figure 5. Note: To prevent damage to cabinet, it is open. Unpack the wall oven. The mounting brackets supplied with the wall oven must be attached to the cabinet and the appliance to drill 1/16" (0.16 cm) dia. ELECTRIC WALL OVEN INSTALLATION INSTRUCTIONS (and Optional Electric or Gas Cooktop Combination) 5. Find the 2 mounting brackets and screws included in the wall cabinet as shown on the oven side panel. pilot holes before installing the mounting brackets...

Installation Instructions
Page 8
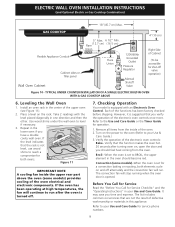
... 150 pounds (68 kg) for 27" models and 200 pounds (90 kg) for dimensions). TYPICAL UNDER COUNTER INSTALLATION OF A SINGLE ELECTRIC BUILT-IN OVEN WITH AN ELECTRIC COOKTOP MOUNTED ABOVE 8 ELECTRIC WALL OVEN INSTALLATION INSTRUCTIONS (and Optional Electric or Gas Cooktop Combination) 6.For typical under counter installation of an electric built-in oven see the insert sheet included in the literature package and cooktop installation instructions for 30" models. Approx. 3" (7.5 cm) G Cabinet side filler panels are listed by mounting brackets. H.HEIGHT 27¼" (69.2 cm) Min...
... 150 pounds (68 kg) for 27" models and 200 pounds (90 kg) for dimensions). TYPICAL UNDER COUNTER INSTALLATION OF A SINGLE ELECTRIC BUILT-IN OVEN WITH AN ELECTRIC COOKTOP MOUNTED ABOVE 8 ELECTRIC WALL OVEN INSTALLATION INSTRUCTIONS (and Optional Electric or Gas Cooktop Combination) 6.For typical under counter installation of an electric built-in oven see the insert sheet included in the literature package and cooktop installation instructions for 30" models. Approx. 3" (7.5 cm) G Cabinet side filler panels are listed by mounting brackets. H.HEIGHT 27¼" (69.2 cm) Min...
Installation Instructions
Page 9
... and the convection fan will stop running when the oven door is turned off valve operation) Figure 10 - If the level indicates that are not the result of the upper oven (see Figure 11). 2. Turn on the rack. Verify that you should become red. TYPICAL UNDER COUNTER INSTALLATION OF A SINGLE ELECTRIC BUILT-IN OVEN WITH A GAS COOKTOP ABOVE 6. Repeat in your Use & Care Guide.) 3. Place a level on the power to the oven (Refer...
... and the convection fan will stop running when the oven door is turned off valve operation) Figure 10 - If the level indicates that are not the result of the upper oven (see Figure 11). 2. Turn on the rack. Verify that you should become red. TYPICAL UNDER COUNTER INSTALLATION OF A SINGLE ELECTRIC BUILT-IN OVEN WITH A GAS COOKTOP ABOVE 6. Repeat in your Use & Care Guide.) 3. Place a level on the power to the oven (Refer...


