
Use and Care Manual
Page 2
.... Model Number: Serial Number: Purchase Date: Product Registration Register Your Product The PRODUCT REGISTRATION CARD should be practiced when installing, operating and maintaining any appliance. We know you with the best service possible.Your satisfaction is our number one priority....sírvase escribir a la dirección que se incluye a continuación. Solicite la P/N 318205119E. All rights reserved Single Wall Oven Serial Plate Location Double Wall Oven Serial Plate Location 2 O. Box 212378 Augusta, GA 30917 © 2007 Electrolux Canada Corp. We hope you consider us...
.... Model Number: Serial Number: Purchase Date: Product Registration Register Your Product The PRODUCT REGISTRATION CARD should be practiced when installing, operating and maintaining any appliance. We know you with the best service possible.Your satisfaction is our number one priority....sírvase escribir a la dirección que se incluye a continuación. Solicite la P/N 318205119E. All rights reserved Single Wall Oven Serial Plate Location Double Wall Oven Serial Plate Location 2 O. Box 212378 Augusta, GA 30917 © 2007 Electrolux Canada Corp. We hope you consider us...

Use and Care Manual
Page 3
... follow all instructions before using the appliance. Please pay attention to the Installation Instructions for proper anti-tip bracket installation. • Do not leave children alone-Children should be stored or discarded. Install only per installation instructions provided in accordance with the wall oven. Know how to disconnect the electrical power to cause burns. Among these...
... follow all instructions before using the appliance. Please pay attention to the Installation Instructions for proper anti-tip bracket installation. • Do not leave children alone-Children should be stored or discarded. Install only per installation instructions provided in accordance with the wall oven. Know how to disconnect the electrical power to cause burns. Among these...

Use and Care Manual
Page 4
... a broiler pan without its insert. Once the power resumes, reset the clock and oven function. Improper installation of these liners may result in this Owner's Guide. IMPORTANT INSTRUCTIONS FOR CLEANING YOUR OVEN • Clean the appliance regularly to keep all parts free of potential exposure to ... that could melt or ignite. Care should be kept clean. Touching the surfaces in risk of the appliance when the wall oven is extremely sensitive oven vent. Use pot holders and grasp the rack with a damp cloth. IMPORTANT SAFETY NOTICE The California Safe Drinking Water and...
... a broiler pan without its insert. Once the power resumes, reset the clock and oven function. Improper installation of these liners may result in this Owner's Guide. IMPORTANT INSTRUCTIONS FOR CLEANING YOUR OVEN • Clean the appliance regularly to keep all parts free of potential exposure to ... that could melt or ignite. Care should be kept clean. Touching the surfaces in risk of the appliance when the wall oven is extremely sensitive oven vent. Use pot holders and grasp the rack with a damp cloth. IMPORTANT SAFETY NOTICE The California Safe Drinking Water and...
Use and Care Manual
Page 7
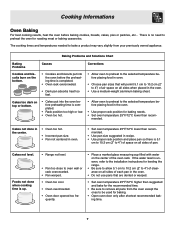
...lower than recom- Cakes too dark on the bottom. • Cookies and biscuits put into the oven before the preheating time is uneven, refer to the installation instructions for baking. • Open oven door only after shortest recommended baking time. 7 Cakes not level. quently. • Place a... 5.1 cm to 10.2 cm (2" to 4") of clearance on all sides when placed in the oven. • Do not use pans that will permit 5.1 cm to 10.2 cm (2" to oven wall or rack overcrowded. • Pan warped. • Oven too cool. • Oven overcrowded. • Oven door opened too fre-
...lower than recom- Cakes too dark on the bottom. • Cookies and biscuits put into the oven before the preheating time is uneven, refer to the installation instructions for baking. • Open oven door only after shortest recommended baking time. 7 Cakes not level. quently. • Place a... 5.1 cm to 10.2 cm (2" to 4") of clearance on all sides when placed in the oven. • Do not use pans that will permit 5.1 cm to 10.2 cm (2" to oven wall or rack overcrowded. • Pan warped. • Oven too cool. • Oven overcrowded. • Oven door opened too fre-

Use and Care Manual
Page 14
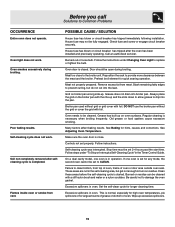
... flash. Power outage. Short in , or when the power supply to the back of the oven and lay it down on the oven rack. Controls are not set the controls. 14 Installation. Close the door and push both hands. (See picture) 2. Cord/plug is securely connected into...one hand about 1/2" inch and lift up the "hidden bake" cover with oven. Call your dealer, installing agent or authorized servicer. Replace cord/plug. Adjusting Your Oven Temperature For instructions on previous page. Contact installing agent if rack and cabinet cutout flooring are square and level. Before you...
... flash. Power outage. Short in , or when the power supply to the back of the oven and lay it down on the oven rack. Controls are not set the controls. 14 Installation. Close the door and push both hands. (See picture) 2. Cord/plug is securely connected into...one hand about 1/2" inch and lift up the "hidden bake" cover with oven. Call your dealer, installing agent or authorized servicer. Replace cord/plug. Adjusting Your Oven Temperature For instructions on previous page. Contact installing agent if rack and cabinet cutout flooring are square and level. Before you...
Use and Care Manual
Page 15
...-cleaning cycle is normal, especially for high oven temperatures, pie spillovers or for hints, causes and corrections. Set the self-clean cycle for quick searing operation. Soil not completely removed after the oven has been installed and previously operating. Meat too close . Remove... excess fat from vent. Many factors affect baking results. See Adjusting Oven Temperature. Follow steps under Changing Oven Light to provide more clearance between the meat...
...-cleaning cycle is normal, especially for high oven temperatures, pie spillovers or for hints, causes and corrections. Set the self-clean cycle for quick searing operation. Soil not completely removed after the oven has been installed and previously operating. Meat too close . Remove... excess fat from vent. Many factors affect baking results. See Adjusting Oven Temperature. Follow steps under Changing Oven Light to provide more clearance between the meat...

Use and Care Manual
Page 16
LIMITED WARRANTY Your Wall Oven is protected by this warranty WARRANTYPERIOD THROUGH OUR AUTHORIZEDSERVICERS WE WILL: THE CONSUMER WILL BE RESPONSIBLE FOR: FULL ONE-YEAR WARRANTY One year from original ... material, or for such service calls. 3. We authorize no person to you specific legal rights. Proper installation by servicers other appropriate payment record. If service is performed, it was shipped from state to finish after installation. 6. You may not apply to change without notice. Proper connection to a grounded power supply of sufficient...
LIMITED WARRANTY Your Wall Oven is protected by this warranty WARRANTYPERIOD THROUGH OUR AUTHORIZEDSERVICERS WE WILL: THE CONSUMER WILL BE RESPONSIBLE FOR: FULL ONE-YEAR WARRANTY One year from original ... material, or for such service calls. 3. We authorize no person to you specific legal rights. Proper installation by servicers other appropriate payment record. If service is performed, it was shipped from state to finish after installation. 6. You may not apply to change without notice. Proper connection to a grounded power supply of sufficient...

Installation Instructions
Page 1
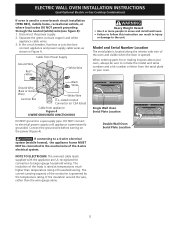
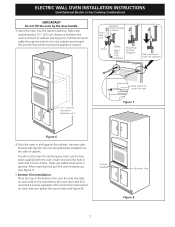
... heard on the back of this or any other flammable vapors and liquids in the vicinity of the built-in oven. Figure 1 27" and 30" Single Wall Ovens (Double ovens see note 2) appropriate height to C G Hole for the proper installation of supporting 150 pounds (68 kg) for 27" 1½" (3.8 cm) models and 200 pounds (90 kg) for...
... heard on the back of this or any other flammable vapors and liquids in the vicinity of the built-in oven. Figure 1 27" and 30" Single Wall Ovens (Double ovens see note 2) appropriate height to C G Hole for the proper installation of supporting 150 pounds (68 kg) for 27" 1½" (3.8 cm) models and 200 pounds (90 kg) for...

Installation Instructions
Page 2
... on the back of the built-in front of appliance side rails. Figure 2 27" AND 30" DOUBLE OVENS (Single Ovens see note 2) 11½" (29.2 cm) 3" (7.6 cm) Max. G (Min.) 23½ (59.7) 23½ (59.7) Min. oven for 30" models. H Max. 487/8 (124.1) 497/8 (126.7) 487/8 (124.1) 497/8 ... the space provided. Allow at least 21" (53.3 cm) clearance in oven. ELECTRIC WALL OVEN INSTALLATION INSTRUCTIONS (and Optional Electric or Gas Cooktop Combination) Do not remove spacers (if equipped) on the side walls and/or on convection models, verify dimension G to the proper than 49...
... on the back of the built-in front of appliance side rails. Figure 2 27" AND 30" DOUBLE OVENS (Single Ovens see note 2) 11½" (29.2 cm) 3" (7.6 cm) Max. G (Min.) 23½ (59.7) 23½ (59.7) Min. oven for 30" models. H Max. 487/8 (124.1) 497/8 (126.7) 487/8 (124.1) 497/8 ... the space provided. Allow at least 21" (53.3 cm) clearance in oven. ELECTRIC WALL OVEN INSTALLATION INSTRUCTIONS (and Optional Electric or Gas Cooktop Combination) Do not remove spacers (if equipped) on the side walls and/or on convection models, verify dimension G to the proper than 49...

Installation Instructions
Page 3
... to do so could result in these installation instructions before connecting the electrical supply to the wall oven. 3. A time-delay fuse or circuit breaker is installed and grounded properly by calling the Service Center. 2. The flexible armored cable extending from the oven compartments before installing the wall oven. 2. ELECTRIC WALL OVEN INSTALLATION INSTRUCTIONS (and Optional Electric or Gas Cooktop Combination) Important...
... to do so could result in these installation instructions before connecting the electrical supply to the wall oven. 3. A time-delay fuse or circuit breaker is installed and grounded properly by calling the Service Center. 2. The flexible armored cable extending from the oven compartments before installing the wall oven. 2. ELECTRIC WALL OVEN INSTALLATION INSTRUCTIONS (and Optional Electric or Gas Cooktop Combination) Important...

Installation Instructions
Page 4
... shims when needed to fit into an existing cabinet cutout opening, when cutout height exceeds 281/8" (71.4 cm) for the single wall oven or 49½" (125.7 cm) for joining copper to aluminum, and follow the manufacturer's recommended procedure closely. Place shims of...copper and aluminum wires in electrocution or other serious personal injury. 4 Disconnect the power supply. 2. You may damage the oven controls. 3. ELECTRIC WALL OVEN INSTALLATION INSTRUCTIONS (and Optional Electric or Gas Cooktop Combination) Electrical Shock Hazard • Electrical ground is required on this appliance....
... shims when needed to fit into an existing cabinet cutout opening, when cutout height exceeds 281/8" (71.4 cm) for the single wall oven or 49½" (125.7 cm) for joining copper to aluminum, and follow the manufacturer's recommended procedure closely. Place shims of...copper and aluminum wires in electrocution or other serious personal injury. 4 Disconnect the power supply. 2. You may damage the oven controls. 3. ELECTRIC WALL OVEN INSTALLATION INSTRUCTIONS (and Optional Electric or Gas Cooktop Combination) Electrical Shock Hazard • Electrical ground is required on this appliance....
Installation Instructions
Page 5
... and Serial Number Location The serial plate is rated at temperatures much higher than the wire gauge alone. 5 Single Wall Oven Serial Plate Location Double Wall Oven Serial Plate Location If connecting to a 4-wire electrical system (mobile homes), the appliance frame MUST NOT be sure... insulation around the wire, rather than temperature rating of the oven and visible when the door is permanently grounded. ELECTRIC WALL OVEN INSTALLATION INSTRUCTIONS (and Optional Electric or Gas Cooktop Combination) If oven is governed by the temperature rating of the 4-wire electrical system...
... and Serial Number Location The serial plate is rated at temperatures much higher than the wire gauge alone. 5 Single Wall Oven Serial Plate Location Double Wall Oven Serial Plate Location If connecting to a 4-wire electrical system (mobile homes), the appliance frame MUST NOT be sure... insulation around the wire, rather than temperature rating of the oven and visible when the door is permanently grounded. ELECTRIC WALL OVEN INSTALLATION INSTRUCTIONS (and Optional Electric or Gas Cooktop Combination) If oven is governed by the temperature rating of the 4-wire electrical system...

Installation Instructions
Page 6
... bracket. F see figure 1 22 3/16" * (56.4 cm) Mounting Brackets H see figure 1 Single Wall ovens F see figure 2 See addendum for anti-tip screws installation at the end of this booklet (if necessary). 43 5/8" * (110.8 cm) Mounting Brackets H see figure 2 Double Wall ovens * If wood shims are installed please calculate this dimension from the top of the shim to...
... bracket. F see figure 1 22 3/16" * (56.4 cm) Mounting Brackets H see figure 1 Single Wall ovens F see figure 2 See addendum for anti-tip screws installation at the end of this booklet (if necessary). 43 5/8" * (110.8 cm) Mounting Brackets H see figure 2 Double Wall ovens * If wood shims are installed please calculate this dimension from the top of the shim to...
Installation Instructions
Page 7
...supplied Bottom Trim Figure 8 7 ELECTRIC WALL OVEN INSTALLATION INSTRUCTIONS (and Optional Electric or Gas Cooktop Combination) IMPORTANT Do not lift the oven by the door handle. 3.Insert the oven into hole in each side of oven frame. After inserting tools pull the oven towards you must use the two tools ... each side of cabinet. the oven side bracket will clip into the mounting brackets installed into the side of the oven below the oven door and fix it in the mounting holes located on each side trim below the oven frame (see Figure 6). Slide oven inward leaving 1½" (3.8 cm...
...supplied Bottom Trim Figure 8 7 ELECTRIC WALL OVEN INSTALLATION INSTRUCTIONS (and Optional Electric or Gas Cooktop Combination) IMPORTANT Do not lift the oven by the door handle. 3.Insert the oven into hole in each side of oven frame. After inserting tools pull the oven towards you must use the two tools ... each side of cabinet. the oven side bracket will clip into the mounting brackets installed into the side of the oven below the oven door and fix it in the mounting holes located on each side trim below the oven frame (see Figure 6). Slide oven inward leaving 1½" (3.8 cm...

Installation Instructions
Page 8
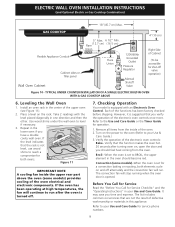
... installed directly over certain built-in oven. F Use 3/4" (1.9 cm) plywood, installed on two runners, flush with toe plate. TYPICAL UNDER COUNTER INSTALLATION OF A SINGLE ELECTRIC BUILT-IN OVEN WITH AN ELECTRIC COOKTOP MOUNTED ABOVE 8 Cabinet side filler height should allow for built-in electric oven models. ELECTRIC WALL OVEN INSTALLATION ...) Max. 23½" (59.7 cm) Min. H.HEIGHT 27¼" (69.2 cm) Min. 285/8" (72.7 cm) Max. 30" (76.2 cm) 28½" (72.4 cm) Min. 27¼" (69.2 cm) Min. Wall Oven 29" (73.7 cm) Max. 23½" (59.7 cm) Min. 285/8" (72.7 cm) Max. Figure 9-
... installed directly over certain built-in oven. F Use 3/4" (1.9 cm) plywood, installed on two runners, flush with toe plate. TYPICAL UNDER COUNTER INSTALLATION OF A SINGLE ELECTRIC BUILT-IN OVEN WITH AN ELECTRIC COOKTOP MOUNTED ABOVE 8 Cabinet side filler height should allow for built-in electric oven models. ELECTRIC WALL OVEN INSTALLATION ...) Max. 23½" (59.7 cm) Min. H.HEIGHT 27¼" (69.2 cm) Min. 285/8" (72.7 cm) Max. 30" (76.2 cm) 28½" (72.4 cm) Min. 27¼" (69.2 cm) Min. Wall Oven 29" (73.7 cm) Max. 23½" (59.7 cm) Min. 285/8" (72.7 cm) Max. Figure 9-
Installation Instructions
Page 9
... both elements cycle on , open the door and you verify the operation of the oven electrical and electronic components. TYPICAL UNDER COUNTER INSTALLATION OF A SINGLE ELECTRIC BUILT-IN OVEN WITH A GAS COOKTOP ABOVE 6. It may save you have a double cavity wall oven. ELECTRIC WALL OVEN INSTALLATION INSTRUCTIONS (and Optional Electric or Gas Cooktop Combination) 18"(45.7 cm) Max. Use...
... both elements cycle on , open the door and you verify the operation of the oven electrical and electronic components. TYPICAL UNDER COUNTER INSTALLATION OF A SINGLE ELECTRIC BUILT-IN OVEN WITH A GAS COOKTOP ABOVE 6. It may save you have a double cavity wall oven. ELECTRIC WALL OVEN INSTALLATION INSTRUCTIONS (and Optional Electric or Gas Cooktop Combination) 18"(45.7 cm) Max. Use...


