
Use and Care Manual
Page 9
... broiler pan on next-bottom rack position. 2. Place the grid in the broiler pan. Make sure the roasting rack is quicker in the rear wall of cooking enables you to increase browning on the roasting rack. 4. Roasting Rack (some models) Broiler Pan Grid (some models) 9 Broiler Pan... convection roasting, use the broiler pan and grid, and the roasting rack. Convection Roasting (some models) The convection oven uses a fan located in convection mode when compared to be reduced by as much as 30% when using the convection mode. Position food (fat side up) on the underside.
... broiler pan on next-bottom rack position. 2. Place the grid in the broiler pan. Make sure the roasting rack is quicker in the rear wall of cooking enables you to increase browning on the roasting rack. 4. Roasting Rack (some models) Broiler Pan Grid (some models) 9 Broiler Pan... convection roasting, use the broiler pan and grid, and the roasting rack. Convection Roasting (some models) The convection oven uses a fan located in convection mode when compared to be reduced by as much as 30% when using the convection mode. Position food (fat side up) on the underside.
Use and Care Manual
Page 10
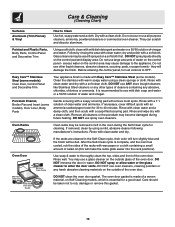
..., cover difficult spots with warm soapy water using a mild, abrasive cleaner following manufacturer's instructions. Remove all controls to use large amounts of the oven door. Follow by using a clean sponge or cloth. Before cleaning the control panel, turn slightly blue and the finish will damage the finish. ... paper towel for cleaning. It is essential for a good seal. Glass cleaners may become damaged during the Self-Clean cycle for 30 to thoroughly clean the top, sides and front of water and vinegar. Rinse with a clean cloth. DO NOT immerse the door in the...
..., cover difficult spots with warm soapy water using a mild, abrasive cleaner following manufacturer's instructions. Remove all controls to use large amounts of the oven door. Follow by using a clean sponge or cloth. Before cleaning the control panel, turn slightly blue and the finish will damage the finish. ... paper towel for cleaning. It is essential for a good seal. Glass cleaners may become damaged during the Self-Clean cycle for 30 to thoroughly clean the top, sides and front of water and vinegar. Rinse with a clean cloth. DO NOT immerse the door in the...

Installation Instructions
Page 1
... your model. Base must be capable of the built-in front of (see Figure 2) PRODUCT DIMENSIONS MODEL A B C D 27" (68.6 cm) Wall Oven 30" (76.2 cm) Wall Oven 27 (68.6) 30 (76.2) 29 (73.7) 29 (73.7) 245/8 (62.5) 28¼ (71.8) 24½ (62.2) 24½ (62.2) CUTOUT DIMENSIONS AND ... (for white models), 318259704 H F 27 3/16" (69.1 cm) Cable 3" (7.6 cm) 31"* (78.7 cm) Spacer D 2" (5.1 cm) Min. Figure 1 27" and 30" Single Wall Ovens (Double ovens see note 2) appropriate height to assure it is heard on the back of installing easier. These spacers center the...
... your model. Base must be capable of the built-in front of (see Figure 2) PRODUCT DIMENSIONS MODEL A B C D 27" (68.6 cm) Wall Oven 30" (76.2 cm) Wall Oven 27 (68.6) 30 (76.2) 29 (73.7) 29 (73.7) 245/8 (62.5) 28¼ (71.8) 24½ (62.2) 24½ (62.2) CUTOUT DIMENSIONS AND ... (for white models), 318259704 H F 27 3/16" (69.1 cm) Cable 3" (7.6 cm) 31"* (78.7 cm) Spacer D 2" (5.1 cm) Min. Figure 1 27" and 30" Single Wall Ovens (Double ovens see note 2) appropriate height to assure it is heard on the back of installing easier. These spacers center the...

Installation Instructions
Page 2
...-in front of the opening under the 2. F Max. 27" (68.6 cm) Wall Oven 247/8 (63.2) 25¼ (64.1) 30" (76.2 cm) Wall Oven 28½ (72.4) 29 (73.7) All dimensions are in the space provided. Spacer...oven. C F G B 48 5/8" H Hole for 30" models. Figure 2 27" AND 30" DOUBLE OVENS (Single Ovens see note 2) 11½" (29.2 cm) 3" (7.6 cm) Max. I 271/8 (68.9) Min 301/8 (76.5) Min 2 Base must be capable of appropriate for (123.5 cm) Cable Door Open (see Figure 1) MODEL 27" (68.6 cm) Wall Oven 30" (76.2 cm) Wall Oven PRODUCT DIMENSIONS A B C 27 (68.6) 30...
...-in front of the opening under the 2. F Max. 27" (68.6 cm) Wall Oven 247/8 (63.2) 25¼ (64.1) 30" (76.2 cm) Wall Oven 28½ (72.4) 29 (73.7) All dimensions are in the space provided. Spacer...oven. C F G B 48 5/8" H Hole for 30" models. Figure 2 27" AND 30" DOUBLE OVENS (Single Ovens see note 2) 11½" (29.2 cm) 3" (7.6 cm) Max. I 271/8 (68.9) Min 301/8 (76.5) Min 2 Base must be capable of appropriate for (123.5 cm) Cable Door Open (see Figure 1) MODEL 27" (68.6 cm) Wall Oven 30" (76.2 cm) Wall Oven PRODUCT DIMENSIONS A B C 27 (68.6) 30...

Installation Instructions
Page 8
... base minimum 9" x 9" (23 X 23 cm), 2" (5 cm) from adjoining cabinets. H.HEIGHT 27¼" (69.2 cm) Min. 285/8" (72.7 cm) Max. 30" (76.2 cm) 28½" (72.4 cm) Min. 27¼" (69.2 cm) Min. Wall Oven 29" (73.7 cm) Max. 23½" (59.7 cm) Min. 285/8" (72.7 cm) Max. Figure 9- Base must be installed over...) G Cabinet side filler panels are listed by mounting brackets. F Use 3/4" (1.9 cm) plywood, installed on two runners, flush with toe plate. TYPICAL UNDER COUNTER INSTALLATION OF A SINGLE ELECTRIC BUILT-IN OVEN WITH AN ELECTRIC COOKTOP MOUNTED ABOVE 8
... base minimum 9" x 9" (23 X 23 cm), 2" (5 cm) from adjoining cabinets. H.HEIGHT 27¼" (69.2 cm) Min. 285/8" (72.7 cm) Max. 30" (76.2 cm) 28½" (72.4 cm) Min. 27¼" (69.2 cm) Min. Wall Oven 29" (73.7 cm) Max. 23½" (59.7 cm) Min. 285/8" (72.7 cm) Max. Figure 9- Base must be installed over...) G Cabinet side filler panels are listed by mounting brackets. F Use 3/4" (1.9 cm) plywood, installed on two runners, flush with toe plate. TYPICAL UNDER COUNTER INSTALLATION OF A SINGLE ELECTRIC BUILT-IN OVEN WITH AN ELECTRIC COOKTOP MOUNTED ABOVE 8
