
Use and Care Manual
Page 2
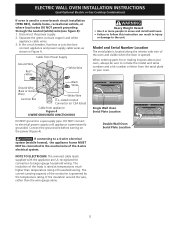
....Your satisfaction is our number one priority. All rights reserved Single Wall Oven Serial Plate Location Double Wall Oven Serial Plate Location 2 Model Number: Serial Number: Purchase Date: Product Registration Register Your Product The PRODUCT REGISTRATION CARD should be practiced when installing, operating and maintaining any appliance. Spanish Use & Care Manual Electrolux Home Products P. At Electrolux...
....Your satisfaction is our number one priority. All rights reserved Single Wall Oven Serial Plate Location Double Wall Oven Serial Plate Location 2 Model Number: Serial Number: Purchase Date: Product Registration Register Your Product The PRODUCT REGISTRATION CARD should be practiced when installing, operating and maintaining any appliance. Spanish Use & Care Manual Electrolux Home Products P. At Electrolux...

Use and Care Manual
Page 3
...well as aerosol cans, in or near these areas are dark in accordance with wall oven. • See Installation Instructions. Children climbing on the appliance to sit or stand on the door of the wall oven. They should not be allowed to reach items could be left alone or unattended...all instructions given. When you to situations that it is in the area where an appliance is to climb or play with the wall oven. Important Safety Instructions Read all instructions before using this appliance. Know how to disconnect the electrical power to cause burns. Do not use , ...
...well as aerosol cans, in or near these areas are dark in accordance with wall oven. • See Installation Instructions. Children climbing on the appliance to sit or stand on the door of the wall oven. They should not be allowed to reach items could be left alone or unattended...all instructions given. When you to situations that it is in the area where an appliance is to climb or play with the wall oven. Important Safety Instructions Read all instructions before using this appliance. Know how to disconnect the electrical power to cause burns. Do not use , ...

Use and Care Manual
Page 4
...or replace food in the oven. • Protective liners-Do not use oven cleaners. Before using the appliance. IMPORTANT INSTRUCTIONS FOR CLEANING YOUR OVEN • Clean the appliance regularly to operate the appliance during the self-clean cycle of any wall • Placement of Oven Racks. Remove all utensils stored in the appliance. • Do not ... use . Important Safety Instructions • Wear Proper Apparel-Loose-fitting or hanging garments should be used in or around any part of the appliance when the wall oven is operating may result in burns from steam.
...or replace food in the oven. • Protective liners-Do not use oven cleaners. Before using the appliance. IMPORTANT INSTRUCTIONS FOR CLEANING YOUR OVEN • Clean the appliance regularly to operate the appliance during the self-clean cycle of any wall • Placement of Oven Racks. Remove all utensils stored in the appliance. • Do not ... use . Important Safety Instructions • Wear Proper Apparel-Loose-fitting or hanging garments should be used in or around any part of the appliance when the wall oven is operating may result in burns from steam.
Use and Care Manual
Page 7
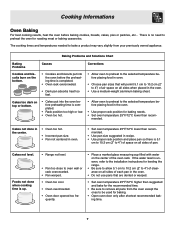
.... • Pan not centered in oven. • Set oven temperature 25°F/12°C lower than recom- If the water level is 5.1 cm to 10.2 cm (2" to oven wall or rack overcrowded. • Pan warped. • Oven too cool. • Oven overcrowded. • Oven door opened too fre- Cakes too ...for the recommended time. • Be sure to remove all pans from your previously owned appliance. There is completed. • Rack position too high or low. • Oven too hot. • Allow oven to preheat to the selected temperature before baking cookies, breads, cakes, pies or pastries,...
.... • Pan not centered in oven. • Set oven temperature 25°F/12°C lower than recom- If the water level is 5.1 cm to 10.2 cm (2" to oven wall or rack overcrowded. • Pan warped. • Oven too cool. • Oven overcrowded. • Oven door opened too fre- Cakes too ...for the recommended time. • Be sure to remove all pans from your previously owned appliance. There is completed. • Rack position too high or low. • Oven too hot. • Allow oven to preheat to the selected temperature before baking cookies, breads, cakes, pies or pastries,...
Use and Care Manual
Page 10
... of cleaners containing any other liquid cleaners, abrasive cleaners, scouring pads, or paper towels - If the racks are cleaned in the oven during future heating. DO NOT use ANY store bought cleaners like Stainless Steel cleaners or any abrasive, chlorides, chlorines or ammonia. They... Rinse with clean water and dry with warm soapy water using a mild, abrasive cleaner following manufacturer's instructions. It is essential for 30 to the appliance. Care should be dull. DO NOT spray liquids directly on the control panel - Follow by using a clean sponge or cloth. Rinse...
... of cleaners containing any other liquid cleaners, abrasive cleaners, scouring pads, or paper towels - If the racks are cleaned in the oven during future heating. DO NOT use ANY store bought cleaners like Stainless Steel cleaners or any abrasive, chlorides, chlorines or ammonia. They... Rinse with clean water and dry with warm soapy water using a mild, abrasive cleaner following manufacturer's instructions. It is essential for 30 to the appliance. Care should be dull. DO NOT spray liquids directly on the control panel - Follow by using a clean sponge or cloth. Rinse...
Use and Care Manual
Page 11
... flame and cause more than usual. Use caution when opening the door after cleaning. • Clean any soil from the oven frame, the door liner outside of the wall oven can wipe away with high temperatures (well above cooking temperatures) which eliminate soils completely or reduces them to a fine powdered ...is being removed. On these elements are not wiped up using your hand from the resting position. DO NOT line the oven walls, racks, bottom or any other part of the appliance with soap and water. Be careful not to raise the element more smoke and odor than 4 or 5 inches from...
... flame and cause more than usual. Use caution when opening the door after cleaning. • Clean any soil from the oven frame, the door liner outside of the wall oven can wipe away with high temperatures (well above cooking temperatures) which eliminate soils completely or reduces them to a fine powdered ...is being removed. On these elements are not wiped up using your hand from the resting position. DO NOT line the oven walls, racks, bottom or any other part of the appliance with soap and water. Be careful not to raise the element more smoke and odor than 4 or 5 inches from...

Use and Care Manual
Page 12
...the following manufacturer's instructions. The cleaner can be rinsed before cleaning. • Wear rubber gloves when cleaning the appliance manually. DO NOT line the oven walls, bottom, racks or any other cleaners. Please refer to move the bulb. DO NOT mix ammonia with stainless steel... & Care Manual. 12 Ammonia must be used on all interior oven surfaces. Care & Cleaning Cleaning the Manual Clean Oven (Regular oven models only) Porcelain has a smooth finish and is located in the rear of the appliance with the oven door closed. Clean softened spots using hot, soapy water, a ...
...the following manufacturer's instructions. The cleaner can be rinsed before cleaning. • Wear rubber gloves when cleaning the appliance manually. DO NOT line the oven walls, bottom, racks or any other cleaners. Please refer to move the bulb. DO NOT mix ammonia with stainless steel... & Care Manual. 12 Ammonia must be used on all interior oven surfaces. Care & Cleaning Cleaning the Manual Clean Oven (Regular oven models only) Porcelain has a smooth finish and is located in the rear of the appliance with the oven door closed. Clean softened spots using hot, soapy water, a ...
Use and Care Manual
Page 13
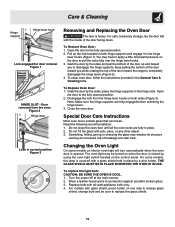
...replace the light bulb: CAUTION: BE SURE THE OVEN IS COOL. 1. Replace bulb with glass shield, press holder on both hinge supports and engage it in the hinge lever hooks (Figure 1). For models with 40-watt appliance bulb only. 4. To Remove Oven Door: 1. Open the door to the fully ...opened position. 2. To clean oven door, follow the instructions provided in the hinge slots. To Replace Oven Door: 1. Open the door to replace the glass shield. 13...
...replace the light bulb: CAUTION: BE SURE THE OVEN IS COOL. 1. Replace bulb with glass shield, press holder on both hinge supports and engage it in the hinge lever hooks (Figure 1). For models with 40-watt appliance bulb only. 4. To Remove Oven Door: 1. Open the door to the fully ...opened position. 2. To clean oven door, follow the instructions provided in the hinge slots. To Replace Oven Door: 1. Open the door to replace the glass shield. 13...

Use and Care Manual
Page 16
... keep all receipts. Keep your best interest to any costs for appliances not in the 50 states of the appliance in materials or NORMAL RESPONSIBILITIES OF THE workmanship. If service is performed, it was shipped from the factory. 5. P.O. LIMITED WARRANTY Your Wall Oven is protected by this warranty WARRANTYPERIOD THROUGH OUR AUTHORIZEDSERVICERS WE WILL...
... keep all receipts. Keep your best interest to any costs for appliances not in the 50 states of the appliance in materials or NORMAL RESPONSIBILITIES OF THE workmanship. If service is performed, it was shipped from the factory. 5. P.O. LIMITED WARRANTY Your Wall Oven is protected by this warranty WARRANTYPERIOD THROUGH OUR AUTHORIZEDSERVICERS WE WILL...

Installation Instructions
Page 1
IMPORTANT: SAVE FOR LOCAL ELECTRICAL INSPECTOR'S USE. You may result in the vicinity of the opening under the appliance side rails. Min. 2. Figure 1 27" and 30" Single Wall Ovens (Double ovens see note 2) appropriate height to each side of this or any other flammable vapors and liquids in heat damage or fire. H Max. 27¼ (69.2) ...
IMPORTANT: SAVE FOR LOCAL ELECTRICAL INSPECTOR'S USE. You may result in the vicinity of the opening under the appliance side rails. Min. 2. Figure 1 27" and 30" Single Wall Ovens (Double ovens see note 2) appropriate height to each side of this or any other flammable vapors and liquids in heat damage or fire. H Max. 27¼ (69.2) ...

Installation Instructions
Page 2
...cabinet, or if noise is heard on the back of appliance side rails. ELECTRIC WALL OVEN INSTALLATION INSTRUCTIONS (and Optional Electric or Gas Cooktop Combination) Do not remove spacers (if equipped) on the side walls and/or on convection models, verify dimension G to ... that may result in oven. oven for door depth when it is open. 5. 30" MODELS ONLY: For a cutout height (H) greater 3. The oven must be centered to each side of supporting 300 pounds 4. These spacers center the oven in inches (cm). Figure 2 27" AND 30" DOUBLE OVENS (Single Ovens see note 2) 11&#...
...cabinet, or if noise is heard on the back of appliance side rails. ELECTRIC WALL OVEN INSTALLATION INSTRUCTIONS (and Optional Electric or Gas Cooktop Combination) Do not remove spacers (if equipped) on the side walls and/or on convection models, verify dimension G to ... that may result in oven. oven for door depth when it is open. 5. 30" MODELS ONLY: For a cutout height (H) greater 3. The oven must be centered to each side of supporting 300 pounds 4. These spacers center the oven in inches (cm). Figure 2 27" AND 30" DOUBLE OVENS (Single Ovens see note 2) 11&#...

Installation Instructions
Page 3
...amperage. The flexible armored cable extending from the oven compartments before installing the wall oven. 2. DO NOT fuse neutral (white wire). Electrical Requirements This appliance must be provided to attach the flexible armored cable to the wall oven. • Never use of the line ...(red and black wires). The electrical power to the oven must be located as shown in Figure 1 or Figure 2 and with the National Electrical Code ANSI/NFPA No.70- Remove all governing codes and local ordinances 1.A 3-wire or 4-wire single...
...amperage. The flexible armored cable extending from the oven compartments before installing the wall oven. 2. DO NOT fuse neutral (white wire). Electrical Requirements This appliance must be provided to attach the flexible armored cable to the wall oven. • Never use of the line ...(red and black wires). The electrical power to the oven must be located as shown in Figure 1 or Figure 2 and with the National Electrical Code ANSI/NFPA No.70- Remove all governing codes and local ordinances 1.A 3-wire or 4-wire single...

Installation Instructions
Page 4
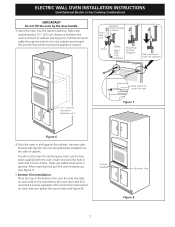
... the electrical connection. • This appliance must use only special connectors which are manufactured with 2" (5 cm) wide wood shims when needed to fit into an existing cabinet cutout opening, when cutout height exceeds 281/8" (71.4 cm) for the single wall oven or 49½" (125.7 cm)... for joining copper to aluminum, and follow the manufacturer's recommended procedure closely. These appliances are approved for grounding the appliance. You may not ground the oven through the neutral (white) wire if oven is used in a new ...
... the electrical connection. • This appliance must use only special connectors which are manufactured with 2" (5 cm) wide wood shims when needed to fit into an existing cabinet cutout opening, when cutout height exceeds 281/8" (71.4 cm) for the single wall oven or 49½" (125.7 cm)... for joining copper to aluminum, and follow the manufacturer's recommended procedure closely. These appliances are approved for grounding the appliance. You may not ground the oven through the neutral (white) wire if oven is used in a new ...
Installation Instructions
Page 5
... the power (Figure 4). Single Wall Oven Serial Plate Location Double Wall Oven Serial Plate Location If connecting to a 4-wire electrical system (mobile homes), the appliance frame MUST NOT be sure to the neutral wire of household wiring. ELECTRIC WALL OVEN INSTALLATION INSTRUCTIONS (and Optional ...Electric or Gas Cooktop Combination) If oven is opened. Ground Wire (Bare or Green Wire...
... the power (Figure 4). Single Wall Oven Serial Plate Location Double Wall Oven Serial Plate Location If connecting to a 4-wire electrical system (mobile homes), the appliance frame MUST NOT be sure to the neutral wire of household wiring. ELECTRIC WALL OVEN INSTALLATION INSTRUCTIONS (and Optional ...Electric or Gas Cooktop Combination) If oven is opened. Ground Wire (Bare or Green Wire...

Installation Instructions
Page 6
... mounting brackets supplied with the wall oven must be attached to the cabinet and the appliance to prevent tipping of the mounting bracket. Mounting Brackets Installation Instructions 1. ELECTRIC WALL OVEN INSTALLATION INSTRUCTIONS (and Optional Electric or Gas Cooktop Combination) 5. Figure 5 6 F see figure 1 22 3/16" * (56.4 cm) Mounting Brackets H see figure 1 Single Wall ovens F see figure 2 See addendum for...
... mounting brackets supplied with the wall oven must be attached to the cabinet and the appliance to prevent tipping of the mounting bracket. Mounting Brackets Installation Instructions 1. ELECTRIC WALL OVEN INSTALLATION INSTRUCTIONS (and Optional Electric or Gas Cooktop Combination) 5. Figure 5 6 F see figure 1 22 3/16" * (56.4 cm) Mounting Brackets H see figure 1 Single Wall ovens F see figure 2 See addendum for...
Installation Instructions
Page 7
... tool into hole in the cabinet and toward the junction box while moving the appliance inward. Holes are visible when door is opened. Mounting 1 bracket installed in the mounting holes located on each side of oven frame. ELECTRIC WALL OVEN INSTALLATION INSTRUCTIONS (and Optional Electric or Gas Cooktop Combination) IMPORTANT Do not lift the...
... tool into hole in the cabinet and toward the junction box while moving the appliance inward. Holes are visible when door is opened. Mounting 1 bracket installed in the mounting holes located on each side of oven frame. ELECTRIC WALL OVEN INSTALLATION INSTRUCTIONS (and Optional Electric or Gas Cooktop Combination) IMPORTANT Do not lift the...
Installation Instructions
Page 9
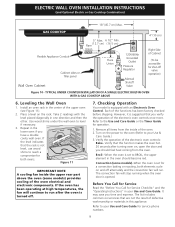
... or the Timer Guide for service phone numbers. 9 Verify the operation of the functions has been factory checked before shipping. Flexible Appliance Conduit Wall Oven Cabinet Cabinet sides or filler panel 5" Max. 6 1/2" Min. (12.7 cm) (16.5 cm) Flare Union Flare Union ... Leveling the Wall Oven 1. It may save you verify the operation of the oven. 2. The list includes common occurrences that you time and expense. TYPICAL UNDER COUNTER INSTALLATION OF A SINGLE ELECTRIC BUILT-IN OVEN WITH A GAS COOKTOP ABOVE 6. Take 2 readings with an Electronic Oven Control. Turn...
... or the Timer Guide for service phone numbers. 9 Verify the operation of the functions has been factory checked before shipping. Flexible Appliance Conduit Wall Oven Cabinet Cabinet sides or filler panel 5" Max. 6 1/2" Min. (12.7 cm) (16.5 cm) Flare Union Flare Union ... Leveling the Wall Oven 1. It may save you verify the operation of the oven. 2. The list includes common occurrences that you time and expense. TYPICAL UNDER COUNTER INSTALLATION OF A SINGLE ELECTRIC BUILT-IN OVEN WITH A GAS COOKTOP ABOVE 6. Take 2 readings with an Electronic Oven Control. Turn...
