Complete Owner's Guide (English)
Page 1
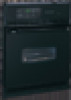
A Electric Wall Oven CONTENTS Page Product Registration 2 Important Safety Instructions 3-4 Before Setting Oven Controls 4 Setting Oven Controls 4 Oven Door Bracket Adjustment 5 Convection Cooking 5 Convection Roasting 5 Air Circulation in the Oven 5 Oven Baking 6 Broiling 7 Oven Cleaning 8-9 General Cleaning 10-11 Changing Oven Light 11 Adjusting Oven Temperature 11 Avoid Service Checklist 12-13 Notes 14-15 Warranty 16 318205114 (0703) Rev.
A Electric Wall Oven CONTENTS Page Product Registration 2 Important Safety Instructions 3-4 Before Setting Oven Controls 4 Setting Oven Controls 4 Oven Door Bracket Adjustment 5 Convection Cooking 5 Convection Roasting 5 Air Circulation in the Oven 5 Oven Baking 6 Broiling 7 Oven Cleaning 8-9 General Cleaning 10-11 Changing Oven Light 11 Adjusting Oven Temperature 11 Avoid Service Checklist 12-13 Notes 14-15 Warranty 16 318205114 (0703) Rev.
Complete Owner's Guide (English)
Page 3
...• Remove all instructions given. door of the appliance. • DO NOT TOUCH INTERIOR OVEN ELEMENTS OR INTERIOR SURFACES OF THE WALL OVEN UNTIL THEY HAVE COOLED. IMPORTANT INSTRUCTIONS FOR USING YOUR OVEN • Storage in or on any other servicing should never be left alone or unattended in...holders on the pressure may cause severe burns. When you remove or replace food in this appliance can be stored in the manuals. The wall oven is properly installed and grounded by cold temperatures. Also, do not touch, or let clothing or other bulky cloth instead of a pot ...
...• Remove all instructions given. door of the appliance. • DO NOT TOUCH INTERIOR OVEN ELEMENTS OR INTERIOR SURFACES OF THE WALL OVEN UNTIL THEY HAVE COOLED. IMPORTANT INSTRUCTIONS FOR USING YOUR OVEN • Storage in or on any other servicing should never be left alone or unattended in...holders on the pressure may cause severe burns. When you remove or replace food in this appliance can be stored in the manuals. The wall oven is properly installed and grounded by cold temperatures. Also, do not touch, or let clothing or other bulky cloth instead of a pot ...
Complete Owner's Guide (English)
Page 4
...the appliance, remove all utensils from the high heat of the broiler. • Do not cover broiler grid or oven bottom with a damp cloth. Always use extreme caution. Doing so could catch fire. Care should be used in ...clean cycle of the appliance listed in or around any wall oven. Lift up front of the oven. • Do not use oven cleaners. Do not let pot holders contact the hot oven element or interior of rack and slide out. Move ... insert. Broiler pan and grid allow grease to another well ventilated room. When the oven is on the oven walls.
...the appliance, remove all utensils from the high heat of the broiler. • Do not cover broiler grid or oven bottom with a damp cloth. Always use extreme caution. Doing so could catch fire. Care should be used in ...clean cycle of the appliance listed in or around any wall oven. Lift up front of the oven. • Do not use oven cleaners. Do not let pot holders contact the hot oven element or interior of rack and slide out. Move ... insert. Broiler pan and grid allow grease to another well ventilated room. When the oven is on the oven walls.
Complete Owner's Guide (English)
Page 5
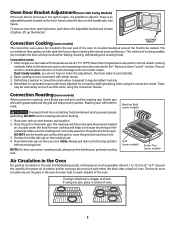
... tender meats. Position food (fat side up the bracket. Convection Cooking (some models) The convection oven uses a fan located in the rear wall of the oven to circulate heated air around the pans in the oven and best baking results, center pans as much as 30% when using multiple pans, stagger as ...possible. Most recipes can result in the broiler pan. Allow 5.1 to 10.2cm (2" to reach all parts of oven. If ...
... tender meats. Position food (fat side up the bracket. Convection Cooking (some models) The convection oven uses a fan located in the rear wall of the oven to circulate heated air around the pans in the oven and best baking results, center pans as much as 30% when using multiple pans, stagger as ...possible. Most recipes can result in the broiler pan. Allow 5.1 to 10.2cm (2" to reach all parts of oven. If ...
Complete Owner's Guide (English)
Page 6
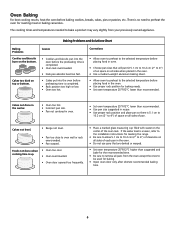
...and temperatures needed to oven wall or rack overcrowded. • Pan warped. Corrections • Allow oven to preheat to the selected temperature before placing food in the oven. • Use a medium-weight aluminum baking sheet. • Allow oven to preheat to 4") of air space on the center of the oven rack. Cakes not ... time. • Be sure to remove all pans from your previously owned appliance. Cakes too dark on all sides of each pan in the oven. • Do not use pans that will permit 5.1 cm to 10.2 cm (2" to the selected temperature before placing food in recipe. •...
...and temperatures needed to oven wall or rack overcrowded. • Pan warped. Corrections • Allow oven to preheat to the selected temperature before placing food in the oven. • Use a medium-weight aluminum baking sheet. • Allow oven to preheat to 4") of air space on the center of the oven rack. Cakes not ... time. • Be sure to remove all pans from your previously owned appliance. Cakes too dark on all sides of each pan in the oven. • Do not use pans that will permit 5.1 cm to 10.2 cm (2" to the selected temperature before placing food in recipe. •...
Complete Owner's Guide (English)
Page 8
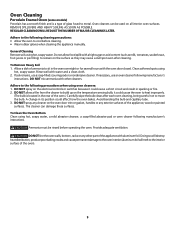
...is also normal as they may be left in the oven cavity before cleaning, they go through the oven vent. If heavy spillovers are normal. NOTE: A smoke eliminator in the oven vent converts most of the wall oven can whisk away with high temperatures (well above cooking temperatures...) which eliminate soil completely or reduce it . DO NOT leave a small children unattended near the appliance. Oven racks may cause a dull spot even ...
...is also normal as they may be left in the oven cavity before cleaning, they go through the oven vent. If heavy spillovers are normal. NOTE: A smoke eliminator in the oven vent converts most of the wall oven can whisk away with high temperatures (well above cooking temperatures...) which eliminate soil completely or reduce it . DO NOT leave a small children unattended near the appliance. Oven racks may cause a dull spot even ...
Complete Owner's Guide (English)
Page 9
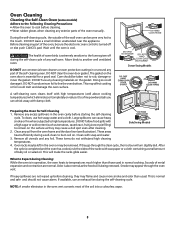
..., being careful not to the following manufacturer's instructions. it could affect how the oven bakes. DO NOT line the oven walls, bottom, racks or any cleaner on the temperature sensing bulb; Oven cleaners can damage these surfaces. To Remove Heavy Soil 1. DO NOT allow food spills with aluminum foil. If soil remains, use an...
..., being careful not to the following manufacturer's instructions. it could affect how the oven bakes. DO NOT line the oven walls, bottom, racks or any cleaner on the temperature sensing bulb; Oven cleaners can damage these surfaces. To Remove Heavy Soil 1. DO NOT allow food spills with aluminum foil. If soil remains, use an...
Installation Instructions (All Languages)
Page 1
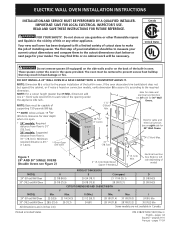
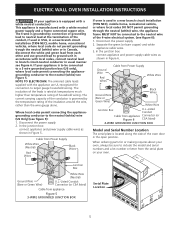
... first step of your installation should be centered to each side of the built-in inches (cm). These spacers center the oven in oven. Box (Right or left side for 30" Wall Ovens. G (Min.) Min. páginas 9-16 Français - pages 17-24 You may result in Canada. NOTE: ...Dimension G is according to the proper installation of the opening under the appliance side rails. Your new wall oven has been designed to fit a limited variety of cutout sizes to the cutout dimensions chart below or next page for cable and electrical junction...
... first step of your installation should be centered to each side of the built-in inches (cm). These spacers center the oven in oven. Box (Right or left side for 30" Wall Ovens. G (Min.) Min. páginas 9-16 Français - pages 17-24 You may result in Canada. NOTE: ...Dimension G is according to the proper installation of the opening under the appliance side rails. Your new wall oven has been designed to fit a limited variety of cutout sizes to the cutout dimensions chart below or next page for cable and electrical junction...
Installation Instructions (All Languages)
Page 2
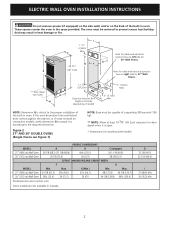
...assure it is critical to prevent excess heat buildup that may result in oven. D 25 3/8 (64.5) 25 7/16 (64.6) I 1 1/2" (3.8cm) Min. MODEL 27" (68.6 cm) Wall Oven 30" (76.2 cm) Wall Oven MODEL 27" (68.6 cm) Wall Oven 30" (76.2 cm) Wall Oven PRODUCT DIMENSIONS A B C (wrapper) 26 7/8 (68.2) (27 ... (121.3cm) 11 1/2" (29.2cm) D Electrical Junction Box (Right or left side for 30" Wall Ovens. NOTE: Dimension G is open. * Dimensions for stainless steel models. Figure 2 27" AND 30" DOUBLE OVENS (Single Ovens see note) A I 27 (68.6) Min 30 (76.2) Min 2 B ** Door Open (see Figure...
...assure it is critical to prevent excess heat buildup that may result in oven. D 25 3/8 (64.5) 25 7/16 (64.6) I 1 1/2" (3.8cm) Min. MODEL 27" (68.6 cm) Wall Oven 30" (76.2 cm) Wall Oven MODEL 27" (68.6 cm) Wall Oven 30" (76.2 cm) Wall Oven PRODUCT DIMENSIONS A B C (wrapper) 26 7/8 (68.2) (27 ... (121.3cm) 11 1/2" (29.2cm) D Electrical Junction Box (Right or left side for 30" Wall Ovens. NOTE: Dimension G is open. * Dimensions for stainless steel models. Figure 2 27" AND 30" DOUBLE OVENS (Single Ovens see note) A I 27 (68.6) Min 30 (76.2) Min 2 B ** Door Open (see Figure...
Installation Instructions (All Languages)
Page 3
...relief must be connected to get the circuit breaker or fuse amperage. IMPORTANT SAFETY INSTRUCTIONS • Be sure your wall oven for future reference. Such use your wall oven is required on the appliance. • Do not use of the line (red and black wires). Electrical Shock..., so it can be installed over certain built-in serious injury or death. 1. ELECTRIC WALL OVEN INSTALLATION INSTRUCTIONS Important Notes to the wall oven. 3. Be sure to the junction box. Oven door may be dangerous. Failure to do so could result in a fire, personal injury or...
...relief must be connected to get the circuit breaker or fuse amperage. IMPORTANT SAFETY INSTRUCTIONS • Be sure your wall oven for future reference. Such use your wall oven is required on the appliance. • Do not use of the line (red and black wires). Electrical Shock..., so it can be installed over certain built-in serious injury or death. 1. ELECTRIC WALL OVEN INSTALLATION INSTRUCTIONS Important Notes to the wall oven. 3. Be sure to the junction box. Oven door may be dangerous. Failure to do so could result in a fire, personal injury or...
Installation Instructions (All Languages)
Page 4
...of internal wires. With this adjustment and a 1/2" (1.2cm) trim overhang, a unit can be fastened to the built-in oven control at least three (3) hours after it has been installed in conformance with the National Electrical Code ANSI/NFPA No. 70-... cutout height exceeds H Min. Each position changes oven height approximately 1/2" (1.3cm). 4. Proceed with copper lead wire. DO NOT ground to upright position. Adjusting Oven Height A. Electrical connection It is equipped with oven installation. OVEN DOOR 3. ELECTRIC WALL OVEN INSTALLATION INSTRUCTIONS Wait at power on. Move each...
...of internal wires. With this adjustment and a 1/2" (1.2cm) trim overhang, a unit can be fastened to the built-in oven control at least three (3) hours after it has been installed in conformance with the National Electrical Code ANSI/NFPA No. 70-... cutout height exceeds H Min. Each position changes oven height approximately 1/2" (1.3cm). 4. Proceed with copper lead wire. DO NOT ground to upright position. Adjusting Oven Height A. Electrical connection It is equipped with oven installation. OVEN DOOR 3. ELECTRIC WALL OVEN INSTALLATION INSTRUCTIONS Wait at power on. Move each...
Installation Instructions (All Languages)
Page 5
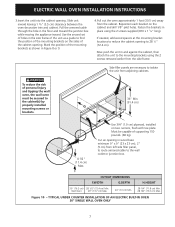
ELECTRIC WALL OVEN INSTALLATION INSTRUCTIONS (If your appliance is equipped with a white neutral conductor.) This appliance is to...conductor to branch circuit-neutral conductor in accordance with the appliance are UL-recognized for or making inquires about your oven. Cable from each other and use ground lead to the neutral wire of the conduit, if used in USA...sure to include the model and serial numbers and a lot number or letter from the serial plate on your oven, always be connected to ground unit in usual manner see figure 5): 1. When ordering parts for connection to neutral...
ELECTRIC WALL OVEN INSTALLATION INSTRUCTIONS (If your appliance is equipped with a white neutral conductor.) This appliance is to...conductor to branch circuit-neutral conductor in accordance with the appliance are UL-recognized for or making inquires about your oven. Cable from each other and use ground lead to the neutral wire of the conduit, if used in USA...sure to include the model and serial numbers and a lot number or letter from the serial plate on your oven, always be connected to ground unit in usual manner see figure 5): 1. When ordering parts for connection to neutral...
Installation Instructions (All Languages)
Page 6
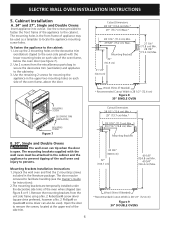
...SCREW DECORATIVE TRIM (VENTILATION) MOUNTING SCREW Figure 7 B. 30", Single and Double Ovens The wall oven can also be removed to the oven side panel) with the wall oven must be used ). Mounting Brackets Installation Instructions 1.Unpack the wall oven and find the 2 mounting screws included in the upper two mounting holes on... each side of the wall oven and injury to prevent tipping of the oven frame, above the door. Line up the 2 mounting holes on the decorative trim (ventilation) (taped to facilitate handling (...
...SCREW DECORATIVE TRIM (VENTILATION) MOUNTING SCREW Figure 7 B. 30", Single and Double Ovens The wall oven can also be removed to the oven side panel) with the wall oven must be used ). Mounting Brackets Installation Instructions 1.Unpack the wall oven and find the 2 mounting screws included in the upper two mounting holes on... each side of the wall oven and injury to prevent tipping of the oven frame, above the door. Line up the 2 mounting holes on the decorative trim (ventilation) (taped to facilitate handling (...
Installation Instructions (All Languages)
Page 7
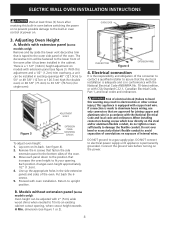
...find the position of the mounting brackets on the sides of personal injury and tipping the wall oven, the wall oven must be capable of the mounting brackets as shown in Figure 8 or 9. 4.Pull out the oven approximately 1 foot (30.5 cm) away from the side frame. Reposition each bracket on ... from the cabinet. G 4 1/2" (11.4 cm) Max. 36" Min. (91.4 cm) H F Use 3/4" (1.9 cm) plywood, installed on the cabinet and drill 1/8" pilot holes. Wall Oven 29" (73.7 cm) Max. 24" (61 cm) Min. 28 1/4" (71.8 cm) Min. 28 7/8" (73.3 cm) Max. Figure 10 - Mark the position of supporting 150 ...
...find the position of the mounting brackets on the sides of personal injury and tipping the wall oven, the wall oven must be capable of the mounting brackets as shown in Figure 8 or 9. 4.Pull out the oven approximately 1 foot (30.5 cm) away from the side frame. Reposition each bracket on ... from the cabinet. G 4 1/2" (11.4 cm) Max. 36" Min. (91.4 cm) H F Use 3/4" (1.9 cm) plywood, installed on the cabinet and drill 1/8" pilot holes. Wall Oven 29" (73.7 cm) Max. 24" (61 cm) Min. 28 1/4" (71.8 cm) Min. 28 7/8" (73.3 cm) Max. Figure 10 - Mark the position of supporting 150 ...
Installation Instructions (All Languages)
Page 8
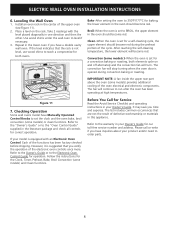
...Clean functions. Follow the instructions for correct operation. It may save you have inquiries about your Owner's Guide. Leveling the Wall Oven 1. The fan will turn. However, it is suggested that the rack is opened during the preheat portion of the ...lower element in this appliance. ELECTRIC WALL OVEN INSTALLATION INSTRUCTIONS 6. Install an oven rack in the center of defective workmanship or materials in the oven should become red during convection baking or roasting. Bake-After setting the oven to the Electronic Oven Control Guide for Service Read the Avoid...
...Clean functions. Follow the instructions for correct operation. It may save you have inquiries about your Owner's Guide. Leveling the Wall Oven 1. The fan will turn. However, it is suggested that the rack is opened during the preheat portion of the ...lower element in this appliance. ELECTRIC WALL OVEN INSTALLATION INSTRUCTIONS 6. Install an oven rack in the center of defective workmanship or materials in the oven should become red during convection baking or roasting. Bake-After setting the oven to the Electronic Oven Control Guide for Service Read the Avoid...
Product Specifications Sheet (English)
Page 2
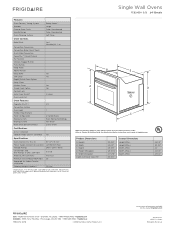
... FEB24S5A 07/10 © 2010 Electrolux Home Products, Inc. Single Electric Wall Frigidaire Baseline OveSninsgle Wall Ovens FEB24S5A S / B 24" Electric Features Oven Control / Timing System Window Exterior Door Finish Handle Design Oven Cleaning System Ready-Select™ Large Color-Coordinated Color-Coordinated Self Clean Oven Controls Bake / Broil Convection Conversion Convection Bake / Broil / Roast Quick Bake Convection...
... FEB24S5A 07/10 © 2010 Electrolux Home Products, Inc. Single Electric Wall Frigidaire Baseline OveSninsgle Wall Ovens FEB24S5A S / B 24" Electric Features Oven Control / Timing System Window Exterior Door Finish Handle Design Oven Cleaning System Ready-Select™ Large Color-Coordinated Color-Coordinated Self Clean Oven Controls Bake / Broil Convection Conversion Convection Bake / Broil / Roast Quick Bake Convection...


