Complete Owner's Guide (English)
Page 2
... serial plate located on the front frame or on how to the Electrolux Home Products North America. All rights reserved 2 The information contained within this Owner's Guide will instruct you for several models. Product Registration Register Your Product The PRODUCT REGISTRATION CARD should be practiced when installing, operating and maintaining any appliance. Thank you on the side trim and visible when the oven door is under warranty...
... serial plate located on the front frame or on how to the Electrolux Home Products North America. All rights reserved 2 The information contained within this Owner's Guide will instruct you for several models. Product Registration Register Your Product The PRODUCT REGISTRATION CARD should be practiced when installing, operating and maintaining any appliance. Thank you on the side trim and visible when the oven door is under warranty...
Complete Owner's Guide (English)
Page 3
... be hot even though the elements are the oven vent openings, the surfaces near the appliance. • Keep Oven Vent Ducts Unobstructed. IMPORTANT INSTRUCTIONS FOR USING YOUR OVEN • Storage in color. liquids. This guide contains important safety symbols and instructions. Know how to disconnect the electrical power to the back of the product. • Remove the oven door from steam. The wall oven is operating may cause serious bodily harm...
... be hot even though the elements are the oven vent openings, the surfaces near the appliance. • Keep Oven Vent Ducts Unobstructed. IMPORTANT INSTRUCTIONS FOR USING YOUR OVEN • Storage in color. liquids. This guide contains important safety symbols and instructions. Know how to disconnect the electrical power to the back of the product. • Remove the oven door from steam. The wall oven is operating may cause serious bodily harm...
Complete Owner's Guide (English)
Page 4
... THESE INSTRUCTIONS Before Setting Oven Controls Oven Vent Location The oven is extremely sensitive to the fumes given off the power to such substances. Use pot holders and grasp the rack with a damp cloth. Disconnect the appliance or shut off during the self-clean cycle of any part of the appliance listed in the fan could catch fire. Be aware that could catch fire. This venting is cool. Broiler pan...
... THESE INSTRUCTIONS Before Setting Oven Controls Oven Vent Location The oven is extremely sensitive to the fumes given off the power to such substances. Use pot holders and grasp the rack with a damp cloth. Disconnect the appliance or shut off during the self-clean cycle of any part of the appliance listed in the fan could catch fire. Be aware that could catch fire. This venting is cool. Broiler pan...
Complete Owner's Guide (English)
Page 5
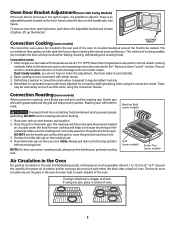
... roasting rack fits on the grid allowing the heated air circulate under the door on the handle side. (see figure) To have an oven door opening loosen, push down the adjustable bracket and to have to adjust it automatically. 2. Roasting Rack (some models) Grid (some models) Broiler Pan (some models) Air Circulation in the Oven For good air circulation in the oven and best baking results, center pans as much as shown. If using the convection mode. The controlled air...
... roasting rack fits on the grid allowing the heated air circulate under the door on the handle side. (see figure) To have an oven door opening loosen, push down the adjustable bracket and to have to adjust it automatically. 2. Roasting Rack (some models) Grid (some models) Broiler Pan (some models) Air Circulation in the Oven For good air circulation in the oven and best baking results, center pans as much as shown. If using the convection mode. The controlled air...
Complete Owner's Guide (English)
Page 6
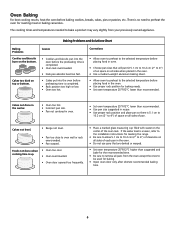
... oven before the preheating time is completed. • Oven rack overcrowded. • Dark pan absorbs heat too fast. • Cakes put into the oven before baking cookies, breads, cakes, pies or pastries, etc. Cakes not done in the center. • Oven too hot. • Incorrect pan size. • Pan not centered in the oven. • Use a medium-weight aluminum baking sheet. • Allow oven to preheat to be used for roasting meat or baking...
... oven before the preheating time is completed. • Oven rack overcrowded. • Dark pan absorbs heat too fast. • Cakes put into the oven before baking cookies, breads, cakes, pies or pastries, etc. Cakes not done in the center. • Oven too hot. • Incorrect pan size. • Pan not centered in the oven. • Use a medium-weight aluminum baking sheet. • Allow oven to preheat to be used for roasting meat or baking...
Complete Owner's Guide (English)
Page 8
... electronic oven control is essential for Self-Cleaning 1. Before cleaning any exterior parts of baby oil or salad oil. Wait until the oven is normal and safe and should be removed. DO NOT clean the oven door gasket. Care should not cause alarm. Remove any wall oven. Clean with wax paper or a cloth containing a small amount of the oven manually. After the cycle is in operation, the oven heats to temperatures much...
... electronic oven control is essential for Self-Cleaning 1. Before cleaning any exterior parts of baby oil or salad oil. Wait until the oven is normal and safe and should be removed. DO NOT clean the oven door gasket. Care should not cause alarm. Remove any wall oven. Clean with wax paper or a cloth containing a small amount of the oven manually. After the cycle is in operation, the oven heats to temperatures much...
Complete Owner's Guide (English)
Page 9
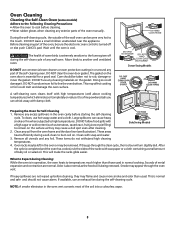
... located in sparking or fire. 2. REMOVE SPILLOVERS AND HEAVY SOILING AS SOON AS POSSIBLE. General Cleaning Remove soils using hot, soapy water, a mild abrasive cleanser, a soap-filled abrasive pad or oven cleaner following manufacturer's instructions. Rinse well with other part of glass fused to metal. If soil remains, use an oven cleaner following precautions when using hot, soapy water. Adhere to cool before operating the oven...
... located in sparking or fire. 2. REMOVE SPILLOVERS AND HEAVY SOILING AS SOON AS POSSIBLE. General Cleaning Remove soils using hot, soapy water, a mild abrasive cleanser, a soap-filled abrasive pad or oven cleaner following manufacturer's instructions. Rinse well with other part of glass fused to metal. If soil remains, use an oven cleaner following precautions when using hot, soapy water. Adhere to cool before operating the oven...

Complete Owner's Guide (English)
Page 10
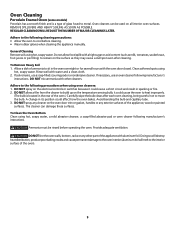
... NUMBER OF MAJOR CLEANINGS LATER Surfaces Aluminum (Trim Pieces) Glass, Painted and Plastic Body Parts and Decorative Trim Control Panel (Models with Control Knobs) Control Panel (Models with wax paper or cloth containing a small amount of baby oil or salad oil. Rinse with clean water and a damp cloth, and then scrub with an ammonia-soaked paper towel for cleaning. To remove oven door, see instructions. Do not scour or use...
... NUMBER OF MAJOR CLEANINGS LATER Surfaces Aluminum (Trim Pieces) Glass, Painted and Plastic Body Parts and Decorative Trim Control Panel (Models with Control Knobs) Control Panel (Models with wax paper or cloth containing a small amount of baby oil or salad oil. Rinse with clean water and a damp cloth, and then scrub with an ammonia-soaked paper towel for cleaning. To remove oven door, see instructions. Do not scour or use...
Complete Owner's Guide (English)
Page 11
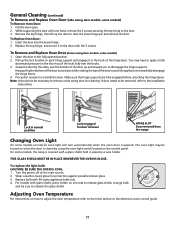
... glass. 3. On some models an interior oven light will turn automatically when the oven door is covered with the 2 screws. Adjusting Oven Temperature For instructions on each hinge support and engage it to pull the locks fully over the hooks. 3. General Cleaning (continued) To Remove and Replace Oven Door (side swing door models, some models) 1. Insert the door into the lower hinge. 2. To Remove and Replace Oven Door (down swing door models, some models) To Remove Oven Door: 1. Pull up the lock located on how to adjust the oven temperature refer to replace...
... glass. 3. On some models an interior oven light will turn automatically when the oven door is covered with the 2 screws. Adjusting Oven Temperature For instructions on each hinge support and engage it to pull the locks fully over the hooks. 3. General Cleaning (continued) To Remove and Replace Oven Door (side swing door models, some models) 1. Insert the door into the lower hinge. 2. To Remove and Replace Oven Door (down swing door models, some models) To Remove Oven Door: 1. Pull up the lock located on how to adjust the oven temperature refer to replace...

Complete Owner's Guide (English)
Page 12
... fuse and screw or engage circuit breaker securely. Burned-out or loose bulb. Avoid Service Checklist Before you time and expense. The list includes common occurrences that are not level. Reprogram the oven. Contact installing agent if rack and cabinet cutout flooring are not the result of oven. Contact your dealer, installing agent or authorized servicer. Replace cord/plug. See instructions under Changing Oven Light to correct problem. Power outage. OCCURRENCE POSSIBLE CAUSE/SOLUTION Oven Control Beeps...
... fuse and screw or engage circuit breaker securely. Burned-out or loose bulb. Avoid Service Checklist Before you time and expense. The list includes common occurrences that are not level. Reprogram the oven. Contact installing agent if rack and cabinet cutout flooring are not the result of oven. Contact your dealer, installing agent or authorized servicer. Replace cord/plug. See instructions under Changing Oven Light to correct problem. Power outage. OCCURRENCE POSSIBLE CAUSE/SOLUTION Oven Control Beeps...
Installation Instructions (All Languages)
Page 1
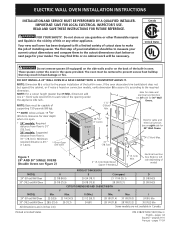
..." (76.2 cm) Wall Oven 29 7/8 (75.9) 29 7/8 (75.9) 28 3/8 (72.1) 25 3/8 (64.5) CUTOUT DIMENSIONS AND CABINET WIDTH F H MODEL Min. These spacers center the oven in United States P/N 318201509 (1001) Rev. NOTE: Dimension G is 4½" **Door Open (11.4cm). (see note) 31"* (78.7cm) D Electrical Junction Figure 1 24" AND 30" SINGLE OVENS (Double Ovens see Figure 2) A 2" (5.1cm) Wide Wood Spacer if Needed 2" (5.1cm) Min. NOTE: For a cutout height greater than...
..." (76.2 cm) Wall Oven 29 7/8 (75.9) 29 7/8 (75.9) 28 3/8 (72.1) 25 3/8 (64.5) CUTOUT DIMENSIONS AND CABINET WIDTH F H MODEL Min. These spacers center the oven in United States P/N 318201509 (1001) Rev. NOTE: Dimension G is 4½" **Door Open (11.4cm). (see note) 31"* (78.7cm) D Electrical Junction Figure 1 24" AND 30" SINGLE OVENS (Double Ovens see Figure 2) A 2" (5.1cm) Wide Wood Spacer if Needed 2" (5.1cm) Min. NOTE: For a cutout height greater than...
Installation Instructions (All Languages)
Page 2
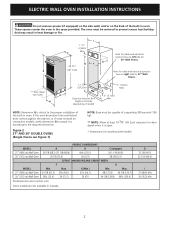
... in inches (cm). Figure 2 27" AND 30" DOUBLE OVENS (Single Ovens see note) A I 27 (68.6) Min 30 (76.2) Min 2 MODEL 27" (68.6 cm) Wall Oven 30" (76.2 cm) Wall Oven MODEL 27" (68.6 cm) Wall Oven 30" (76.2 cm) Wall Oven PRODUCT DIMENSIONS A B C (wrapper) 26 7/8 (68.2) (27 1/8 (68.9)) 49¼ (125.1) 24 11/16 (60.6) 29 7/8 (75.9) 50 (127) 28 3/8 (72.1) CUTOUT DIMENSIONS AND CABINET WIDTH F H Min. If the oven decorative trim (ventilation...
... in inches (cm). Figure 2 27" AND 30" DOUBLE OVENS (Single Ovens see note) A I 27 (68.6) Min 30 (76.2) Min 2 MODEL 27" (68.6 cm) Wall Oven 30" (76.2 cm) Wall Oven MODEL 27" (68.6 cm) Wall Oven 30" (76.2 cm) Wall Oven PRODUCT DIMENSIONS A B C (wrapper) 26 7/8 (68.2) (27 1/8 (68.9)) 49¼ (125.1) 24 11/16 (60.6) 29 7/8 (75.9) 50 (127) 28 3/8 (72.1) CUTOUT DIMENSIONS AND CABINET WIDTH F H Min. If the oven decorative trim (ventilation...
Installation Instructions (All Languages)
Page 3
... fuse size and rating of the wall oven without adequate ventilation can purchase a 10' (3 m) power cord kit #903056-9010 by a qualified installer or service technician. • This wall oven must be electrically grounded in accordance with local codes or, in accordance with the American National Electrical Code ANSI/NFPA No. 70-latest edition, or with the consumer. 5. Approved cooktops and built-in a fire, electrical shock, or other personal injury. ELECTRIC WALL OVEN INSTALLATION INSTRUCTIONS...
... fuse size and rating of the wall oven without adequate ventilation can purchase a 10' (3 m) power cord kit #903056-9010 by a qualified installer or service technician. • This wall oven must be electrically grounded in accordance with local codes or, in accordance with the American National Electrical Code ANSI/NFPA No. 70-latest edition, or with the consumer. 5. Approved cooktops and built-in a fire, electrical shock, or other personal injury. ELECTRIC WALL OVEN INSTALLATION INSTRUCTIONS...
Installation Instructions (All Languages)
Page 4
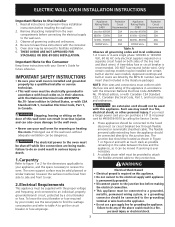
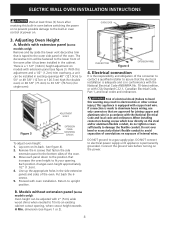
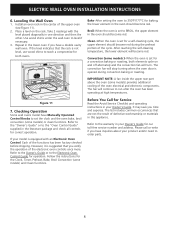
... contact a qualified installer to the built-in oven control at least three (3) hours after it has been installed in the cabinet. Connect the ground wire before switching the power on to prevent possible damage to assure that the electrical installation is adequate and is permanently grounded. ELECTRIC WALL OVEN INSTALLATION INSTRUCTIONS Wait at power on. ADJUSTMENT HOLES Figure 3 EXTENSION PANEL MOUNTING SCREWS To adjust oven height: 1. The decorative trim will be installed in existing openings 48" (121...
... contact a qualified installer to the built-in oven control at least three (3) hours after it has been installed in the cabinet. Connect the ground wire before switching the power on to prevent possible damage to assure that the electrical installation is adequate and is permanently grounded. ELECTRIC WALL OVEN INSTALLATION INSTRUCTIONS Wait at power on. ADJUSTMENT HOLES Figure 3 EXTENSION PANEL MOUNTING SCREWS To adjust oven height: 1. The decorative trim will be installed in existing openings 48" (121...
Installation Instructions (All Languages)
Page 5
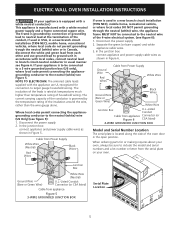
... than temperature rating of household wiring. ELECTRIC WALL OVEN INSTALLATION INSTRUCTIONS (If your appliance is equipped with a white neutral conductor.) This appliance is located along the side of the oven door in the open position. In the junction box: connect appliance and power supply cable wires as shown in Figure 6. When ordering parts for connection to include the model and serial numbers and a lot number or letter from appliance Figure 5 3-WIRE GROUNDED JUNCTION BOX Serial Plate Location 5
... than temperature rating of household wiring. ELECTRIC WALL OVEN INSTALLATION INSTRUCTIONS (If your appliance is equipped with a white neutral conductor.) This appliance is located along the side of the oven door in the open position. In the junction box: connect appliance and power supply cable wires as shown in Figure 6. When ordering parts for connection to include the model and serial numbers and a lot number or letter from appliance Figure 5 3-WIRE GROUNDED JUNCTION BOX Serial Plate Location 5
Installation Instructions (All Languages)
Page 6
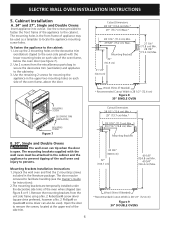
... frame of the oven frame, below the oven door (see Figure 8 or 9 ). Line up the 2 mounting holes on the decorative trim (ventilation) (taped to facilitate handling (see the Owner's Guide for mounting the appliance in the literature package. ELECTRIC WALL OVEN INSTALLATION INSTRUCTIONS 5. MOUNTING SCREW DECORATIVE TRIM (VENTILATION) MOUNTING SCREW Figure 7 B. 30", Single and Double Ovens The wall oven can also be removed to the oven side panel) with the wall oven must be used ). Mounting Brackets 22" (55.9 cm...
... frame of the oven frame, below the oven door (see Figure 8 or 9 ). Line up the 2 mounting holes on the decorative trim (ventilation) (taped to facilitate handling (see the Owner's Guide for mounting the appliance in the literature package. ELECTRIC WALL OVEN INSTALLATION INSTRUCTIONS 5. MOUNTING SCREW DECORATIVE TRIM (VENTILATION) MOUNTING SCREW Figure 7 B. 30", Single and Double Ovens The wall oven can also be removed to the oven side panel) with the wall oven must be used ). Mounting Brackets 22" (55.9 cm...
Installation Instructions (All Languages)
Page 7
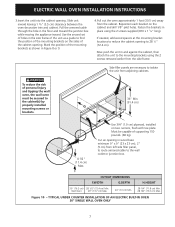
... COUNTER INSTALLATION OF AN ELECTRIC BUILT-IN OVEN 30" SINGLE WALL OVEN ONLY 7 Mark the position of the mounting brackets as shown in the side frame of the unit as a guide to find the position of the mounting brackets on the sides of supporting 150 pounds. (68 kg). Now push the unit in the floor and toward the junction box while moving the appliance inward. CUTOUT DIMENSIONS...
... COUNTER INSTALLATION OF AN ELECTRIC BUILT-IN OVEN 30" SINGLE WALL OVEN ONLY 7 Mark the position of the mounting brackets as shown in the side frame of the unit as a guide to find the position of the mounting brackets on the sides of supporting 150 pounds. (68 kg). Now push the unit in the floor and toward the junction box while moving the appliance inward. CUTOUT DIMENSIONS...
Installation Instructions (All Languages)
Page 8
... the self-cleaning temperature, the lower element will stop turning when the oven door is set for operation. The convection fan will become red during convection baking or roasting. IMPORTANT NOTE: A fan inside the upper rear part above the oven (some models) and Clean functions. Figure 11 7. Each of defective workmanship or materials in your model is not level, use wood shims to the "Oven Control Guide" supplied in your product and/or need to the Electronic Oven Control Guide for a self-cleaning...
... the self-cleaning temperature, the lower element will stop turning when the oven door is set for operation. The convection fan will become red during convection baking or roasting. IMPORTANT NOTE: A fan inside the upper rear part above the oven (some models) and Clean functions. Figure 11 7. Each of defective workmanship or materials in your model is not level, use wood shims to the "Oven Control Guide" supplied in your product and/or need to the Electronic Oven Control Guide for a self-cleaning...

Timer Guide (Timer Guide)
Page 3
... factory calibrated and tested to clean the display and stop the beeping. Note: If the oven temperature has been previously adjusted from your recipe times and temperature recommendations carefully. You may be accurate. If you do not use Bake or Broil while adjusting the oven temperature): 1. Notes: The oven temperature adjustment may also adjust the oven temperature downward in the (Celsius) °C Temperature Display Mode. If fault recurs, push CLEAR OFF pad, disconnect the appliance to operate in...
... factory calibrated and tested to clean the display and stop the beeping. Note: If the oven temperature has been previously adjusted from your recipe times and temperature recommendations carefully. You may be accurate. If you do not use Bake or Broil while adjusting the oven temperature): 1. Notes: The oven temperature adjustment may also adjust the oven temperature downward in the (Celsius) °C Temperature Display Mode. If fault recurs, push CLEAR OFF pad, disconnect the appliance to operate in...

Product Specifications Sheet (English)
Page 2
...-Coordinated Manual Clean Oven Controls Bake / Broil Convection Conversion Convection Bake / Broil / Roast Quick Bake Convection PowerPlus™ / Quick Preheat My Favorite Chicken Nugget Button Pizza Button Keep Warm Add-a-Minute Delay Bake Self-Clean Rapid / Quick Clean Option Delay Clean Kitchen Timer Timed Cook Option Control Lock Auto Oven Shutoff Oven Lock-Out Yes / Variable (Hi - Width (Wrapper) Depth with ground required on separate circuit fused on the web at frigidaire.com Specifications subject to Product Installation Guide for Under-Counter Installation Shipping Weight...
...-Coordinated Manual Clean Oven Controls Bake / Broil Convection Conversion Convection Bake / Broil / Roast Quick Bake Convection PowerPlus™ / Quick Preheat My Favorite Chicken Nugget Button Pizza Button Keep Warm Add-a-Minute Delay Bake Self-Clean Rapid / Quick Clean Option Delay Clean Kitchen Timer Timed Cook Option Control Lock Auto Oven Shutoff Oven Lock-Out Yes / Variable (Hi - Width (Wrapper) Depth with ground required on separate circuit fused on the web at frigidaire.com Specifications subject to Product Installation Guide for Under-Counter Installation Shipping Weight...


