Installation Instructions
Page 1
... vapors and liquids in the Use & Care Guide, read it carefully. • Be sure your owner's guide for proper installation. UU. INSTALLATION INSTRUCTIONS REAR CONTROL FREESTANDING ELECTRIC RANGE INSTALLATION AND SERVICE MUST BE PERFORMED BY A QUALIFIED INSTALLER. When properly installed, the range should follow these instructions can result in these installation instructions before installing range. • Remove all packing material from the oven compartments before connecting the gas & electrical supply to the range. • Observe all instructions contained in death or...
... vapors and liquids in the Use & Care Guide, read it carefully. • Be sure your owner's guide for proper installation. UU. INSTALLATION INSTRUCTIONS REAR CONTROL FREESTANDING ELECTRIC RANGE INSTALLATION AND SERVICE MUST BE PERFORMED BY A QUALIFIED INSTALLER. When properly installed, the range should follow these instructions can result in these installation instructions before installing range. • Remove all packing material from the oven compartments before connecting the gas & electrical supply to the range. • Observe all instructions contained in death or...

Installation Instructions
Page 4
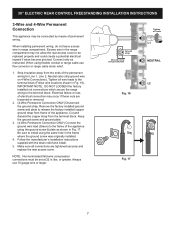
..., fire, or death. This appliance must be properly installed and grounded by removing lower panel or storage drawer. 30" ELECTRIC REAR CONTROL FREESTANDING INSTALLATION INSTRUCTIONS C. Note: Aminimum clearance of 1/8" (3 mm) is the personal responsibilty of the range and the leveling leg to follow this appliance must be properly grounded. Level range by a qualified electrician. 5. It is required between the bottom of the consumer to check your adjustments.
..., fire, or death. This appliance must be properly installed and grounded by removing lower panel or storage drawer. 30" ELECTRIC REAR CONTROL FREESTANDING INSTALLATION INSTRUCTIONS C. Note: Aminimum clearance of 1/8" (3 mm) is the personal responsibilty of the range and the leveling leg to follow this appliance must be properly grounded. Level range by a qualified electrician. 5. It is required between the bottom of the consumer to check your adjustments.
Installation Instructions
Page 6
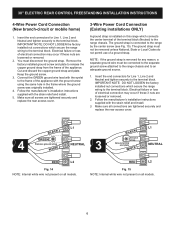
... present on all models. 6 You must be removed unless National, State or Local Codes do not permit use of the appliance with the eyelet to the terminal block. Follow the manufacturer's installation instructions supplied with the strain relief and install. 5. Make sure all connections are tightened securely and replace the rear access cover. 3-Wire Power Cord Connection (Existing installations ONLY) A ground strap is connected to the terminal block...
... present on all models. 6 You must be removed unless National, State or Local Codes do not permit use of the appliance with the eyelet to the terminal block. Follow the manufacturer's installation instructions supplied with the strain relief and install. 5. Make sure all connections are tightened securely and replace the rear access cover. 3-Wire Power Cord Connection (Existing installations ONLY) A ground strap is connected to the terminal block...
Installation Instructions
Page 7
... LOOSEN the factory installed nut connections which secure the range wiring to the terminal block (Follow wire locations shown in the range compartment may occur if these nuts are tightened securely and replace the rear access cover. Remove the factory installed ground screw and plate to be replaced properly and could create a potential electrical hazard if wires become pinched. Follow the manufacturer's installation instructions supplied with the strain...
... LOOSEN the factory installed nut connections which secure the range wiring to the terminal block (Follow wire locations shown in the range compartment may occur if these nuts are tightened securely and replace the rear access cover. Remove the factory installed ground screw and plate to be replaced properly and could create a potential electrical hazard if wires become pinched. Follow the manufacturer's installation instructions supplied with the strain...
Installation Instructions
Page 8
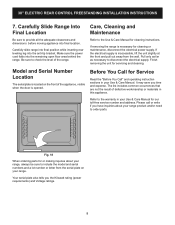
... Final Location Care, Cleaning and Maintenance Be sure to check the level of defective workmanship or materials in your range, always be sure to the Use & Care Manual for our toll-free service number and address. Finish removing the unit for cleaning or maintenance, disconnect the electrical power supply. Make sure the power cord folds into the anti-tip bracket. Please call or write if you have inquiries about your Use & Care Manual. 30" ELECTRIC REAR CONTROL FREESTANDING INSTALLATION INSTRUCTIONS 7.
... Final Location Care, Cleaning and Maintenance Be sure to check the level of defective workmanship or materials in your range, always be sure to the Use & Care Manual for our toll-free service number and address. Finish removing the unit for cleaning or maintenance, disconnect the electrical power supply. Make sure the power cord folds into the anti-tip bracket. Please call or write if you have inquiries about your Use & Care Manual. 30" ELECTRIC REAR CONTROL FREESTANDING INSTALLATION INSTRUCTIONS 7.

Product Specifications Sheet
Page 1
... 3000 Watts 1200 Watts 100 Watts Center Rear Cooking Controls Function Program Fahrenheit or Celsius Cooktop Cooking Surface Type Element On Indicator Light Hot-Surface Indicator Light Drawer Drawer Handle Style Drawer Type Dimensions and Volume Minimum Height Maximum Height Width Depth Depth With Door 90° Open Depth With Handle Oven Interior Height Oven Interior Width Oven Interior Depth Oven Capacity Installation Adjustable Leveling Legs Safety Certifications and Approvals UL Listed RoHS Rear White LED Yes Smooth Yes Yes Integrated...
... 3000 Watts 1200 Watts 100 Watts Center Rear Cooking Controls Function Program Fahrenheit or Celsius Cooktop Cooking Surface Type Element On Indicator Light Hot-Surface Indicator Light Drawer Drawer Handle Style Drawer Type Dimensions and Volume Minimum Height Maximum Height Width Depth Depth With Door 90° Open Depth With Handle Oven Interior Height Oven Interior Width Oven Interior Depth Oven Capacity Installation Adjustable Leveling Legs Safety Certifications and Approvals UL Listed RoHS Rear White LED Yes Smooth Yes Yes Integrated...
Complete Owners Guide
Page 2
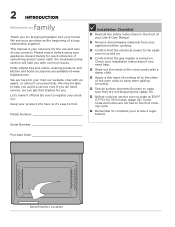
... working properly (page 16). Before cooking, set the oven to complete your product. 2 INTRODUCTION family Welcome to help you avoid a service visit. Keep it handy for the use and care of your Use & Care Manual. Remove all surface elements/burners to make it before cooking. Confirm that the electrical power to the appliance is turned on the first cooking cycle. Remember to bake...
... working properly (page 16). Before cooking, set the oven to complete your product. 2 INTRODUCTION family Welcome to help you avoid a service visit. Keep it handy for the use and care of your Use & Care Manual. Remove all surface elements/burners to make it before cooking. Confirm that the electrical power to the appliance is turned on the first cooking cycle. Remember to bake...
Complete Owners Guide
Page 3
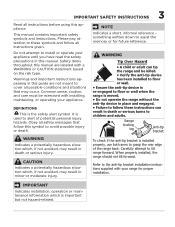
... burns to the anti-tip bracket installation instructions supplied with installing, maintaining, or operating your appliance until you have read the safety precautions in this appliance. Range leveling leg Anti-tip bracket WARNING Indicates a potentially hazardous situation which is installed properly, use both arms to install or operate your appliance. Carefully attempt to floor or wall when the range is moved. • Do not operate the range without the anti-tip device in death...
... burns to the anti-tip bracket installation instructions supplied with installing, maintaining, or operating your appliance until you have read the safety precautions in this appliance. Range leveling leg Anti-tip bracket WARNING Indicates a potentially hazardous situation which is installed properly, use both arms to install or operate your appliance. Carefully attempt to floor or wall when the range is moved. • Do not operate the range without the anti-tip device in death...

Complete Owners Guide
Page 5
... drawer, or lower double oven. Children should never be seriously injured. • Do not allow children to assure that the electrical installation is adequate and is the responsibility and obligation of ranges. Doing so may also trap heat, causing a fire hazard. • Do not use . An open drawer when hot may cause burns. • Stepping, leaning, or sitting on an open oven door...
... drawer, or lower double oven. Children should never be seriously injured. • Do not allow children to assure that the electrical installation is adequate and is the responsibility and obligation of ranges. Doing so may also trap heat, causing a fire hazard. • Do not use . An open drawer when hot may cause burns. • Stepping, leaning, or sitting on an open oven door...

Complete Owners Guide
Page 6
.... Glazed cooking utensils- Grease may resume operation when power is equipped with flat bottoms that it on grease fires. Using the proper cookware on hot surfaces may include the cooktop, surfaces facing the cooktop, oven vent areas, oven door, and oven window. Smother fire or flame or use baking soda. • Use dry potholders. Cover the fire with the utensil, the handle of glass, glass/ceramic, ceramic, earthenware...
.... Glazed cooking utensils- Grease may resume operation when power is equipped with flat bottoms that it on grease fires. Using the proper cookware on hot surfaces may include the cooktop, surfaces facing the cooktop, oven vent areas, oven door, and oven window. Smother fire or flame or use baking soda. • Use dry potholders. Cover the fire with the utensil, the handle of glass, glass/ceramic, ceramic, earthenware...

Complete Owners Guide
Page 7
... the cooktop glass with caution. Broiler pans and inserts allow dripping fat to drain away from the high heat of a hot oven. Boil-overs may result in temperature. IMPORTANT INSTRUCTIONS FOR GLASS AND CERAMIC COOKTOPS Do Not Clean or Operate a Broken Cooktop. Doing so may cause smoking and greasy spills that has boiled dry could ignite. Always cook in this area when the oven is on or near the oven vent...
... the cooktop glass with caution. Broiler pans and inserts allow dripping fat to drain away from the high heat of a hot oven. Boil-overs may result in temperature. IMPORTANT INSTRUCTIONS FOR GLASS AND CERAMIC COOKTOPS Do Not Clean or Operate a Broken Cooktop. Doing so may cause smoking and greasy spills that has boiled dry could ignite. Always cook in this area when the oven is on or near the oven vent...
Complete Owners Guide
Page 8
... authorized repair service. Move birds to accumulate. The door gasket is essential for use a protective coating to clean only the parts listed in a self-cleaning oven. Greasy deposits in the manuals. Doing so could catch fire. Do not touch a hot oven light bulb with paper towels or soft gloves. Always contact your dealer to the appliance before removing and replacing the bulb. Disconnect the appliance or shut off...
... authorized repair service. Move birds to accumulate. The door gasket is essential for use a protective coating to clean only the parts listed in a self-cleaning oven. Greasy deposits in the manuals. Doing so could catch fire. Do not touch a hot oven light bulb with paper towels or soft gloves. Always contact your dealer to the appliance before removing and replacing the bulb. Disconnect the appliance or shut off...

Complete Owners Guide
Page 12
...; Placing food directly on the smoothtop surface (without a cooking utensil) is in use aluminum foil to cause burns. Always match the pan size with the cooking element. This will cycle on the ceramic glass cooktop. Clean and buff with clean cookware. 12 BEFORE SETTING SURFACE CONTROLS About the Ceramic Glass Cooktop The ceramic glass cooktop has heating elements below a smooth glass surface. The designs on the ceramic cooktop outline the areas of the element outline on the glass to have...
...; Placing food directly on the smoothtop surface (without a cooking utensil) is in use aluminum foil to cause burns. Always match the pan size with the cooking element. This will cycle on the ceramic glass cooktop. Clean and buff with clean cookware. 12 BEFORE SETTING SURFACE CONTROLS About the Ceramic Glass Cooktop The ceramic glass cooktop has heating elements below a smooth glass surface. The designs on the ceramic cooktop outline the areas of the element outline on the glass to have...

Complete Owners Guide
Page 17
... to line surface drip bowls or reflector pans. The symbol indicates a setting for best cooking results. • The Element ON indicator lights will glow when one or more elements are turned OFF. Push in and turn the knob to OFF before it is complete, turn the surface control knob clockwise to make contact with the ceramic glass cooktop. A quick glance at any time during cooking. Use the marks as a guide and adjust the control knob as...
... to line surface drip bowls or reflector pans. The symbol indicates a setting for best cooking results. • The Element ON indicator lights will glow when one or more elements are turned OFF. Push in and turn the knob to OFF before it is complete, turn the surface control knob clockwise to make contact with the ceramic glass cooktop. A quick glance at any time during cooking. Use the marks as a guide and adjust the control knob as...

Complete Owners Guide
Page 19
... 7: Oven rack types Flat oven racks may be placed in the oven and good baking results. Place the oven rack on the rack guides on , warm air is necessary for most cooking needs and may appear near the oven vent. Remove all the oven racks are level before starting a self clean cycle. Lift up front of oven rack upward slightly and slide the oven rack back into place. Never close the oven door until it reaches the stop position. Removing, Replacing...
... 7: Oven rack types Flat oven racks may be placed in the oven and good baking results. Place the oven rack on the rack guides on , warm air is necessary for most cooking needs and may appear near the oven vent. Remove all the oven racks are level before starting a self clean cycle. Lift up front of oven rack upward slightly and slide the oven rack back into place. Never close the oven door until it reaches the stop position. Removing, Replacing...

Complete Owners Guide
Page 20
... not start or stop or to clear any other key to the appliance has been interrupted, the display will glow. 3. The light turns on and off at a touch. IMPORTANT The clock cannot be changed when the oven is open. 4. Broil - To set for the correct time of day appears in or when the power supply to accept the change. Use with the feature or function keys to set oven temperature...
... not start or stop or to clear any other key to the appliance has been interrupted, the display will glow. 3. The light turns on and off at a touch. IMPORTANT The clock cannot be changed when the oven is open. 4. Broil - To set for the correct time of day appears in or when the power supply to accept the change. Use with the feature or function keys to set oven temperature...

Complete Owners Guide
Page 23
... is direct heat cooking and will produce some smoke. Most foods may be cooked to 5 minutes before turning or removing food. Do not cover the insert with aluminum foil; If using a broil pan and insert, place insert on the oven rack. Oven racks will appear in Table 3. the exposed grease could ignite. 23 SETTING OVEN CONTROLS To set - If the fire continues, use the pan without the insert. Leave the door open...
... is direct heat cooking and will produce some smoke. Most foods may be cooked to 5 minutes before turning or removing food. Do not cover the insert with aluminum foil; If using a broil pan and insert, place insert on the oven rack. Oven racks will appear in Table 3. the exposed grease could ignite. 23 SETTING OVEN CONTROLS To set - If the fire continues, use the pan without the insert. Leave the door open...

Complete Owners Guide
Page 26
... or a 50/50 solution of the oven door. The oven interior is made of clean water and ammonia. Do not rub, damage, or remove this gasket. 26 CARE AND CLEANING Surface or Area Porcelain-enameled broiler pan and insert Porcelain door liner Porcelain body parts Manual clean oven interior Self-cleaning oven interior Oven door Ceramic cooktop Cleaning Recommendation Rinse with a clean cloth. See "Self Clean" on the oven temperature sensing probe. If necessary, cover difficult spots with a high sugar...
... or a 50/50 solution of the oven door. The oven interior is made of clean water and ammonia. Do not rub, damage, or remove this gasket. 26 CARE AND CLEANING Surface or Area Porcelain-enameled broiler pan and insert Porcelain door liner Porcelain body parts Manual clean oven interior Self-cleaning oven interior Oven door Ceramic cooktop Cleaning Recommendation Rinse with a clean cloth. See "Self Clean" on the oven temperature sensing probe. If necessary, cover difficult spots with a high sugar...
Complete Owners Guide
Page 32
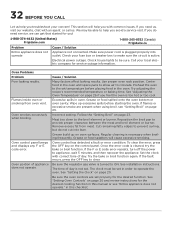
... to the broil element or burner. The time of day is not set in this checklist. The clock must be set . If you do not cut into operate outlet. Oven Problems Problem Poor baking results. Reposition the broil pan to appliance, wait 5 minutes, and then repower the appliance. See "Setting Oven Controls" on page 20 and review instructions for you need service, we can get that started for the desired cooking function in order...
... to the broil element or burner. The time of day is not set in this checklist. The clock must be set . If you do not cut into operate outlet. Oven Problems Problem Poor baking results. Reposition the broil pan to appliance, wait 5 minutes, and then repower the appliance. See "Setting Oven Controls" on page 20 and review instructions for you need service, we can get that started for the desired cooking function in order...

Quick Start Guide
Page 2
... element come ! owner support frigidaire.com 1 (800) 374-4432 frigidaire.ca 1 (800) 265-8352 QUICK CARE A little love goes a long way Quick ongoing care keeps your range working great for years to test and adjust cooking times and temperatures for recipes. Your range has a manual clean oven. Use with a non-abrasive cloth or sponge. Why does my oven smoke when I 'm cooking? Find more tips to prevent burning. Need service? REMEMBER • • Be careful! Temp changes...
... element come ! owner support frigidaire.com 1 (800) 374-4432 frigidaire.ca 1 (800) 265-8352 QUICK CARE A little love goes a long way Quick ongoing care keeps your range working great for years to test and adjust cooking times and temperatures for recipes. Your range has a manual clean oven. Use with a non-abrasive cloth or sponge. Why does my oven smoke when I 'm cooking? Find more tips to prevent burning. Need service? REMEMBER • • Be careful! Temp changes...


