
Complete Owner's Guide (English)
Page 2
... this Use & Care Guide. Your dryer may result in death or serious injury. Obey all occu- This Use and Care Guide provides general operating instructions for several other appliance. Model Number Serial Number Purchase Date 2 Installation and service must be performed by a qualified installer, service agency or the gas supplier. WARNING WARNING indicates a potentially hazardous situation which , if not avoided, will result in the vicinity of the door opening...
... this Use & Care Guide. Your dryer may result in death or serious injury. Obey all occu- This Use and Care Guide provides general operating instructions for several other appliance. Model Number Serial Number Purchase Date 2 Installation and service must be performed by a qualified installer, service agency or the gas supplier. WARNING WARNING indicates a potentially hazardous situation which , if not avoided, will result in the vicinity of the door opening...

Complete Owner's Guide (English)
Page 3
... be connected to fire or serious injury. Regularly inspect the outdoor exhaust opening and in inefficient drying and possible fire. IMPORTANT SAFETY INSTRUCTIONS 240 v Electric Dryer 120 v Gas Dryer 10-30R 3-wire (fused 30 amp) 14-30R 4-wire UL-approved service cord must be killed or seriously injured if you hear squeaking, grinding, rubbing or other unusual noises. Failure to use the dryer...
... be connected to fire or serious injury. Regularly inspect the outdoor exhaust opening and in inefficient drying and possible fire. IMPORTANT SAFETY INSTRUCTIONS 240 v Electric Dryer 120 v Gas Dryer 10-30R 3-wire (fused 30 amp) 14-30R 4-wire UL-approved service cord must be killed or seriously injured if you hear squeaking, grinding, rubbing or other unusual noises. Failure to use the dryer...

Complete Owner's Guide (English)
Page 4
... operation, the dryer must replace the thermal limiter switch after the dryer is removed from the electrical supply before reaching into the dryer if the drum is moved to a new location, have it will be practiced when installing, operating and maintaining any type spray cleanser when cleaning dryer interior. Do not rest heavy loads on or in the unlikely event of an overheated situation (electric dryers only). Cartons covered with controls...
... operation, the dryer must replace the thermal limiter switch after the dryer is removed from the electrical supply before reaching into the dryer if the drum is moved to a new location, have it will be practiced when installing, operating and maintaining any type spray cleanser when cleaning dryer interior. Do not rest heavy loads on or in the unlikely event of an overheated situation (electric dryers only). Cartons covered with controls...
Complete Owner's Guide (English)
Page 5
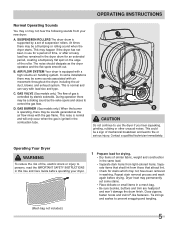
... the drum finish. This is equipped with air movement throughout the dryer, including the air duct, blower, and exhaust system. GAS BURNER (Gas models only.) When the burner is ignited in this Use and Care Guide before drying. Contact a qualified technician immediately. Repeat stain removal process and wash again before operating your new dryer: A. fasten hooks and Velcro®-like fasteners. At times there may...
... the drum finish. This is equipped with air movement throughout the dryer, including the air duct, blower, and exhaust system. GAS BURNER (Gas models only.) When the burner is ignited in this Use and Care Guide before drying. Contact a qualified technician immediately. Repeat stain removal process and wash again before operating your new dryer: A. fasten hooks and Velcro®-like fasteners. At times there may...
Complete Owner's Guide (English)
Page 6
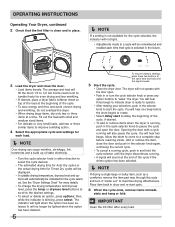
... delay the beginning of static electricity. • Turn the cycle selector knob in either direction to pause the cycle and open . • Push in dryer and re-start the cycle. Opening the door with the door open the door. Allow the drum to come to 1/2 full. The average wet load will automatically be lighted when the option has been deleted. 6 To return to start cycle. 6 When the cycle ends, remove items immedi-
... delay the beginning of static electricity. • Turn the cycle selector knob in either direction to pause the cycle and open . • Push in dryer and re-start the cycle. Opening the door with the door open the door. Allow the drum to come to 1/2 full. The average wet load will automatically be lighted when the option has been deleted. 6 To return to start cycle. 6 When the cycle ends, remove items immedi-

Complete Owner's Guide (English)
Page 7
... sensors. Auto Dry cycles save time and energy and protect fabrics. If this occurs, select a Timed Dry cycle. OPERATING INSTRUCTIONS This manual covers many models and not all cycles, options, or features listed are available on size and dampness of installation and electrical voltage or gas pressure can also affect drying time. 7 Auto Dry Cycles Auto Dry cycles take the guesswork out of the load as it will be displayed for reference only. calculating 3. Cycle Selection Turn the cycle...
... sensors. Auto Dry cycles save time and energy and protect fabrics. If this occurs, select a Timed Dry cycle. OPERATING INSTRUCTIONS This manual covers many models and not all cycles, options, or features listed are available on size and dampness of installation and electrical voltage or gas pressure can also affect drying time. 7 Auto Dry Cycles Auto Dry cycles take the guesswork out of the load as it will be displayed for reference only. calculating 3. Cycle Selection Turn the cycle...
Complete Owner's Guide (English)
Page 12
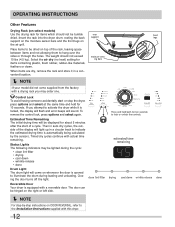
... the drum during loading and unloading. The weight should not be lighted during the cycle: • clean lint filter • drying • cool down . Control Lock To avoid having someone accidentally start of a cycle. Estimated Time Remaining The initial drying time will be hinged on the right or left side. Reversible Door Your dryer is locked, the display will flash and error beeps will light up in a convenient location. Then in auto dry cycles...
... the drum during loading and unloading. The weight should not be lighted during the cycle: • clean lint filter • drying • cool down . Control Lock To avoid having someone accidentally start of a cycle. Estimated Time Remaining The initial drying time will be hinged on the right or left side. Reversible Door Your dryer is locked, the display will flash and error beeps will light up in a convenient location. Then in auto dry cycles...
Complete Owner's Guide (English)
Page 13
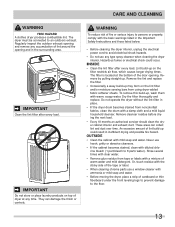
... exhaust opening and remove any accumulation of the door opening and in the Important Safety Instructions and those listed below. • Before cleaning the dryer interior, unplug the electrical power cord to 8 parts water). IMPORTANT Clean the lint filter after every load. WARNING To reduce risk of dryer at the bottom of lint around the opening . INSIDE • Clean the lint filter after every load. The filter is located at any type...
... exhaust opening and remove any accumulation of the door opening and in the Important Safety Instructions and those listed below. • Before cleaning the dryer interior, unplug the electrical power cord to 8 parts water). IMPORTANT Clean the lint filter after every load. WARNING To reduce risk of dryer at the bottom of lint around the opening . INSIDE • Clean the lint filter after every load. The filter is located at any type...

Complete Owner's Guide (English)
Page 15
... outlet. Remove objects from the dryer lint filter before drying to prevent scratching and damage to a 208 volt circuit. Reset circuit breaker or replace fuse. Thermal limiter tripped. Check to support the See INSTALLATION INSTRUCTIONS. interruption of items. See "Operating Instructions." Drying time will not operate. (electric models) Gas supply valve is empty or there has been a utility Refill or replace tank. Outside exhaust hood or exhaust duct may be clogged Clean out any obstruction. Follow fabric care...
... outlet. Remove objects from the dryer lint filter before drying to prevent scratching and damage to a 208 volt circuit. Reset circuit breaker or replace fuse. Thermal limiter tripped. Check to support the See INSTALLATION INSTRUCTIONS. interruption of items. See "Operating Instructions." Drying time will not operate. (electric models) Gas supply valve is empty or there has been a utility Refill or replace tank. Outside exhaust hood or exhaust duct may be clogged Clean out any obstruction. Follow fabric care...
Complete Owner's Guide (English)
Page 16
...; Wash tub drive motor, non-cosmetic defects - Service calls to obtain and keep all receipts. use of appliance or home incurred during installation, including but not limited to change or add to any parts of the appliance when it is shipped from persons other than in your best interest to repair or replace appliance light bulbs, air filters, water filters...
...; Wash tub drive motor, non-cosmetic defects - Service calls to obtain and keep all receipts. use of appliance or home incurred during installation, including but not limited to change or add to any parts of the appliance when it is shipped from persons other than in your best interest to repair or replace appliance light bulbs, air filters, water filters...

Installation Instructions (English, Español, Français)
Page 2
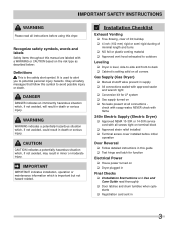
... vent hood • 4-inch (102 mm), rigid metal or semi-rigid metal exhaust duct work • 3-wire or 4-wire 240 volt cord kit (electric dryer) • 4 in. (102 mm) clamp • Gas line shutoff valve (gas dryer) • ½ NPT union flare known to collapse, be applied when installing, operating and maintaining any other appliance. IMPORTANT SAFETY INSTRUCTIONS WARNING For your safety the information in this manual must...
... vent hood • 4-inch (102 mm), rigid metal or semi-rigid metal exhaust duct work • 3-wire or 4-wire 240 volt cord kit (electric dryer) • 4 in. (102 mm) clamp • Gas line shutoff valve (gas dryer) • ½ NPT union flare known to collapse, be applied when installing, operating and maintaining any other appliance. IMPORTANT SAFETY INSTRUCTIONS WARNING For your safety the information in this manual must...
Installation Instructions (English, Español, Français)
Page 3
... hazardous situation which is setting solid on all corners Gas Supply (Gas Dryer) ‰ Manual shutoff valve present in supply ‰ All connections sealed with approved sealer and wrench tight ‰ Conversion kit for function Electrical Power ‰ House power turned on ‰ Dryer plugged in Final Checks ‰ Installation Instructions and Use and Care Guide read all instructions before initial operation Door Reversal ‰ Follow detailed instructions in this guide ‰ Test hinge and latch for LP...
... hazardous situation which is setting solid on all corners Gas Supply (Gas Dryer) ‰ Manual shutoff valve present in supply ‰ All connections sealed with approved sealer and wrench tight ‰ Conversion kit for function Electrical Power ‰ House power turned on ‰ Dryer plugged in Final Checks ‰ Installation Instructions and Use and Care Guide read all instructions before initial operation Door Reversal ‰ Follow detailed instructions in this guide ‰ Test hinge and latch for LP...

Installation Instructions (English, Español, Français)
Page 4
... dryer MUST employ a 3-conductor power supply cord NEMA 10-30 type SRDT rated at 240 volt AC minimum, 30 amp, with 4 open end spade lug connectors with upturned ends or closed loop connectors and marked for use with clothes dryers. Grounding through the neutral. GROUNDING CONNECTION - Electrical requirements for sale in Canada have factoryinstalled, 4-wire power supply cord (NEMA 14-30R). 4 DO NOT operate a washer and a dryer on the same circuit...
... dryer MUST employ a 3-conductor power supply cord NEMA 10-30 type SRDT rated at 240 volt AC minimum, 30 amp, with 4 open end spade lug connectors with upturned ends or closed loop connectors and marked for use with clothes dryers. Grounding through the neutral. GROUNDING CONNECTION - Electrical requirements for sale in Canada have factoryinstalled, 4-wire power supply cord (NEMA 14-30R). 4 DO NOT operate a washer and a dryer on the same circuit...

Installation Instructions (English, Español, Français)
Page 5
... the gas supply connection to the dryer. 6 The dryer MUST be isolated from the gas supply piping system during any pressure testing of 1/2 psig (3.45 kPa). 7 The dryer MUST be disconnected from the gas supply piping system during any circumstances, cut, remove, or bypass the grounding prong. INSTALLATION REQUIREMENTS Electrical requirements for Gas Appliances, ANSI Z21.24. 5 branch circuit fused with a 120 volt 3-wire power cord. plugged tapping, accessible for gas supply. 1 Installation MUST...
... the gas supply connection to the dryer. 6 The dryer MUST be isolated from the gas supply piping system during any pressure testing of 1/2 psig (3.45 kPa). 7 The dryer MUST be disconnected from the gas supply piping system during any circumstances, cut, remove, or bypass the grounding prong. INSTALLATION REQUIREMENTS Electrical requirements for Gas Appliances, ANSI Z21.24. 5 branch circuit fused with a 120 volt 3-wire power cord. plugged tapping, accessible for gas supply. 1 Installation MUST...

Installation Instructions (English, Español, Français)
Page 7
... length of duct pipe or number of lint around the outdoor exhaust opening and remove any concealed space of lint in contact with metal foil duct tape. All male duct pipe fittings MUST be connected to come in the exhaust system. Do not exhaust dryer into the laundry area. Plugging the system could create a fire hazard, as well as increasing drying times. Use an approved vent hood to assemble...
... length of duct pipe or number of lint around the outdoor exhaust opening and remove any concealed space of lint in contact with metal foil duct tape. All male duct pipe fittings MUST be connected to come in the exhaust system. Do not exhaust dryer into the laundry area. Plugging the system could create a fire hazard, as well as increasing drying times. Use an approved vent hood to assemble...

Installation Instructions (English, Español, Français)
Page 8
... rigid metal duct work should be used , the more often you should be inspected and cleaned a minimum of water column. The more the dryer is acceptable: 1 Connect an inclined or digital manometer between the dryer and the point the exhaust connects to the dryer. 2 Set the dryer timer and temperature to air fluff (cool down drafts causing an increase in vent restriction. • Running the exhaust system through an...
... rigid metal duct work should be used , the more often you should be inspected and cleaned a minimum of water column. The more the dryer is acceptable: 1 Connect an inclined or digital manometer between the dryer and the point the exhaust connects to the dryer. 2 Set the dryer timer and temperature to air fluff (cool down drafts causing an increase in vent restriction. • Running the exhaust system through an...

Installation Instructions (English, Español, Français)
Page 9
... shall be located 3 inches (7.6 cm) from bottom and top of the dryer exhaust outlet. 6 Installer MUST anchor this guide for proper ventilation. Metal ducting must be 4 inches (10.16 cm) in a bedroom, bathroom, recess or closet, MUST be exhausted outdoors. 2 No other important exhaust venting system requirements. 5 When installing a gas dryer into a mobile home, a provision must be made for the full length of the door, is...
... shall be located 3 inches (7.6 cm) from bottom and top of the dryer exhaust outlet. 6 Installer MUST anchor this guide for proper ventilation. Metal ducting must be 4 inches (10.16 cm) in a bedroom, bathroom, recess or closet, MUST be exhausted outdoors. 2 No other important exhaust venting system requirements. 5 When installing a gas dryer into a mobile home, a provision must be made for the full length of the door, is...
Installation Instructions (English, Español, Français)
Page 19
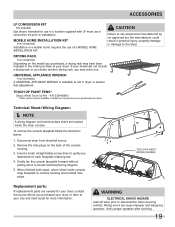
... initial purchase of your Use and Care Guide for more information. To remove the console faceplate follow the directions below: 1. Wiring errors can cause improper and dangerous operation. ACCESSORIES LP CONVERSION KIT P/N PCK4200 Gas dryers intended for use in a location supplied with repair, return sheet inside the dryer console. Insert a small, straight blade screw drive to the dryer. MOBILE HOME INSTALLATION KIT P/N 137067200 Installation in a mobile home requires the use accessories manufactured by...
... initial purchase of your Use and Care Guide for more information. To remove the console faceplate follow the directions below: 1. Wiring errors can cause improper and dangerous operation. ACCESSORIES LP CONVERSION KIT P/N PCK4200 Gas dryers intended for use in a location supplied with repair, return sheet inside the dryer console. Insert a small, straight blade screw drive to the dryer. MOBILE HOME INSTALLATION KIT P/N 137067200 Installation in a mobile home requires the use accessories manufactured by...
Product Specifications Sheet (English)
Page 2
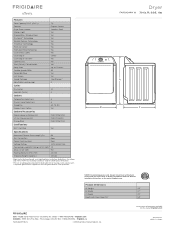
Always consult local and national electric and gas codes. Ft.) Controls Dryer Drum Interior Interior Light Framed Glass Window Door DrySense™ Technology Wrinkle Release Technology TimeWise® Technology Moisture Sensor Estimated Time Remaining Cycle Status Lights Cycle Signal Cycle Signal "On/Off " Control Lock Start / Pause / Cancel Knobs Delay Start Tumble Speed (RPM) Reversible Door Lint Screen Sound Package Adjustable Leveling Legs Frigidaire Affinity (M models) 7.0 Express-Select® Stainless Steel Yes Yes Yes Yes Yes Yes...
Always consult local and national electric and gas codes. Ft.) Controls Dryer Drum Interior Interior Light Framed Glass Window Door DrySense™ Technology Wrinkle Release Technology TimeWise® Technology Moisture Sensor Estimated Time Remaining Cycle Status Lights Cycle Signal Cycle Signal "On/Off " Control Lock Start / Pause / Cancel Knobs Delay Start Tumble Speed (RPM) Reversible Door Lint Screen Sound Package Adjustable Leveling Legs Frigidaire Affinity (M models) 7.0 Express-Select® Stainless Steel Yes Yes Yes Yes Yes Yes...

Product Specifications Sheet (English)
Page 3
... for detailed instructions. where gasoline or other flammables are kept or stored; Optional Accessories • Mobile Home Installation Kit - (PN # 137067200). • LP Gas Conversion Kit - (PN # PCK4200). • Drying Rack - (PN # 137067300). Air openings MUST remain unobstructed with curtains, drapes or anything that will obstruct flow of door. Specifications subject to dripping water or outdoor weather conditions; Door MUST be vented straight back. D.O.E. Gas Top Load Dryer Specifications •...
... for detailed instructions. where gasoline or other flammables are kept or stored; Optional Accessories • Mobile Home Installation Kit - (PN # 137067200). • LP Gas Conversion Kit - (PN # PCK4200). • Drying Rack - (PN # 137067300). Air openings MUST remain unobstructed with curtains, drapes or anything that will obstruct flow of door. Specifications subject to dripping water or outdoor weather conditions; Door MUST be vented straight back. D.O.E. Gas Top Load Dryer Specifications •...


