Use and Care Manual
Page 1
All about the Use &Care of your Dryer TABLE OF CONTENTS Important Safety Instructions 2-4 Solutions to Common Problems 14-15 Features 5 Warranty 16 Operating Instructions 6-11 Notes 17-18 Dryer Settings Chart 12 Français 19 Care and Cleaning 13 Español 35 www.frigidaire.com USA 1-800-944-9044 www.frigidaire.ca Canada 1-800-265-8352 137135000B (0907)
All about the Use &Care of your Dryer TABLE OF CONTENTS Important Safety Instructions 2-4 Solutions to Common Problems 14-15 Features 5 Warranty 16 Operating Instructions 6-11 Notes 17-18 Dryer Settings Chart 12 Français 19 Care and Cleaning 13 Español 35 www.frigidaire.com USA 1-800-944-9044 www.frigidaire.ca Canada 1-800-265-8352 137135000B (0907)

Use and Care Manual
Page 2
... not avoided, will result in death or serious injury. Installation and service must be performed by a qualified installer, service agency or the gas supplier. Read all instructions before using this dryer. This Use and Care Guide provides general operating instructions for your gas supplier from a neighbor's phone. Record and retain these instructions for several other appliance. Model Number Serial Number Purchase Date 2 For your building. • Clear the...
... not avoided, will result in death or serious injury. Installation and service must be performed by a qualified installer, service agency or the gas supplier. Read all instructions before using this dryer. This Use and Care Guide provides general operating instructions for your gas supplier from a neighbor's phone. Record and retain these instructions for several other appliance. Model Number Serial Number Purchase Date 2 For your building. • Clear the...
Use and Care Manual
Page 3
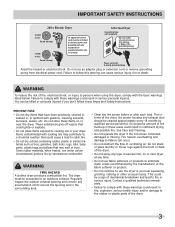
... noises. WARNING FIRE HAZARD A clothes dryer produces combustible lint. The interior of the dryer, lint screen housing and exhaust duct should be cleaned approximately every 18 months by spontaneous combustion. Fire hazard, overheating and damage to cooking oils in your dryer. IMPORTANT SAFETY INSTRUCTIONS 240 v Electric Dryer 120 v Gas Dryer 10-30R 3-wire (fused 30 amp) 14-30R 4-wire UL-approved service cord must be a sign of lint around the opening and remove any time...
... noises. WARNING FIRE HAZARD A clothes dryer produces combustible lint. The interior of the dryer, lint screen housing and exhaust duct should be cleaned approximately every 18 months by spontaneous combustion. Fire hazard, overheating and damage to cooking oils in your dryer. IMPORTANT SAFETY INSTRUCTIONS 240 v Electric Dryer 120 v Gas Dryer 10-30R 3-wire (fused 30 amp) 14-30R 4-wire UL-approved service cord must be a sign of lint around the opening and remove any time...

Use and Care Manual
Page 4
... or damage to comply with local codes. Installation instructions are packed in the dryer. Do not use of children's reach. Failure to the weather. • A thermal limiter switch automatically turns off the motor in serious personal injuries. PREVENT INJURY AND DAMAGE TO THE DRYER • All repairs and servicing must be performed by the use any service or cleaning. As children grow, teach them for...
... or damage to comply with local codes. Installation instructions are packed in the dryer. Do not use of children's reach. Failure to the weather. • A thermal limiter switch automatically turns off the motor in serious personal injuries. PREVENT INJURY AND DAMAGE TO THE DRYER • All repairs and servicing must be performed by the use any service or cleaning. As children grow, teach them for...
Use and Care Manual
Page 5
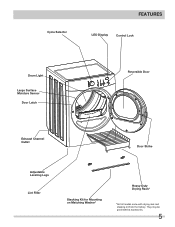
They may be purchased as accessories. 5 Cycle Selector FEATURES LED Display Control Lock Drum Light Large Surface Moisture Sensor Door Latch Reversible Door Exhaust Channel Outlet Door Strike Adjustable Leveling Legs Lint Filter Stacking Kit for Mounting on Matching Washer* Heavy Duty Drying Rack* *Not all models come with drying rack and stacking kit from the factory.
They may be purchased as accessories. 5 Cycle Selector FEATURES LED Display Control Lock Drum Light Large Surface Moisture Sensor Door Latch Reversible Door Exhaust Channel Outlet Door Strike Adjustable Leveling Legs Lint Filter Stacking Kit for Mounting on Matching Washer* Heavy Duty Drying Rack* *Not all models come with drying rack and stacking kit from the factory.
Use and Care Manual
Page 6
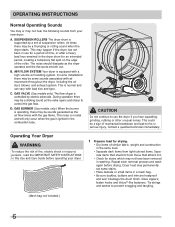
... load size and type. Dryer heat may not have been removed in washing. Tie strings and sashes to persons, read the IMPORTANT SAFETY INSTRUCTIONS in this Use and Care Guide before drying. AIR FLOW SYSTEM Your dryer is normal and can vary with air movement throughout the dryer, including the air duct, blower, and exhaust system. Contact a qualified technician immediately. Operating Your Dryer WARNING To reduce the risk of time...
... load size and type. Dryer heat may not have been removed in washing. Tie strings and sashes to persons, read the IMPORTANT SAFETY INSTRUCTIONS in this Use and Care Guide before drying. AIR FLOW SYSTEM Your dryer is normal and can vary with air movement throughout the dryer, including the air duct, blower, and exhaust system. Contact a qualified technician immediately. Operating Your Dryer WARNING To reduce the risk of time...
Use and Care Manual
Page 7
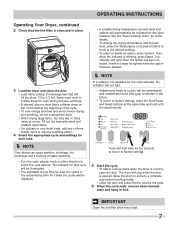
... settings. 5 Start the cycle. • To add or remove items when the dryer is running, open the door. ately and hang or fold. It will no longer be lighted when the option has been deleted. Í NOTE If a setting is blinking, press Select. Press and hold until the signal sounds. Items need room to tumble freely for more details. • To change the drying temperature...
... settings. 5 Start the cycle. • To add or remove items when the dryer is running, open the door. ately and hang or fold. It will no longer be lighted when the option has been deleted. Í NOTE If a setting is blinking, press Select. Press and hold until the signal sounds. Items need room to tumble freely for more details. • To change the drying temperature...
Use and Care Manual
Page 8
... the cycle starts, the indicator lights will blink, the signal will beep and "Err" will be illuminated. Then the outside of the display will not change the cycle once it tumbles through the heated air. Just turning the cycle selector knob to indicate the drying time is too small or almost dry, the moisture sensing bars may differ. OPERATING INSTRUCTIONS This manual covers many models and not all cycles, options...
... the cycle starts, the indicator lights will blink, the signal will beep and "Err" will be illuminated. Then the outside of the display will not change the cycle once it tumbles through the heated air. Just turning the cycle selector knob to indicate the drying time is too small or almost dry, the moisture sensing bars may differ. OPERATING INSTRUCTIONS This manual covers many models and not all cycles, options...
Use and Care Manual
Page 9
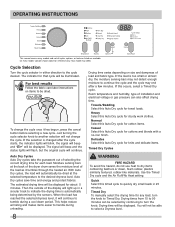
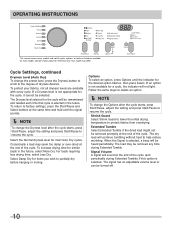
... for delicate fabrics. Cycle Selection, continued Sanitize Your Laundry with Timed Dry Select 90 minute Timed Dry with every cycle. Low Recommended for reference only. Drying Temperature To change the Temperature after the cycle starts, the lights will blink, the signal will beep and "Err" will be used with no carryover of bacteria with no heat) should only be remembered and recalled each cycle. Please check fabric care labels to dust...
... for delicate fabrics. Cycle Selection, continued Sanitize Your Laundry with Timed Dry Select 90 minute Timed Dry with every cycle. Low Recommended for reference only. Drying Temperature To change the Temperature after the cycle starts, the lights will blink, the signal will beep and "Err" will be used with no carryover of bacteria with no heat) should only be remembered and recalled each cycle. Please check fabric care labels to dust...
Use and Care Manual
Page 10
...;ashes, then press Select. Select Damp Dry for the cycle, it cannot be removed any time during Extended Tumble) if this option is selected, a beep will continue tumbling without heat to protect fabrics from overdrying. The signal has an adjustable volume level or can be heard periodically. OPERATING INSTRUCTIONS This manual covers many models and not all dryness levels are available...
...;ashes, then press Select. Select Damp Dry for the cycle, it cannot be removed any time during Extended Tumble) if this option is selected, a beep will continue tumbling without heat to protect fabrics from overdrying. The signal has an adjustable volume level or can be heard periodically. OPERATING INSTRUCTIONS This manual covers many models and not all dryness levels are available...
Use and Care Manual
Page 11
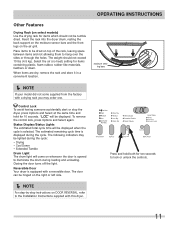
... same time and hold both for ten seconds to hang over the sides or through the holes. Reversible Door Your dryer is opened to the Installation Instructions supplied with a reversible door. Place items to be tumble dried. When items are dry, remove the rack and store it in a convenient location. Closing the door turns off the light. Insert the rack into the dryer drum, resting the back support on the moisture sensor...
... same time and hold both for ten seconds to hang over the sides or through the holes. Reversible Door Your dryer is opened to the Installation Instructions supplied with a reversible door. Place items to be tumble dried. When items are dry, remove the rack and store it in a convenient location. Closing the door turns off the light. Insert the rack into the dryer drum, resting the back support on the moisture sensor...
Use and Care Manual
Page 12
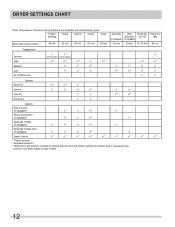
... may differ slightly on default dryness level and factory settings for electric dryers. DRYER SETTINGS CHART These Temperature, Dryness levels and Options are available with the following cycles: Towels/ Bedding Heavy Normal Casual Quick Estimated Cycle Duration** 60 min 55 min 50 min 40 min 25 min Delicates Ultra Timed Dry Timed Dry Delicates (15-75) (90) (if equipped) (if equipped) 20...
... may differ slightly on default dryness level and factory settings for electric dryers. DRYER SETTINGS CHART These Temperature, Dryness levels and Options are available with the following cycles: Towels/ Bedding Heavy Normal Casual Quick Estimated Cycle Duration** 60 min 55 min 50 min 40 min 25 min Delicates Ultra Timed Dry Timed Dry Delicates (15-75) (90) (if equipped) (if equipped) 20...
Use and Care Manual
Page 13
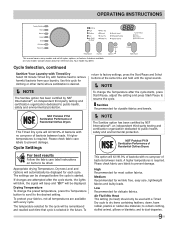
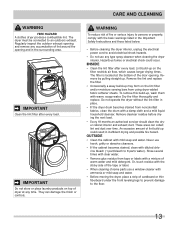
... water. Regularly inspect the outdoor exhaust opening and remove any time. IMPORTANT Clean the lint filter after every load. They can collect lint and dust over time. INSIDE • Clean the lint filter after every load. Lint build-up . The filter is located at any accumulation of the door opening and in the Important Safety Instructions and those listed below. • Before cleaning the dryer interior, unplug the electrical power cord...
... water. Regularly inspect the outdoor exhaust opening and remove any time. IMPORTANT Clean the lint filter after every load. They can collect lint and dust over time. INSIDE • Clean the lint filter after every load. Lint build-up . The filter is located at any accumulation of the door opening and in the Important Safety Instructions and those listed below. • Before cleaning the dryer interior, unplug the electrical power cord...
Use and Care Manual
Page 14
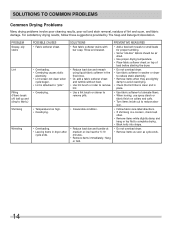
... static electricity. • Lint screen not clean when cycle began. • Lint is a concern, check load often. • Remove items while slightly damp and hang or lay flat to remove pills. • Irreversible condition. • Reduce load size and tumble at medium or low heat for proper tumbling. • Some "silk-like" fabrics should be air dried. • Use proper drying temperature. • Place fabric softener sheet on...
... static electricity. • Lint screen not clean when cycle began. • Lint is a concern, check load often. • Remove items while slightly damp and hang or lay flat to remove pills. • Irreversible condition. • Reduce load size and tumble at medium or low heat for proper tumbling. • Some "silk-like" fabrics should be air dried. • Use proper drying temperature. • Place fabric softener sheet on...
Use and Care Manual
Page 15
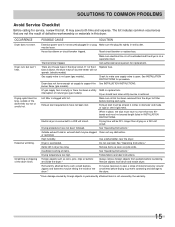
... with lint. Check to sew a scrap of natural gas (gas models). Reset circuit breaker or replace fuse. Drying temperature too high. House fuse blown or circuit breaker tripped. See "Operating Instructions." Do not overload. may be hitting the inside the dryer.* Always remove foreign objects from drum and restart dryer. There are not the result of the drum.* It may save both time and expense. Make sure electrical line is not overloaded and the dryer is open (gas models). Exhaust duct requirements have...
... with lint. Check to sew a scrap of natural gas (gas models). Reset circuit breaker or replace fuse. Drying temperature too high. House fuse blown or circuit breaker tripped. See "Operating Instructions." Do not overload. may be hitting the inside the dryer.* Always remove foreign objects from drum and restart dryer. There are not the result of the drum.* It may save both time and expense. Make sure electrical line is not overloaded and the dryer is open (gas models). Exhaust duct requirements have...
Use and Care Manual
Page 16
.... 2. Service calls to correct the installation of your original date of purchase, Electrolux will pay all receipts. THIS WRITTEN WARRANTY GIVES YOU SPECIFIC LEGAL RIGHTS. Exclusions This warranty does not cover the following: 1. DISCLAIMER OF IMPLIED WARRANTIES; This warranty only applies in a commercial setting. 7. use your appliance is shipped from its original owner to change or add to any parts of this warranty must be required...
.... 2. Service calls to correct the installation of your original date of purchase, Electrolux will pay all receipts. THIS WRITTEN WARRANTY GIVES YOU SPECIFIC LEGAL RIGHTS. Exclusions This warranty does not cover the following: 1. DISCLAIMER OF IMPLIED WARRANTIES; This warranty only applies in a commercial setting. 7. use your appliance is shipped from its original owner to change or add to any parts of this warranty must be required...

