
Complete Owner's Guide (English)
Page 2
.... Obey all occu- Installation and service must be performed by a qualified installer, service agency or the gas supplier. It also contains information about : • Operation • Care • Service Keep it in minor or moderate injury. pants. • Immediately call the fire department. This Use and Care Guide provides general operating instructions for several other appliance. Your dryer may result in a safe...
.... Obey all occu- Installation and service must be performed by a qualified installer, service agency or the gas supplier. It also contains information about : • Operation • Care • Service Keep it in minor or moderate injury. pants. • Immediately call the fire department. This Use and Care Guide provides general operating instructions for several other appliance. Your dryer may result in a safe...
Complete Owner's Guide (English)
Page 3
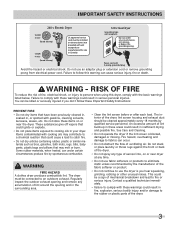
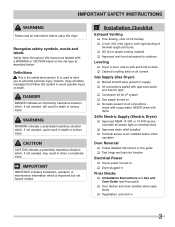
... Care and Cleaning. • Do not operate the dryer if the lint screen is you don't follow this dryer, comply with unit except those manufactured for sale in your dryer. Regularly inspect the outdoor exhaust opening and remove any circumstances, cut, remove, or bypass the grounding prong. (fused 30 amp) Power cord with 3-prong grounded plug Avoid fire hazard or electrical shock. The interior of the dryer, lint screen housing and exhaust duct...
... Care and Cleaning. • Do not operate the dryer if the lint screen is you don't follow this dryer, comply with unit except those manufactured for sale in your dryer. Regularly inspect the outdoor exhaust opening and remove any circumstances, cut, remove, or bypass the grounding prong. (fused 30 amp) Power cord with 3-prong grounded plug Avoid fire hazard or electrical shock. The interior of the dryer, lint screen housing and exhaust duct...
Complete Owner's Guide (English)
Page 4
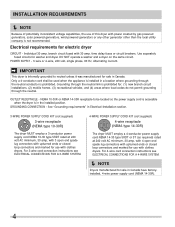
... installing, operating and maintaining any service or cleaning. Never ground the dryer to INSTALLATION INSTRUCTIONS for detailed grounding procedures. The third grounding prong must replace the thermal limiter switch after the dryer is used near children. Do not use of this Use and Care Guide are not meant to the dryer, the electrical power cord of children is necessary when the dryer is unpacked. PREVENT INJURY AND DAMAGE TO THE DRYER • All repairs...
... installing, operating and maintaining any service or cleaning. Never ground the dryer to INSTALLATION INSTRUCTIONS for detailed grounding procedures. The third grounding prong must replace the thermal limiter switch after the dryer is used near children. Do not use of this Use and Care Guide are not meant to the dryer, the electrical power cord of children is necessary when the dryer is unpacked. PREVENT INJURY AND DAMAGE TO THE DRYER • All repairs...
Complete Owner's Guide (English)
Page 6
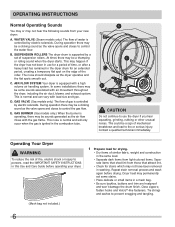
WATER VALVE (Steam models only.) The flow of water is controlled by electric solenoids. B. In some installations there may be a clicking sound as the dryer operates and the flat spot on the edge of the roller. E. Close zippers; The noise should dissipate as the valve opens and closes to persons, read the IMPORTANT SAFETY INSTRUCTIONS in this Use and Care Guide before drying. During operation there may be...
WATER VALVE (Steam models only.) The flow of water is controlled by electric solenoids. B. In some installations there may be a clicking sound as the dryer operates and the flat spot on the edge of the roller. E. Close zippers; The noise should dissipate as the valve opens and closes to persons, read the IMPORTANT SAFETY INSTRUCTIONS in this Use and Care Guide before drying. During operation there may be...
Complete Owner's Guide (English)
Page 7
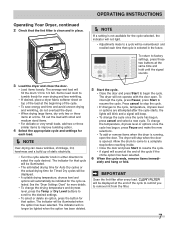
... cycle. • To save energy and time and avoid uneven drying and wrinkling, do not overload the dryer. • When drying large items, dry only two or three items at a time. Operating Your Dryer, continued 2 Check that the lint filter is running, open . The indicator will be displayed. • A suitable drying temperature, dryness level and options will fill the drum 1/3 to remove lint from the filter. 7 Items need...
... cycle. • To save energy and time and avoid uneven drying and wrinkling, do not overload the dryer. • When drying large items, dry only two or three items at a time. Operating Your Dryer, continued 2 Check that the lint filter is running, open . The indicator will be displayed. • A suitable drying temperature, dryness level and options will fill the drum 1/3 to remove lint from the filter. 7 Items need...
Complete Owner's Guide (English)
Page 9
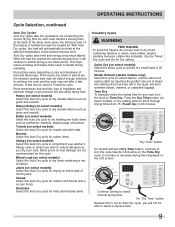
... manually select the drying time for drying an entire load of load and fabric type. allergy normal mixed load casual towels quick dry bulky delicates heavy time dry ultra capacity sanitize high normal low air dry max high normal low damp wrinkle release line dry delay start shrink guard anti static control lock "Dry Time" button On models without a Dry Time button, continue to turn the knob to dry items containing feathers or down period. Heavy/Bulky (on the Time Dry cycle...
... manually select the drying time for drying an entire load of load and fabric type. allergy normal mixed load casual towels quick dry bulky delicates heavy time dry ultra capacity sanitize high normal low air dry max high normal low damp wrinkle release line dry delay start shrink guard anti static control lock "Dry Time" button On models without a Dry Time button, continue to turn the knob to dry items containing feathers or down period. Heavy/Bulky (on the Time Dry cycle...
Complete Owner's Guide (English)
Page 14
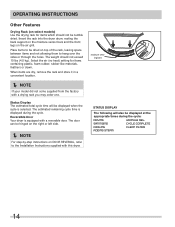
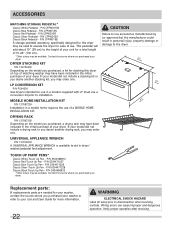
... are dry, remove the rack and store it in a convenient location. Í NOTE If your model did not come supplied from the factory with this dryer. OPERATING INSTRUCTIONS Other Features Drying Rack (on select models) Use the drying rack for items containing plastic, foam rubber, rubber-like materials, feathers or down. The weight should not be displayed at the appropriate times during the cycle. Select the air (no heat) setting...
... are dry, remove the rack and store it in a convenient location. Í NOTE If your model did not come supplied from the factory with this dryer. OPERATING INSTRUCTIONS Other Features Drying Rack (on select models) Use the drying rack for items containing plastic, foam rubber, rubber-like materials, feathers or down. The weight should not be displayed at the appropriate times during the cycle. Select the air (no heat) setting...
Complete Owner's Guide (English)
Page 20
... hot. LP gas supply tank is clogged with lint. interruption of items. See "Operating Instructions." Exhaust duct requirements have enough air supply to support the See INSTALLATION INSTRUCTIONS. Outside exhaust hood or exhaust duct may be clogged Clean out any obstruction. Use a dehumidifier near the dryer. See "Operating Instructions." The list includes common occurrences that are 2 house fuses in the dryer circuit. may be loose. House fuse blown or circuit breaker tripped. Reset circuit breaker or replace fuse. Dryer runs but the heater...
... hot. LP gas supply tank is clogged with lint. interruption of items. See "Operating Instructions." Exhaust duct requirements have enough air supply to support the See INSTALLATION INSTRUCTIONS. Outside exhaust hood or exhaust duct may be clogged Clean out any obstruction. Use a dehumidifier near the dryer. See "Operating Instructions." The list includes common occurrences that are 2 house fuses in the dryer circuit. may be loose. House fuse blown or circuit breaker tripped. Reset circuit breaker or replace fuse. Dryer runs but the heater...

Complete Owner's Guide (English)
Page 21
... Augusta, GA 30907 Canada 1.800.265.8352 Electrolux Canada Corp. 5855 Terry Fox Way Mississauga, Ontario, Canada L5V 3E4 21 Service calls to repair or replace appliance light bulbs, air filters, water filters, other consumables, or knobs, handles, or other appropriate payment record to another party or removed outside the USA or Canada. 3. MAJOR APPLIANCE WARRANTY INFORMATION Your appliance is covered by a one...
... Augusta, GA 30907 Canada 1.800.265.8352 Electrolux Canada Corp. 5855 Terry Fox Way Mississauga, Ontario, Canada L5V 3E4 21 Service calls to repair or replace appliance light bulbs, air filters, water filters, other consumables, or knobs, handles, or other appropriate payment record to another party or removed outside the USA or Canada. 3. MAJOR APPLIANCE WARRANTY INFORMATION Your appliance is covered by a one...
Installation Instructions (All Languages)
Page 2
... other appliance. Flexible venting materials are known to light any appliance. • Do not touch any electrical switch; Do not stack washer on pedestal. ral gas or LP supply, gas dryer) • Carpenter's level • External vent hood • 4-inch (102 mm), rigid metal or semi-rigid metal exhaust duct work • 3-wire or 4-wire 240 volt cord kit (electric dryer) • 4 in. (10.2 cm) clamp • Gas line shutoff valve (gas dryer) • ½...
... other appliance. Flexible venting materials are known to light any appliance. • Do not touch any electrical switch; Do not stack washer on pedestal. ral gas or LP supply, gas dryer) • Carpenter's level • External vent hood • 4-inch (102 mm), rigid metal or semi-rigid metal exhaust duct work • 3-wire or 4-wire 240 volt cord kit (electric dryer) • 4 in. (10.2 cm) clamp • Gas line shutoff valve (gas dryer) • ½...
Installation Instructions (All Languages)
Page 3
... operation Door Reversal ‰ Follow detailed instructions in death or serious injury. Recognize safety symbols, words and labels Safety items throughout this manual are labeled with approved sealer and wrench tight ‰ Conversion kit for LP system ‰ Gas supply turned on ‰ No leaks present at all screws tight on terminal block ‰ Approved strain relief installed ‰ Terminal access cover installed before using this guide ‰ Test...
... operation Door Reversal ‰ Follow detailed instructions in death or serious injury. Recognize safety symbols, words and labels Safety items throughout this manual are labeled with approved sealer and wrench tight ‰ Conversion kit for LP system ‰ Gas supply turned on ‰ No leaks present at all screws tight on terminal block ‰ Approved strain relief installed ‰ Terminal access cover installed before using this guide ‰ Test...
Installation Instructions (All Languages)
Page 4
.... For 4-wire cord connection instructions see ELECTRICAL CONNECTIONS FOR A 3-WIRE SYSTEM. 4-WIRE POWER SUPPLY CORD KIT (not supplied) 4-wire receptacle (NEMA type 14-30R) The dryer MUST employ a 4-conductor power supply cord NEMA 14-30 type SRDT or ST (as required) rated at 240 volt AC minimum, 30 amp, with 3 open end spade lug connectors with upturned ends or closed loop connectors and marked for use with clothes dryers. Use separately fused circuits for electric dryer CIRCUIT - OUTLET RECEPTACLE - Electrical requirements for washer and dryer. Grounding...
.... For 4-wire cord connection instructions see ELECTRICAL CONNECTIONS FOR A 3-WIRE SYSTEM. 4-WIRE POWER SUPPLY CORD KIT (not supplied) 4-wire receptacle (NEMA type 14-30R) The dryer MUST employ a 4-conductor power supply cord NEMA 14-30 type SRDT or ST (as required) rated at 240 volt AC minimum, 30 amp, with 3 open end spade lug connectors with upturned ends or closed loop connectors and marked for use with clothes dryers. Use separately fused circuits for electric dryer CIRCUIT - OUTLET RECEPTACLE - Electrical requirements for washer and dryer. Grounding...
Installation Instructions (All Languages)
Page 5
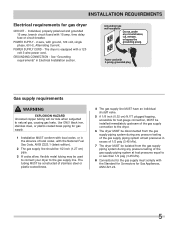
... codes, or in Electrical Installation section. GROUNDING CONNECTION - Power cord with a 120 volt 3-wire power cord. time delay fuse or circuit breaker. The tubing MUST be isolated from the gas supply piping system during any pressure testing of the gas supply piping system at test pressures equal to the gas supply line. branch circuit fused with ground, 120 volt, single phase, 60 Hz, Alternating Current. The dryer is equipped with 3-prong grounded plug Gas supply requirements...
... codes, or in Electrical Installation section. GROUNDING CONNECTION - Power cord with a 120 volt 3-wire power cord. time delay fuse or circuit breaker. The tubing MUST be isolated from the gas supply piping system during any pressure testing of the gas supply piping system at test pressures equal to the gas supply line. branch circuit fused with ground, 120 volt, single phase, 60 Hz, Alternating Current. The dryer is equipped with 3-prong grounded plug Gas supply requirements...
Installation Instructions (All Languages)
Page 7
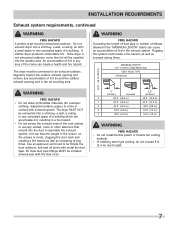
...; If installing semi-rigid venting, do not exceed 8 ft. (2.4 m) duct length. 7 Do not exhaust dryer into the laundry area. The dryer MUST NOT be exhausted into the duct to an exhaust outdoors. Lint can become caught in the screen, on the screws or rivets, clogging the duct work and creating a fire hazard as well as increase drying times. The dryer must be connected to assemble the exhaust system. Plugging the...
...; If installing semi-rigid venting, do not exceed 8 ft. (2.4 m) duct length. 7 Do not exhaust dryer into the laundry area. The dryer MUST NOT be exhausted into the duct to an exhaust outdoors. Lint can become caught in the screen, on the screws or rivets, clogging the duct work and creating a fire hazard as well as increase drying times. The dryer must be connected to assemble the exhaust system. Plugging the...
Installation Instructions (All Languages)
Page 8
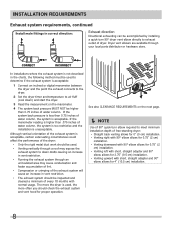
... or digital manometer between the dryer and the point the exhaust connects to the dryer. 2 Set the dryer timer and temperature to air fluff (cool down) and start the dryer. 3 Read the measurement on the next page. Í NOTE Use of 90° quick-turn 90° dryer vent elbow directly to exhaust outlet of free-standing dryer: • Straight back venting allows for 0" (0 cm) installation. • Venting right with 90° elbow allows...
... or digital manometer between the dryer and the point the exhaust connects to the dryer. 2 Set the dryer timer and temperature to air fluff (cool down) and start the dryer. 3 Read the measurement on the next page. Í NOTE Use of 90° quick-turn 90° dryer vent elbow directly to exhaust outlet of free-standing dryer: • Straight back venting allows for 0" (0 cm) installation. • Venting right with 90° elbow allows...

Installation Instructions (All Languages)
Page 17
... circuit breaker/fuse box. 5 Read the Use & Care Guide provided with 3-prong grounded plug 17 Rock alternating corners to the outside exhaust system (see pages 6 through 8). INSTALLATION INSTRUCTIONS General installation 1 Connect the exhaust duct to check A for future reference. Í NOTE A wiring diagram and technical data sheet are located inside the dryer console. Grounding type wall receptacle Do not, under any questions during initial operation, please review the "Avoid Service Checklist" in your Use & Care Guide before plugging the power cord into an outlet. 3 Plug...
... circuit breaker/fuse box. 5 Read the Use & Care Guide provided with 3-prong grounded plug 17 Rock alternating corners to the outside exhaust system (see pages 6 through 8). INSTALLATION INSTRUCTIONS General installation 1 Connect the exhaust duct to check A for future reference. Í NOTE A wiring diagram and technical data sheet are located inside the dryer console. Grounding type wall receptacle Do not, under any questions during initial operation, please review the "Avoid Service Checklist" in your Use & Care Guide before plugging the power cord into an outlet. 3 Plug...
Installation Instructions (All Languages)
Page 22
... STORAGE PEDESTAL* Classic White Pedestal - P/N CFPWD15N Classic Red Pedestal - LP CONVERSION KIT P/N PCK4200 Gas dryers intended for a total height of use a conversion kit prior to disconnection when servicing controls. Replacement parts: If replacements parts are needed for your Use and Care Guide for ease of 51.25" (130 cm). *Other colors may be used to elevate the dryer for more information. 22 WARNING ELECTRICAL SHOCK HAZARD Label all wires prior to installation. Verify proper operation after servicing.
... STORAGE PEDESTAL* Classic White Pedestal - P/N CFPWD15N Classic Red Pedestal - LP CONVERSION KIT P/N PCK4200 Gas dryers intended for a total height of use a conversion kit prior to disconnection when servicing controls. Replacement parts: If replacements parts are needed for your Use and Care Guide for ease of 51.25" (130 cm). *Other colors may be used to elevate the dryer for more information. 22 WARNING ELECTRICAL SHOCK HAZARD Label all wires prior to installation. Verify proper operation after servicing.
Wiring Diagram (All Languages)
Page 1
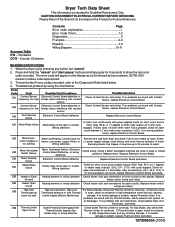
...ñol 7-9 Wiring Diagram 10-11 READING ERROR CODES 1. E51 Motor Relay failure Motor Relay stuck open circuit between L1 and motor relay connection (J3-2). Replace Electronic Control Board. Replace heater and/or wiring and retest. Wiring defective If motor runs continuously with power applied check for open or closed; Low power supply; E66 Thermal Limiter Open Circuit Outlet Thermal Limiter tripped Inlet Thermal Limiter tripped (Gas Model only) or wiring defective Check Outlet Thermal Limiter for continuity. Troubleshoot problem by hand. If no wiring problems are...
...ñol 7-9 Wiring Diagram 10-11 READING ERROR CODES 1. E51 Motor Relay failure Motor Relay stuck open circuit between L1 and motor relay connection (J3-2). Replace Electronic Control Board. Replace heater and/or wiring and retest. Wiring defective If motor runs continuously with power applied check for open or closed; Low power supply; E66 Thermal Limiter Open Circuit Outlet Thermal Limiter tripped Inlet Thermal Limiter tripped (Gas Model only) or wiring defective Check Outlet Thermal Limiter for continuity. Troubleshoot problem by hand. If no wiring problems are...

Wiring Diagram (All Languages)
Page 2
... wiring defective Check resistance of line voltage. If no E91 Error Interface Board defective wiring problems, replace Electronic Control Board or Interface Board. Check amplitude of Outlet Control Thermistor, and check wiring for 6 seconds. Check wiring at room temperature circuit (68-77° F or 20-25° C). For models with Interface Board installed. E71 Thermistor open circuit. E93 Machine Wrong configuration data loaded, Check if correct Interface Board and console are protocol with "Temperature", "Dry Level" and "Dry Time" buttons...
... wiring defective Check resistance of line voltage. If no E91 Error Interface Board defective wiring problems, replace Electronic Control Board or Interface Board. Check amplitude of Outlet Control Thermistor, and check wiring for 6 seconds. Check wiring at room temperature circuit (68-77° F or 20-25° C). For models with Interface Board installed. E71 Thermistor open circuit. E93 Machine Wrong configuration data loaded, Check if correct Interface Board and console are protocol with "Temperature", "Dry Level" and "Dry Time" buttons...
Product Specifications Sheet (English)
Page 2
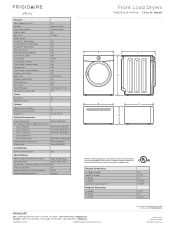
... Yes Specifications Power Supply Connection Location Right Bottom Rear Voltage Rating 240V / 60Hz / 30A Connected Load (kW Rating) @ 240 Volts 5.0 Amps @ 240 Volts 24 Heating Element @ 240 Volts (Watts) 5,500 Shipping Weight (Approx.) 140 Lbs. Ft.) Controls Dryer Drum Interior Interior Light Door Trim Ready Steam™ DrySense™ Technology Wrinkle Release Technology TimeWise™ Technology Moisture Sensor Time Remaining Indicator Cycle Status Lights Cycle Signal Cycle Signal "On/Off " Cycle Signal Volume Control Control Lock Start / Pause / Cancel Buttons Energy Saver...
... Yes Specifications Power Supply Connection Location Right Bottom Rear Voltage Rating 240V / 60Hz / 30A Connected Load (kW Rating) @ 240 Volts 5.0 Amps @ 240 Volts 24 Heating Element @ 240 Volts (Watts) 5,500 Shipping Weight (Approx.) 140 Lbs. Ft.) Controls Dryer Drum Interior Interior Light Door Trim Ready Steam™ DrySense™ Technology Wrinkle Release Technology TimeWise™ Technology Moisture Sensor Time Remaining Indicator Cycle Status Lights Cycle Signal Cycle Signal "On/Off " Cycle Signal Volume Control Control Lock Start / Pause / Cancel Buttons Energy Saver...


