
Use and Care Guide
Page 5
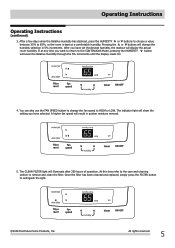
...button to HIGH or LOW. After you have selected. If at a comfortable humidity. Once the filter has been cleaned and replaced, simply press the FILTER button to remove and clean the filter. Operating Instructions Operating Instructions (continued) 3. The indicator light will change the fan speed to ... will lower the Relative Humidity through the 5% increments until the display reads CO. 4. The CLEAN FILTER light will result in 5% increments. At this time refer to the care and cleaning section to extinguish the light. 2009 Electrolux Home Products, Inc. After a few days when ...
...button to HIGH or LOW. After you have selected. If at a comfortable humidity. Once the filter has been cleaned and replaced, simply press the FILTER button to remove and clean the filter. Operating Instructions Operating Instructions (continued) 3. The indicator light will change the fan speed to ... will lower the Relative Humidity through the 5% increments until the display reads CO. 4. The CLEAN FILTER light will result in 5% increments. At this time refer to the care and cleaning section to extinguish the light. 2009 Electrolux Home Products, Inc. After a few days when ...
Use and Care Guide
Page 8
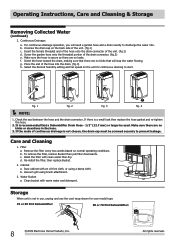
... Removing Collected Water (continued) 2. g. Care and Cleaning 1. b. Re-install the filter, then replace Bucket. 2. b. Storage When unit is not in the hose. 3. All rights reserved. Make sure the hose is recommended that there are ...Dehumidifier Drain Hose - 1/2" (12.7 mm) or larger be screwed securely to start. fig. 1 fig. 2 fig. 3 fig. 4 NOTE: 1. Make sure there are no leaks. Filter a. Water Bucket a. Clean bucket with clean water then dry. b. f. It is secure so there are no kinks that will need a garden hose and a drain nearby to discharge the water...
... Removing Collected Water (continued) 2. g. Care and Cleaning 1. b. Re-install the filter, then replace Bucket. 2. b. Storage When unit is not in the hose. 3. All rights reserved. Make sure the hose is recommended that there are ...Dehumidifier Drain Hose - 1/2" (12.7 mm) or larger be screwed securely to start. fig. 1 fig. 2 fig. 3 fig. 4 NOTE: 1. Make sure there are no leaks. Filter a. Water Bucket a. Clean bucket with clean water then dry. b. f. It is secure so there are no kinks that will need a garden hose and a drain nearby to discharge the water...


