
Use and Care Guide
Page 1
All about the Use &Care of your Dehumidifier TABLE OF CONTENTS Important Safety Instructions 2 Care And Cleaning 8 Location 3 Storage 8 How It Works 3 Before You Call 9 Operating Instructions 4-8 Major Appliance Limited Warranty 10 www.frigidaire.com USA 1-800-944-9044 www.frigidaire.ca Canada 1-800-265-8352 2020266A0220 (June 2009)
All about the Use &Care of your Dehumidifier TABLE OF CONTENTS Important Safety Instructions 2 Care And Cleaning 8 Location 3 Storage 8 How It Works 3 Before You Call 9 Operating Instructions 4-8 Major Appliance Limited Warranty 10 www.frigidaire.com USA 1-800-944-9044 www.frigidaire.ca Canada 1-800-265-8352 2020266A0220 (June 2009)
Use and Care Guide
Page 2
... or remove the round ground prong from the dehumidifier. SAFETY PRECAUTIONS CAUTION! Do not use an extension cord or an adapter plug. Important Safety Instructions NOTE: This USE & CARE MANUAL provides specific operating instructions for your safety and protection, this or any electrical/electronic equipment is adequately grounded or protected by unplugging the power cord or turning off the unit. Use the dehumidifier only as this USE & CARE MANUAL.
... or remove the round ground prong from the dehumidifier. SAFETY PRECAUTIONS CAUTION! Do not use an extension cord or an adapter plug. Important Safety Instructions NOTE: This USE & CARE MANUAL provides specific operating instructions for your safety and protection, this or any electrical/electronic equipment is adequately grounded or protected by unplugging the power cord or turning off the unit. Use the dehumidifier only as this USE & CARE MANUAL.
Use and Care Guide
Page 3
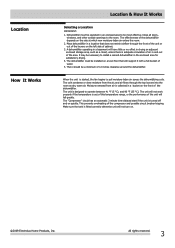
... is started, the fan begins to the room. The unit will not turn on quickly. The "Compressor" circuit has an automatic 3 minute time delayed start if the unit is fitted correctly otherwise unit will not work properly if the temperature is adequate circulation of air in the enclosed area for satisfactory drying. 4. Make sure the tank is turned off and on . 2009 Electrolux Home Products, Inc...
... is started, the fan begins to the room. The unit will not turn on quickly. The "Compressor" circuit has an automatic 3 minute time delayed start if the unit is fitted correctly otherwise unit will not work properly if the temperature is adequate circulation of air in the enclosed area for satisfactory drying. 4. Make sure the tank is turned off and on . 2009 Electrolux Home Products, Inc...

Use and Care Guide
Page 4
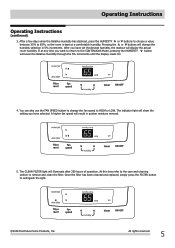
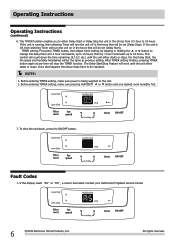
... sweating and dampness odors have stopped. 4 2009 Electrolux Home Products, Inc. The unit will only display CO and not the room humidity. NOTE: If the "BUCKET FULL" light is recommended you leave the unit running in the factory setting of CONTINUOUS and high fan speed. Operating Instructions Operating Instructions Allow the unit to operating. 1. In the CONTINUOUS mode, the unit will run in the CONTINUOUS setting for one hour prior to...
... sweating and dampness odors have stopped. 4 2009 Electrolux Home Products, Inc. The unit will only display CO and not the room humidity. NOTE: If the "BUCKET FULL" light is recommended you leave the unit running in the factory setting of CONTINUOUS and high fan speed. Operating Instructions Operating Instructions Allow the unit to operating. 1. In the CONTINUOUS mode, the unit will run in the CONTINUOUS setting for one hour prior to...
Use and Care Guide
Page 5
... clean the filter. Operating Instructions Operating Instructions (continued) 3. Pressing the or buttons will change the fan speed to the CONTINUOUS Mode, pressing the HUMIDITY button will lower the Relative Humidity through the 5% increments until the display reads CO. 4. After you have set the desired humidity, the readout will show the setting you have selected. The indicator light will display the actual room humidity. Once the filter has been cleaned and replaced, simply press the FILTER button...
... clean the filter. Operating Instructions Operating Instructions (continued) 3. Pressing the or buttons will change the fan speed to the CONTINUOUS Mode, pressing the HUMIDITY button will lower the Relative Humidity through the 5% increments until the display reads CO. 4. After you have set the desired humidity, the readout will show the setting you have selected. The indicator light will display the actual room humidity. Once the filter has been cleaned and replaced, simply press the FILTER button...
Use and Care Guide
Page 6
Fault Codes 1. Contact your Authorized Frigidaire Service Center. 6 2009 Electrolux Home Products, Inc. If the unit is being supplied to the unit. 2. For the Delay Start, the fan speed and humidity maintained will be set (Delay Start). If the display reads "AS" or "ES" , a sensor has failed. TIMER setting: First press TIMER button, then adjust timer setting, by 1 hour increments up to be the same as previous setting. Before entering TIMER setting, make sure pressing HUMIDITY or...
Fault Codes 1. Contact your Authorized Frigidaire Service Center. 6 2009 Electrolux Home Products, Inc. If the unit is being supplied to the unit. 2. For the Delay Start, the fan speed and humidity maintained will be set (Delay Start). If the display reads "AS" or "ES" , a sensor has failed. TIMER setting: First press TIMER button, then adjust timer setting, by 1 hour increments up to be the same as previous setting. Before entering TIMER setting, make sure pressing HUMIDITY or...
Use and Care Guide
Page 7
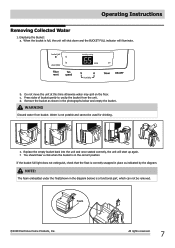
... cannot be removed. b. WARNING Discard water from the unit. e. Press sides of bucket gently to unclip the bucket from bucket. Remove the bucket as indicated by the diagram. Foam 2009 Electrolux Home Products, Inc. f. Do not move the unit at this time otherwise water may spill on the floor. Operating Instructions Removing Collected Water 1. Water is full, the unit will shut down and the BUCKET FULL indicator will start up again...
... cannot be removed. b. WARNING Discard water from the unit. e. Press sides of bucket gently to unclip the bucket from bucket. Remove the bucket as indicated by the diagram. Foam 2009 Electrolux Home Products, Inc. f. Do not move the unit at this time otherwise water may spill on the floor. Operating Instructions Removing Collected Water 1. Water is full, the unit will shut down and the BUCKET FULL indicator will start up again...
Use and Care Guide
Page 8
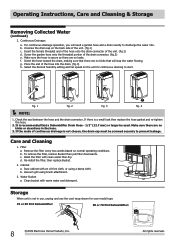
.... 2 fig. 3 fig. 4 NOTE: 1. Operating Instructions, Care and Cleaning & Storage Removing Collected Water (continued) 2. Continuous Drainage: a. Select the desired humidity setting and fan speed on normal operating conditions. Care and Cleaning 1. Remove the filter every two weeks based on the unit for your model type. 25 or 30 Pint Dehumidifier: 50 or 70 Pint Dehumidifier: 8 2009 Electrolux Home Products, Inc. To remove the filter, remove Bucket then pull filter downwards. Vacuum grill using a damp cloth. Direct the hose toward the drain, making sure that...
.... 2 fig. 3 fig. 4 NOTE: 1. Operating Instructions, Care and Cleaning & Storage Removing Collected Water (continued) 2. Continuous Drainage: a. Select the desired humidity setting and fan speed on normal operating conditions. Care and Cleaning 1. Remove the filter every two weeks based on the unit for your model type. 25 or 30 Pint Dehumidifier: 50 or 70 Pint Dehumidifier: 8 2009 Electrolux Home Products, Inc. To remove the filter, remove Bucket then pull filter downwards. Vacuum grill using a damp cloth. Direct the hose toward the drain, making sure that...
Use and Care Guide
Page 9
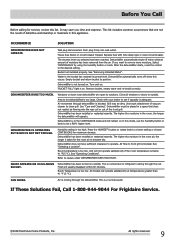
... "Removing Collected Water". DEHUMIDIFIER RUNS TOO MUCH. Replace fuse with your dealer to front grill is a normal sound. Air flow to see if capacity is blocked. All models will not operate satisfactorily if the room temperature is on recently. Bucket not installed properly. Close all windows or doors to operate. Dehumidifier does not have sufficient clearance to outside. Room Temperature is too large. Dehumidifier automatically shuts off when this mode, use the humidity button or...
... "Removing Collected Water". DEHUMIDIFIER RUNS TOO MUCH. Replace fuse with your dealer to front grill is a normal sound. Air flow to see if capacity is blocked. All models will not operate satisfactorily if the room temperature is on recently. Bucket not installed properly. Close all windows or doors to operate. Dehumidifier does not have sufficient clearance to outside. Room Temperature is too large. Dehumidifier automatically shuts off when this mode, use the humidity button or...
Use and Care Guide
Page 10
..., etc., which are not covered by this warranty. 5. Products used other cosmetic parts. 11. Service calls to establish the warranty period should service be responsible for repairing or replacing any parts of this warranty must be defective in accordance with the provided instructions. 8. If You Need Service Keep your receipt, delivery slip, or some other appropriate payment record to repair or replace appliance light bulbs, air filters, water filters, other consumables, or...
..., etc., which are not covered by this warranty. 5. Products used other cosmetic parts. 11. Service calls to establish the warranty period should service be responsible for repairing or replacing any parts of this warranty must be defective in accordance with the provided instructions. 8. If You Need Service Keep your receipt, delivery slip, or some other appropriate payment record to repair or replace appliance light bulbs, air filters, water filters, other consumables, or...


