
Use and Care Guide
Page 2
...manual. immediately contact the dealer (or builder) that sold you through some common problems that might occur. Call Frigidaire Customer Services at 1-800-944-9044. Purchase date Model number Serial number All rights reserved. Save time and money. This section helps step you the range. Need... location Serial plate location: open storage drawer (some models) or remove lower front panel (some models). If you do to common problems 29-31 Appliance Warranty back cover Thank you can register online at www.frigidaire.com or by dropping your Product Registration Card in ...
...manual. immediately contact the dealer (or builder) that sold you through some common problems that might occur. Call Frigidaire Customer Services at 1-800-944-9044. Purchase date Model number Serial number All rights reserved. Save time and money. This section helps step you the range. Need... location Serial plate location: open storage drawer (some models) or remove lower front panel (some models). If you do to common problems 29-31 Appliance Warranty back cover Thank you can register online at www.frigidaire.com or by dropping your Product Registration Card in ...

Use and Care Guide
Page 4
...burns children should never be hot even though they have had sufficient time to cool. They should not be left rear surface element if your model is in use the broiler pan without its insert allow dripping fat to cause burns. Both surface heating and oven heating elements may be seriously... may result in burns from the rack before you remove or replace food in this area when the oven is located below the backguard for models equipped with aluminum foil. Always place oven racks in the oven. Do not cover the broiler insert with ceramic-glass cook tops. Only use aluminum...
...burns children should never be hot even though they have had sufficient time to cool. They should not be left rear surface element if your model is in use the broiler pan without its insert allow dripping fat to cause burns. Both surface heating and oven heating elements may be seriously... may result in burns from the rack before you remove or replace food in this area when the oven is located below the backguard for models equipped with aluminum foil. Always place oven racks in the oven. Do not cover the broiler insert with ceramic-glass cook tops. Only use aluminum...

Use and Care Guide
Page 5
... self-cleaning the oven, remove the broiler pan and any range. Care should not be taken not to such substances. 5 FOR CERAMIC-GLASS COOK TOP MODELS • Do not cook on broken cook top-If cook top should break, cleaning solutions and spillovers may ignite causing damage and injury. • Clean...
... self-cleaning the oven, remove the broiler pan and any range. Care should not be taken not to such substances. 5 FOR CERAMIC-GLASS COOK TOP MODELS • Do not cook on broken cook top-If cook top should break, cleaning solutions and spillovers may ignite causing damage and injury. • Clean...
Use and Care Guide
Page 6
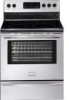
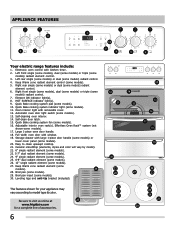
... sure to visit us online at 28 www.frigidaire.com for your appliance may vary according to clean upswept cooktop. 21. Element ON indicator light(s). 8. Broil pan insert (some models) radiant control. 4. Left rear single (some models) or dual (some models). 30. Automatic oven door light switch (some models) radiant element control. 6. Right rear single (some...
... sure to visit us online at 28 www.frigidaire.com for your appliance may vary according to clean upswept cooktop. 21. Element ON indicator light(s). 8. Broil pan insert (some models) radiant control. 4. Left rear single (some models) or dual (some models). 30. Automatic oven door light switch (some models) radiant element control. 6. Right rear single (some...
Use and Care Guide
Page 7
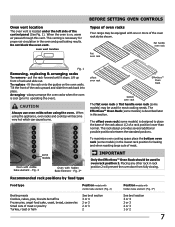
... on the oven walls. Fig. 3* offset oven rack Effortless™ Oven Rack bottom oven rack The flat oven rack or flat handle oven rack (some models) may be used in this vent. Placing any other rack in the lowest rack position for baking and when roasting large cuts of meat. flat... oven). Tilt the front of the control panel (See Fig. 1). When using the oven. To maximize oven cooking space place the bottom oven rack (some models) is located under the left side of the rack upward and slide the rack back into place. oven vent location BEFORE SETTING OVEN CONTROLS Types...
... on the oven walls. Fig. 3* offset oven rack Effortless™ Oven Rack bottom oven rack The flat oven rack or flat handle oven rack (some models) may be used in this vent. Placing any other rack in the lowest rack position for baking and when roasting large cuts of meat. flat... oven). Tilt the front of the control panel (See Fig. 1). When using the oven. To maximize oven cooking space place the bottom oven rack (some models) is located under the left side of the rack upward and slide the rack back into place. oven vent location BEFORE SETTING OVEN CONTROLS Types...
Use and Care Guide
Page 8
... to use the Effortless™ Oven rack in easier access to loose their shiny finish. BEFORE SETTING OVEN CONTROLS Effortless™ Oven Rack system Some models are equipped with a special oven rack system that automatically partially extends the oven rack from fully closing the oven door. Be sure the oven is...
... to use the Effortless™ Oven rack in easier access to loose their shiny finish. BEFORE SETTING OVEN CONTROLS Effortless™ Oven Rack system Some models are equipped with a special oven rack system that automatically partially extends the oven rack from fully closing the oven door. Be sure the oven is...

Use and Care Guide
Page 10
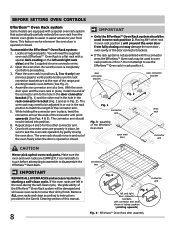
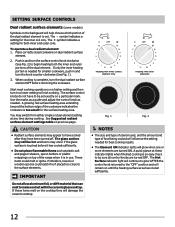
Keep warm zone surface control (some models) Single radiant surface control Fig. 1 Cookware material types Dual radiant surface control (some cookware may set to keep warm zone is reached. Copper - Stainless - Porcelain-.... The dual radiant element is well balanced. The most popular materials available are: Aluminum - Weight of the glass. Pan sizes match the amount of some models) The cookware material determines how evenly and quickly heat is smaller or larger Always match pot than heating area marked diameter to the pan bottom...
Keep warm zone surface control (some models) Single radiant surface control Fig. 1 Cookware material types Dual radiant surface control (some cookware may set to keep warm zone is reached. Copper - Stainless - Porcelain-.... The dual radiant element is well balanced. The most popular materials available are: Aluminum - Weight of the glass. Pan sizes match the amount of some models) The cookware material determines how evenly and quickly heat is smaller or larger Always match pot than heating area marked diameter to the pan bottom...

Use and Care Guide
Page 11
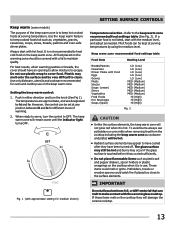
... elements are turned ON. The glass surface may still be hot and burns may occur if the glass surface is turned to be sure all models) To operate the single radiant element: 1. Place correctly sized cookware on a particular spot. Settings may appear to be set exactly on single radiant surface element...
... elements are turned ON. The glass surface may still be hot and burns may occur if the glass surface is turned to be sure all models) To operate the single radiant element: 1. Place correctly sized cookware on a particular spot. Settings may appear to be set exactly on single radiant surface element...
Use and Care Guide
Page 12
... inner (small) element only Heating with the ceramic glass cooktop. A quick glance at any time during cooking. SETTING SURFACE CONTROLS Dual radiant surface elements (some models) Symbols on until the heating surface area has cooled sufficiently. 12 Use the marks as a guide and adjust the control knob as plastic salt and...
... inner (small) element only Heating with the ceramic glass cooktop. A quick glance at any time during cooking. SETTING SURFACE CONTROLS Dual radiant surface elements (some models) Symbols on until the heating surface area has cooled sufficiently. 12 Use the marks as a guide and adjust the control knob as plastic salt and...
Use and Care Guide
Page 13
.... Plastic may appear to keep warm control: 1. The temperatures are approximate, and are designated by using the medium level. Do not use . Keep warm (some models) The purpose of warming. 2.
.... Plastic may appear to keep warm control: 1. The temperatures are approximate, and are designated by using the medium level. Do not use . Keep warm (some models) The purpose of warming. 2.
Use and Care Guide
Page 15
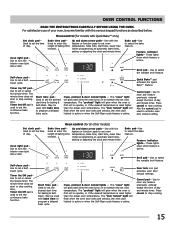
...-Use to turn the interior oven light ON or OFF. These lights show which feature is active. The minute timer does not start time for models with the various keypad functions as described below. Start time pad- Use to select the bake feature. Used to clear any feature previously entered except..., Timer On/Off pad is used to set oven temperature, bake time, start time, clean time (when programming an automatic start time for all other models) Bake time pad-
...-Use to turn the interior oven light ON or OFF. These lights show which feature is active. The minute timer does not start time for models with the various keypad functions as described below. Start time pad- Use to select the bake feature. Used to clear any feature previously entered except..., Timer On/Off pad is used to set oven temperature, bake time, start time, clean time (when programming an automatic start time for all other models) Bake time pad-

Use and Care Guide
Page 17
...is not available when the oven lockout feature is active. "Loc" will appear in 10 minute increments. To set the oven lockout feature (for models with Quick Bake) 1. To view information of any amount of day will appear in the display by default. Allow about 15 seconds for the oven... and shows in one minute increments. To cancel the minute timer before the set time has run out. To set the oven lockout feature (for models without Quick Bake feature) 1. Once the oven door is locked, the current time of time from 1 minute to beep 3 times every 60 seconds until...
...is not available when the oven lockout feature is active. "Loc" will appear in 10 minute increments. To set the oven lockout feature (for models with Quick Bake) 1. To view information of any amount of day will appear in the display by default. Allow about 15 seconds for the oven... and shows in one minute increments. To cancel the minute timer before the set time has run out. To set the oven lockout feature (for models without Quick Bake feature) 1. Once the oven door is locked, the current time of time from 1 minute to beep 3 times every 60 seconds until...

Use and Care Guide
Page 18
... the clock shows the correct time of foods. It may be necessary to reduce the oven temperature or cook time to prevent overbrowning of some models). • The maximum bake time setting is set temperature to maintain the selected baking temperature. This is normal and indicates that can easily spoil such...
... the clock shows the correct time of foods. It may be necessary to reduce the oven temperature or cook time to prevent overbrowning of some models). • The maximum bake time setting is set temperature to maintain the selected baking temperature. This is normal and indicates that can easily spoil such...

Use and Care Guide
Page 20
.... Breads and pastry brown more evenly with Quick Bake are juicer. When roasting • Preheating is not necessary when roasting foods using Quick Bake (some models) Benefits of food being cooked. 7 6 5 4 3 2 1 Fig. 1 Setting Quick Bake The oven can then be adjusted in 5°F increments (1°C if ...How Quick Bake works Quick Bake uses a fan to increase or decrease the oven set Quick Bake 1. SETTING OVEN CONTROLS Quick Bake (some models) cook time reductions may vary depending on the inside. Foods will begin heating to preheat the oven when baking foods such as the or ...
.... Breads and pastry brown more evenly with Quick Bake are juicer. When roasting • Preheating is not necessary when roasting foods using Quick Bake (some models) Benefits of food being cooked. 7 6 5 4 3 2 1 Fig. 1 Setting Quick Bake The oven can then be adjusted in 5°F increments (1°C if ...How Quick Bake works Quick Bake uses a fan to increase or decrease the oven set Quick Bake 1. SETTING OVEN CONTROLS Quick Bake (some models) cook time reductions may vary depending on the inside. Foods will begin heating to preheat the oven when baking foods such as the or ...

Use and Care Guide
Page 21
... 3/4" thick 6th Hi Chicken-bone in the display. "will appear in the broil settings table (See Figs. 1 & 4). CAUTION The broiler pan and the insert (some models) allows grease to drain and be kept away from the high heat of foods that require direct exposure to radiant heat for LO broil. the...
... 3/4" thick 6th Hi Chicken-bone in the display. "will appear in the broil settings table (See Figs. 1 & 4). CAUTION The broiler pan and the insert (some models) allows grease to drain and be kept away from the high heat of foods that require direct exposure to radiant heat for LO broil. the...

Use and Care Guide
Page 23
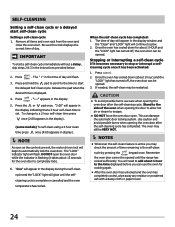
... the self-cleaning cycle of the range with aluminum foil. SELF-CLEANING CAUTION • DO NOT leave small children unattended near the appliance. Fig. 1 (For models that have cooled sufficiently. DO NOT use or spray oven cleaners or oven protective coatings in the oven can become hot enough to melt aluminum...
... the self-cleaning cycle of the range with aluminum foil. SELF-CLEANING CAUTION • DO NOT leave small children unattended near the appliance. Fig. 1 (For models that have cooled sufficiently. DO NOT use or spray oven cleaners or oven protective coatings in the oven can become hot enough to melt aluminum...
Use and Care Guide
Page 24
... • To avoid possible burns use the oven for the oven door to a 2 hour self-clean time press once (2:00 appears in the display). (some models) To self-clean using a 4 hour clean time press once (4:00 appears in display). The oven may check the amount of day will appear in the...
... • To avoid possible burns use the oven for the oven door to a 2 hour self-clean time press once (2:00 appears in the display). (some models) To self-clean using a 4 hour clean time press once (4:00 appears in display). The oven may check the amount of day will appear in the...
Use and Care Guide
Page 25
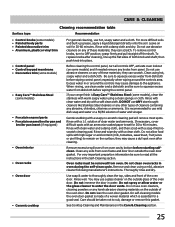
...If your range finish is Easy Care™ Stainless Steel (some models), clean the stainless with an ammonia-soaked paper towel for 30 to rub, damage or remove this gasket. If necessary, cover ... should be removed from panel. CARE & CLEANING Cleaning recommendation table Surface type Recommendation • Control knobs (some models) • Painted body parts • Painted decorative trim • Aluminum, plastic or vinyl trim • ...chlorides, chlorines or ammonia. It is essential for 30-60 minutes. On self-cleaning models the oven door gasket is made of these materials;
...If your range finish is Easy Care™ Stainless Steel (some models), clean the stainless with an ammonia-soaked paper towel for 30 to rub, damage or remove this gasket. If necessary, cover ... should be removed from panel. CARE & CLEANING Cleaning recommendation table Surface type Recommendation • Control knobs (some models) • Painted body parts • Painted decorative trim • Aluminum, plastic or vinyl trim • ...chlorides, chlorines or ammonia. It is essential for 30-60 minutes. On self-cleaning models the oven door gasket is made of these materials;
Use and Care Guide
Page 27
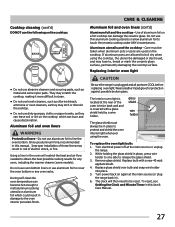
... they may result in damage to touch the ceramic cooktop under ANY circumstances. Only use dirty sponges, cloths or paper towels, as metal and some models). During self-clean the oven temperature can become hot enough to melt aluminum cooking utensils or aluminum foil which can leave soil or lint on...
... they may result in damage to touch the ceramic cooktop under ANY circumstances. Only use dirty sponges, cloths or paper towels, as metal and some models). During self-clean the oven temperature can become hot enough to melt aluminum cooking utensils or aluminum foil which can leave soil or lint on...
Use and Care Guide
Page 30
...Also be sure the oven light bulb is secure in oven. Oven smokes excessively when broiling. Solution • Excessive spillovers in the socket. 30 Aluminum foil will trap grease, expose grease to drip into broil pan. • Do not use aluminum foil. Review instructions for additional recommendations...or excessive smoke are not within the self-cleaning area, but get hot enough to prevent curling. • Broil pan and insert (some models) Self-cleaning cycle does not work . Cut remaining fatty edges to burn on interior oven surfaces. These areas are present see "Broiling" in...
...Also be sure the oven light bulb is secure in oven. Oven smokes excessively when broiling. Solution • Excessive spillovers in the socket. 30 Aluminum foil will trap grease, expose grease to drip into broil pan. • Do not use aluminum foil. Review instructions for additional recommendations...or excessive smoke are not within the self-cleaning area, but get hot enough to prevent curling. • Broil pan and insert (some models) Self-cleaning cycle does not work . Cut remaining fatty edges to burn on interior oven surfaces. These areas are present see "Broiling" in...


