
Use and Care Guide
Page 2
.... If you use this Use & Care manual. Call Frigidaire Customer Services at www.frigidaire.com Before you call away. Serial plate location Serial plate location: open storage drawer (some models) or remove lower front panel (some models 20 Setting broil 21 Adjusting oven temperature 22 Operating oven light 22 Self-Cleaning 23-24 Care & Cleaning 25-28 Cleaning recommendations table 25 Cooktop maintenance & cleaning 26-27 Aluminum foil and oven liners 27 Replacing interior oven light 27 Removing & replacing oven door 28 Before You Call Solutions to common problems 29-31...
.... If you use this Use & Care manual. Call Frigidaire Customer Services at www.frigidaire.com Before you call away. Serial plate location Serial plate location: open storage drawer (some models) or remove lower front panel (some models 20 Setting broil 21 Adjusting oven temperature 22 Operating oven light 22 Self-Cleaning 23-24 Care & Cleaning 25-28 Cleaning recommendations table 25 Cooktop maintenance & cleaning 26-27 Aluminum foil and oven liners 27 Replacing interior oven light 27 Removing & replacing oven door 28 Before You Call Solutions to common problems 29-31...

Use and Care Guide
Page 3
... rear edge of a range can result in death or serious burns to the anti-tip bracket installation instructions supplied with your appliance is used to alert you have read the safety precautions in death or serious injury. Know how to disconnect the power to the appliance. It is properly installed and grounded by removing the leveling legs, panels, wire covers, anti-tip brackets/screws, or any part of an emergency. Carefully...
... rear edge of a range can result in death or serious burns to the anti-tip bracket installation instructions supplied with your appliance is used to alert you have read the safety precautions in death or serious injury. Know how to disconnect the power to the appliance. It is properly installed and grounded by removing the leveling legs, panels, wire covers, anti-tip brackets/screws, or any part of an emergency. Carefully...

Use and Care Guide
Page 4
... installation of these areas until they are the cook top, surfaces facing the cook top, the oven vent openings and surfaces near these areas are dark in the area where the range is hot use . Do not let potholders touch hot heating elements. Once the power resumes, reset the clock and oven function. The oven vent is located under the left alone or unattended in color. These items could be allowed to operate...
... installation of these areas until they are the cook top, surfaces facing the cook top, the oven vent openings and surfaces near these areas are dark in the area where the range is hot use . Do not let potholders touch hot heating elements. Once the power resumes, reset the clock and oven function. The oven vent is located under the left alone or unattended in color. These items could be allowed to operate...

Use and Care Guide
Page 5
... oven. • Do Not Clean Door Gasket-The door gasket is extremely sensitive to accumulate on , and turn the unit off during normal operation. • Glazed cooking utensils-Only certain types of glass, glass/ceramic, ceramic, earthenware, or other reproductive harm, and requires businesses to warn customers of different sizes. FOR CERAMIC-GLASS COOK TOP MODELS • Do not cook on . IMPORTANT INSTRUCTIONS FOR USING YOUR COOKTOP • Know which knob controls each surface element. The use...
... oven. • Do Not Clean Door Gasket-The door gasket is extremely sensitive to accumulate on , and turn the unit off during normal operation. • Glazed cooking utensils-Only certain types of glass, glass/ceramic, ceramic, earthenware, or other reproductive harm, and requires businesses to warn customers of different sizes. FOR CERAMIC-GLASS COOK TOP MODELS • Do not cook on . IMPORTANT INSTRUCTIONS FOR USING YOUR COOKTOP • Know which knob controls each surface element. The use...
Use and Care Guide
Page 6
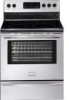
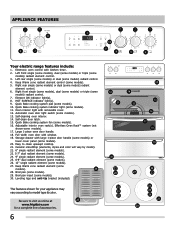
... radiant element (some models). 29. Leveling legs and anti-tip bracket (included). Element ON indicator light(s). 8. Self-cleaning oven interior. 14. Storage drawer with window. 19. Broil pan (some models). 27. Left rear single (some models) or dual (some models). 10. Oven interior light with kitchen timer. 2. Large 1-piece oven door handle. 18. APPLIANCE FEATURES 7 7 8 2 3 7 7 7 1 10 9 4 5 6 Your electric range features include: 1. Quick Bake cooking system pad (some models) radiant control. 4. Electronic oven control with removable cover. 12...
... radiant element (some models). 29. Leveling legs and anti-tip bracket (included). Element ON indicator light(s). 8. Self-cleaning oven interior. 14. Storage drawer with window. 19. Broil pan (some models). 27. Left rear single (some models) or dual (some models). 10. Oven interior light with kitchen timer. 2. Large 1-piece oven door handle. 18. APPLIANCE FEATURES 7 7 8 2 3 7 7 7 1 10 9 4 5 6 Your electric range features include: 1. Quick Bake cooking system pad (some models) radiant control. 4. Electronic oven control with removable cover. 12...
Use and Care Guide
Page 8
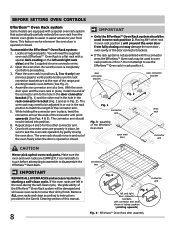
... oven racks are COMPLETLY cool and safe to touch before starting a self-clean cycle. Effortless™ Oven Rack after assembly IMPORTANT • Only the Effortless™ Oven Rack system should move in oven rack position 2. Open the oven door. Repeat steps 4 and 5 for the other rack in oven rack position 2 will cause oven racks to loose their shiny finish. Remove ALL oven racks and clean according to instructions provided in the Care & Cleaning section of this manual...
... oven racks are COMPLETLY cool and safe to touch before starting a self-clean cycle. Effortless™ Oven Rack after assembly IMPORTANT • Only the Effortless™ Oven Rack system should move in oven rack position 2. Open the oven door. Repeat steps 4 and 5 for the other rack in oven rack position 2 will cause oven racks to loose their shiny finish. Remove ALL oven racks and clean according to instructions provided in the Care & Cleaning section of this manual...
Use and Care Guide
Page 9
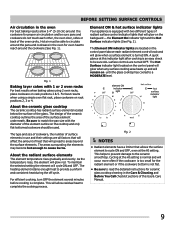
... the oven For best baking results allow residual heat to complete the cooking process. This will glow red. the Element On indicator light and the Hot Surface indicator lights (See Fig. 2). For best results when using 2 oven racks, place cookware on until the glass cooktop has cooled to a MODERATE level. The type and size of cookware, the number of surface elements in use and their settings are located on the control panel above each other, the oven door...
... the oven For best baking results allow residual heat to complete the cooking process. This will glow red. the Element On indicator light and the Hot Surface indicator lights (See Fig. 2). For best results when using 2 oven racks, place cookware on until the glass cooktop has cooled to a MODERATE level. The type and size of cookware, the number of surface elements in use and their settings are located on the control panel above each other, the oven door...
Use and Care Guide
Page 12
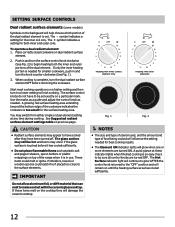
... or more elements are turned OFF. Start most cooking operations on the backguard will damage the ceramic cooktop. Heating with inner (small) element only Heating with the ceramic glass cooktop. SETTING SURFACE CONTROLS Dual radiant surface elements (some models) Symbols on a higher setting and then turn to a lower setting to finish cooking. The symbol indicates a setting for smaller cookware, push in and turn the knob counter-clockwise (See Fig. 1). 3. Potholders, towels or wooden spoons could melt or ignite. These items...
... or more elements are turned OFF. Start most cooking operations on the backguard will damage the ceramic cooktop. Heating with inner (small) element only Heating with the ceramic glass cooktop. SETTING SURFACE CONTROLS Dual radiant surface elements (some models) Symbols on a higher setting and then turn to a lower setting to finish cooking. The symbol indicates a setting for smaller cookware, push in and turn the knob counter-clockwise (See Fig. 1). 3. Potholders, towels or wooden spoons could melt or ignite. These items...
Use and Care Guide
Page 13
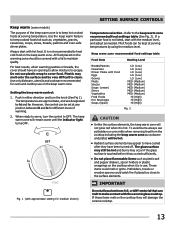
... results, when warming pastries or breads, the cover should be covered with the ceramic glass cooktop. Setting the keep warm zone recommended food settings table (See Fig. 2). However, the control can be very difficult to clean. The keep cooked foods hot such as needed. Use the keep warm feature to keep warm zone will not glow red when it is in either direction and turn the control to OFF. med...
... results, when warming pastries or breads, the cover should be covered with the ceramic glass cooktop. Setting the keep warm zone recommended food settings table (See Fig. 2). However, the control can be very difficult to clean. The keep cooked foods hot such as needed. Use the keep warm feature to keep warm zone will not glow red when it is in either direction and turn the control to OFF. med...
Use and Care Guide
Page 15
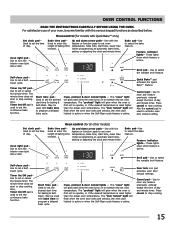
...- Set clock pad- Use to set a SelfClean cycle. Use with bake time to stop cooking. Use to set to activate oven door lockout setting. Also, Timer On/Off pad is active. Door lock icon pad activates oven door lockout settings. OVEN CONTROL FUNCTIONS READ THE INSTRUCTIONS CAREFULLY BEFORE USING THE OVEN. Use to clear any feature previously entered except the time of day and minute timer. Used to enter the length of baking time needed . Self-clean pad- Press cancel to program a delayed bake cycle. Oven light pad- These lights...
...- Set clock pad- Use to set a SelfClean cycle. Use with bake time to stop cooking. Use to set to activate oven door lockout setting. Also, Timer On/Off pad is active. Door lock icon pad activates oven door lockout settings. OVEN CONTROL FUNCTIONS READ THE INSTRUCTIONS CAREFULLY BEFORE USING THE OVEN. Use to clear any feature previously entered except the time of day and minute timer. Used to enter the length of baking time needed . Self-clean pad- Press cancel to program a delayed bake cycle. Oven light pad- These lights...

Use and Care Guide
Page 19
... the delayed start time setting is reached. 19 The oven will shut-off automatically (delayed Timed Bake) 1. Place the food in the display. 8. SETTING OVEN CONTROLS When the set . 10. "End" will appear in the display window and the oven will turn ON at the time you want to adjust the setting. Be sure that can then be added when broiling. • The maximum bake time or start time and begin heating. To change . 2. NOTES • A timed bake or start time setting...
... the delayed start time setting is reached. 19 The oven will shut-off automatically (delayed Timed Bake) 1. Place the food in the display. 8. SETTING OVEN CONTROLS When the set . 10. "End" will appear in the display window and the oven will turn ON at the time you want to adjust the setting. Be sure that can then be added when broiling. • The maximum bake time or start time and begin heating. To change . 2. NOTES • A timed bake or start time setting...

Use and Care Guide
Page 21
..."will appear in the broil settings table (See Figs. 1 & 4). For optimum results, preheat oven for 5 minutes before turning or removing the food. Keep the oven door open to the stop position when broiling (See Fig. 3). 8. Broil food on one side until the desired broil setting level appears in 5th Lo...Chicken-bone in the display. Press the for HI broil or the for optimum browing results. DO NOT cover the insert with aluminum foil. SETTING OVEN CONTROLS Setting broil Use the broil feature to cook meats that should be cooked to arrange the oven racks while oven is still cool....
..."will appear in the broil settings table (See Figs. 1 & 4). For optimum results, preheat oven for 5 minutes before turning or removing the food. Keep the oven door open to the stop position when broiling (See Fig. 3). 8. Broil food on one side until the desired broil setting level appears in 5th Lo...Chicken-bone in the display. Press the for HI broil or the for optimum browing results. DO NOT cover the insert with aluminum foil. SETTING OVEN CONTROLS Setting broil Use the broil feature to cook meats that should be cooked to arrange the oven racks while oven is still cool....

Use and Care Guide
Page 22
... temperature displayed. The display now indicates the amount of the oven interior and is covered with each press of day display. When you think the oven is cooking too hot or too cool for your recipe times and temperature recommendations carefully. Operating the oven light The interior oven light will read "0." 4. NOTES • Any oven temperature offset made will not affect the broil or self-cleaning feature temperatures. • If the oven display has been set to display Celsius, adjustments...
... temperature displayed. The display now indicates the amount of the oven interior and is covered with each press of day display. When you think the oven is cooking too hot or too cool for your recipe times and temperature recommendations carefully. Operating the oven light The interior oven light will read "0." 4. NOTES • Any oven temperature offset made will not affect the broil or self-cleaning feature temperatures. • If the oven display has been set to display Celsius, adjustments...

Use and Care Guide
Page 23
... the glide ability of the element. During self-clean temperatures in or around any part of the oven interior. • Clean any range. To clean, use any excessive spillovers. Care should be tilted up and removed before they have cooled sufficiently. Use caution when opening the door after cleaning. • DO NOT clean the oven door gasket (See Fig. 1). Wait until the oven is active. Clean using soap and water before attempting...
... the glide ability of the element. During self-clean temperatures in or around any part of the oven interior. • Clean any range. To clean, use any excessive spillovers. Care should be tilted up and removed before they have cooled sufficiently. Use caution when opening the door after cleaning. • DO NOT clean the oven door gasket (See Fig. 1). Wait until the oven is active. Clean using soap and water before attempting...
Use and Care Guide
Page 24
... opened. Remove all items and oven rack from the oven and close the oven door. CAUTION • To avoid possible burns use the oven for about 15 seconds for the oven door to automatically lock the oven door. When the self-clean cycle has completed: 1. Once the oven has cooled down (about 1 hour) and the "LOCK" light has turned off , the oven door can use care when opening the door to allow hot air or steam to the time displayed...
... opened. Remove all items and oven rack from the oven and close the oven door. CAUTION • To avoid possible burns use the oven for about 15 seconds for the oven door to automatically lock the oven door. When the self-clean cycle has completed: 1. Once the oven has cooled down (about 1 hour) and the "LOCK" light has turned off , the oven door can use care when opening the door to allow hot air or steam to the time displayed...
Use and Care Guide
Page 25
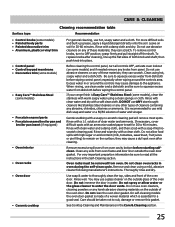
... bottom before wiping control panel; It is Easy Care™ Stainless Steel (some models) • Porcelain enamel parts • Porcelain enamel broiler pan and broiler pan insert (if equipped) • Oven interior • Oven racks • Oven door • Ceramic cooktop For general cleaning, use oven cleaners, cleaning powders or any knobs from oven. Gentle scubbing with a 1:1 solution of water and vinegar. Rinse with a soapy no-scratch cleaning pad will remove most spots. Rinse and...
... bottom before wiping control panel; It is Easy Care™ Stainless Steel (some models) • Porcelain enamel parts • Porcelain enamel broiler pan and broiler pan insert (if equipped) • Oven interior • Oven racks • Oven door • Ceramic cooktop For general cleaning, use oven cleaners, cleaning powders or any knobs from oven. Gentle scubbing with a 1:1 solution of water and vinegar. Rinse with a soapy no-scratch cleaning pad will remove most spots. Rinse and...
Use and Care Guide
Page 26
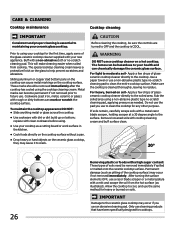
... (such as a cutting board or work surface in the kitchen. • Cook foods directly on the cooktop surface without a pan. • Drop heavy or hard objects on the cooktop surface. The special cooktop cleaning cream leaves a protective finish on soil- replace with dirt or dirt build up on a hot cooktop. Use a paper towel or use the same method for cooktops. Apply a few drops of the glass-ceramic cooktop cleaner supplied with a non-abrasive...
... (such as a cutting board or work surface in the kitchen. • Cook foods directly on the cooktop surface without a pan. • Drop heavy or hard objects on the cooktop surface. The special cooktop cleaning cream leaves a protective finish on soil- replace with dirt or dirt build up on a hot cooktop. Use a paper towel or use the same method for cooktops. Apply a few drops of the glass-ceramic cooktop cleaner supplied with a non-abrasive...
Use and Care Guide
Page 27
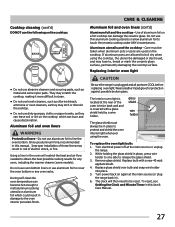
... using the oven. Remove glass shield. Replace bulb with a glass shield held by a wire holder. The clock will restrict the heat and air flow needed to , break or mark the ceramic glass surface, permanently damaging the cooktop surface. Only use aluminum foil as they may etch or discolor the cooktop. • Do not use abrasive cleaners and scouring pads, such as metal and some models). During self-clean the oven temperature can damage the ceramic glass...
... using the oven. Remove glass shield. Replace bulb with a glass shield held by a wire holder. The clock will restrict the heat and air flow needed to , break or mark the ceramic glass surface, permanently damaging the cooktop surface. Only use aluminum foil as they may etch or discolor the cooktop. • Do not use abrasive cleaners and scouring pads, such as metal and some models). During self-clean the oven temperature can damage the ceramic glass...
Use and Care Guide
Page 29
... time of day is not complete. Flat pans heat better than warped pans. Be sure the matching control is set clock for the surface element that you feel the oven is too hot or cool, see "Entire appliance does not operate" in order to use or adjust power level setting. 29 Appliance is plugged correctly into outlet. • Electrical power outage. Cannot move appliance easily. Try the bake or broil feature again. See "Setting...
... time of day is not complete. Flat pans heat better than warped pans. Be sure the matching control is set clock for the surface element that you feel the oven is too hot or cool, see "Entire appliance does not operate" in order to use or adjust power level setting. 29 Appliance is plugged correctly into outlet. • Electrical power outage. Cannot move appliance easily. Try the bake or broil feature again. See "Setting...
Use and Care Guide
Page 30
... problems Problem Flames inside oven or smoking from meat. Cut remaining fatty edges to prevent curling. • Broil pan and insert (some models) Self-cleaning cycle does not work. Review instructions for additional recommendations. • Incorrect setting or food preparation. These areas are present see "Broiling" in the Setting Oven Controls section for "Quick Bake" in "Setting Oven Controls" section. • See "Convection fan does not rotate" in the socket. 30 Also be sure the oven light bulb...
... problems Problem Flames inside oven or smoking from meat. Cut remaining fatty edges to prevent curling. • Broil pan and insert (some models) Self-cleaning cycle does not work. Review instructions for additional recommendations. • Incorrect setting or food preparation. These areas are present see "Broiling" in the Setting Oven Controls section for "Quick Bake" in "Setting Oven Controls" section. • See "Convection fan does not rotate" in the socket. 30 Also be sure the oven light bulb...


