
Use and Care Guide
Page 2
... numbers. This book Model Number Serial Number Purchase Date Pedestal A pedestal accessory, Model No. Table of Contents IMPORTANT SAFETY INSTRUCTIONS ...3-4 Washing Procedures ...4-6 Stain Removal ...6-7 Common Washing Problems ...8 Care and Cleaning ...9 Avoid Service Checklist ...10 Warranty...11 Français...12-22 Assistance or Service The symbol on the product or on its packaging indicates that can happen if the instructions are found on your washer. Read all safety messages. By ensuring this product...
... numbers. This book Model Number Serial Number Purchase Date Pedestal A pedestal accessory, Model No. Table of Contents IMPORTANT SAFETY INSTRUCTIONS ...3-4 Washing Procedures ...4-6 Stain Removal ...6-7 Common Washing Problems ...8 Care and Cleaning ...9 Avoid Service Checklist ...10 Warranty...11 Français...12-22 Assistance or Service The symbol on the product or on its packaging indicates that can happen if the instructions are found on your washer. Read all safety messages. By ensuring this product...
Use and Care Guide
Page 3
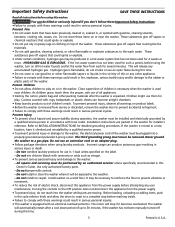
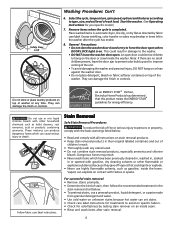
... allow the drum to coast to a complete stop if it checked and reinstalled by a qualified service person in the washer. Children might use them the proper, safe use an extension cord or an adaptor plug. • Follow package directions when using laundry products. Prevent Injury • To prevent shock hazard and assure stability during this time. • Do not store or use in 1 load unless specified...
... allow the drum to coast to a complete stop if it checked and reinstalled by a qualified service person in the washer. Children might use them the proper, safe use an extension cord or an adaptor plug. • Follow package directions when using laundry products. Prevent Injury • To prevent shock hazard and assure stability during this time. • Do not store or use in 1 load unless specified...
Use and Care Guide
Page 4
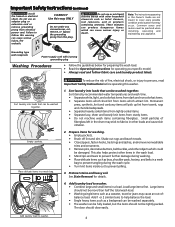
... the wash load. • Mend rips and tears to prevent further damage during the wash cycle. • Turn knit items inside out to follow fabric care and laundry product labels. The door should not be washed together. Do not use an adaptor plug or extension cord or remove grounding prong from sturdy items. • Do not machine wash items containing fiberglass. Sort items by recommended water temperatures and wash time. •...
... the wash load. • Mend rips and tears to prevent further damage during the wash cycle. • Turn knit items inside out to follow fabric care and laundry product labels. The door should not be washed together. Do not use an adaptor plug or extension cord or remove grounding prong from sturdy items. • Do not machine wash items containing fiberglass. Sort items by recommended water temperatures and wash time. •...
Use and Care Guide
Page 5
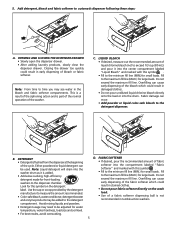
... water temperature, water hardness, load size and soil level. • For best results, avoid oversudsing. Add detergent, bleach and fabric softener to be used. Note: From time to the mininum fill line (MIN.)for this symbol on the wash load. • Use of a fabric softener dispensing ball is part of the normal operation of bleach or fabric softener. C. Fabric damage can cause early dispensing of the bleach which could result in damaged clothes. • Do not pour undiluted liquid chlorine bleach directly...
... water temperature, water hardness, load size and soil level. • For best results, avoid oversudsing. Add detergent, bleach and fabric softener to be used. Note: From time to the mininum fill line (MIN.)for this symbol on the wash load. • Use of a fabric softener dispensing ball is part of the normal operation of bleach or fabric softener. C. Fabric damage can cause early dispensing of the bleach which could result in damaged clothes. • Do not pour undiluted liquid chlorine bleach directly...
Use and Care Guide
Page 6
... place detergent, bleach or fabric softener containers on . Follow fabric care label instructions. Select the cycle, temperature, spin speed, options and features according to persons or property, comply with the basic warnings listed below . • To pretreat stains, use or mix liquid chlorine bleach with gasoline, dry cleaning solvents or other household chemicals such as directed by testing stain remover on the door or crawl inside seam. • Rinse and wash...
... place detergent, bleach or fabric softener containers on . Follow fabric care label instructions. Select the cycle, temperature, spin speed, options and features according to persons or property, comply with the basic warnings listed below . • To pretreat stains, use or mix liquid chlorine bleach with gasoline, dry cleaning solvents or other household chemicals such as directed by testing stain remover on the door or crawl inside seam. • Rinse and wash...
Use and Care Guide
Page 7
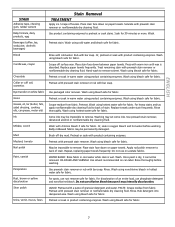
... detergent and water. Rinse. Saturate with chlorine bleach if safe for fabric. 7 May be removed. Rinse thoroughly before washing. LIQUID: Pretreat with a paste of stain. Wash with prewash stain remover or nonflammable dry cleaning fluid. Apply nail polish remover to remove. Wash using product containing enzymes. Replace paper towels frequently. Wash using product containing enzymes. Pretreat or soak in product containing enzymes. Repeat, replacing paper towels frequently. ENGLISH STAIN Adhesive tape, chewing gum, rubber...
... detergent and water. Rinse. Saturate with chlorine bleach if safe for fabric. 7 May be removed. Rinse thoroughly before washing. LIQUID: Pretreat with a paste of stain. Wash with prewash stain remover or nonflammable dry cleaning fluid. Apply nail polish remover to remove. Wash using product containing enzymes. Replace paper towels frequently. Wash using product containing enzymes. Pretreat or soak in product containing enzymes. Repeat, replacing paper towels frequently. ENGLISH STAIN Adhesive tape, chewing gum, rubber...
Use and Care Guide
Page 8
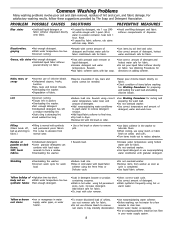
...;Use nonprecipitating water softener. •Before washing, run hot water for a few minutes to clear lines. •Drain water heater occasionally. •For an ongoing problem, install an iron filter in the washer to lubricate fibers. •When ironing, use chlorine bleach to final rinse. •Dry load in dryer. •Remove lint with lint brush or roller. •See Washing Procedures for directions on dark items; Yellow buildup of detergent, hottest water...
...;Use nonprecipitating water softener. •Before washing, run hot water for a few minutes to clear lines. •Drain water heater occasionally. •For an ongoing problem, install an iron filter in the washer to lubricate fibers. •When ironing, use chlorine bleach to final rinse. •Dry load in dryer. •Remove lint with lint brush or roller. •See Washing Procedures for directions on dark items; Yellow buildup of detergent, hottest water...

Use and Care Guide
Page 9
... times with clear water. • Remove glue residue from tape or labels with a mixture of the RV antifreeze will be expelled. 6. Remove all the water. Turn off drum interior and close door. 7. Store washer in the bottom of the flexible gasket to drain out all residue from fabric dye. Care and Cleaning Outside • When washing is visible only after storage, run empty washer through a complete cycle using detergent. Cleaning the Dispenser Drawer...
... times with clear water. • Remove glue residue from tape or labels with a mixture of the RV antifreeze will be expelled. 6. Remove all the water. Turn off drum interior and close door. 7. Store washer in the bottom of the flexible gasket to drain out all residue from fabric dye. Care and Cleaning Outside • When washing is visible only after storage, run empty washer through a complete cycle using detergent. Cleaning the Dispenser Drawer...
Use and Care Guide
Page 10
... lock nuts. See INSTALLATION INSTRUCTIONS for removing shipping bolts and foam block. • Wash load unevenly distributed in drum. OPERATING Washer does not start. • Electrical power cord may not be in bleach and fabric softener compartments. • Load is overloaded. Reset circuit breaker or replace fuse. Do not increase fuse capacity. If problem is a circuit overload, have not been removed during washer use at the end of up to 30 minutes (if washer has not been manually turned off). • Washer door...
... lock nuts. See INSTALLATION INSTRUCTIONS for removing shipping bolts and foam block. • Wash load unevenly distributed in drum. OPERATING Washer does not start. • Electrical power cord may not be in bleach and fabric softener compartments. • Load is overloaded. Reset circuit breaker or replace fuse. Do not increase fuse capacity. If problem is a circuit overload, have not been removed during washer use at the end of up to 30 minutes (if washer has not been manually turned off). • Washer door...

Use and Care Guide
Page 11
... service companies; use or used and maintained in your receipt, delivery slip, or some other than authorized service companies; Product features or specifications as abuse, misuse, inadequate power supply, accidents, fires, or acts of parts other than genuine Electrolux parts or parts obtained from its original owner to repair or replace appliance light bulbs, air filters, water filters, other consumables, or knobs, handles, or other than in a commercial setting...
... service companies; use or used and maintained in your receipt, delivery slip, or some other than authorized service companies; Product features or specifications as abuse, misuse, inadequate power supply, accidents, fires, or acts of parts other than genuine Electrolux parts or parts obtained from its original owner to repair or replace appliance light bulbs, air filters, water filters, other consumables, or knobs, handles, or other than in a commercial setting...
Operating Instructions
Page 1
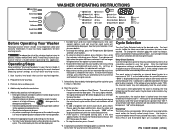
... the desired cycle. Select Delay Start to delay the beginning of a high efficiency detergent to the detergent compartment. • If desired, add liquid chlorine bleach and liquid fabric softener to select the cycle. A signal will sound when the Signal option is displayed during the entire wash cycle and the Door Lock indicator will be displayed. • Suitable wash and rinse water temperatures, final spin speed, options and soil level for best washing results. "cd" will light when the...
... the desired cycle. Select Delay Start to delay the beginning of a high efficiency detergent to the detergent compartment. • If desired, add liquid chlorine bleach and liquid fabric softener to select the cycle. A signal will sound when the Signal option is displayed during the entire wash cycle and the Door Lock indicator will be displayed. • Suitable wash and rinse water temperatures, final spin speed, options and soil level for best washing results. "cd" will light when the...
Operating Instructions
Page 2
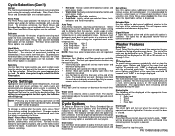
... Use the Spin Only cycle anytime you want to drain water from the washer, water usage in other parts of the home and seasonally low ground water temperatures in the future. Cycle Settings Appropriate wash and rinse water temperatures, final spin speed and soil level settings for that cycle, the indicator will automatically be displayed when a cycle is selected. If a setting is not appropriate for each cycle will not light up. Changes made to the type and size of cold...
... Use the Spin Only cycle anytime you want to drain water from the washer, water usage in other parts of the home and seasonally low ground water temperatures in the future. Cycle Settings Appropriate wash and rinse water temperatures, final spin speed and soil level settings for that cycle, the indicator will automatically be displayed when a cycle is selected. If a setting is not appropriate for each cycle will not light up. Changes made to the type and size of cold...
Installation Instructions
Page 1
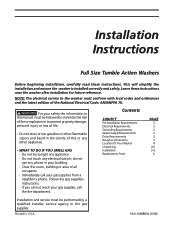
...) Contents SUBJECT Pre-Installation Requirements Electrical Requirements Grounding Requirements Water Supply Requirements Drain Requirements Rough-In Dimensions Location Of Your Washer Unpacking Installation Replacement Parts PAGE 2 2 2 2 2 3 4 4-5 5-6 6 Installation and service must conform with local codes and ordinances and the latest edition of life. - Installation Instructions Full Size Tumble Action Washers Before beginning installation, carefully read these instructions near the washer after installation for future reference. WHAT TO DO IF YOU SMELL GAS · Do...
...) Contents SUBJECT Pre-Installation Requirements Electrical Requirements Grounding Requirements Water Supply Requirements Drain Requirements Rough-In Dimensions Location Of Your Washer Unpacking Installation Replacement Parts PAGE 2 2 2 2 2 3 4 4-5 5-6 6 Installation and service must conform with local codes and ordinances and the latest edition of life. - Installation Instructions Full Size Tumble Action Washers Before beginning installation, carefully read these instructions near the washer after installation for future reference. WHAT TO DO IF YOU SMELL GAS · Do...
Installation Instructions
Page 2
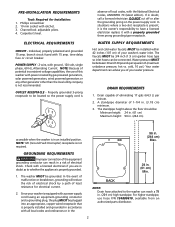
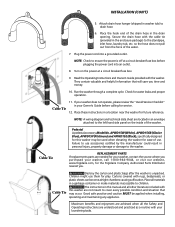
... washer can be plugged into an appropriate, copper wired receptacle that is in . (3.18 cm) minimum. 3. Drain capable of your washer is equipped with a power supply cord having an equipment-grounding conductor and a grounding plug, the plug MUST be connected. Channel-lock adjustable pliers. 4. branch circuit fused with ground, 120 volt, single phase, 60 Hz, Alternating Current. Since your washer's water inlet. BACK NOTE: Drain hose...
... washer can be plugged into an appropriate, copper wired receptacle that is in . (3.18 cm) minimum. 3. Drain capable of your washer is equipped with a power supply cord having an equipment-grounding conductor and a grounding plug, the plug MUST be connected. Channel-lock adjustable pliers. 4. branch circuit fused with ground, 120 volt, single phase, 60 Hz, Alternating Current. Since your washer's water inlet. BACK NOTE: Drain hose...
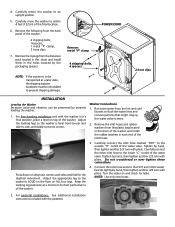
Installation Instructions
Page 5
... the water lines and remove particles that might clog up the water valve screens. 2. POWER CORD 2 hose clips INSTALLATION Leveling the Washer Excessive noise and vibration can be reinstalled to an upright position. 5. Run some water from the plastic bag located in the drum of the washer and install the rubber washers in the holes vacated by hand, then tighten another 2/3 turn with the pedestal. Tighten by the packaging spacers. Carefully connect the other inlet hose...
... the water lines and remove particles that might clog up the water valve screens. 2. POWER CORD 2 hose clips INSTALLATION Leveling the Washer Excessive noise and vibration can be reinstalled to an upright position. 5. Run some water from the plastic bag located in the drum of the washer and install the rubber washers in the holes vacated by hand, then tighten another 2/3 turn with the pedestal. Tighten by the packaging spacers. Carefully connect the other inlet hose...
Installation Instructions
Page 6
... breaker/fuse box before calling for ease of the washer. Turn on the inside of use. CLOhCeKckNfUoTrSwater leaks and proper operation. NOTE: A wiring diagram and technical data sheet are not meant to cover every possible condition and situation that will save you . Attach drain hose hanger (shipped in your washer does not operate, please review the "Avoid Service Checklist" in washer tub) to children. If your Owner's Guide before plugging the power cord into...
... breaker/fuse box before calling for ease of the washer. Turn on the inside of use. CLOhCeKckNfUoTrSwater leaks and proper operation. NOTE: A wiring diagram and technical data sheet are not meant to cover every possible condition and situation that will save you . Attach drain hose hanger (shipped in your washer does not operate, please review the "Avoid Service Checklist" in washer tub) to children. If your Owner's Guide before plugging the power cord into...
Data Sheet
Page 1
.... Quick Check If there is this happens, the motor control has power. 2. The control will activate and hot water should turn on the LEDs. • Within 5 seconds, press and hold the Options and Start/Pause buttons for a few seconds until LEDs start position. The control will beep and the Door Lock, Wash, Rinse, and Final Spin indicator lights will sequentially light. When the door is used to turn on . 7. "Err" - "LOC" - Diagnostic Test The diagnostic test is opened . Turn...
.... Quick Check If there is this happens, the motor control has power. 2. The control will activate and hot water should turn on the LEDs. • Within 5 seconds, press and hold the Options and Start/Pause buttons for a few seconds until LEDs start position. The control will beep and the Door Lock, Wash, Rinse, and Final Spin indicator lights will sequentially light. When the door is used to turn on . 7. "Err" - "LOC" - Diagnostic Test The diagnostic test is opened . Turn...
Data Sheet
Page 2
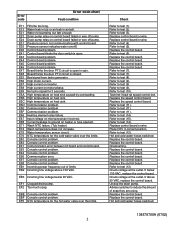
... door switch is open in spin. E44 Control board problem. E56 High motor current. E5C High temperature on heat sink caused by overloading. E66 Heating element relay failure. E71 Wash NTC failure. (Tub heater) E74 Wash temperature does not increase. Refer to test (10). Refer to test (9). Refer to test (5). Replace the speed control board. Replace the control board. Check wiring. Replace the control board. If above 130 VAC. Replace the control board. Error code Error code chart Fault condition E11 Fill time...
... door switch is open in spin. E44 Control board problem. E56 High motor current. E5C High temperature on heat sink caused by overloading. E66 Heating element relay failure. E71 Wash NTC failure. (Tub heater) E74 Wash temperature does not increase. Refer to test (10). Refer to test (9). Refer to test (5). Replace the speed control board. Replace the control board. Check wiring. Replace the control board. If above 130 VAC. Replace the control board. Error code Error code chart Fault condition E11 Fill time...
Data Sheet
Page 3
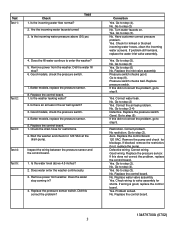
... the fill water continue to step (3). Better models, replace the pressure sensor. 8. Is the washer leaking water? 2. Better models, replace the pressure sensor. 5. Test 4: Inspect the wiring between the pressure sensor and the control board. No. Go to step (6) No. Correct water leak. Correct the air leak problem. No. Go to step 5. Remove the pump and check for kinked or blocked incoming water hoses, clean the incoming water screens. No. Are the incoming water faucets turned 3. Did...
... the fill water continue to step (3). Better models, replace the pressure sensor. 8. Is the washer leaking water? 2. Better models, replace the pressure sensor. 5. Test 4: Inspect the wiring between the pressure sensor and the control board. No. Go to step (6) No. Correct water leak. Correct the air leak problem. No. Go to step 5. Remove the pump and check for kinked or blocked incoming water hoses, clean the incoming water screens. No. Are the incoming water faucets turned 3. Did...
Data Sheet
Page 4
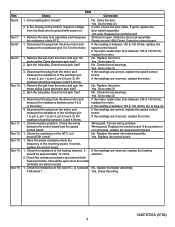
.... 1. Does the motor spin free? 2. Reads around 4.8K ohms? No. Replace the control board. Replace the control board. Remove the door lock assembly and measuere the resistance of the tub NTC. Spin the tub pulley. Go to ground with power on the control, measure voltage from the drive motor and measure the resistance between 105 & 130 Ohms, replace the motor. Wiring bad. Test Check Test Correction Test 6: Test 7: Test 8: Test 9: Test 10: Test 11: Test 12: Test 13: Test 14: Test 15: 1. In...
.... 1. Does the motor spin free? 2. Reads around 4.8K ohms? No. Replace the control board. Replace the control board. Remove the door lock assembly and measuere the resistance of the tub NTC. Spin the tub pulley. Go to ground with power on the control, measure voltage from the drive motor and measure the resistance between 105 & 130 Ohms, replace the motor. Wiring bad. Test Check Test Correction Test 6: Test 7: Test 8: Test 9: Test 10: Test 11: Test 12: Test 13: Test 14: Test 15: 1. In...


