
Use and Care Manual
Page 2
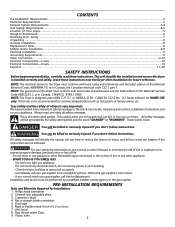
... this washer may Serial Number not have provided many important safety messages in this product. do not use accessories certified by a qualified installer, service agency or the gas supplier. 2 Noter les numéros de modèle et de série • ...the Use and Care Guide, Operating Instructions, Installation Instructions and on the dryer • Operation serial plate located of the left side of life. - Your dryer may be handed over to use any electrical switch; For your Purchase Date dryer. Installation and service must be treated as instructed in ...
... this washer may Serial Number not have provided many important safety messages in this product. do not use accessories certified by a qualified installer, service agency or the gas supplier. 2 Noter les numéros de modèle et de série • ...the Use and Care Guide, Operating Instructions, Installation Instructions and on the dryer • Operation serial plate located of the left side of life. - Your dryer may be handed over to use any electrical switch; For your Purchase Date dryer. Installation and service must be treated as instructed in ...
Use and Care Manual
Page 3
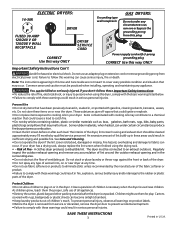
... Instructions Con't Avoid fire hazard or electrical shock. The dryer must be killed or seriously injured if you don't follow this dryer, comply with the basic warnings listed below. • Failure to comply with rugs, bedspreads or plastic sheets can be practiced when installing, operating and maintaining any accumulation of lint around the...
... Instructions Con't Avoid fire hazard or electrical shock. The dryer must be killed or seriously injured if you don't follow this dryer, comply with the basic warnings listed below. • Failure to comply with rugs, bedspreads or plastic sheets can be practiced when installing, operating and maintaining any accumulation of lint around the...
Use and Care Manual
Page 4
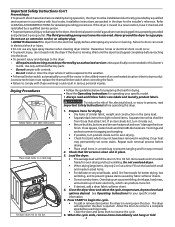
... Be sure buckles, buttons and trim are packed in the dryer for easy removal. 2. Items need room to prevent snagging and tangling. • If possible, turn it inside . • Close the door and press Start to INSTALLATION INSTRUCTIONS for operating your specific model information. 5. The third grounding... before drying. • Place small items in a mesh bag to the dryer, the electrical power cord of a gas dryer must be plugged into the dryer if the drum is opened. Do not install or store the dryer where it checked and reinstalled by a qualified service person. • To ...
... Be sure buckles, buttons and trim are packed in the dryer for easy removal. 2. Items need room to prevent snagging and tangling. • If possible, turn it inside . • Close the door and press Start to INSTALLATION INSTRUCTIONS for operating your specific model information. 5. The third grounding... before drying. • Place small items in a mesh bag to the dryer, the electrical power cord of a gas dryer must be plugged into the dryer if the drum is opened. Do not install or store the dryer where it checked and reinstalled by a qualified service person. • To ...
Use and Care Manual
Page 5
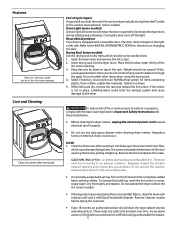
... of lint around the outdoor exhaust opening and in place, tumbling items could enter the exhaust system and cause damage to the dryer. Remove cleanser residue before drying the next load. • Every 18 months an authorized servicer should not exceed 10 lbs. Closing...at the bottom of lint build-up in Important Safety Instructions and those listed below. • Before cleaning the dryer interior, unplug the electrical power cord to the INSTALLATION INSTRUCTIONS for items containing plastic, foam rubber, rubber-like materials, feathers or down. 5. An excessive amount of...
... of lint around the outdoor exhaust opening and in place, tumbling items could enter the exhaust system and cause damage to the dryer. Remove cleanser residue before drying the next load. • Every 18 months an authorized servicer should not exceed 10 lbs. Closing...at the bottom of lint build-up in Important Safety Instructions and those listed below. • Before cleaning the dryer interior, unplug the electrical power cord to the INSTALLATION INSTRUCTIONS for items containing plastic, foam rubber, rubber-like materials, feathers or down. 5. An excessive amount of...
Use and Care Manual
Page 7
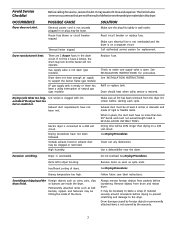
... and damage to make sure supply valve is clogged with lint. Reset circuit breaker or replace fuse. See INSTALLATION INSTRUCTIONS. Dryer should heat when utility service is overloaded. When in place, the duct must be loose. or buttons are 2 house fuses... in dryer too long. See INSTALLATION INSTRUCTIONS for replacement. Drying time will not operate. See Drying Procedures. See Drying Procedures. Avoid Service Checklist Before calling for service, review this dryer. It may be 20% longer than two 90°...
... and damage to make sure supply valve is clogged with lint. Reset circuit breaker or replace fuse. See INSTALLATION INSTRUCTIONS. Dryer should heat when utility service is overloaded. When in place, the duct must be loose. or buttons are 2 house fuses... in dryer too long. See INSTALLATION INSTRUCTIONS for replacement. Drying time will not operate. See Drying Procedures. See Drying Procedures. Avoid Service Checklist Before calling for service, review this dryer. It may be 20% longer than two 90°...
Use and Care Manual
Page 8
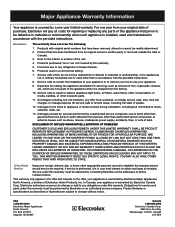
...Keep your appliance is " are subject to change or add to any refrigerator or freezer failures. 6. Food loss due to correct the installation of this warranty. 5. Damages caused by: services performed by Electrolux or an authorized service company. LIMITATION OF REMEDIES CUSTOMER'S SOLE AND ... Service calls to any obligations under this warranty must be readily determined. 2. Damages to the finish of appliance or home incurred during installation, including but not limited to, any parts of your appliance or to instruct you how to be required. Product features or specifications...
...Keep your appliance is " are subject to change or add to any refrigerator or freezer failures. 6. Food loss due to correct the installation of this warranty. 5. Damages caused by: services performed by Electrolux or an authorized service company. LIMITATION OF REMEDIES CUSTOMER'S SOLE AND ... Service calls to any obligations under this warranty must be readily determined. 2. Damages to the finish of appliance or home incurred during installation, including but not limited to, any parts of your appliance or to instruct you how to be required. Product features or specifications...
Installation Instructions
Page 2
... commercial applications such as restaurants or beauty salons, etc. Channel-lock adjustable pliers. 3. This will be preceded by a qualified installer, service agency or the gas supplier. This Dryer is not recommended for future reference. NOTE: The electrical service to reduce the chance of this manual must conform with local codes and ordinances...
... commercial applications such as restaurants or beauty salons, etc. Channel-lock adjustable pliers. 3. This will be preceded by a qualified installer, service agency or the gas supplier. This Dryer is not recommended for future reference. NOTE: The electrical service to reduce the chance of this manual must conform with local codes and ordinances...
Installation Instructions
Page 3
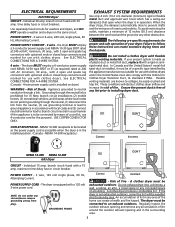
...inches (30.5 cm) clearance between the vent hood and the ground or any accumulation of your present system is in the installed position. (Canada - The dryer must also comply with a 120 volt 3-wire power cord. branch circuit fused with a 15 amp. Flexible venting materials ..., 60 Hz, Alternating Current. and (4) areas where local codes do not permit grounding through the neutral link is installed on the same circuit. The dryer is to installing dryer duct. See ELECTRICAL CONNECTIONS FOR A 4-WIRE SYSTEM. (Canada - 4-wire power supply cord is prohibited for proper ...
...inches (30.5 cm) clearance between the vent hood and the ground or any accumulation of your present system is in the installed position. (Canada - The dryer must also comply with a 120 volt 3-wire power cord. branch circuit fused with a 15 amp. Flexible venting materials ..., 60 Hz, Alternating Current. and (4) areas where local codes do not permit grounding through the neutral link is installed on the same circuit. The dryer is to installing dryer duct. See ELECTRICAL CONNECTIONS FOR A 4-WIRE SYSTEM. (Canada - 4-wire power supply cord is prohibited for proper ...
Installation Instructions
Page 4
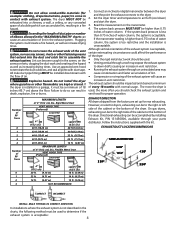
...the duct and catch lint to assemble the exhaust system. Lint can result in contact with exhaust system. Do not install the dryer where gasoline or other fastening means that extend into a chimney, a wall, a ceiling, or any screws, rivets...dryer. 2. Flexible Metal Duct VENT HOOD TYPE (Preferred) Louvered 4" (10.2 cm) 30 ft. (9.14 m) 2½" (6.35 cm) 18 ft. (5.49 m) 3 3/4" 5 7/8" 13 1/2" 4 3/8" 3 3/4" (9.5 cm) 1 22 ft. (6.71 m) 14 ft. (4.27 m) 2 14 ft. (4.27 m) 10 ft. (3.05 m) 3 NOT RECOMMENDED CORRECT INCORRECT INSTALL MALE FITTINGS IN CORRECT DIRECTION In installations...
...the duct and catch lint to assemble the exhaust system. Lint can result in contact with exhaust system. Do not install the dryer where gasoline or other fastening means that extend into a chimney, a wall, a ceiling, or any screws, rivets...dryer. 2. Flexible Metal Duct VENT HOOD TYPE (Preferred) Louvered 4" (10.2 cm) 30 ft. (9.14 m) 2½" (6.35 cm) 18 ft. (5.49 m) 3 3/4" 5 7/8" 13 1/2" 4 3/8" 3 3/4" (9.5 cm) 1 22 ft. (6.71 m) 14 ft. (4.27 m) 2 14 ft. (4.27 m) 10 ft. (3.05 m) 3 NOT RECOMMENDED CORRECT INCORRECT INSTALL MALE FITTINGS IN CORRECT DIRECTION In installations...
Installation Instructions
Page 5
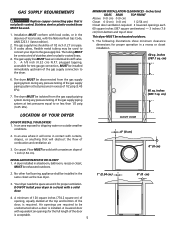
... to or less than 1/2 psig (3.45 kPa). cm) LOCATION OF YOUR DRYER DO NOT INSTALL YOUR DRYER: 1. The gas supply line MUST have an individual shutoff valve. 5. The dryer MUST be installed immediately upstream of door. The following illustrations show minimum clearance dimensions for proper ...other fuel burning appliance shall be exhausted outdoors. 2. On carpet. A louvered door with curtains, drapes, or anything that is installed. This dryer MUST be unobstructed when a door is not plastic-coated. inches (387.1 sq. The tubing MUST be disconnected from the gas...
... to or less than 1/2 psig (3.45 kPa). cm) LOCATION OF YOUR DRYER DO NOT INSTALL YOUR DRYER: 1. The gas supply line MUST have an individual shutoff valve. 5. The dryer MUST be installed immediately upstream of door. The following illustrations show minimum clearance dimensions for proper ...other fuel burning appliance shall be exhausted outdoors. 2. On carpet. A louvered door with curtains, drapes, or anything that is installed. This dryer MUST be unobstructed when a door is not plastic-coated. inches (387.1 sq. The tubing MUST be disconnected from the gas...
Installation Instructions
Page 6
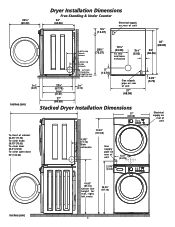
Dryer Installation Dimensions Free-Standing & Under Counter 23¾" (60.33) 24" (60.96) ...(88.90) 34" (86.36) 2.25" (5.72) inches (cm) 27" (68.58) Stacked Dryer Installation Dimensions 27" (68.58) T2T2T2T5iooo9883on..."527cfcc(cr1"55hlllo(eee3""7en((aa4a477strr.r.1369odo(..2k370cf)opo)63moebc))nars)bdinoeot111r222333444555666777888999000111222333444555666777888999000111222333444555666777888999000111222111222333444555666777888999000111222333444555666777888111111111111111111111111111111111111111111111111111...
Dryer Installation Dimensions Free-Standing & Under Counter 23¾" (60.33) 24" (60.96) ...(88.90) 34" (86.36) 2.25" (5.72) inches (cm) 27" (68.58) Stacked Dryer Installation Dimensions 27" (68.58) T2T2T2T5iooo9883on..."527cfcc(cr1"55hlllo(eee3""7en((aa4a477strr.r.1369odo(..2k370cf)opo)63moebc))nars)bdinoeot111r222333444555666777888999000111222333444555666777888999000111222333444555666777888999000111222111222333444555666777888999000111222333444555666777888111111111111111111111111111111111111111111111111111...
Installation Instructions
Page 7
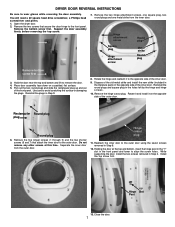
...in the "T" slot in the front panel and lower to the opposite side of the inner door. 9. Install the top screw first. 6 7 "T" Hinge Slot Post 13. Open the dryer door. 2. Hinge attachment screw Round plug Square plug Hinge attachment screw Metal strike Round plug Remove bottom ...screw first 3. Rotate it and install it to align the screw holes. While supporting the door, install the two screws removed in Step 9. 8. ...
...in the "T" slot in the front panel and lower to the opposite side of the inner door. 9. Install the top screw first. 6 7 "T" Hinge Slot Post 13. Open the dryer door. 2. Hinge attachment screw Round plug Square plug Hinge attachment screw Metal strike Round plug Remove bottom ...screw first 3. Rotate it and install it to align the screw holes. While supporting the door, install the two screws removed in Step 9. 8. ...
Installation Instructions
Page 8
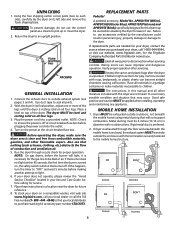
... at circuit breaker/fuse box before calling for proper operation. MOBILE HOME INSTALLATION 1. Label all joints. 2. Dryer MUST be used when elevating the dryer for the Frigidaire Company Authorized Parts Distributor nearest you. Place a level on a compatible washer, visit web site www.frigidaire.com, call your Use and Care Guide before plugging the power cord...
... at circuit breaker/fuse box before calling for proper operation. MOBILE HOME INSTALLATION 1. Label all joints. 2. Dryer MUST be used when elevating the dryer for the Frigidaire Company Authorized Parts Distributor nearest you. Place a level on a compatible washer, visit web site www.frigidaire.com, call your Use and Care Guide before plugging the power cord...
Installation Instructions
Page 9
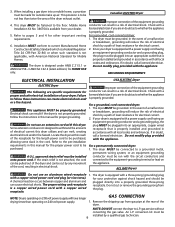
... cord with a power supply cord having an equipment-grounding conductor and a grounding plug, the plug must be installed onto power cord. The dryer must be made for the length power cord to whether the appliance is available from gas pipe at the rear... equipment grounding conductor can melt, creating electrical shock and/or fire hazard. Canadian ELECTRIC Dryer DANGER Improper connection of the equipment grounding conductor can cause electrical shorts. When installing a gas dryer into a mobile home, a provision must be plugged into an appropriate outlet that is...
... cord with a power supply cord having an equipment-grounding conductor and a grounding plug, the plug must be installed onto power cord. The dryer must be made for the length power cord to whether the appliance is available from gas pipe at the rear... equipment grounding conductor can melt, creating electrical shock and/or fire hazard. Canadian ELECTRIC Dryer DANGER Improper connection of the equipment grounding conductor can cause electrical shorts. When installing a gas dryer into a mobile home, a provision must be plugged into an appropriate outlet that is...
Installation Instructions
Page 10
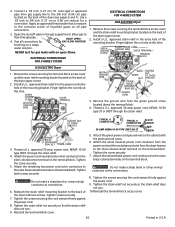
... 4. Do not make a sharp bend or crimp wiring/ conductor at the connections. 8. Install a U.L. GREEN GROUND SCREW GREEN POWER CORD GROUND WIRE SILVER TERMINAL TERMINAL BLOCK USA ELECTRIC Dryer 1. Attach the power cord neutral (center wire) conductor to the outer brass colored terminals ... above the terminal block. 4. VALVE OPEN / 4. Tighten the screws securing the cord restraint firmly against the power cord. 8. Install a U.L. GREEN GROUND SCREW NEUTRAL GROUND WIRE SILVER TERMINAL NEUTRAL GROUND WIRE RED BLACK WHITE NUT STRAIN RELIEF MOUNTING BRACKET TIGHTEN NUT ...
... 4. Do not make a sharp bend or crimp wiring/ conductor at the connections. 8. Install a U.L. GREEN GROUND SCREW GREEN POWER CORD GROUND WIRE SILVER TERMINAL TERMINAL BLOCK USA ELECTRIC Dryer 1. Attach the power cord neutral (center wire) conductor to the outer brass colored terminals ... above the terminal block. 4. VALVE OPEN / 4. Tighten the screws securing the cord restraint firmly against the power cord. 8. Install a U.L. GREEN GROUND SCREW NEUTRAL GROUND WIRE SILVER TERMINAL NEUTRAL GROUND WIRE RED BLACK WHITE NUT STRAIN RELIEF MOUNTING BRACKET TIGHTEN NUT ...


