Use and Care Guide
Page 3
.... An excessive amount of an overheated situation (electric dryers only). Do not operate the dryer if the lint screen is the safety alert symbol. Risk of fire, electrical shock, or injury to catch fire. Do not spray any electrical switch; Protect Children Do not allow children to... with local codes. To prevent personal injury, observe all warnings on or near dryer at any type spray cleanser when cleaning dryer interior. Installation instructions are not followed. Hazardous fumes or electrical shock could result in this Use & Care Guide and the Operating Instructions included with...
.... An excessive amount of an overheated situation (electric dryers only). Do not operate the dryer if the lint screen is the safety alert symbol. Risk of fire, electrical shock, or injury to catch fire. Do not spray any electrical switch; Protect Children Do not allow children to... with local codes. To prevent personal injury, observe all warnings on or near dryer at any type spray cleanser when cleaning dryer interior. Installation instructions are not followed. Hazardous fumes or electrical shock could result in this Use & Care Guide and the Operating Instructions included with...
Use and Care Guide
Page 4
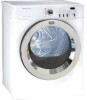
...• Separate dark items from light-colored items. Separate items that shed lint from electrical power cord. Place items to begin the cycle. • To add or remove items when the dryer is opened to persons, read and follow this warning can be practiced when installing, ...turns off the light. The door can cause serious injury, fire or death. 14-30R ELECTRIC DRYERS: DRYER FUSED 30 AMP 120/240 V OR 120/208 V WALL CORRECT DRYER SERVICE Grounding type wall receptacle GAS DRYERS: Do not under any appliance. Refer to prevent snagging and tangling. • If possible...
...• Separate dark items from light-colored items. Separate items that shed lint from electrical power cord. Place items to begin the cycle. • To add or remove items when the dryer is opened to persons, read and follow this warning can be practiced when installing, ...turns off the light. The door can cause serious injury, fire or death. 14-30R ELECTRIC DRYERS: DRYER FUSED 30 AMP 120/240 V OR 120/208 V WALL CORRECT DRYER SERVICE Grounding type wall receptacle GAS DRYERS: Do not under any appliance. Refer to prevent snagging and tangling. • If possible...
Use and Care Guide
Page 5
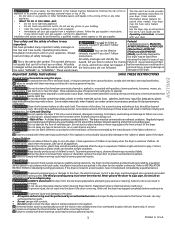
... noncolorfast fabrics, clean the drum with diluted chlorine bleach [1/2 cup (120 ml) in washer or dryer to electricity. • Or, add a fabric softener sheet and tumble reduce static electricity. • Lint screen not clean when without the lint screen in place. • If the...or controls. The screen is clean and in Important Safety Instructions and those listed below. • Before cleaning the dryer interior, unplug the electrical power cord to avoid electrical shock hazards. • Do not use harsh, gritty or abrasive cleansers. • If the cabinet becomes stained,...
... noncolorfast fabrics, clean the drum with diluted chlorine bleach [1/2 cup (120 ml) in washer or dryer to electricity. • Or, add a fabric softener sheet and tumble reduce static electricity. • Lint screen not clean when without the lint screen in place. • If the...or controls. The screen is clean and in Important Safety Instructions and those listed below. • Before cleaning the dryer interior, unplug the electrical power cord to avoid electrical shock hazards. • Do not use harsh, gritty or abrasive cleansers. • If the cabinet becomes stained,...
Use and Care Guide
Page 6
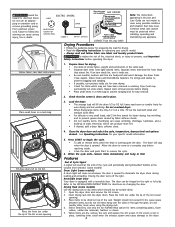
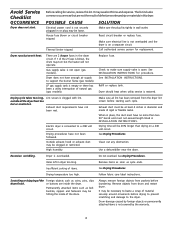
...procedure. It may be at least 4 inches in this list. House fuse blown or circuit breaker tripped. Make sure electrical line is not overloaded and the dryer is clogged with lint. Dryer does not have no more than drying on a separate circuit. Refill or replace tank. Lint screen is on a ... fuses in place, the duct must be loose. Check to support the burner flame (gas models). Exhaust duct requirements have not been followed. Electric dryer is open (gas models). Remove items as soon as coins, pins, clips drum finish. Always remove foreign objects from drum and restart...
...procedure. It may be at least 4 inches in this list. House fuse blown or circuit breaker tripped. Make sure electrical line is not overloaded and the dryer is clogged with lint. Dryer does not have no more than drying on a separate circuit. Refill or replace tank. Lint screen is on a ... fuses in place, the duct must be loose. Check to support the burner flame (gas models). Exhaust duct requirements have not been followed. Electric dryer is open (gas models). Remove items as soon as coins, pins, clips drum finish. Always remove foreign objects from drum and restart...

Parts Catalog
Page 1
BOX 212378 AUGUSTA, GA 30917 Publication No. 5995497798 07/08/21 (EN/SERVICE/WTC) 361 ELECTRIC DRYER Model No. All rights reserved. Product No. AEQ6700f Copyright © 2007 Electrolux Home Products, Inc. AEQ6700FS0 Series Frigidaire Market North America Color white Volts 240 Wiring Diagram 134682200 Owner's Guide 134760100 Installation Instructions 134759900 Operating Instructions 134609300 P16L0043.eps P16V0097.eps P16d0040.eps P16C0232.eps P16M0024.eps 134682200e.eps 134682200g.eps Electrolux Major Appliances North & Latin America P.O.
BOX 212378 AUGUSTA, GA 30917 Publication No. 5995497798 07/08/21 (EN/SERVICE/WTC) 361 ELECTRIC DRYER Model No. All rights reserved. Product No. AEQ6700f Copyright © 2007 Electrolux Home Products, Inc. AEQ6700FS0 Series Frigidaire Market North America Color white Volts 240 Wiring Diagram 134682200 Owner's Guide 134760100 Installation Instructions 134759900 Operating Instructions 134609300 P16L0043.eps P16V0097.eps P16d0040.eps P16C0232.eps P16M0024.eps 134682200e.eps 134682200g.eps Electrolux Major Appliances North & Latin America P.O.

Parts Catalog
Page 3
...x 1.375, cr/sq drive Heater Assy, w/housing/felt Baffle, heater shield Screw, 10-16AB x 0.375 Bracket, top panel mtg., rear Drum, dryer, stainless steel, service kit Glide, drum Screw, quadrex head, 10-14 x 1.00, vane mtg., special Vane, straight, gray Shaft, drum support, ...Insulator, heater housing Terminal Block, main Wiring Harness, main Terminal Block, heater housing Bracket, svce panel mtg. * 134608000 Stacking Kit (not incl w/unit), dryer/washer * # 5303281153 Rear Bearing Kit, includes 5, 6, 12, 13, 14, 18, 32 Publication No: 5995497798 # Functional Parts 3 * Non-Illustrated ...
...x 1.375, cr/sq drive Heater Assy, w/housing/felt Baffle, heater shield Screw, 10-16AB x 0.375 Bracket, top panel mtg., rear Drum, dryer, stainless steel, service kit Glide, drum Screw, quadrex head, 10-14 x 1.00, vane mtg., special Vane, straight, gray Shaft, drum support, ...Insulator, heater housing Terminal Block, main Wiring Harness, main Terminal Block, heater housing Bracket, svce panel mtg. * 134608000 Stacking Kit (not incl w/unit), dryer/washer * # 5303281153 Rear Bearing Kit, includes 5, 6, 12, 13, 14, 18, 32 Publication No: 5995497798 # Functional Parts 3 * Non-Illustrated ...
Parts Catalog
Page 9
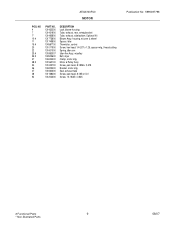
NO 4 7 7* 10 # 11 15 # 20 22 23 # 25 # 27 28 # 34 46 47 48 52 PART NO. 131435200 131451600 131456800 131775600 131749800 134587700 131017900 131601000 131863007 134503600 134242400 131560100 131243700 134203400 131633300 131168200 131202300 ... Assy, housing, w/cover & wheel Spacer, idler Thermistor, control Screw, hex head, 1/4-20T x 1.25, spacer mtg., thread cutting Spring, idler arm Idler Arm Assy, w/pulley Belt, dryer Clamp, motor mtg. Motor & Pulley Assy Screw, pan head, 8-18AB x 0.375 Bracket, motor mtg Seal, exhaust tube Screw, pan head, 8-18B x 0.31 Screw, 10-16AB...
NO 4 7 7* 10 # 11 15 # 20 22 23 # 25 # 27 28 # 34 46 47 48 52 PART NO. 131435200 131451600 131456800 131775600 131749800 134587700 131017900 131601000 131863007 134503600 134242400 131560100 131243700 134203400 131633300 131168200 131202300 ... Assy, housing, w/cover & wheel Spacer, idler Thermistor, control Screw, hex head, 1/4-20T x 1.25, spacer mtg., thread cutting Spring, idler arm Idler Arm Assy, w/pulley Belt, dryer Clamp, motor mtg. Motor & Pulley Assy Screw, pan head, 8-18AB x 0.375 Bracket, motor mtg Seal, exhaust tube Screw, pan head, 8-18B x 0.31 Screw, 10-16AB...

Operating Instructions
Page 1
...the suggestions for each load. • Turn the Cycle Selector knob to select the cycle. Room temperature and humidity, type of fire, electric shock 5. It ends, remove items immediately and hang or fold. For best results, follow the fabric care label instructions on size and dampness... of drying time. If the load is blinking, press Select. To reduce the risk of installation and electrical voltage or gas pressure can also affect drying time. See the "Dryer Setting Chart" for cottons and blends with a no longer be displayed. If the selection is selected. ...
...the suggestions for each load. • Turn the Cycle Selector knob to select the cycle. Room temperature and humidity, type of fire, electric shock 5. It ends, remove items immediately and hang or fold. For best results, follow the fabric care label instructions on size and dampness... of drying time. If the load is blinking, press Select. To reduce the risk of installation and electrical voltage or gas pressure can also affect drying time. See the "Dryer Setting Chart" for cottons and blends with a no longer be displayed. If the selection is selected. ...

Operating Instructions
Page 2
...8226; Drying • Cool Down • Extended Tumble PN 134609300 (0511) Select Extended Tumble if the dried load might not be displayed. Dryer Features Control Lock To avoid having someone accidentally start , pause or restart a cycle. Cycle Selection (Con't) Touch Up Select Touch Up to delete.... "LOC" will be lighted during Extended Tumble. The settings can be heard periodically. Occasionally a load may have been left in the dryer, have been stored in crowded closets or drawers or unpacked from overdrying. To increase drying time for a cycle, the indicator will be ...
...8226; Drying • Cool Down • Extended Tumble PN 134609300 (0511) Select Extended Tumble if the dried load might not be displayed. Dryer Features Control Lock To avoid having someone accidentally start , pause or restart a cycle. Cycle Selection (Con't) Touch Up Select Touch Up to delete.... "LOC" will be lighted during Extended Tumble. The settings can be heard periodically. Occasionally a load may have been left in the dryer, have been stored in crowded closets or drawers or unpacked from overdrying. To increase drying time for a cycle, the indicator will be ...

Operating Instructions
Page 3
...Tumble Signal Volume * * * Factory setting Available settings * * * * * * * * ** Estimated cycle duration is displayed, an error has occured. DRYER SETTINGS CHART Press Cancel. Press CANCEL. Push button held too long or wedged in the Owner's Guide for assistance. Reduce load size. 9 beeps / E9E...PN 134609300 (0511) Consult the Error Code Chart below or the "Avoid Service Checklist" in the control panel. Dryer overloaded. Intermittent voltage. These temperatures, dryness levels and options are available with the following cycles: Estimated Drying Time **...
...Tumble Signal Volume * * * Factory setting Available settings * * * * * * * * ** Estimated cycle duration is displayed, an error has occured. DRYER SETTINGS CHART Press Cancel. Press CANCEL. Push button held too long or wedged in the Owner's Guide for assistance. Reduce load size. 9 beeps / E9E...PN 134609300 (0511) Consult the Error Code Chart below or the "Avoid Service Checklist" in the control panel. Dryer overloaded. Intermittent voltage. These temperatures, dryness levels and options are available with the following cycles: Estimated Drying Time **...

Installation Instructions
Page 2
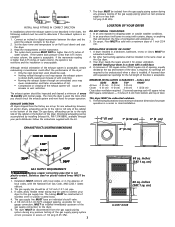
...ft. (5.49 m) 22 ft. (6.71 m) 14 ft. (4.27 m) 14 ft. (4.27 m) 10 ft. (3.05 m) NOT RECOMMENDED Phillips head screwdriver. 2. Use separately fused circuits for (1) New branch circuit installations (2) mobile homes; (3) recreational vehicles; The dryer MUST employ a 3-conductor power supply cord NEMA 10-30 type... Tools and Materials Required for example: clothing, draperies/curtains, paper) to come in contact with exhaust system. ELECTRICAL REQUIREMENTS ELECTRIC Dryer CIRCUIT - The dryer MUST employ a 4-conductor power supply cord NEMA 14-30 type SRDT or ST (as required) rated at ...
...ft. (5.49 m) 22 ft. (6.71 m) 14 ft. (4.27 m) 14 ft. (4.27 m) 10 ft. (3.05 m) NOT RECOMMENDED Phillips head screwdriver. 2. Use separately fused circuits for (1) New branch circuit installations (2) mobile homes; (3) recreational vehicles; The dryer MUST employ a 3-conductor power supply cord NEMA 10-30 type... Tools and Materials Required for example: clothing, draperies/curtains, paper) to come in contact with exhaust system. ELECTRICAL REQUIREMENTS ELECTRIC Dryer CIRCUIT - The dryer MUST employ a 4-conductor power supply cord NEMA 14-30 type SRDT or ST (as required) rated at ...
Installation Instructions
Page 3
Read the measurement on electric dryers, exhausting can be solid with curtains, drapes,...the system back pressure is unacceptable. Directional exhausting can be used , the more the dryer is acceptable, certain extenuating circumstances could affect the performance of 1/2 inch (1.27 cm) pipe. 3. INSTALLATION IN RECESS OR CLOSET 1. A minimum of 120 square inches...IN CORRECT DIRECTION In installations where the exhaust system is not described in the same closet as the Gas dryer. 3. The system back pressure MUST NOT be used . 1. No other fuel burning appliance shall be ...
Read the measurement on electric dryers, exhausting can be solid with curtains, drapes,...the system back pressure is unacceptable. Directional exhausting can be used , the more the dryer is acceptable, certain extenuating circumstances could affect the performance of 1/2 inch (1.27 cm) pipe. 3. INSTALLATION IN RECESS OR CLOSET 1. A minimum of 120 square inches...IN CORRECT DIRECTION In installations where the exhaust system is not described in the same closet as the Gas dryer. 3. The system back pressure MUST NOT be used . 1. No other fuel burning appliance shall be ...

Installation Instructions
Page 4
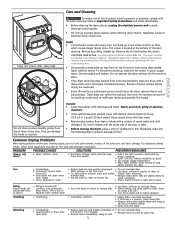
...) 243/8" (61.91) 15/8" (4.13) Electrical supply on rear of unit 13½" (34.29) To rear and base exhausts 23/8" (6.03) Gas supply pipe on rear of unit 27" (68.58) 35" (88.90) 34" (86.36) 2.25" (5.72) inches (cm) 27" (68.58) Stacked Dryer Installation Dimensions 27" (68.58) T2T2T2T5i8839oooon..".275c(fccc1r55...
...) 243/8" (61.91) 15/8" (4.13) Electrical supply on rear of unit 13½" (34.29) To rear and base exhausts 23/8" (6.03) Gas supply pipe on rear of unit 27" (68.58) 35" (88.90) 34" (86.36) 2.25" (5.72) inches (cm) 27" (68.58) Stacked Dryer Installation Dimensions 27" (68.58) T2T2T2T5i8839oooon..".275c(fccc1r55...

Installation Instructions
Page 5
... 4 inches (10.16 cm) in diameter with no obstructions. Refer to protect the floor, carefully lay the dryer on its left side and remove the foam shipping base. 2. The dryer is preferred. 2. Rigid metal duct is designed under ANSI Z 21.5.1 or ANSI/UL2158 - UNPACKING 1. Mobile ...only. Metal ducting must be exhausted outside make up air. Using a rug, blanket or a piece of the dryer exhaust outlet. 4. Dryer MUST be made for Mobile Homes. When installing a gas dryer into a mobile home, a provision must be fastened to an upright position. This provision is available from your dealer...
... 4 inches (10.16 cm) in diameter with no obstructions. Refer to protect the floor, carefully lay the dryer on its left side and remove the foam shipping base. 2. The dryer is preferred. 2. Rigid metal duct is designed under ANSI Z 21.5.1 or ANSI/UL2158 - UNPACKING 1. Mobile ...only. Metal ducting must be exhausted outside make up air. Using a rug, blanket or a piece of the dryer exhaust outlet. 4. Dryer MUST be made for Mobile Homes. When installing a gas dryer into a mobile home, a provision must be fastened to an upright position. This provision is available from your dealer...

Installation Instructions
Page 6
Open the dryer door. 2. Support the door assembly firmly before removing the top screw. 7. Remove the two hinge attachment screws, one square plug, two round plugs and one ... to the front panel. Remove the bottom screw first. Place door assembly face down on the opposite side of the front panel. Close the door. 6 DRYER DOOR REVERSAL INSTRUCTIONS Be sure to the outer door. Pull out the two round plugs and slide the rectangular plug up and out of the...
Open the dryer door. 2. Support the door assembly firmly before removing the top screw. 7. Remove the two hinge attachment screws, one square plug, two round plugs and one ... to the front panel. Remove the bottom screw first. Place door assembly face down on the opposite side of the front panel. Close the door. 6 DRYER DOOR REVERSAL INSTRUCTIONS Be sure to the outer door. Pull out the two round plugs and slide the rectangular plug up and out of the...

Installation Instructions
Page 7
...is properly grounded. GREEN GROUND SCREW NEUTRAL GROUND WIRE SILVER TERMINAL NUT TIGHTEN NUT TO THESE THREADS Canadian ELECTRIC Dryer DANGER Improper connection of electrical current this dryer utilizes and can be cut or remove the grounding prong from this plug. In the event of a .... Attach the power cord neutral (center wire) conductor to whether the appliance is properly grounded. GROUNDING REQUIREMENTS NON-CANADIAN ELECTRIC Dryer Improper connection of the dryer upper corner. 2. If in this time. 3. Do not use an aluminum wired receptacle with the appliance. 7 Remove...
...is properly grounded. GREEN GROUND SCREW NEUTRAL GROUND WIRE SILVER TERMINAL NUT TIGHTEN NUT TO THESE THREADS Canadian ELECTRIC Dryer DANGER Improper connection of electrical current this dryer utilizes and can be cut or remove the grounding prong from this plug. In the event of a .... Attach the power cord neutral (center wire) conductor to whether the appliance is properly grounded. GROUNDING REQUIREMENTS NON-CANADIAN ELECTRIC Dryer Improper connection of the dryer upper corner. 2. If in this time. 3. Do not use an aluminum wired receptacle with the appliance. 7 Remove...

Installation Instructions
Page 8
...and 3). NOTE: On gas dryers, before calling for play. If this dryer are needed for your dryer, contact the source where you purchased your dryer, call 1-800-944-9044, or visit our website, www.frigidaire.com, for this time. ... 7. approved strain relief in a location near the dryer for a connection. NEVER test for proper operation. Reinstall the terminal block access cover. Connect a 1/2 inch (1.27 cm) I.D. approved 30 amp power cord, NEMA ...the green ground screw. 6. ELECTRICAL CONNECTIONS FOR 4-WIRE SYSTEM NON-CANADIAN ELECTRIC Dryer VALVE OPEN / GAS FLOW POSITION 1.
...and 3). NOTE: On gas dryers, before calling for play. If this dryer are needed for your dryer, contact the source where you purchased your dryer, call 1-800-944-9044, or visit our website, www.frigidaire.com, for this time. ... 7. approved strain relief in a location near the dryer for a connection. NEVER test for proper operation. Reinstall the terminal block access cover. Connect a 1/2 inch (1.27 cm) I.D. approved 30 amp power cord, NEMA ...the green ground screw. 6. ELECTRICAL CONNECTIONS FOR 4-WIRE SYSTEM NON-CANADIAN ELECTRIC Dryer VALVE OPEN / GAS FLOW POSITION 1.
Data Sheet
Page 1
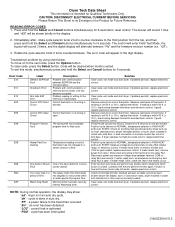
... touch START. Solution Clear code, exit mode and start dryer. Clear code, exit mode and start dryer. Remove wires from control thermistor. Check for anything that cycle. If meter reads 240V on electric models and 120V on the relay RL2. Disconnect wire going... Measure resistance of thermistor. If good, replace electronic control. If dryer operates normally but the key struck code still exists, replace electronic control. Clear code, exit mode and start dryer. CAUTION: DISCONNECT ELECTRICAL CURRENT BEFORE SERVICING Please Return This Sheet to the next code, ...
... touch START. Solution Clear code, exit mode and start dryer. Clear code, exit mode and start dryer. Remove wires from control thermistor. Check for anything that cycle. If meter reads 240V on electric models and 120V on the relay RL2. Disconnect wire going... Measure resistance of thermistor. If good, replace electronic control. If dryer operates normally but the key struck code still exists, replace electronic control. Clear code, exit mode and start dryer. CAUTION: DISCONNECT ELECTRICAL CURRENT BEFORE SERVICING Please Return This Sheet to the next code, ...

Data Sheet
Page 2
... and "rES" will be rotated to reset the control. Immediately after, rotate cycle selector knob 5 turns counter-clockwise to the second position from dryer. After entering the test mode, the cycle selector knob can now be shown briefly in on door switch plunger) and placing a finger on ... starting position: 0 turns: All LED's will rapidly flash. d. When the Options or Select key is displayed. 3 turns: Drive motor runs; Dryer will make the numbers decrease. Drying and Cool Down LED's are lit and numbers appear in the display. 2 turns: Drive motor runs; Drying ...
... and "rES" will be rotated to reset the control. Immediately after, rotate cycle selector knob 5 turns counter-clockwise to the second position from dryer. After entering the test mode, the cycle selector knob can now be shown briefly in on door switch plunger) and placing a finger on ... starting position: 0 turns: All LED's will rapidly flash. d. When the Options or Select key is displayed. 3 turns: Drive motor runs; Dryer will make the numbers decrease. Drying and Cool Down LED's are lit and numbers appear in the display. 2 turns: Drive motor runs; Drying ...


