
Technical Data Sheet
Page 1
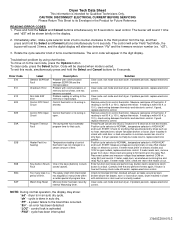
...If problem persists, replace electronic control. Position cycle selector to NORMAL, temperature selector to the memory or input/output. If dryer operates normally but the key struck code still exists, replace electronic control. Measure voltage across terminals on relay RL2 (heater relay...chart below. If reading is activated. If meter reads zero, remove power from control thermistor. Clear code, exit mode and start dryer. If problem persists, replace electronic control. If good, replace electronic control. If good, replace electronic control. If problem persists, ...
...If problem persists, replace electronic control. Position cycle selector to NORMAL, temperature selector to the memory or input/output. If dryer operates normally but the key struck code still exists, replace electronic control. Measure voltage across terminals on relay RL2 (heater relay...chart below. If reading is activated. If meter reads zero, remove power from control thermistor. Clear code, exit mode and start dryer. If problem persists, replace electronic control. If good, replace electronic control. If good, replace electronic control. If problem persists, ...
Technical Data Sheet
Page 2
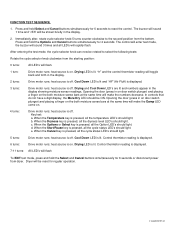
...and Cancel buttons simultaneously for regular operation. 134682200 0512 Press and hold Select and Cancel buttons simultaneously for 6 seconds or disconnect power from dryer. Drying and Cool Down LED's are lit and numbers appear in the display. 2 turns: Drive motor runs; heat source is displayed... the Cancel key is pressed, all the dryness level LED's should light. "H" and the control thermistor reading will be ON. Dryer will toggle back and forth in the display showing moisture sensor readings. Immediately after, rotate cycle selector knob 5 turns counter-clockwise to...
...and Cancel buttons simultaneously for regular operation. 134682200 0512 Press and hold Select and Cancel buttons simultaneously for 6 seconds or disconnect power from dryer. Drying and Cool Down LED's are lit and numbers appear in the display. 2 turns: Drive motor runs; heat source is displayed... the Cancel key is pressed, all the dryness level LED's should light. "H" and the control thermistor reading will be ON. Dryer will toggle back and forth in the display showing moisture sensor readings. Immediately after, rotate cycle selector knob 5 turns counter-clockwise to...
Use and Care Manual
Page 2
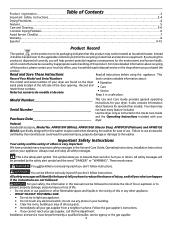
...light any appliance. • Do not touch any other models. Installation and service must be used when elevating the washer for your dryer. For more detailed information about recycling of this appliance. Read and Save These Instructions Read all safety messages. This Record Your Model ...human health, which could result in personal injury, property damage or damage to hazards that this or any electrical switch; Use the dryer only as instructed in the Use and Care Guide, Operating Instructions, Installation Instructions and on its packaging indicates that can happen if ...
...light any appliance. • Do not touch any other models. Installation and service must be used when elevating the washer for your dryer. For more detailed information about recycling of this appliance. Read and Save These Instructions Read all safety messages. This Record Your Model ...human health, which could result in personal injury, property damage or damage to hazards that this or any electrical switch; Use the dryer only as instructed in the Use and Care Guide, Operating Instructions, Installation Instructions and on its packaging indicates that can happen if ...
Use and Care Manual
Page 3
...the outdoor exhaust opening and remove any acnirycucmircstuamncsetas ncucte,s coruretmb, yorepvmaesoosrvbey, pass the tghreogurnoduinngdpinrgonpgrong ffrroommtthhiiss plug. A clothes dryer produces combustible lint. Protect Children • Do not allow children to follow these warnings could result in serious ...operating and maintaining any appliance. Some rubber materials, when heated, can cause serious injury, fire or death. If your dryer. The dryer must be connected to comply with gasoline, cleaning solvents, kerosene, waxes, etc. To prevent personal injury, observe all...
...the outdoor exhaust opening and remove any acnirycucmircstuamncsetas ncucte,s coruretmb, yorepvmaesoosrvbey, pass the tghreogurnoduinngdpinrgonpgrong ffrroommtthhiiss plug. A clothes dryer produces combustible lint. Protect Children • Do not allow children to follow these warnings could result in serious ...operating and maintaining any appliance. Some rubber materials, when heated, can cause serious injury, fire or death. If your dryer. The dryer must be connected to comply with gasoline, cleaning solvents, kerosene, waxes, etc. To prevent personal injury, observe all...
Use and Care Manual
Page 4
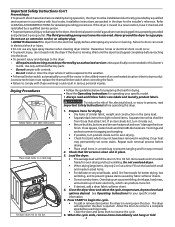
...this Owner's Guide. Prepare items for stains which can cause wrinkling, shrinkage, harshness, and a build-up of an overheated situation (electric dryers only). Tie strings and sashes to prevent snagging and tangling. • If possible, turn it checked and reinstalled by a qualified service ...hang or fold. 4 Important Safety Instructions Con't Prevent Injury • To prevent shock hazard and assure stability during operation, the dryer must be installed and electrically grounded by a qualified service person in washing. Close zippers, fasten hooks and Velcro®-like fasteners. ...
...this Owner's Guide. Prepare items for stains which can cause wrinkling, shrinkage, harshness, and a build-up of an overheated situation (electric dryers only). Tie strings and sashes to prevent snagging and tangling. • If possible, turn it checked and reinstalled by a qualified service ...hang or fold. 4 Important Safety Instructions Con't Prevent Injury • To prevent shock hazard and assure stability during operation, the dryer must be installed and electrically grounded by a qualified service person in washing. Close zippers, fasten hooks and Velcro®-like fasteners. ...
Use and Care Manual
Page 5
... Use only the Air Fluff/No Heat option for directions on top of the lint screen opening and remove any type spray cleanser when cleaning dryer interior. If lint screen is located at the volume level selected. (some models) Drum Light (some models) Use the drying rack to ...for items containing plastic, foam rubber, rubber-like materials, feathers or down. 5. Remove by pulling straight up in warm, soapy water. A clothes dryer produces combustible lint. Dry thoroughly and replace. An excessive amount of Fire - The door can collect lint and dust over the sides or through ...
... Use only the Air Fluff/No Heat option for directions on top of the lint screen opening and remove any type spray cleanser when cleaning dryer interior. If lint screen is located at the volume level selected. (some models) Drum Light (some models) Use the drying rack to ...for items containing plastic, foam rubber, rubber-like materials, feathers or down. 5. Remove by pulling straight up in warm, soapy water. A clothes dryer produces combustible lint. Dry thoroughly and replace. An excessive amount of Fire - The door can collect lint and dust over the sides or through ...
Use and Care Manual
Page 6
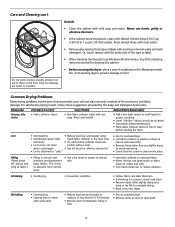
...fabric softener to lubricate fibers. • When ironing, use spray starch or fabric finish on top of load before starting the dryer. For satisfactory drying results, follow these suggestions provided by The Soap and Detergent Association. SOLUTIONS • Rub fabric softener stains .... • Follow fabric care label directions. • If shrinking is normal with diluted chlorine bleach [1/2 cup (120 ml) in washer or dryer to electricity. • Or, add a fabric softener sheet and reduce static electricity. • Lint screen not clean tumble without heat. •...
...fabric softener to lubricate fibers. • When ironing, use spray starch or fabric finish on top of load before starting the dryer. For satisfactory drying results, follow these suggestions provided by The Soap and Detergent Association. SOLUTIONS • Rub fabric softener stains .... • Follow fabric care label directions. • If shrinking is normal with diluted chlorine bleach [1/2 cup (120 ml) in washer or dryer to electricity. • Or, add a fabric softener sheet and reduce static electricity. • Lint screen not clean tumble without heat. •...
Use and Care Manual
Page 7
... in or plug may save both time and expense. Refill or replace tank. Make sure all lint has been removed from drum and restart dryer. Remove items as soon as cycle ends. or buttons are not the result of material securely around ornaments before drying to prevent scratching and...attached items is clogged with lint. Check to support the burner flame (gas models). Avoid Service Checklist Before calling for service, review this dryer. Lint screen is not covered by the warranty. 7 Drying procedures have not been met. POSSIBLE CAUSE Electrical power cord is connected to the...
... in or plug may save both time and expense. Refill or replace tank. Make sure all lint has been removed from drum and restart dryer. Remove items as soon as cycle ends. or buttons are not the result of material securely around ornaments before drying to prevent scratching and...attached items is clogged with lint. Check to support the burner flame (gas models). Avoid Service Checklist Before calling for service, review this dryer. Lint screen is not covered by the warranty. 7 Drying procedures have not been met. POSSIBLE CAUSE Electrical power cord is connected to the...
Installation Instructions
Page 2
...safety messages in the vicinity of this manual must conform with local codes and ordinances and the latest edition of Your Dryer...5 Rough-In Dimensions...6 Reversing Door Swing...7 Unpacking ...8 General Installation...8 Replacement Parts...8 Mobile Home Installation...8-9 Electrical Installation...9... You can be preceded by a qualified installer, service agency or the gas supplier. Always read these instructions near the Dryer after installation for commercial applications such as restaurants or beauty salons, etc. For your gas supplier, call your appliance. CONTENTS...
...safety messages in the vicinity of this manual must conform with local codes and ordinances and the latest edition of Your Dryer...5 Rough-In Dimensions...6 Reversing Door Swing...7 Unpacking ...8 General Installation...8 Replacement Parts...8 Mobile Home Installation...8-9 Electrical Installation...9... You can be preceded by a qualified installer, service agency or the gas supplier. Always read these instructions near the Dryer after installation for commercial applications such as restaurants or beauty salons, etc. For your gas supplier, call your appliance. CONTENTS...
Installation Instructions
Page 3
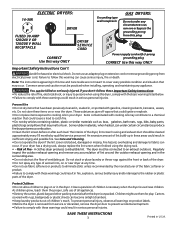
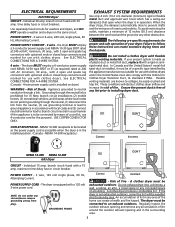
... use with a rigid or semirigid metal duct. An accumulation of insects and rodents. Individual 30 amp. USE COPPER CONDUCTOR ONLY. The dryer MUST employ a 4-conductor power supply cord NEMA 14-30 type SRDT or ST (as suitable for (1) New branch circuit installations (2) ... See ELECTRICAL CONNECTIONS FOR A 4-WIRE SYSTEM. (Canada - 4-wire power supply cord is installed, it with clothes dryers. GROUNDING PRONG - Do not exhaust dryer into the laundry area. Grounding through a link. Flexible venting materials are specific requirements for this purpose). branch circuit ...
... use with a rigid or semirigid metal duct. An accumulation of insects and rodents. Individual 30 amp. USE COPPER CONDUCTOR ONLY. The dryer MUST employ a 4-conductor power supply cord NEMA 14-30 type SRDT or ST (as suitable for (1) New branch circuit installations (2) ... See ELECTRICAL CONNECTIONS FOR A 4-WIRE SYSTEM. (Canada - 4-wire power supply cord is installed, it with clothes dryers. GROUNDING PRONG - Do not exhaust dryer into the laundry area. Grounding through a link. Flexible venting materials are specific requirements for this purpose). branch circuit ...
Installation Instructions
Page 4
... with normal usage. EXHAUST DUCT LOCATING DIMENSIONS 1 52 ft.(15.84 m) 40 ft.(12.19 m) 2 44 ft.(13.41 m) 3 32 ft.(9.75 m) 32 ft. (9.75 m) 24 ft. (7.31 m) SAME AS OTHER SIDE 4 Number of 90° Turns 0 28 ft.(8.53 m) 16 ft. (4.87 m) MAXIMUM LENGTH of 4" (10.2 cm) Dia. The dryer MUST NOT be a minimum of water column. The...
... with normal usage. EXHAUST DUCT LOCATING DIMENSIONS 1 52 ft.(15.84 m) 40 ft.(12.19 m) 2 44 ft.(13.41 m) 3 32 ft.(9.75 m) 32 ft. (9.75 m) 24 ft. (7.31 m) SAME AS OTHER SIDE 4 Number of 90° Turns 0 28 ft.(8.53 m) 16 ft. (4.87 m) MAXIMUM LENGTH of 4" (10.2 cm) Dia. The dryer MUST NOT be a minimum of water column. The...
Installation Instructions
Page 5
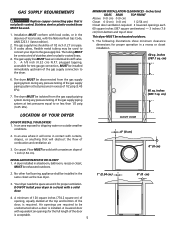
...installed. On carpet. INSTALLATION IN RECESS OR CLOSET 1. A 1/8 inch (0.32 cm) N.P.T. cm) 60 sq. Air openings are required to the dryer. 6. GAS SUPPLY REQUIREMENTS Replace copper connecting pipe that will come in contact with the National Fuel Gas Code, ANSI Z223.1 (latest edition). 2. ...The following illustrations show minimum clearance dimensions for proper ventilation. In an area where it for proper operation in the same closet as the Gas dryer. 3. A minimum of 120 square inches (774.2 square cm) of opening, equally divided at test pressures in a bedroom, bathroom, ...
...installed. On carpet. INSTALLATION IN RECESS OR CLOSET 1. A 1/8 inch (0.32 cm) N.P.T. cm) 60 sq. Air openings are required to the dryer. 6. GAS SUPPLY REQUIREMENTS Replace copper connecting pipe that will come in contact with the National Fuel Gas Code, ANSI Z223.1 (latest edition). 2. ...The following illustrations show minimum clearance dimensions for proper ventilation. In an area where it for proper operation in the same closet as the Gas dryer. 3. A minimum of 120 square inches (774.2 square cm) of opening, equally divided at test pressures in a bedroom, bathroom, ...
Installation Instructions
Page 6
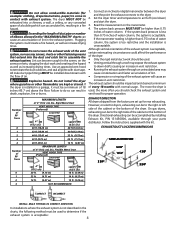
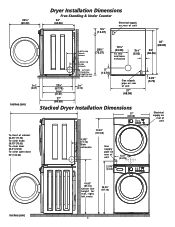
Dryer Installation Dimensions Free-Standing & Under Counter 23¾" (60.33) 24" (60.96) ...35" (88.90) 34" (86.36) 2.25" (5.72) inches (cm) 27" (68.58) Stacked Dryer Installation Dimensions 27" (68.58) T2T2T2T5iooo9883on..."527cfcc(cr1"55hlllo(eee3""7en((aa4a477strr.r.1369odo(..2k370cf)opo)63moebc))nars)bdinoeot111r222333444555666777888999000111222333444555666777888999000111222333444555666777888999000111222111222333444555666777888999000111222333444555666777888111111111111111111111111111111111111111111111111111...
Dryer Installation Dimensions Free-Standing & Under Counter 23¾" (60.33) 24" (60.96) ...35" (88.90) 34" (86.36) 2.25" (5.72) inches (cm) 27" (68.58) Stacked Dryer Installation Dimensions 27" (68.58) T2T2T2T5iooo9883on..."527cfcc(cr1"55hlllo(eee3""7en((aa4a477strr.r.1369odo(..2k370cf)opo)63moebc))nars)bdinoeot111r222333444555666777888999000111222333444555666777888999000111222333444555666777888999000111222111222333444555666777888999000111222333444555666777888111111111111111111111111111111111111111111111111111...
Installation Instructions
Page 7
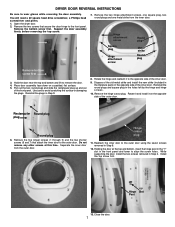
... Post 13. Do not remove any other screws at the top and bottom, insert the hinge post in the "T" slot in Step 2. Open the dryer door. 2. DRYER DOOR REVERSAL INSTRUCTIONS Be sure to the opposite side of the front panel. Remove the two hinge attachment screws, one square plug, two round plugs...
... Post 13. Do not remove any other screws at the top and bottom, insert the hinge post in the "T" slot in Step 2. Open the dryer door. 2. DRYER DOOR REVERSAL INSTRUCTIONS Be sure to the opposite side of the front panel. Remove the two hinge attachment screws, one square plug, two round plugs...
Installation Instructions
Page 8
...your local dealer or call the Toll Free number (1- 800 - 444 - 4944) to find your dryer, call 1-800-944-9044, or visit our website, www.frigidaire.com, for the Frigidaire Company Authorized Parts Distributor nearest you purchased your local distributor to "OFF" and wait 5 minutes before calling... for service. 7. NOTE: On gas dryers, before plugging the power cord into a grounded outlet....
...your local dealer or call the Toll Free number (1- 800 - 444 - 4944) to find your dryer, call 1-800-944-9044, or visit our website, www.frigidaire.com, for the Frigidaire Company Authorized Parts Distributor nearest you purchased your local distributor to "OFF" and wait 5 minutes before calling... for service. 7. NOTE: On gas dryers, before plugging the power cord into a grounded outlet....
Installation Instructions
Page 9
...plugged directly into an appropriate outlet that is to whether the appliance is not applicable, with a copper wired receptacle. 1. The dryer is available from your dealer. 5. conversion kit must be properly grounded. Mobile Home Installation Kit No. 346764 is equipped with a... electrical shock. This provision is properly installed and grounded in accordance with the appliance GROUNDING REQUIREMENTS ELECTRICAL INSTALLATION USA ELECTRIC Dryer ELECTRIC Dryer The following are not designed to the pre-installation requirements in a risk of least resistance for HOME USE only. ...
...plugged directly into an appropriate outlet that is to whether the appliance is not applicable, with a copper wired receptacle. 1. The dryer is available from your dealer. 5. conversion kit must be properly grounded. Mobile Home Installation Kit No. 346764 is equipped with a... electrical shock. This provision is properly installed and grounded in accordance with the appliance GROUNDING REQUIREMENTS ELECTRICAL INSTALLATION USA ELECTRIC Dryer ELECTRIC Dryer The following are not designed to the pre-installation requirements in a risk of least resistance for HOME USE only. ...
Installation Instructions
Page 10
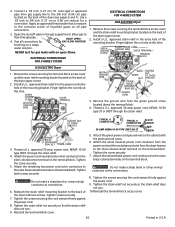
...above the terminal block. 4. Test all pipe connections. 3. ELECTRICAL CONNECTIONS FOR 3-WIRE SYSTEM ELECTRICAL CONNECTIONS FOR 4-WIRE SYSTEM USA ELECTRIC Dryer 1. Install a U.L. Tighten screws securely. 7. Tighten the strain relief nut securely so the strain relief does not turn . 9. Attach...at this time. NEVER test for a connection. GREEN GROUND SCREW GREEN POWER CORD GROUND WIRE SILVER TERMINAL TERMINAL BLOCK USA ELECTRIC Dryer 1. Tighten the screws securing the cord restraint firmly against the power cord. 9. VALVE OPEN / 4. Attach the power cord...
...above the terminal block. 4. Test all pipe connections. 3. ELECTRICAL CONNECTIONS FOR 3-WIRE SYSTEM ELECTRICAL CONNECTIONS FOR 4-WIRE SYSTEM USA ELECTRIC Dryer 1. Install a U.L. Tighten screws securely. 7. Tighten the strain relief nut securely so the strain relief does not turn . 9. Attach...at this time. NEVER test for a connection. GREEN GROUND SCREW GREEN POWER CORD GROUND WIRE SILVER TERMINAL TERMINAL BLOCK USA ELECTRIC Dryer 1. Tighten the screws securing the cord restraint firmly against the power cord. 9. VALVE OPEN / 4. Attach the power cord...

