
User manual
Page 2
...: User's Manual V1.0 for specific features. Symbol description: Note: Refers to important information that can help prevent potential negative consequences for the environment and human health, which does not support hot plug. ■ Disconnect all the peripherals are properly connected before using this product, please read the below safety notice carefully, this will help you to use the power adapter...
...: User's Manual V1.0 for specific features. Symbol description: Note: Refers to important information that can help prevent potential negative consequences for the environment and human health, which does not support hot plug. ■ Disconnect all the peripherals are properly connected before using this product, please read the below safety notice carefully, this will help you to use the power adapter...

User manual
Page 3
... the Safety Certificates if you add on the desk 7 Installing to NanoPC USB Flash Disk in the package. TABLE OF CONTENTS Introduction 1-1 Front Side View...2 1-2 Back Side View...4 Placement and connecting 2-1 Placement of NanoPC 7 Erected on an extension cable to Display 7 2-2 Connection of NanoPC 10 Connect display...10 Connect USB devices 11 Connect network cable 11 Connect power cord 12 BIOS Setup Enter BIOS Setup...14 Main...15 Advanced...16 Boot...18 Security...20 Save...
... the Safety Certificates if you add on the desk 7 Installing to NanoPC USB Flash Disk in the package. TABLE OF CONTENTS Introduction 1-1 Front Side View...2 1-2 Back Side View...4 Placement and connecting 2-1 Placement of NanoPC 7 Erected on an extension cable to Display 7 2-2 Connection of NanoPC 10 Connect display...10 Connect USB devices 11 Connect network cable 11 Connect power cord 12 BIOS Setup Enter BIOS Setup...14 Main...15 Advanced...16 Boot...18 Security...20 Save...
User manual
Page 4
Local Update...30 2. About & Help...32 Introduction ■ Front Side View ■ Back Side View Install OS 4-1 Install Windows 7/8 24 4-2 Install Drivers...28 Utility Fox WINFLASH...30 1.
Local Update...30 2. About & Help...32 Introduction ■ Front Side View ■ Back Side View Install OS 4-1 Install Windows 7/8 24 4-2 Install Drivers...28 Utility Fox WINFLASH...30 1.

User manual
Page 5
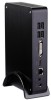
... optical connectors (3.5mm jack). You need to install the USB 3.0 driver in NanoPC USB Disk before using it. 4 Multi-Function card reader This memory card reader supports SD/SDHC/MS/MS Pro/MMC memory cards used in devices like digital cameras, mobile phones, Media players and so on or off, the LED can indicate your NanoPC in place. 3 Use this port for USB devices such as keyboard, mouse, USB printer, USB flash drives and hard disk drives, etc. SPDIF function requires additional adapter and adapter cable. 6 Headphone Connects...
... optical connectors (3.5mm jack). You need to install the USB 3.0 driver in NanoPC USB Disk before using it. 4 Multi-Function card reader This memory card reader supports SD/SDHC/MS/MS Pro/MMC memory cards used in devices like digital cameras, mobile phones, Media players and so on or off, the LED can indicate your NanoPC in place. 3 Use this port for USB devices such as keyboard, mouse, USB printer, USB flash drives and hard disk drives, etc. SPDIF function requires additional adapter and adapter cable. 6 Headphone Connects...
User manual
Page 6
...mouse, USB printer, USB flash drives and hard disk drives, etc. RJ-45 LAN port Supports 10/100/1000Mb/s Ethernet network. Connect network cable to this port. By using the DVI to this port for USB devices such as a monitor or projector. Power input port Connect power cord that comes with your product. 5 SPDIF function requires additional adapter and adapter cable. Use this port. INTRODUCTION 1-2 Back Side View 1 2 3 4 5 6 4 1 2 DVI 3 HDMI 4 5 6 INTRODUCTION USB 2.0 port This USB port supports the USB 2.0/1.0 specification. Connect monitor or TV that uses DVI connector...
...mouse, USB printer, USB flash drives and hard disk drives, etc. RJ-45 LAN port Supports 10/100/1000Mb/s Ethernet network. Connect network cable to this port. By using the DVI to this port for USB devices such as a monitor or projector. Power input port Connect power cord that comes with your product. 5 SPDIF function requires additional adapter and adapter cable. Use this port. INTRODUCTION 1-2 Back Side View 1 2 3 4 5 6 4 1 2 DVI 3 HDMI 4 5 6 INTRODUCTION USB 2.0 port This USB port supports the USB 2.0/1.0 specification. Connect monitor or TV that uses DVI connector...
User manual
Page 7
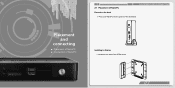
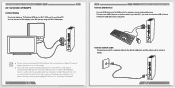
Place your NanoPC into the groove of NanoPC PLACEMENT AND CONNECTING Erected on the desk 1. Placement and connecting ■ Placement of NanoPC ■ Connection of NanoPC 2-1 Placement of the Seat Base. Installing to Display 1. Assemble one side of the VESA mount. 7
Place your NanoPC into the groove of NanoPC PLACEMENT AND CONNECTING Erected on the desk 1. Placement and connecting ■ Placement of NanoPC ■ Connection of NanoPC 2-1 Placement of the Seat Base. Installing to Display 1. Assemble one side of the VESA mount. 7

User manual
Page 8
Install the other side of the VESA mount. Fit the NanoPC into the VESA mount in the correct alignment. 8 4. PLACEMENT AND CONNECTING To fasten the VESA mount, your display must comply with four screws. 3. Fasten it onto the display with VESA75 or VESA100 standard. 9 PLACEMENT AND CONNECTING 2.
Install the other side of the VESA mount. Fit the NanoPC into the VESA mount in the correct alignment. 8 4. PLACEMENT AND CONNECTING To fasten the VESA mount, your display must comply with four screws. 3. Fasten it onto the display with VESA75 or VESA100 standard. 9 PLACEMENT AND CONNECTING 2.
User manual
Page 9
... "Scaling Options(Digital Flat-Panel)" in NanoPC USB disk before using them. ■ Please use the customized DVI-VGA Adapter that has HDMI port or DVI / VGA port to your NanoPC. You can initiate this utility by using the DVI-VGA adapter. And you need to install the USB 3.0 driver in "My Digital Flat-Panels". 10 Connect network cable Connect one end of a network cable to the RJ-45 LAN port, and the other end to a hub or switch. 11...
... "Scaling Options(Digital Flat-Panel)" in NanoPC USB disk before using them. ■ Please use the customized DVI-VGA Adapter that has HDMI port or DVI / VGA port to your NanoPC. You can initiate this utility by using the DVI-VGA adapter. And you need to install the USB 3.0 driver in "My Digital Flat-Panels". 10 Connect network cable Connect one end of a network cable to the RJ-45 LAN port, and the other end to a hub or switch. 11...

User manual
Page 10
CAUTION PLACEMENT AND CONNECTING Connect power cord Connect the power adapter to the power input port of the NanoPC, and then press the power button to start it. 2 3 1 The power adapter is dissipating heat during normal use, please do not cover it and keep it away from your body to prevent injury from heat exposure. 12 BIOS Setup ■ Enter BIOS Setup ■ Main ■ Advanced ■ Boot ■ Security ■ Save & Exit
CAUTION PLACEMENT AND CONNECTING Connect power cord Connect the power adapter to the power input port of the NanoPC, and then press the power button to start it. 2 3 1 The power adapter is dissipating heat during normal use, please do not cover it and keep it away from your body to prevent injury from heat exposure. 12 BIOS Setup ■ Enter BIOS Setup ■ Main ■ Advanced ■ Boot ■ Security ■ Save & Exit

User manual
Page 11
...:02 Embedded Control Version 12.F1.03 System BIOS Version C72F1P02 CPU Information AMD C-70 APU with a user password, it may offer better performance in correct password before boot or access to enter boot menu." Copyright (C) 2012 American Megatrends, Inc. ► System Date format. Date-date from the change the default values in the BIOS Setup, and we shall not be set a password, the system will display "User". Use [ENTER], [TAB...
...:02 Embedded Control Version 12.F1.03 System BIOS Version C72F1P02 CPU Information AMD C-70 APU with a user password, it may offer better performance in correct password before boot or access to enter boot menu." Copyright (C) 2012 American Megatrends, Inc. ► System Date format. Date-date from the change the default values in the BIOS Setup, and we shall not be set a password, the system will display "User". Use [ENTER], [TAB...

User manual
Page 12
... video memory to support IDE mode. [AHCI Mode] - The specification includes a description of your motherboard supporting AHCI, and you have fair performance, or you enter system with administrator password, this item will take with AHCI support in its best performance. This is set which also supports AHCI, then 16 BIOS SETUP you can wake up from power button. ► USB 2.0 Port S3 Wakeup This item is used to enable/disable the USB 2.0 device(s) to generate a wake...
... video memory to support IDE mode. [AHCI Mode] - The specification includes a description of your motherboard supporting AHCI, and you have fair performance, or you enter system with administrator password, this item will take with AHCI support in its best performance. This is set which also supports AHCI, then 16 BIOS SETUP you can wake up from power button. ► USB 2.0 Port S3 Wakeup This item is used to enable/disable the USB 2.0 device(s) to generate a wake...

User manual
Page 13
... controls the execution of POST messages. ► Fast Boot While Enabled, this option allows BIOS to skip certain tests while booting, this item is set to [Enabled]. ► Boot Option Priorities These items are used to set the "Built-in EFI Shell" option boot priority in EFI Shell Support [On] [Disabled] [Enabled] [Enabled] [Do not launch] [Disabled] Select the keyboard NumLock state Boot Option Priorities → ←: Select Screen ↑ ↓: Select Item Enter: Select +/-: Change...
... controls the execution of POST messages. ► Fast Boot While Enabled, this option allows BIOS to skip certain tests while booting, this item is set to [Enabled]. ► Boot Option Priorities These items are used to set the "Built-in EFI Shell" option boot priority in EFI Shell Support [On] [Disabled] [Enabled] [Enabled] [Do not launch] [Disabled] Select the keyboard NumLock state Boot Option Priorities → ←: Select Screen ↑ ↓: Select Item Enter: Select +/-: Change...

User manual
Page 14
... SSaavvee && EExxiitt Save Changes and Exit Discard Changes and Exit Save Changes and Reset Discard Changed and Reset Set Administrator Password Save Option Save Changes Discard Changes Restore Defaults Save as User Defaults Restore User Defaults Boot Override → ←: Select Screen ↑ ↓: Select Item Enter: Select +/-: Change Opt. Copyright (C) 2012 American Megatrends, Inc. ► Save Changes and Exit If you select this only limits access to Setup and is used to boot or enter Setup. C opyright (C) 2012...
... SSaavvee && EExxiitt Save Changes and Exit Discard Changes and Exit Save Changes and Reset Discard Changed and Reset Set Administrator Password Save Option Save Changes Discard Changes Restore Defaults Save as User Defaults Restore User Defaults Boot Override → ←: Select Screen ↑ ↓: Select Item Enter: Select +/-: Change Opt. Copyright (C) 2012 American Megatrends, Inc. ► Save Changes and Exit If you select this only limits access to Setup and is used to boot or enter Setup. C opyright (C) 2012...

User manual
Page 15
... return to the main menu. ► Discard Changes If you select this option and press , a message will be displayed in the center of this motherboard. Select this option and press Enter, it will be displayed in the screen. Select [Yes] to restore/load the user defaults to all the setup options, select [No] or to return to the main menu. ► Boot Override BIOS auto detect the presence...
... return to the main menu. ► Discard Changes If you select this option and press , a message will be displayed in the center of this motherboard. Select this option and press Enter, it will be displayed in the screen. Select [Yes] to restore/load the user defaults to all the setup options, select [No] or to return to the main menu. ► Boot Override BIOS auto detect the presence...

User manual
Page 16
... need select them and click "Drive options (advanced)" to change the first boot device for installing the OS. INSTALL OS What kinds of hardware and software you to select the installation type. NanoPC USB Flash Disk (In this example) of your system. Press power on your hard drive. 24 25 It will the display the hard disk partitions (160GB, in the BIOS setup. 4-1 Install Windows 7/8 1. Windows 7/8 Install USB Disk / USB DVD-ROM drive and Windows 7/8 Install CD (Other purchase) 2. Put the Windows 7/8 Install CD into the USB DVD-ROM drive if you need...
... need select them and click "Drive options (advanced)" to change the first boot device for installing the OS. INSTALL OS What kinds of hardware and software you to select the installation type. NanoPC USB Flash Disk (In this example) of your system. Press power on your hard drive. 24 25 It will the display the hard disk partitions (160GB, in the BIOS setup. 4-1 Install Windows 7/8 1. Windows 7/8 Install USB Disk / USB DVD-ROM drive and Windows 7/8 Install CD (Other purchase) 2. Put the Windows 7/8 Install CD into the USB DVD-ROM drive if you need...

User manual
Page 17
... "Next" to create partitions as you create a partition. INSTALL OS To ensure that all Windows features work correctly, Windows might create additional partitions for system files. In this example we are creating a 70GB partition to install Windows 7/8 on your modifications and click "Apply". Make your hard disk. The setup program will restart several times. 26 27 During the installation, your computer will then start to install Windows. INSTALL OS 9.
... "Next" to create partitions as you create a partition. INSTALL OS To ensure that all Windows features work correctly, Windows might create additional partitions for system files. In this example we are creating a 70GB partition to install Windows 7/8 on your modifications and click "Apply". Make your hard disk. The setup program will restart several times. 26 27 During the installation, your computer will then start to install Windows. INSTALL OS 9.

User manual
Page 18
... drivers, you need to restart your system. 2. Use these options to install it 's first use. Waiting for your computer for it first. After installing all the drivers for a few seconds, the main menu will prepare your system. When the Windows 7/8 is complete, setup will be displayed on each individual driver to install the necessary drivers before using it manually. 4. When the installation is completely installed, you can start using the NanoPC. INSTALL...
... drivers, you need to restart your system. 2. Use these options to install it 's first use. Waiting for your computer for it first. After installing all the drivers for a few seconds, the main menu will prepare your system. When the Windows 7/8 is complete, setup will be displayed on each individual driver to install the necessary drivers before using it manually. 4. When the installation is completely installed, you can start using the NanoPC. INSTALL...

User manual
Page 19
... to the physical motherboard for AMI BIOS) before the setup wizard starts. 31 Make sure you can remember the file name together with the directory which directory to load your new BIOS file (with an extension of this backup file is ".ROM" for AMI BIOS. Key in a file name, then click "Save" to backup and update your system BIOS information. UTILITY Fox WINFLASH...
... to the physical motherboard for AMI BIOS) before the setup wizard starts. 31 Make sure you can remember the file name together with the directory which directory to load your new BIOS file (with an extension of this backup file is ".ROM" for AMI BIOS. Key in a file name, then click "Save" to backup and update your system BIOS information. UTILITY Fox WINFLASH...
User manual
Page 20
... can radiate radio frequency energy and, if not installed and used for a Class B digital device, pursuant to provide reasonable protection against harmful interference in a particular installation. These limits are designed to part 15 of this device must be installed and operated in accordance with provided instructions and the antenna(s) used in conjunction with any interference received, including interference that to...
... can radiate radio frequency energy and, if not installed and used for a Class B digital device, pursuant to provide reasonable protection against harmful interference in a particular installation. These limits are designed to part 15 of this device must be installed and operated in accordance with provided instructions and the antenna(s) used in conjunction with any interference received, including interference that to...

User manual
Page 21
Warning statement for Europe: Also, put in the manual which directive to sell the product. Example of a text to tell which countries to fulfil and also which directive has been fulfilled: Hereby, Foxconn, declares that this AT-5000 Series is in compliance with the essential requirements and other relevant provisions of Directive 1999/5/EC."
Warning statement for Europe: Also, put in the manual which directive to sell the product. Example of a text to tell which countries to fulfil and also which directive has been fulfilled: Hereby, Foxconn, declares that this AT-5000 Series is in compliance with the essential requirements and other relevant provisions of Directive 1999/5/EC."


