User manual
Page 2
Safety Notice: Before using NanoPC. ■ This product should only be caused by inappropriate waste handling of this product by yourself, any disassembly not... product, please read the below safety notice carefully, this will help you to use NanoPC better, and tells you will help to extend the product's lifecycle, and work normally. ■ When NanoPC is working, please make sure its ventilation system is working. ■ The power ... the power adapter that this product. © All rights reserved. Symbol description: Note: Refers to the physical product for NanoPC.
Safety Notice: Before using NanoPC. ■ This product should only be caused by inappropriate waste handling of this product by yourself, any disassembly not... product, please read the below safety notice carefully, this will help you to use NanoPC better, and tells you will help to extend the product's lifecycle, and work normally. ■ When NanoPC is working, please make sure its ventilation system is working. ■ The power ... the power adapter that this product. © All rights reserved. Symbol description: Note: Refers to the physical product for NanoPC.
User manual
Page 3
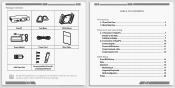
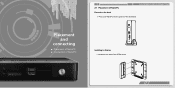
TABLE OF CONTENTS Introduction 1-1 Front Side View...2 1-2 Back Side View...4 Placement and connecting 2-1 Placement of NanoPC 10 Connect display...10 Connect USB devices 11 Connect network cable 11 Connect power cord 12 BIOS Setup Enter BIOS Setup...14 Main...15 ...Advanced...16 Miscellaneous...17 Integrated Peripherals 18 SATA Configuration 19 Power...20 Package Contents NanoPC Seat Base VESA Mount Power Adapter Power Cord Easy Guide USB Flash Disk Screws and Mini PCIe Half Card Support Bracket We DO NOT guarantee...
TABLE OF CONTENTS Introduction 1-1 Front Side View...2 1-2 Back Side View...4 Placement and connecting 2-1 Placement of NanoPC 10 Connect display...10 Connect USB devices 11 Connect network cable 11 Connect power cord 12 BIOS Setup Enter BIOS Setup...14 Main...15 ...Advanced...16 Miscellaneous...17 Integrated Peripherals 18 SATA Configuration 19 Power...20 Package Contents NanoPC Seat Base VESA Mount Power Adapter Power Cord Easy Guide USB Flash Disk Screws and Mini PCIe Half Card Support Bracket We DO NOT guarantee...
User manual
Page 5
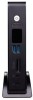
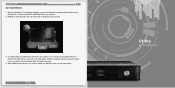
...adapter and adapter cable. 6 Headphone Connects to a headphone. 7 Kensington lock Attach a Kensington security system or a compatible security lock to secure your NanoPC in port Connects to a microphone or playback devices with Power indicator LED Press to install the USB 3.0 driver in.../MS Pro/MMC memory cards used in devices like digital cameras, mobile phones, Media players and so on or off, the LED can indicate your NanoPC on . 5 Microphone / SPDIF in place. 3 You need to turn your system states. 2 Speaker 3 USB 3.0 port This USB port supports the USB 3.0/2.0/1.0 ...
...adapter and adapter cable. 6 Headphone Connects to a headphone. 7 Kensington lock Attach a Kensington security system or a compatible security lock to secure your NanoPC in port Connects to a microphone or playback devices with Power indicator LED Press to install the USB 3.0 driver in.../MS Pro/MMC memory cards used in devices like digital cameras, mobile phones, Media players and so on or off, the LED can indicate your NanoPC on . 5 Microphone / SPDIF in place. 3 You need to turn your system states. 2 Speaker 3 USB 3.0 port This USB port supports the USB 3.0/2.0/1.0 ...
User manual
Page 7
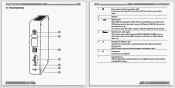
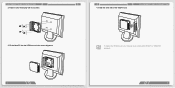
Assemble one side of the Seat Base. Installing to Display 1. Place your NanoPC into the groove of the VESA mount. 7 Placement and connecting ■ Placement of NanoPC ■ Connection of NanoPC 2-1 Placement of NanoPC PLACEMENT AND CONNECTING Erected on the desk 1.
Assemble one side of the Seat Base. Installing to Display 1. Place your NanoPC into the groove of the VESA mount. 7 Placement and connecting ■ Placement of NanoPC ■ Connection of NanoPC 2-1 Placement of NanoPC PLACEMENT AND CONNECTING Erected on the desk 1.
User manual
Page 8
PLACEMENT AND CONNECTING To fasten the VESA mount, your display must comply with four screws. 3. PLACEMENT AND CONNECTING 2. Fasten it onto the display with VESA75 or VESA100 standard. 9 Fit the NanoPC into the VESA mount in the correct alignment. 8 4. Install the other side of the VESA mount.
PLACEMENT AND CONNECTING To fasten the VESA mount, your display must comply with four screws. 3. PLACEMENT AND CONNECTING 2. Fasten it onto the display with VESA75 or VESA100 standard. 9 Fit the NanoPC into the VESA mount in the correct alignment. 8 4. Install the other side of the VESA mount.
User manual
Page 9
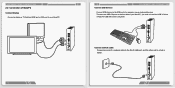
Connect network cable Connect one end of your NanoPC. 10 Connect USB devices PLACEMENT AND CONNECTING Connect USB devices to the USB ports, for example, mouse, keyboard devices. PLACEMENT AND CONNECTING 2-2 Connection of NanoPC Connect display Connect a display or TV that has HDMI port or VGA port to your NanoPC, you need to install the USB 3.0 driver in NanoPC USB disk before using them. There are two USB 3.0 ports on the front side of a network cable to the RJ-45 LAN port, and the other end to a hub or switch. 11
Connect network cable Connect one end of your NanoPC. 10 Connect USB devices PLACEMENT AND CONNECTING Connect USB devices to the USB ports, for example, mouse, keyboard devices. PLACEMENT AND CONNECTING 2-2 Connection of NanoPC Connect display Connect a display or TV that has HDMI port or VGA port to your NanoPC, you need to install the USB 3.0 driver in NanoPC USB disk before using them. There are two USB 3.0 ports on the front side of a network cable to the RJ-45 LAN port, and the other end to a hub or switch. 11
User manual
Page 10
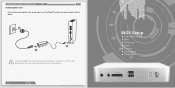
CAUTION PLACEMENT AND CONNECTING Connect power cord Connect the power adapter to the power input port of the NanoPC, and then press the power button to start it. 2 3 1 The power adapter is dissipating heat during normal use, please do not cover it and keep it away from your body to prevent injury from heat exposure. 12 BIOS Setup ■ Enter BIOS Setup ■ Main ■ Advanced ■ Power ■ Security ■ BootOptions ■ Save & Exit
CAUTION PLACEMENT AND CONNECTING Connect power cord Connect the power adapter to the power input port of the NanoPC, and then press the power button to start it. 2 3 1 The power adapter is dissipating heat during normal use, please do not cover it and keep it away from your body to prevent injury from heat exposure. 12 BIOS Setup ■ Enter BIOS Setup ■ Main ■ Advanced ■ Power ■ Security ■ BootOptions ■ Save & Exit
User manual
Page 17
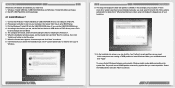
...ROM drive. (If you to create partitions as Linux) installed previously, you need select them and click "Drive options (advanced)" to one USB port of NanoPC. 2. The computer will reboot, and it will then ask you use , set the related items and click "Next" to continue, then click "Install now...INSTALL OS What kinds of hardware and software you need . Windows 7 Install USB Disk / USB DVD-ROM drive and Windows 7 Install CD (Other purchase) 2. NanoPC USB Flash Disk (In this example we are clean, setup will see a 100MB partition reserved by system after you use the USB DVD-ROM drive...
...ROM drive. (If you to create partitions as Linux) installed previously, you need select them and click "Drive options (advanced)" to one USB port of NanoPC. 2. The computer will reboot, and it will then ask you use , set the related items and click "Next" to continue, then click "Install now...INSTALL OS What kinds of hardware and software you need . Windows 7 Install USB Disk / USB DVD-ROM drive and Windows 7 Install CD (Other purchase) 2. NanoPC USB Flash Disk (In this example we are clean, setup will see a 100MB partition reserved by system after you use the USB DVD-ROM drive...
User manual
Page 19
...install it manually. 4. After installing all the drivers for a few seconds, the main menu will be displayed on each individual driver to restart your NanoPC, then you want to your system. After that, you can click "One Click Setup" and then choose the items you can click on the ...screen. 3. INSTALL OS 4-2 Install Drivers 1. Connect the NanoPC USB Flash Disk to install, or you have to install it . 30 Utility ■ Fox WINFLASH You must click "Intel Chipset Driver" to install the...
...install it manually. 4. After installing all the drivers for a few seconds, the main menu will be displayed on each individual driver to restart your NanoPC, then you want to your system. After that, you can click "One Click Setup" and then choose the items you can click on the ...screen. 3. INSTALL OS 4-2 Install Drivers 1. Connect the NanoPC USB Flash Disk to install, or you have to install it . 30 Utility ■ Fox WINFLASH You must click "Intel Chipset Driver" to install the...