User manual
Page 2
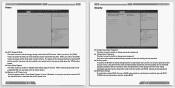
..., and tells you to use the power adapter that can help prevent potential negative consequences for the environment and human health, which does not support hot plug. ■ Disconnect all the peripherals are for reference only, please refer to cover it and keep it away from your device. ■ Make sure all peripherals before servicing or disassembling this equipment. ■...
..., and tells you to use the power adapter that can help prevent potential negative consequences for the environment and human health, which does not support hot plug. ■ Disconnect all the peripherals are for reference only, please refer to cover it and keep it away from your device. ■ Make sure all peripherals before servicing or disassembling this equipment. ■...
User manual
Page 3
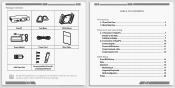
... desk 7 Installing to NanoPC USB Flash Disk in compliance with the Safety Certificates if you add on an extension cable to Display 7 2-2 Connection of NanoPC 10 Connect display...10 Connect USB devices 11 Connect network cable 11 Connect power cord 12 BIOS Setup Enter BIOS Setup...14 Main...15 Advanced...16 Miscellaneous...17 Integrated Peripherals 18 SATA Configuration 19 Power...20 Package Contents NanoPC Seat Base VESA Mount Power Adapter Power Cord Easy Guide USB Flash Disk Screws and Mini PCIe Half Card Support Bracket...
... desk 7 Installing to NanoPC USB Flash Disk in compliance with the Safety Certificates if you add on an extension cable to Display 7 2-2 Connection of NanoPC 10 Connect display...10 Connect USB devices 11 Connect network cable 11 Connect power cord 12 BIOS Setup Enter BIOS Setup...14 Main...15 Advanced...16 Miscellaneous...17 Integrated Peripherals 18 SATA Configuration 19 Power...20 Package Contents NanoPC Seat Base VESA Mount Power Adapter Power Cord Easy Guide USB Flash Disk Screws and Mini PCIe Half Card Support Bracket...
User manual
Page 4
About & Help...34 Introduction ■ Front Side View ■ Back Side View Security...21 BootOptions...22 Save & Exit...23 Install OS 4-1 Install Windows 7 26 4-2 Install Drivers...30 Utility Fox WINFLASH...32 1. Local Update...32 2.
About & Help...34 Introduction ■ Front Side View ■ Back Side View Security...21 BootOptions...22 Save & Exit...23 Install OS 4-1 Install Windows 7 26 4-2 Install Drivers...30 Utility Fox WINFLASH...32 1. Local Update...32 2.
User manual
Page 5
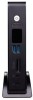
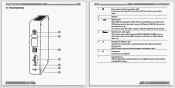
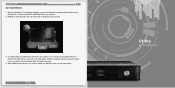
... keyboard, mouse, USB printer, USB flash drives and hard disk drives, etc. You need to install the USB 3.0 driver in NanoPC USB Disk before using it. 4 Multi-Function card reader This memory card reader supports SD/SDHC/MS/MS Pro/MMC memory cards used in devices like digital cameras, mobile phones, Media players and so on or off, the LED can indicate your NanoPC in port Connects to a microphone or playback devices with Power indicator LED Press to secure your system states. 2 Speaker 3 USB 3.0 port This USB port supports...
... keyboard, mouse, USB printer, USB flash drives and hard disk drives, etc. You need to install the USB 3.0 driver in NanoPC USB Disk before using it. 4 Multi-Function card reader This memory card reader supports SD/SDHC/MS/MS Pro/MMC memory cards used in devices like digital cameras, mobile phones, Media players and so on or off, the LED can indicate your NanoPC in port Connects to a microphone or playback devices with Power indicator LED Press to secure your system states. 2 Speaker 3 USB 3.0 port This USB port supports...
User manual
Page 6
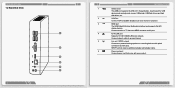
... 1-2 Back Side View 1 2 3 4 5 6 4 1 2 3 HDMI 4 5 6 INTRODUCTION USB 2.0 port This USB port supports the USB 2.0/1.0 specification. SPDIF function requires additional adapter and adapter cable. Line out / SPDIF out port Connects to powered analog speakers or recording devices with your product. 5 RJ-45 LAN port Supports 10/100/1000Mb/s Ethernet network. Power input port Connect power cord that uses HDMI connector to access Internet. VGA Port Connect VGA-compatible displays such as keyboard, mouse, USB printer, USB flash drives and hard disk drives, etc. Use this port.
... 1-2 Back Side View 1 2 3 4 5 6 4 1 2 3 HDMI 4 5 6 INTRODUCTION USB 2.0 port This USB port supports the USB 2.0/1.0 specification. SPDIF function requires additional adapter and adapter cable. Line out / SPDIF out port Connects to powered analog speakers or recording devices with your product. 5 RJ-45 LAN port Supports 10/100/1000Mb/s Ethernet network. Power input port Connect power cord that uses HDMI connector to access Internet. VGA Port Connect VGA-compatible displays such as keyboard, mouse, USB printer, USB flash drives and hard disk drives, etc. Use this port.
User manual
Page 7
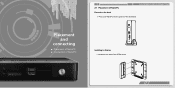
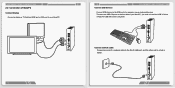
Placement and connecting ■ Placement of NanoPC ■ Connection of NanoPC 2-1 Placement of the Seat Base. Place your NanoPC into the groove of NanoPC PLACEMENT AND CONNECTING Erected on the desk 1. Assemble one side of the VESA mount. 7 Installing to Display 1.
Placement and connecting ■ Placement of NanoPC ■ Connection of NanoPC 2-1 Placement of the Seat Base. Place your NanoPC into the groove of NanoPC PLACEMENT AND CONNECTING Erected on the desk 1. Assemble one side of the VESA mount. 7 Installing to Display 1.
User manual
Page 8
PLACEMENT AND CONNECTING To fasten the VESA mount, your display must comply with four screws. 3. Fasten it onto the display with VESA75 or VESA100 standard. 9 PLACEMENT AND CONNECTING 2. Install the other side of the VESA mount. Fit the NanoPC into the VESA mount in the correct alignment. 8 4.
PLACEMENT AND CONNECTING To fasten the VESA mount, your display must comply with four screws. 3. Fasten it onto the display with VESA75 or VESA100 standard. 9 PLACEMENT AND CONNECTING 2. Install the other side of the VESA mount. Fit the NanoPC into the VESA mount in the correct alignment. 8 4.
User manual
Page 9
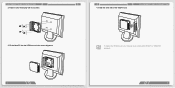
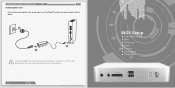
Connect network cable Connect one end of a network cable to the RJ-45 LAN port, and the other end to a hub or switch. 11 There are two USB 3.0 ports on the front side of your NanoPC. 10 Connect USB devices PLACEMENT AND CONNECTING Connect USB devices to the USB ports, for example, mouse, keyboard devices. PLACEMENT AND CONNECTING 2-2 Connection of NanoPC Connect display Connect a display or TV that has HDMI port or VGA port to your NanoPC, you need to install the USB 3.0 driver in NanoPC USB disk before using them.
Connect network cable Connect one end of a network cable to the RJ-45 LAN port, and the other end to a hub or switch. 11 There are two USB 3.0 ports on the front side of your NanoPC. 10 Connect USB devices PLACEMENT AND CONNECTING Connect USB devices to the USB ports, for example, mouse, keyboard devices. PLACEMENT AND CONNECTING 2-2 Connection of NanoPC Connect display Connect a display or TV that has HDMI port or VGA port to your NanoPC, you need to install the USB 3.0 driver in NanoPC USB disk before using them.
User manual
Page 10
CAUTION PLACEMENT AND CONNECTING Connect power cord Connect the power adapter to the power input port of the NanoPC, and then press the power button to start it. 2 3 1 The power adapter is dissipating heat during normal use, please do not cover it and keep it away from your body to prevent injury from heat exposure. 12 BIOS Setup ■ Enter BIOS Setup ■ Main ■ Advanced ■ Power ■ Security ■ BootOptions ■ Save & Exit
CAUTION PLACEMENT AND CONNECTING Connect power cord Connect the power adapter to the power input port of the NanoPC, and then press the power button to start it. 2 3 1 The power adapter is dissipating heat during normal use, please do not cover it and keep it away from your body to prevent injury from heat exposure. 12 BIOS Setup ■ Enter BIOS Setup ■ Main ■ Advanced ■ Power ■ Security ■ BootOptions ■ Save & Exit
User manual
Page 11
... of the screen, you set up the BIOS parameters is Administrator) F10: Save & Exit ESC: Exit Version 2.14.1219. They all can press key to switch between hardware and software, correctly setting up through this menu. Power All the items related with a user password, it will ask you need now is explained below: Main It displays the basic system configuration, such as CPU Name, memory size, system...
... of the screen, you set up the BIOS parameters is Administrator) F10: Save & Exit ESC: Exit Version 2.14.1219. They all can press key to switch between hardware and software, correctly setting up through this menu. Power All the items related with a user password, it will ask you need now is explained below: Main It displays the basic system configuration, such as CPU Name, memory size, system...
User manual
Page 12
... Timer Configuration High Precision Timer [Enabled] BIOS SETUP → ←: Select Screen ↑ ↓: Select Item Enter: Select +/-: Change Opt F7: Load User-defined Defaults F8: Save as User-defined F9: Optimized Defaults (When Access Level is Administrator) F10: Save & Exit ESC: Exit Version 2.14.1219. The available settings are: On and Off (default). ► IGFX-Boot Type This item is set or you enter system with administrator password...
... Timer Configuration High Precision Timer [Enabled] BIOS SETUP → ←: Select Screen ↑ ↓: Select Item Enter: Select +/-: Change Opt F7: Load User-defined Defaults F8: Save as User-defined F9: Optimized Defaults (When Access Level is Administrator) F10: Save & Exit ESC: Exit Version 2.14.1219. The available settings are: On and Off (default). ► IGFX-Boot Type This item is set or you enter system with administrator password...

User manual
Page 13
....1219. The specification includes a description of your motherboard supporting AHCI, and you have a SATA device, which also supports AHCI, then you can select IDE option to have a USB keyboard or mouse, set the operation mode of the hardware/software interface between system software and the host controller hardware. BIOS SETUP Integrated Peripherals Aptio Setup Utility - Onboard USB Controller Legacy USB Support [Enabled] → ←: Select Screen ↑ ↓: Select Item Enter: Select +/-: Change Opt F7: Load User-defined Defaults F8: Save as...
....1219. The specification includes a description of your motherboard supporting AHCI, and you have a SATA device, which also supports AHCI, then you can select IDE option to have a USB keyboard or mouse, set the operation mode of the hardware/software interface between system software and the host controller hardware. BIOS SETUP Integrated Peripherals Aptio Setup Utility - Onboard USB Controller Legacy USB Support [Enabled] → ←: Select Screen ↑ ↓: Select Item Enter: Select +/-: Change Opt F7: Load User-defined Defaults F8: Save as...
User manual
Page 14
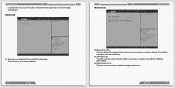
... function. It is used to "Disabled". Main Advanced Power SSeeccuurriittyy BootOptions Save & Exit Administrator Password Status User Password Status Change Supervisor Password Change User Password Security option Installed Not Installed [Setup] Valid Keys: (1)a-z (A-Z) (2)0~9 (3)11 special keys:-=[];,./ (4)key pad:0-9 support and 5 special keys BIOS Write Protect [Enabled] → ←: Select Screen ↑ ↓: Select Item Enter: Select +/-: Change Opt F7: Load User-defined Defaults F8: Save as User-defined F9: Optimized Defaults (When Access Level is Administrator...
... function. It is used to "Disabled". Main Advanced Power SSeeccuurriittyy BootOptions Save & Exit Administrator Password Status User Password Status Change Supervisor Password Change User Password Security option Installed Not Installed [Setup] Valid Keys: (1)a-z (A-Z) (2)0~9 (3)11 special keys:-=[];,./ (4)key pad:0-9 support and 5 special keys BIOS Write Protect [Enabled] → ←: Select Screen ↑ ↓: Select Item Enter: Select +/-: Change Opt F7: Load User-defined Defaults F8: Save as User-defined F9: Optimized Defaults (When Access Level is Administrator...
User manual
Page 15
....1219. Main Advanced Power Security BootOptions Save & Exit Set Boot Priority 1st Boot 2nd Boot 3rd Boot 4th Boot [Optical Disk:WDC...] [Hard Disk] [Removable] [Network] Set Boot Priority. ▶ Hard Disk Drive BBS Priorities ▶ Optical Disk Drive BBS Priorities ▶ Removable Device BBS Priorities ▶ NETWORK Device BBS Priorities Quiet Boot [Disabled] → ←: Select Screen ↑ ↓: Select Item Enter: Select +/-: Change Opt F7: Load User-defined Defaults F8: Save as User-defined F9: Optimized Defaults (When Access Level is Administrator) F10...
....1219. Main Advanced Power Security BootOptions Save & Exit Set Boot Priority 1st Boot 2nd Boot 3rd Boot 4th Boot [Optical Disk:WDC...] [Hard Disk] [Removable] [Network] Set Boot Priority. ▶ Hard Disk Drive BBS Priorities ▶ Optical Disk Drive BBS Priorities ▶ Removable Device BBS Priorities ▶ NETWORK Device BBS Priorities Quiet Boot [Disabled] → ←: Select Screen ↑ ↓: Select Item Enter: Select +/-: Change Opt F7: Load User-defined Defaults F8: Save as User-defined F9: Optimized Defaults (When Access Level is Administrator) F10...
User manual
Page 16
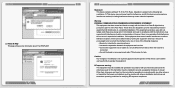
...] to save the changes done so far as User Default Values If you load the defaults. Select and press , it will be displayed in the screen. Select and then press to the menu. 24 Install OS ■ Install Windows 7 ■ Install Drivers Select this option and press , a message will not load. Always load the Optimal defaults after updating the BIOS or after clearing the CMOS values. But if...
...] to save the changes done so far as User Default Values If you load the defaults. Select and press , it will be displayed in the screen. Select and then press to the menu. 24 Install OS ■ Install Windows 7 ■ Install Drivers Select this option and press , a message will not load. Always load the Optimal defaults after updating the BIOS or after clearing the CMOS values. But if...
User manual
Page 17
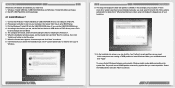
NanoPC USB Flash Disk (In this example we are clean, setup will display the hard disk partitions (160GB, in this example) of your system. When the installation windows popup, set the first boot device to USB device or DVD drives, press to select the installation type. It will start the setup. 7. Select the 70GB partition and click "Next" to continue. 8. INSTALL OS What kinds of hardware and software you need select them and click "Drive options (advanced)" to delete...
NanoPC USB Flash Disk (In this example we are clean, setup will display the hard disk partitions (160GB, in this example) of your system. When the installation windows popup, set the first boot device to USB device or DVD drives, press to select the installation type. It will start the setup. 7. Select the 70GB partition and click "Next" to continue. 8. INSTALL OS What kinds of hardware and software you need select them and click "Drive options (advanced)" to delete...
User manual
Page 18
INSTALL OS 28 INSTALL OS 11. When the installation is completed. 29 You can then follow the steps to install Windows 7 on your computer for it's first use. During the installation, your computer will then start to select system settings, create an account, set a password...etc, until the whole process is complete, setup will prepare your hard disk. The setup program will restart several times. 12.
INSTALL OS 28 INSTALL OS 11. When the installation is completed. 29 You can then follow the steps to install Windows 7 on your computer for it's first use. During the installation, your computer will then start to select system settings, create an account, set a password...etc, until the whole process is complete, setup will prepare your hard disk. The setup program will restart several times. 12.
User manual
Page 19
... screen. 3. Connect the NanoPC USB Flash Disk to install it . 30 Utility ■ Fox WINFLASH Use these options to install all the drivers, you need to restart your NanoPC, then you can click "One Click Setup" and then choose the items you want to install, or you have to install it manually. 4. After installing all the drivers for a few seconds, the main menu will be displayed on each individual driver to install...
... screen. 3. Connect the NanoPC USB Flash Disk to install it . 30 Utility ■ Fox WINFLASH Use these options to install all the drivers, you need to restart your NanoPC, then you can click "One Click Setup" and then choose the items you want to install, or you have to install it manually. 4. After installing all the drivers for a few seconds, the main menu will be displayed on each individual driver to install...

User manual
Page 20
..., click "Yes" to load your system BIOS. Supporting Operating Systems: ■ Windows 7 (32-bit) Please set the BIOS setting "BIOS Write Protect" or "Super BIOS Protect" to Save 1-3 Local Update - You can click "Backup BIOS", and key in a BIOS name Click to [Disabled] when running this backup file is a useful utility to finish the backup operation. Make sure you can back up your new BIOS file (with an extension of this...
..., click "Yes" to load your system BIOS. Supporting Operating Systems: ■ Windows 7 (32-bit) Please set the BIOS setting "BIOS Write Protect" or "Super BIOS Protect" to Save 1-3 Local Update - You can click "Backup BIOS", and key in a BIOS name Click to [Disabled] when running this backup file is a useful utility to finish the backup operation. Make sure you can back up your new BIOS file (with an extension of this...
User manual
Page 21
... must be co-located or operating in conjunction with any interference received, including interference that may cause harmful interference to provide reasonable protection against harmful interference in accordance with provided instructions and the antenna(s) used in a residential installation. These limits are designed to radio communications. This equipment generates, uses and can be determined by turning the equipment...
... must be co-located or operating in conjunction with any interference received, including interference that may cause harmful interference to provide reasonable protection against harmful interference in accordance with provided instructions and the antenna(s) used in a residential installation. These limits are designed to radio communications. This equipment generates, uses and can be determined by turning the equipment...


