
FE 192,196,199 C Users Manual
Page 1
All product names are trademarks of their respective companies. Users Manual Printed in the Netherlands. All rights reserved. Fluke 192B - 196B/C - 199B/C ScopeMeter 4822 872 30601 October 2002 Rev. 2, 12/04 © 2002 Fluke Corporation.
All product names are trademarks of their respective companies. Users Manual Printed in the Netherlands. All rights reserved. Fluke 192B - 196B/C - 199B/C ScopeMeter 4822 872 30601 October 2002 Rev. 2, 12/04 © 2002 Fluke Corporation.

FE 192,196,199 C Users Manual
Page 6
Fluke 192B - 196B/C - 199B/C Users Manual Analyzing Waveforms ...25 2 Using The Multimeter 27 Making Meter Connections 27 Making Multimeter Measurements 28 Freezing the Readings 31 Selecting Auto/Manual Ranges 31 Making Relative Measurements 32 3 Using The Recorder Functions 33 Opening the Recorder Main Menu 33 Plotting Measurements Over Time (TrendPlot 34 Recording Scope ...
Fluke 192B - 196B/C - 199B/C Users Manual Analyzing Waveforms ...25 2 Using The Multimeter 27 Making Meter Connections 27 Making Multimeter Measurements 28 Freezing the Readings 31 Selecting Auto/Manual Ranges 31 Making Relative Measurements 32 3 Using The Recorder Functions 33 Opening the Recorder Main Menu 33 Plotting Measurements Over Time (TrendPlot 34 Recording Scope ...
FE 192,196,199 C Users Manual
Page 8
Fluke 192B - 196B/C - 199B/C Users Manual Parts and Accessories 88 Troubleshooting ...93 9 Specifications ...95 Introduction ...95 Dual Input Oscilloscope 96 Automatic Scope Measurements 98 Meter ...102 DMM Measurements on Meter Inputs 102 Recorder ...104 Zoom, Replay and Cursors 105 Miscellaneous ...105 Environmental...107 Safety ...107 10:1 Probe ...109 Electromagnetic Immunity 110 iv
Fluke 192B - 196B/C - 199B/C Users Manual Parts and Accessories 88 Troubleshooting ...93 9 Specifications ...95 Introduction ...95 Dual Input Oscilloscope 96 Automatic Scope Measurements 98 Meter ...102 DMM Measurements on Meter Inputs 102 Recorder ...104 Zoom, Replay and Cursors 105 Miscellaneous ...105 Environmental...107 Safety ...107 10:1 Probe ...109 Electromagnetic Immunity 110 iv
FE 192,196,199 C Users Manual
Page 10
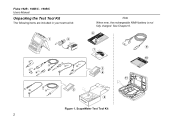
Fluke 192B - 196B/C - 199B/C Users Manual Unpacking the Test Tool Kit The following items are included in your test tool kit: 1 2 e (2x) (1x) f (2x) b a (2x) c (2x) (2x) d Note When new, the rechargeable NiMH battery is not fully charged. ScopeMeter Test Tool Kit 2 See Chapter 8. 6 7 3 4 9 10 11 b (2x) a 5 8 Figure 1.
Fluke 192B - 196B/C - 199B/C Users Manual Unpacking the Test Tool Kit The following items are included in your test tool kit: 1 2 e (2x) (1x) f (2x) b a (2x) c (2x) (2x) d Note When new, the rechargeable NiMH battery is not fully charged. ScopeMeter Test Tool Kit 2 See Chapter 8. 6 7 3 4 9 10 11 b (2x) a 5 8 Figure 1.
FE 192,196,199 C Users Manual
Page 11
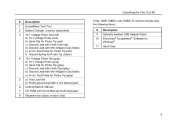
... Probe for Probe Tip (gray) 5 a) Test Lead Set b) Probe ground lead with 4 mm banana jack 6 Getting Started Manual 7 CD ROM with Users Manual (multi-language) 8 Shipment box (basic version only) Unpacking the Test Tool Kit Fluke 192B, 196B/C and 199B/C S versions include also the following items: # Description 9 Optically Isolated USB Adapter/Cable 10 FlukeView...
... Probe for Probe Tip (gray) 5 a) Test Lead Set b) Probe ground lead with 4 mm banana jack 6 Getting Started Manual 7 CD ROM with Users Manual (multi-language) 8 Shipment box (basic version only) Unpacking the Test Tool Kit Fluke 192B, 196B/C and 199B/C S versions include also the following items: # Description 9 Optically Isolated USB Adapter/Cable 10 FlukeView...

FE 192,196,199 C Users Manual
Page 12
...male plug that must be connected to a line cord appropriate for connection to the user. Specific warning and caution statements, where they apply, appear throughout the manual. Since the adapter is equipped with a terminal for local use line cords that ...safety information before using these anyhow. A "Caution" identifies conditions and actions that pose hazard(s) to protective ground. Fluke 192B - 196B/C - 199B/C Users Manual Safety Information: Read First Carefully read the following international symbols are more commonly available you might consider using the test...
...male plug that must be connected to a line cord appropriate for connection to the user. Specific warning and caution statements, where they apply, appear throughout the manual. Since the adapter is equipped with a terminal for local use line cords that ...safety information before using these anyhow. A "Caution" identifies conditions and actions that pose hazard(s) to protective ground. Fluke 192B - 196B/C - 199B/C Users Manual Safety Information: Read First Carefully read the following international symbols are more commonly available you might consider using the test...
FE 192,196,199 C Users Manual
Page 14
... jacks, and the red and black 4-mm banana jacks can independently be turned off and disconnected from earth ground. Fluke 192B - 196B/C - 199B/C Users Manual The terms 'Isolated' or 'Electrically floating' are used in this manual to indicate a measurement in a manner not specified may impair the protection provided by the equipment. If Safety Features...
... jacks, and the red and black 4-mm banana jacks can independently be turned off and disconnected from earth ground. Fluke 192B - 196B/C - 199B/C Users Manual The terms 'Isolated' or 'Electrically floating' are used in this manual to indicate a measurement in a manner not specified may impair the protection provided by the equipment. If Safety Features...
FE 192,196,199 C Users Manual
Page 16
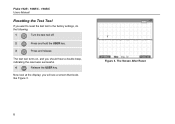
Fluke 192B - 196B/C - 199B/C Users Manual Resetting the Test Tool If you should hear a double beep, indicating the reset was successful. 4 Release the USER key. The test tool turns on, and you want to reset the test tool to the factory settings, do the following: 1 Turn the test tool off. 2 Press and hold the USER key. 3 Press and release. you will see a screen that looks like Figure 3. Figure 3. Now look at the display; The Screen After Reset 8
Fluke 192B - 196B/C - 199B/C Users Manual Resetting the Test Tool If you should hear a double beep, indicating the reset was successful. 4 Release the USER key. The test tool turns on, and you want to reset the test tool to the factory settings, do the following: 1 Turn the test tool off. 2 Press and hold the USER key. 3 Press and release. you will see a screen that looks like Figure 3. Figure 3. Now look at the display; The Screen After Reset 8
FE 192,196,199 C Users Manual
Page 18
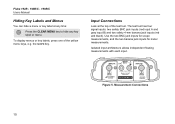
... for meter measurements. Input Connections Look at any time: Press the CLEAR MENU key to hide any key label or menu. Measurement Connections 10 Fluke 192B - 196B/C - 199B/C Users Manual Hiding Key Labels and Menus You can hide a menu or key label at the top of the yellow menu keys, e.g. To display menus...
... for meter measurements. Input Connections Look at any time: Press the CLEAR MENU key to hide any key label or menu. Measurement Connections 10 Fluke 192B - 196B/C - 199B/C Users Manual Hiding Key Labels and Menus You can hide a menu or key label at the top of the yellow menu keys, e.g. To display menus...
FE 192,196,199 C Users Manual
Page 20
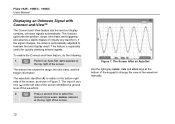
.... If the signal changes, the setup is especially useful for quickly checking several signals. This feature is automatically adjusted to select the manual range again. The waveform identifier (A) is visible on the bottom right side of virtually any waveform. The input A zero - To...side of the screen identifies the ground level of the waveform manually. 12 MANUAL appears at the top right of the screen. AUTO appears at the top right of the screen. Figure 7. Fluke 192B - 196B/C - 199B/C Users Manual Displaying an Unknown Signal with Connect-and-View™ The...
.... If the signal changes, the setup is especially useful for quickly checking several signals. This feature is automatically adjusted to select the manual range again. The waveform identifier (A) is visible on the bottom right side of virtually any waveform. The input A zero - To...side of the screen identifies the ground level of the waveform manually. 12 MANUAL appears at the top right of the screen. AUTO appears at the top right of the screen. Figure 7. Fluke 192B - 196B/C - 199B/C Users Manual Displaying an Unknown Signal with Connect-and-View™ The...
FE 192,196,199 C Users Manual
Page 22
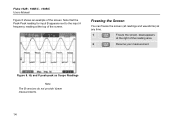
Fluke 192B - 196B/C - 199B/C Users Manual Figure 8 shows an example of the screen. Note that the Peak-Peak reading for input B appears next to the input A frequency reading at the top of the screen. HOLD appears at any time. 1 Freeze the screen. Figure 8. Hz and V peak-peak as Scope Readings Note The B versions do not provide Vpwm measurements. 14 Freezing the Screen You can freeze the screen (all readings and waveforms) at the right of the reading area. 2 Resume your measurement.
Fluke 192B - 196B/C - 199B/C Users Manual Figure 8 shows an example of the screen. Note that the Peak-Peak reading for input B appears next to the input A frequency reading at the top of the screen. HOLD appears at any time. 1 Freeze the screen. Figure 8. Hz and V peak-peak as Scope Readings Note The B versions do not provide Vpwm measurements. 14 Freezing the Screen You can freeze the screen (all readings and waveforms) at the right of the reading area. 2 Resume your measurement.
FE 192,196,199 C Users Manual
Page 24
... for the waveform representation. 4 Select Digital Persistence: Short, Figure 10. Select Dot-join: On or Off to Signals observe dynamic waveforms (C-versions only). Fluke 192B - 196B/C - 199B/C Users Manual Using Persistence to Display Waveforms You can use Persistence to observe dynamic signals. 1 Display the SCOPE key labels. 2 Open the Waveform Options menu. 3 Jump...
... for the waveform representation. 4 Select Digital Persistence: Short, Figure 10. Select Dot-join: On or Off to Signals observe dynamic waveforms (C-versions only). Fluke 192B - 196B/C - 199B/C Users Manual Using Persistence to Display Waveforms You can use Persistence to observe dynamic signals. 1 Display the SCOPE key labels. 2 Open the Waveform Options menu. 3 Jump...

FE 192,196,199 C Users Manual
Page 26
... an inversed trace identifier ( ) at the right of the screen displays the ac-coupling icon: . Observe that the bottom left of the waveform. 18 Fluke 192B - 196B/C - 199B/C Users Manual Acquiring Waveforms Selecting AC-Coupling After a reset, the test tool is dc-coupled so that ac and dc voltages appear on a dc signal.
... an inversed trace identifier ( ) at the right of the screen displays the ac-coupling icon: . Observe that the bottom left of the waveform. 18 Fluke 192B - 196B/C - 199B/C Users Manual Acquiring Waveforms Selecting AC-Coupling After a reset, the test tool is dc-coupled so that ac and dc voltages appear on a dc signal.
FE 192,196,199 C Users Manual
Page 28
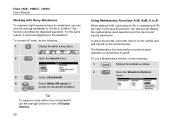
... a plot with Noisy Waveforms To suppress high frequency noise on waveforms, you can limit the working bandwidth to -point operation on waveforms A and B. Fluke 192B - 196B/C - 199B/C Users Manual Working with input A on the vertical axis and input B on the horizontal axis. For the same reason, it improves triggering on the waveform. Tip...
... a plot with Noisy Waveforms To suppress high frequency noise on waveforms, you can limit the working bandwidth to -point operation on waveforms A and B. Fluke 192B - 196B/C - 199B/C Users Manual Working with input A on the vertical axis and input B on the horizontal axis. For the same reason, it improves triggering on the waveform. Tip...

FE 192,196,199 C Users Manual
Page 30
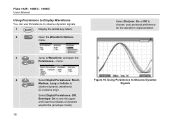
... aliasing, or too fast, which results in less than one signal period on the screen. 6 Perform a spectrum analysis on (toggle function). Spectrum measurement 22 Fluke 192B - 196B/C - 199B/C Users Manual 3 Jump to open the Mathematics menu. 4 Select Function: Spectrum. 5 Select Window: Auto (automatic windowing), Hanning, Hamming, or None (no windowing). If it displays...
... aliasing, or too fast, which results in less than one signal period on the screen. 6 Perform a spectrum analysis on (toggle function). Spectrum measurement 22 Fluke 192B - 196B/C - 199B/C Users Manual 3 Jump to open the Mathematics menu. 4 Select Function: Spectrum. 5 Select Window: Auto (automatic windowing), Hanning, Hamming, or None (no windowing). If it displays...
FE 192,196,199 C Users Manual
Page 32
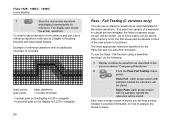
.... To use the Pass - If at least one sample of a waveform is outside the reference will hear a beep. Up to analyze the stored screens. Fluke 192B - 196B/C - 199B/C Users Manual 7 Store the momentary waveform and display it as a reference waveform refer also to Chapter 6 Recalling Screens with an additional envelope of ±2 pixels...
.... To use the Pass - If at least one sample of a waveform is outside the reference will hear a beep. Up to analyze the stored screens. Fluke 192B - 196B/C - 199B/C Users Manual 7 Store the momentary waveform and display it as a reference waveform refer also to Chapter 6 Recalling Screens with an additional envelope of ±2 pixels...

FE 192,196,199 C Users Manual
Page 34
Fluke 192B - 196B/C - 199B/C Users Manual 26
Fluke 192B - 196B/C - 199B/C Users Manual 26

FE 192,196,199 C Users Manual
Page 36
Measuring Resistance Values To measure a resistance, do the following: 1 Connect the red and black test leads from the 4-mm banana jack inputs to the resistor. 2 Display the METER key labels. 3 Open the Measurement menu. 4 Highlight Ohms. 5 Select Ohms measurement. 28 The resistor value is displayed in ohms. Observe also that the bargraph is displayed. (See Figure 13.) Figure 13. Fluke 192B - 196B/C - 199B/C Users Manual Making Multimeter Measurements The screen displays the numeric readings of the measurements on the meter input. Resistor Value Readings
Measuring Resistance Values To measure a resistance, do the following: 1 Connect the red and black test leads from the 4-mm banana jack inputs to the resistor. 2 Display the METER key labels. 3 Open the Measurement menu. 4 Highlight Ohms. 5 Select Ohms measurement. 28 The resistor value is displayed in ohms. Observe also that the bargraph is displayed. (See Figure 13.) Figure 13. Fluke 192B - 196B/C - 199B/C Users Manual Making Multimeter Measurements The screen displays the numeric readings of the measurements on the meter input. Resistor Value Readings
FE 192,196,199 C Users Manual
Page 38
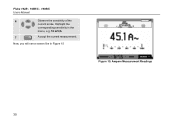
Fluke 192B - 196B/C - 199B/C Users Manual 6 Observe the sensitivity of the current probe. Highlight the corresponding sensitivity in Figure 15 Figure 15. Ampere Measurement Readings 30 Now, you will see a screen like in the menu, e.g. 10 mV/A. 7 Accept the current measurement.
Fluke 192B - 196B/C - 199B/C Users Manual 6 Observe the sensitivity of the current probe. Highlight the corresponding sensitivity in Figure 15 Figure 15. Ampere Measurement Readings 30 Now, you will see a screen like in the menu, e.g. 10 mV/A. 7 Accept the current measurement.

FE 192,196,199 C Users Manual
Page 40
.... 3 Set RELATIVE to ON. (ON is displayed beneath these readings. (See Figure 16.) 2 Measure a voltage to be compared to a known good value. 32 Figure 16. Fluke 192B - 196B/C - 199B/C Users Manual Making Relative Measurements A relative measurement displays the present measurement result relative to perform a relative voltage measurement.
.... 3 Set RELATIVE to ON. (ON is displayed beneath these readings. (See Figure 16.) 2 Measure a voltage to be compared to a known good value. 32 Figure 16. Fluke 192B - 196B/C - 199B/C Users Manual Making Relative Measurements A relative measurement displays the present measurement result relative to perform a relative voltage measurement.


