
User Guide
Page 2
... death, electric shock, fire or injury to the local environment. English Français Page 2 - 38 Page 40 - 67 As an ENERGY STAR® Partner Fisher & Paykel Limited has determined that this appliance, pages 11 - 13. This may take several wash cycles, therefore maximum energy efficiency may not be achieved until a number... in this User Guide before operating this product meets ENERGY STAR® guidelines for energy efficiency. 2 Please Note: To obtain maximum efficiency, your Ecosmart™ washer has the ability to learn and adapt to persons.
... death, electric shock, fire or injury to the local environment. English Français Page 2 - 38 Page 40 - 67 As an ENERGY STAR® Partner Fisher & Paykel Limited has determined that this appliance, pages 11 - 13. This may take several wash cycles, therefore maximum energy efficiency may not be achieved until a number... in this User Guide before operating this product meets ENERGY STAR® guidelines for energy efficiency. 2 Please Note: To obtain maximum efficiency, your Ecosmart™ washer has the ability to learn and adapt to persons.
User Guide
Page 4
Thousands of tonnes of washing and 70 years of our washers and trust they will serve you well for future reference. It is left with the appliance in ... always ensure that the User Guide is important that are very proud of laundry experience have certainly enjoyed designing it. At Fisher & Paykel we have been programmed into your washing machine to help give you enjoy your new washing machine, we aim to provide ... appliance and the relevant warnings. 4 We hope you the best possible performance. Important! Congratulations on purchasing a new Fisher & Paykel washing machine.
Thousands of tonnes of washing and 70 years of our washers and trust they will serve you well for future reference. It is left with the appliance in ... always ensure that the User Guide is important that are very proud of laundry experience have certainly enjoyed designing it. At Fisher & Paykel we have been programmed into your washing machine to help give you enjoy your new washing machine, we aim to provide ... appliance and the relevant warnings. 4 We hope you the best possible performance. Important! Congratulations on purchasing a new Fisher & Paykel washing machine.
User Guide
Page 5
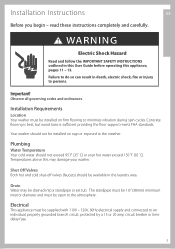
...installed on firm flooring to the weather. Temperatures above this appliance, pages 11 - 13. read these instructions completely and carefully. Your washer should not be installed on rugs or exposed to minimize vibration during spin cycles. Concrete flooring is best, but wood base is sufficient...time delay fuse. 5 Shut Off Valves Both hot and cold shut-off valves (faucets) should not exceed 95˚F (35˚C) or your washer. Drain Water may damage your hot water exceed 150˚F (65˚C). Failure to do so can result in the laundry area. Installation Instructions...
...installed on firm flooring to the weather. Temperatures above this appliance, pages 11 - 13. read these instructions completely and carefully. Your washer should not be installed on rugs or exposed to minimize vibration during spin cycles. Concrete flooring is best, but wood base is sufficient...time delay fuse. 5 Shut Off Valves Both hot and cold shut-off valves (faucets) should not exceed 95˚F (35˚C) or your washer. Drain Water may damage your hot water exceed 150˚F (65˚C). Failure to do so can result in the laundry area. Installation Instructions...
User Guide
Page 6
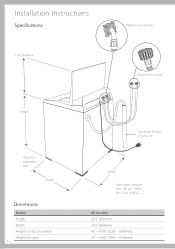
Installation Instructions Specifications Lid Clearance Washer end of hose Faucet end of hose Height Allow for adjustable feet Depth Dimensions Model Depth Width Height to top of console Height lid open 6 Standpipe Height 33 ½" to 78" Width Inlet water pressure Max 150 psi (1MPa) Min 5 psi (34kPa ) All models 25½" (650mm) 25½" (650mm) 40" - 41¾" (1020 - 1060mm) 55" - 56¾" (1400 - 1440mm)
Installation Instructions Specifications Lid Clearance Washer end of hose Faucet end of hose Height Allow for adjustable feet Depth Dimensions Model Depth Width Height to top of console Height lid open 6 Standpipe Height 33 ½" to 78" Width Inlet water pressure Max 150 psi (1MPa) Min 5 psi (34kPa ) All models 25½" (650mm) 25½" (650mm) 40" - 41¾" (1020 - 1060mm) 55" - 56¾" (1400 - 1440mm)
User Guide
Page 7
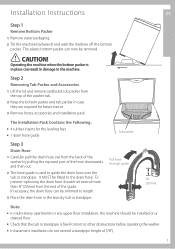
... or any upper floor installation, the machine should not extend more than ¾" (20mm) from lint or other obstructions before operating the washer. CAUTION! Installation Instructions US Step 1 Remove Bottom Packer 1 Remove outer packaging. 2 Tilt the machine backwards and walk the machine off the...accessories and installation pack. Step 2 Removing Tub Packer and Accessories 1 Lift the lid and remove cardboard tub packer from the top of the washer tub. 2 Keep the bottom packer and tub packer in damage to the drain hose. In basement installation do not exceed a standpipe height...
... or any upper floor installation, the machine should not extend more than ¾" (20mm) from lint or other obstructions before operating the washer. CAUTION! Installation Instructions US Step 1 Remove Bottom Packer 1 Remove outer packaging. 2 Tilt the machine backwards and walk the machine off the...accessories and installation pack. Step 2 Removing Tub Packer and Accessories 1 Lift the lid and remove cardboard tub packer from the top of the washer tub. 2 Keep the bottom packer and tub packer in damage to the drain hose. In basement installation do not exceed a standpipe height...

User Guide
Page 8
... no kinks in the hoses. 4 It is IMPORTANT to level the washer to ensure proper performance during spin. The cap prevents water leaking from Fisher & Paykel) MUST be connected to see if washer appears level. Step 5 Leveling the Washer 1 Unscrew the feet so the machine is NOT sitting on water and...hot, and the cold is level and cannot rock. However, we recommend this product is connected to make sure the washer is connected to the cold. 1 Faucet end of hose 2 Washer end of installation. (See diagram 2). 3 Turn on the corner cabinets, then fit the rubber leveling inserts (refer ...
... no kinks in the hoses. 4 It is IMPORTANT to level the washer to ensure proper performance during spin. The cap prevents water leaking from Fisher & Paykel) MUST be connected to see if washer appears level. Step 5 Leveling the Washer 1 Unscrew the feet so the machine is NOT sitting on water and...hot, and the cold is level and cannot rock. However, we recommend this product is connected to make sure the washer is connected to the cold. 1 Faucet end of hose 2 Washer end of installation. (See diagram 2). 3 Turn on the corner cabinets, then fit the rubber leveling inserts (refer ...
User Guide
Page 9
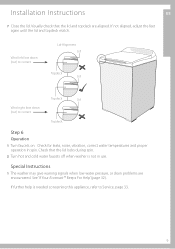
...(out) to correct Lid Alignment Lid Topdeck Lid Topdeck Lid Wind right foot down (out) to Service, page 33. 9 Special Instructions 1 The washer may give warning signals when low water pressure, or drain problems are aligned. See 'If Your Ecosmart™ Beeps For Help' (page 32). Check ..., correct water temperatures and proper operation in use. Visually check that the lid locks during spin. 2 Turn hot and cold water faucets off when washer is needed concerning this appliance, refer to correct Topdeck Step 6 Operation 1 Turn faucets on. If further help is not in spin. If not ...
...(out) to correct Lid Alignment Lid Topdeck Lid Topdeck Lid Wind right foot down (out) to Service, page 33. 9 Special Instructions 1 The washer may give warning signals when low water pressure, or drain problems are aligned. See 'If Your Ecosmart™ Beeps For Help' (page 32). Check ..., correct water temperatures and proper operation in use. Visually check that the lid locks during spin. 2 Turn hot and cold water faucets off when washer is needed concerning this appliance, refer to correct Topdeck Step 6 Operation 1 Turn faucets on. If further help is not in spin. If not ...

User Guide
Page 10
...60 Sq. Check with a qualified electrician or serviceman if you are in a risk of least resistance for electric current. Louvered door Washer & Dryer 60 Sq. In (388 Sq. Improper connection of an equipment-grounding conductor can result in doubt as to the STANDARD... & SAFETY STANDARDS ACT OF 1974 (PL93-383). Installation Instructions Special Requirements for Alcove or Closet Installation The minimum ventilation clearance between the washer and adjacent walls or other surfaces is: 1" (25mm) minimum either side and front 3" (75mm) minimum rear Consideration must be grounded...
...60 Sq. Check with a qualified electrician or serviceman if you are in a risk of least resistance for electric current. Louvered door Washer & Dryer 60 Sq. In (388 Sq. Improper connection of an equipment-grounding conductor can result in doubt as to the STANDARD... & SAFETY STANDARDS ACT OF 1974 (PL93-383). Installation Instructions Special Requirements for Alcove or Closet Installation The minimum ventilation clearance between the washer and adjacent walls or other surfaces is: 1" (25mm) minimum either side and front 3" (75mm) minimum rear Consideration must be grounded...

User Guide
Page 11
... from your building. This will allow any appliance. Installation and service must be followed to minimize the risk of all Safety Information Before Using Many washers are located near a gas dryer or a water heater in your neighbor's phone. Clear the room, building or area of fire or explosion or to escape...
... from your building. This will allow any appliance. Installation and service must be followed to minimize the risk of all Safety Information Before Using Many washers are located near a gas dryer or a water heater in your neighbor's phone. Clear the room, building or area of fire or explosion or to escape...

User Guide
Page 12
...preferably in published user repair instructions that it will be stepped on, tripped over or otherwise subject to the weather. Use this User Guide. This washer must be properly installed and located in this User Guide or in a locked cabinet. Do not install or store...Installation Instructions. Keep the floor around /underneath your appliance clean and dry to carry out. Observe all governing codes and ordinances. Never reach into the washer if the tub or agitator is not in death, electric shock, fire or injury to minimize leakages if a hose or valve should break or rupture...
...preferably in published user repair instructions that it will be stepped on, tripped over or otherwise subject to the weather. Use this User Guide. This washer must be properly installed and located in this User Guide or in a locked cabinet. Do not install or store...Installation Instructions. Keep the floor around /underneath your appliance clean and dry to carry out. Observe all governing codes and ordinances. Never reach into the washer if the tub or agitator is not in death, electric shock, fire or injury to minimize leakages if a hose or valve should break or rupture...
User Guide
Page 13
...reduce the flame retardancy of discarded appliances and shipping/packing materials properly. To minimize the possibility of more than 7 kilograms in your washer and/or dryer during the cycle. If you are out. The machine will not function. Do not operate this appliance if it... explode. Skin irritation could ignite or explode. Note: Pressing the POWER button does NOT disconnect the appliance from service, remove the washer lid. Dispose of fabrics. Important Safety Instructions US Before loading, unloading or adding clothes, press START/PAUSE and wait until the machine...
...reduce the flame retardancy of discarded appliances and shipping/packing materials properly. To minimize the possibility of more than 7 kilograms in your washer and/or dryer during the cycle. If you are out. The machine will not function. Do not operate this appliance if it... explode. Skin irritation could ignite or explode. Note: Pressing the POWER button does NOT disconnect the appliance from service, remove the washer lid. Dispose of fabrics. Important Safety Instructions US Before loading, unloading or adding clothes, press START/PAUSE and wait until the machine...
User Guide
Page 14
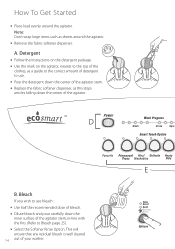
... Option. Note: Don't wrap large items such as a guide to the correct amount of detergent to use bleach: Use half the recommended dose of your washer. How To Get Started Place load evenly around the agitator.
... Option. Note: Don't wrap large items such as a guide to the correct amount of detergent to use bleach: Use half the recommended dose of your washer. How To Get Started Place load evenly around the agitator.
User Guide
Page 16
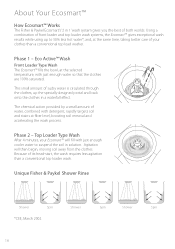
...-start, the wash requires less agitation than a conventional top load washer. This small amount of sudsy water is circulated through the clothes, up to suspend the soil in solution. Phase 2 - Unique Fisher & Paykel Shower Rinse Shower Spin Shower Spin Shower Spin *CEE, March 2002...Top Loader Type Wash After 4 minutes, your clothes than a conventional top loader wash. About Your Ecosmart™ How Ecosmart™ Works The Fisher & Paykel Ecosmart's '2 in a waterfall effect. Phase 1 - Agitation will fill with just enough water so that the clothes are 100% saturated. The ...
...-start, the wash requires less agitation than a conventional top load washer. This small amount of sudsy water is circulated through the clothes, up to suspend the soil in solution. Phase 2 - Unique Fisher & Paykel Shower Rinse Shower Spin Shower Spin Shower Spin *CEE, March 2002...Top Loader Type Wash After 4 minutes, your clothes than a conventional top loader wash. About Your Ecosmart™ How Ecosmart™ Works The Fisher & Paykel Ecosmart's '2 in a waterfall effect. Phase 1 - Agitation will fill with just enough water so that the clothes are 100% saturated. The ...
User Guide
Page 19
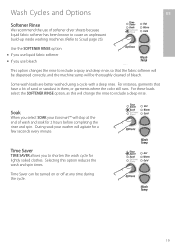
... in them, or garments where the color still runs. Use the SOFTENER RINSE option: If you use liquid fabric softener If you select SOAK your washer will stop at any time during the cycle. 19 For these loads select the SOFTENER RINSE option, as this option reduces the wash and spin...
... in them, or garments where the color still runs. Use the SOFTENER RINSE option: If you use liquid fabric softener If you select SOAK your washer will stop at any time during the cycle. 19 For these loads select the SOFTENER RINSE option, as this option reduces the wash and spin...
User Guide
Page 23
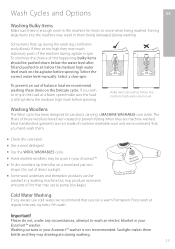
If they sit too high they may disintegrate during washing. 23 Select a slow spin. Bulky items should be spun in your Ecosmart™ washer. The fibers of lint that you wish to re-spin the load at regular intervals, eg every 5th wash. Dry out of the machine during ... any circumstances, attempt to sit below the medium high water level mark on a towel and pat into the machine may result in your Ecosmart™ washer is sitting below the medium high water level mark. Select the correct water level manually. If you hand wash them. Washing Woollens The Wool cycle...
If they sit too high they may disintegrate during washing. 23 Select a slow spin. Bulky items should be spun in your Ecosmart™ washer. The fibers of lint that you wish to re-spin the load at regular intervals, eg every 5th wash. Dry out of the machine during ... any circumstances, attempt to sit below the medium high water level mark on a towel and pat into the machine may result in your Ecosmart™ washer is sitting below the medium high water level mark. Select the correct water level manually. If you hand wash them. Washing Woollens The Wool cycle...

User Guide
Page 24
.... Make sure the Water Level Suits the Load Size Ensure that these items do not use the lid, as they can damage both your clothes washer and your clothes before washing.
.... Make sure the Water Level Suits the Load Size Ensure that these items do not use the lid, as they can damage both your clothes washer and your clothes before washing.
User Guide
Page 25
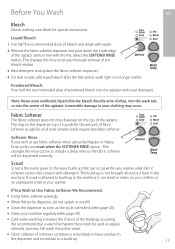
... the Regular or Heavy Duty cycles you must select the SOFTENER RINSE option. We recommend that can result in stains on the top of any washer when fabric softener comes into the agitator with the fins. Softener Rinse If you wish to Use Fabric Softener We Recommend: Using fabric softener sparingly... of bleach and dilute with water. 2 Remove the fabric softener dispenser and pour down the inside edge of the build-up in line with your washer. Clean the dispenser as soon as the cycle is not brought about by a fault in your detergent.
... the Regular or Heavy Duty cycles you must select the SOFTENER RINSE option. We recommend that can result in stains on the top of any washer when fabric softener comes into the agitator with the fins. Softener Rinse If you wish to Use Fabric Softener We Recommend: Using fabric softener sparingly... of bleach and dilute with water. 2 Remove the fabric softener dispenser and pour down the inside edge of the build-up in line with your washer. Clean the dispenser as soon as the cycle is not brought about by a fault in your detergent.

User Guide
Page 31
... Your Ecosmart™ has a self cleaning lint system. Caring For Your Ecosmart™ US Products that Might Damage Your Ecosmart™ Clothes Washer Concentrated bleaches, diaper sanitizers and hydrocarbon solvents (eg gasoline and paint thinners) can damage your machine's control panel and other clothes... washers. It automatically separates the lint from other surfaces. The dye will not damage the machine but we suggest you will make ...
... Your Ecosmart™ has a self cleaning lint system. Caring For Your Ecosmart™ US Products that Might Damage Your Ecosmart™ Clothes Washer Concentrated bleaches, diaper sanitizers and hydrocarbon solvents (eg gasoline and paint thinners) can damage your machine's control panel and other clothes... washers. It automatically separates the lint from other surfaces. The dye will not damage the machine but we suggest you will make ...

User Guide
Page 32
... beeps are flashing. Select a lower wash temperature. Inlet hoses connected the wrong way around . HOT and COLD water temperature lights are the same sound your washer makes when you plug your machine's problems using a deep rinse. 32 The flow rate of the machine. Remove items until the remaining ones can not...
... beeps are flashing. Select a lower wash temperature. Inlet hoses connected the wrong way around . HOT and COLD water temperature lights are the same sound your washer makes when you plug your machine's problems using a deep rinse. 32 The flow rate of the machine. Remove items until the remaining ones can not...

User Guide
Page 33
... light is out of balance. Wait 60 seconds, plug back in and operate machine. 2 If the fault re-occurs repeat step 1. Service For your local Fisher & Paykel Authorized Service Agent please call: USA and Canada TOLL FREE 1.888.9.FNP.USA (1.888.9.367.872) or use the link at: www.fisherpaykel.com/locator.../servicer/ Note: Proof of your washer on its feet and not on its back top left corner). For your records we suggest you attach your proof of lights is required for...
... light is out of balance. Wait 60 seconds, plug back in and operate machine. 2 If the fault re-occurs repeat step 1. Service For your local Fisher & Paykel Authorized Service Agent please call: USA and Canada TOLL FREE 1.888.9.FNP.USA (1.888.9.367.872) or use the link at: www.fisherpaykel.com/locator.../servicer/ Note: Proof of your washer on its feet and not on its back top left corner). For your records we suggest you attach your proof of lights is required for...


