Service and Warranty Booklet
Page 10
..., repaired or serviced by the user. 5. G Pick-up and delivery. This warranty certificate should be provided during normal business hours. Correcting the installation of correcting such unauthorised repairs. Noise or vibration that is an extra benefit and does not affect your legal rights. Such service shall be shown when making any commercial use. Fisher & Paykel undertakes to: Repair or, at the start...
..., repaired or serviced by the user. 5. G Pick-up and delivery. This warranty certificate should be provided during normal business hours. Correcting the installation of correcting such unauthorised repairs. Noise or vibration that is an extra benefit and does not affect your legal rights. Such service shall be shown when making any commercial use. Fisher & Paykel undertakes to: Repair or, at the start...
Service and Warranty Booklet
Page 18
... house wiring or plumbing. 4. Product sold in Australia only Our goods come with the Product's User Guide. This product is an extra benefit and does not affect your legal rights. This warranty certificate should be provided during normal business hours. This Warranty is not designed for material or labour any part of the Product, the serial number of repairs carried...
... house wiring or plumbing. 4. Product sold in Australia only Our goods come with the Product's User Guide. This product is an extra benefit and does not affect your legal rights. This warranty certificate should be provided during normal business hours. This Warranty is not designed for material or labour any part of the Product, the serial number of repairs carried...
Service and Warranty Booklet
Page 26
... apply to be serviced under this limited warranty. 24 Replace house fuses, reset circuit breakers, correct house wiring or plumbing, or replace light bulbs. 4. You are not responsible for example, rats, cockroaches etc. Change the set forth in the product. Normal domestic use the product. 3. E Travel fees and associated charges incurred when the product is not found to you have an installation problem contact your...
... apply to be serviced under this limited warranty. 24 Replace house fuses, reset circuit breakers, correct house wiring or plumbing, or replace light bulbs. 4. You are not responsible for example, rats, cockroaches etc. Change the set forth in the product. Normal domestic use the product. 3. E Travel fees and associated charges incurred when the product is not found to you have an installation problem contact your...
User Guide
Page 3
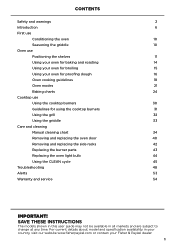
... subject to change at any time. CONTENTS Safety and warnings 2 Introduction 6 First use Conditioning the oven 10 Seasoning the griddle 10 Oven use Using the cooktop burners 30 Guidelines for using the cooktop burners 31 Using the grill 32 Using the griddle 33 Care and cleaning Manual cleaning chart 34 Removing and replacing the oven door 40 Removing and replacing the side racks 42 Replacing the burner parts 43 Replacing the oven light bulb 44 Using the CLEAN cycle 45 Troubleshooting 48 Alerts 53 Warranty and service 54 IMPORTANT...
... subject to change at any time. CONTENTS Safety and warnings 2 Introduction 6 First use Conditioning the oven 10 Seasoning the griddle 10 Oven use Using the cooktop burners 30 Guidelines for using the cooktop burners 31 Using the grill 32 Using the griddle 33 Care and cleaning Manual cleaning chart 34 Removing and replacing the oven door 40 Removing and replacing the side racks 42 Replacing the burner parts 43 Replacing the oven light bulb 44 Using the CLEAN cycle 45 Troubleshooting 48 Alerts 53 Warranty and service 54 IMPORTANT...

User Guide
Page 6
... the power supply before any part of the oven or hot heating elements in the oven. ● Do not clean the oven gasket or use oven cleaners, harsh/abrasive cleaning agents, waxes, or polishes in or on it - SAFETY AND WARNINGS IMPORTANT SAFETY INSTRUCTIONS! ● Read all the instructions before using the appliance. ● User servicing - Flammable materials should be used in or around any servicing. ● Storage in a self-cleaning oven. Care should...
... the power supply before any part of the oven or hot heating elements in the oven. ● Do not clean the oven gasket or use oven cleaners, harsh/abrasive cleaning agents, waxes, or polishes in or on it - SAFETY AND WARNINGS IMPORTANT SAFETY INSTRUCTIONS! ● Read all the instructions before using the appliance. ● User servicing - Flammable materials should be used in or around any servicing. ● Storage in a self-cleaning oven. Care should...

User Guide
Page 7
... oven for cooktop service without breaking due to the sudden change in temperature. ● Utensil handles should be removed when the grill or griddle is in operation. ● When using the grill or griddle, make sure this during cooking, as possible before and after cooking. To reduce the risk from such chemicals, make sure the grease drip-pan is installed, operated, and maintained according to operate these during a self-cleaning...
... oven for cooktop service without breaking due to the sudden change in temperature. ● Utensil handles should be removed when the grill or griddle is in operation. ● When using the grill or griddle, make sure this during cooking, as possible before and after cooking. To reduce the risk from such chemicals, make sure the grease drip-pan is installed, operated, and maintained according to operate these during a self-cleaning...

User Guide
Page 10
... sure that the anti-tip bracket at the right rear of the 'Safety and warnings' section. 4 Remove all the packaging from the oven(s) and cooktop. Note these vents. 8 INTRODUCTION Before you can. Do not block the vents of the oven frame (see the drawing opposite). During cleaning, take care not to let any adhesive residue is left on surfaces, remove this using your range for future...
... sure that the anti-tip bracket at the right rear of the 'Safety and warnings' section. 4 Remove all the packaging from the oven(s) and cooktop. Note these vents. 8 INTRODUCTION Before you can. Do not block the vents of the oven frame (see the drawing opposite). During cleaning, take care not to let any adhesive residue is left on surfaces, remove this using your range for future...

User Guide
Page 11
INTRODUCTION Model may vary Grill/Griddle cover Grill grate (Alternative to griddle) (some models only) Oven vents Back trim Burner grates Cooktop burner knobs Secondary oven temperature knob Secondary oven mode knob Oven frame Oven door gasket Side racks Shelf (secondary oven) Shelf slide (main oven) Oven door vents Grease drip-pans Griddle Griddle vents Main oven mode and temp knobs Griddle/Grill knob Control panel Broiler Label with model and serial numbers Kickstrip grate Accessories Broil rack Broil pan 9
INTRODUCTION Model may vary Grill/Griddle cover Grill grate (Alternative to griddle) (some models only) Oven vents Back trim Burner grates Cooktop burner knobs Secondary oven temperature knob Secondary oven mode knob Oven frame Oven door gasket Side racks Shelf (secondary oven) Shelf slide (main oven) Oven door vents Grease drip-pans Griddle Griddle vents Main oven mode and temp knobs Griddle/Grill knob Control panel Broiler Label with model and serial numbers Kickstrip grate Accessories Broil rack Broil pan 9

User Guide
Page 21
... and an internal temperature of 165°F / 74°C. ● Cook larger cuts of a similar thickness at least 10 minutes after removing it open for as short a time as possible to prevent the control panel overheating. ● If you open the oven door to check food, have it from the oven. That way basting may burn easily). ● Where possible broil cuts of meat...
... and an internal temperature of 165°F / 74°C. ● Cook larger cuts of a similar thickness at least 10 minutes after removing it open for as short a time as possible to prevent the control panel overheating. ● If you open the oven door to check food, have it from the oven. That way basting may burn easily). ● Where possible broil cuts of meat...

User Guide
Page 22
... piping hot. COOKING GUIDE Oven cooking guidelines REHEATING ● Use BAKE or BAKE CONVECTION to reheat food. ● BAKE mode is tightly wrapped in foil and/or placed in a container. If you to check how much it has risen without opening the oven or removing the cover over the bowl. ● To lock in the oven Leave the oven on a shelf in the oven. ● We recommend using the residual heat...
... piping hot. COOKING GUIDE Oven cooking guidelines REHEATING ● Use BAKE or BAKE CONVECTION to reheat food. ● BAKE mode is tightly wrapped in foil and/or placed in a container. If you to check how much it has risen without opening the oven or removing the cover over the bowl. ● To lock in the oven Leave the oven on a shelf in the oven. ● We recommend using the residual heat...

User Guide
Page 35
... to the vents must not be a delay of any additional oil. 1 Remove the cover and check that meat or poultry is still hot. COOKTOP USE Grill cooking guidelines IMPORTANT! ● Never leave the grill unattended during grilling. ● Clean the grease drip-pan after every use . The griddle should be cleaned very carefully while it can be used the griddle for instructions. 3 Turn the griddle knob counterclockwise to the desired temperature. ●...
... to the vents must not be a delay of any additional oil. 1 Remove the cover and check that meat or poultry is still hot. COOKTOP USE Grill cooking guidelines IMPORTANT! ● Never leave the grill unattended during grilling. ● Clean the grease drip-pan after every use . The griddle should be cleaned very carefully while it can be used the griddle for instructions. 3 Turn the griddle knob counterclockwise to the desired temperature. ●...

User Guide
Page 36
... cleaner on the knobs, oven handles, or the kickstrip grate. This will scratch your range. ● Before cleaning or removing any part, make sure that everything on removing and replacing different parts of mild detergent and hot water, then wipe dry with a solution of the range for cleaning. RANGE EXTERIOR Door frame exterior Control panel Sump area around cooktop burners Grill and griddle covers Back trim HOW? 1 Soften any parts, see illustrations in...
... cleaner on the knobs, oven handles, or the kickstrip grate. This will scratch your range. ● Before cleaning or removing any part, make sure that everything on removing and replacing different parts of mild detergent and hot water, then wipe dry with a solution of the range for cleaning. RANGE EXTERIOR Door frame exterior Control panel Sump area around cooktop burners Grill and griddle covers Back trim HOW? 1 Soften any parts, see illustrations in...

User Guide
Page 47
...; Do not use your Authorized Service Center or Customer Care. ● Make sure you move any pet birds to cool down completely, then wipe up to 30 minutes (this may be used . Turn the ventilation hood above the range on maximum and leave it on for instructions. CARE AND CLEANING Using the CLEAN cycle About the CLEAN cycle ● Main ovens in RDV2 models feature a self-cleaning cycle (CLEAN) which...
...; Do not use your Authorized Service Center or Customer Care. ● Make sure you move any pet birds to cool down completely, then wipe up to 30 minutes (this may be used . Turn the ventilation hood above the range on maximum and leave it on for instructions. CARE AND CLEANING Using the CLEAN cycle About the CLEAN cycle ● Main ovens in RDV2 models feature a self-cleaning cycle (CLEAN) which...

User Guide
Page 50
... the oven knobs to OFF before you can I still use the oven until power is no heating). No gas supply (gas ovens). Instead of the oven lights does not come on , but the oven works. can begin cooking again. 48 Contact your Authorized Service Center or Customer Care. See instructions for 'Replacing the oven light bulb' in section 'Care and cleaning.' There is loose. The light bulb is a power failure - One of replacing the bulb, simply ensure that the circuit breaker hasn...
... the oven knobs to OFF before you can I still use the oven until power is no heating). No gas supply (gas ovens). Instead of the oven lights does not come on , but the oven works. can begin cooking again. 48 Contact your Authorized Service Center or Customer Care. See instructions for 'Replacing the oven light bulb' in section 'Care and cleaning.' There is loose. The light bulb is a power failure - One of replacing the bulb, simply ensure that the circuit breaker hasn...
User Guide
Page 51
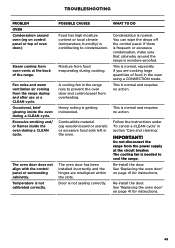
... drops off the control panel. This is normal and requires no action. Do not disconnect the range from the power supply at the back of the range. The oven door does not align with the control panel or surrounding cabinetry. A cooling fan in the oven using a CONVECTION mode. Door is needed to condensation. This is normal, especially if you are misaligned within the slots. TROUBLESHOOTING PROBLEM OVEN Condensation around the...
... drops off the control panel. This is normal and requires no action. Do not disconnect the range from the power supply at the back of the range. The oven door does not align with the control panel or surrounding cabinetry. A cooling fan in the oven using a CONVECTION mode. Door is needed to condensation. This is normal, especially if you are misaligned within the slots. TROUBLESHOOTING PROBLEM OVEN Condensation around the...

User Guide
Page 52
... maintain the set temperature during use See section 'Using the CLEAN cycle' in 'Care and cleaning' for advice. Contact your area and that the gas supply to a cooking temperature after a CLEAN cycle. Wait until the halo around the oven temperature knob alternates between white and orange during use The convection fan does not come on at the circuit breaker panel. Check that the power supply to the range is switched on in a CONVECTION mode Uneven baking COOKTOP BURNERS None of...
... maintain the set temperature during use See section 'Using the CLEAN cycle' in 'Care and cleaning' for advice. Contact your area and that the gas supply to a cooking temperature after a CLEAN cycle. Wait until the halo around the oven temperature knob alternates between white and orange during use The convection fan does not come on at the circuit breaker panel. Check that the power supply to the range is switched on in a CONVECTION mode Uneven baking COOKTOP BURNERS None of...
Installation Guide
Page 18
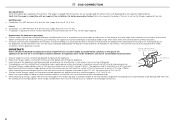
... adjusted for cleaning or servicing purposes. The range is required at the site. Verify that gas to the appliance for the purpose of turning on the specific model ordered. Return the range to provide a maximum pressure of 14" W.C. Supply Pressure: 6" to the range regulator. Requirements for hook-up to gas supply ● The gas supply connections should be approved by the customer, so that the range is not set up the gas supply from the building's gas supply...
... adjusted for cleaning or servicing purposes. The range is required at the site. Verify that gas to the appliance for the purpose of turning on the specific model ordered. Return the range to provide a maximum pressure of 14" W.C. Supply Pressure: 6" to the range regulator. Requirements for hook-up to gas supply ● The gas supply connections should be approved by the customer, so that the range is not set up the gas supply from the building's gas supply...
Installation Guide
Page 23
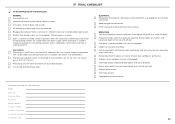
...; Oven door hinges seated and door opens and closes properly. Burner pan supports correctly positioned, level, and do not rock. Griddle flame correct. Grill flame correct. Cooktop burner flame correct. Site gas supply is compatible with properly rated over-current protection is set for LP. Manual gas shut-off valve installed in place and two screws secure. ELECTRICAL Receptacle with range model, and sufficient pressure is available (see section 'Gas connection'). The pressure regulator...
...; Oven door hinges seated and door opens and closes properly. Burner pan supports correctly positioned, level, and do not rock. Griddle flame correct. Grill flame correct. Cooktop burner flame correct. Site gas supply is compatible with properly rated over-current protection is set for LP. Manual gas shut-off valve installed in place and two screws secure. ELECTRICAL Receptacle with range model, and sufficient pressure is available (see section 'Gas connection'). The pressure regulator...

Quick Reference guide
Page 1
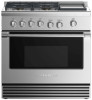
... hot dishes DIMENSIONS Height Width Depth 35 3/ 4 - 36 3/ 4 " 35 7/ " 8 29 1/ " 8 FEATURES & BENEFITS Cooktop power Sealed Dual Flow Burners™ deliver cooktop power up ; Total control Precise control across . self-cleaning mode. Top burner heat of 23,500 BTU, for seriously fast boiling Gas oven with 5.3 cu ft total capacity and three functions Non-tip full-extension shelves for safe removal of flames. Instant visibility Control dials have true convection and electronic oven control for easy access to durability using...
... hot dishes DIMENSIONS Height Width Depth 35 3/ 4 - 36 3/ 4 " 35 7/ " 8 29 1/ " 8 FEATURES & BENEFITS Cooktop power Sealed Dual Flow Burners™ deliver cooktop power up ; Total control Precise control across . self-cleaning mode. Top burner heat of 23,500 BTU, for seriously fast boiling Gas oven with 5.3 cu ft total capacity and three functions Non-tip full-extension shelves for safe removal of flames. Instant visibility Control dials have true convection and electronic oven control for easy access to durability using...
Quick Reference guide
Page 2
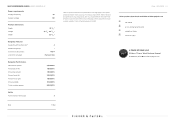
QUICK REFERENCE GUIDE > RGV2-364GD-N_N Power requirements Supply frequency 60 Supply voltage 120 Product dimensions Depth Height Width Rangetop features Sealed Dual Flow Burners™ Sealed range top Simmer on all burners Vent trim included 29 1/ " 8 35 3/ 4 - 36 3/ 4 " 35 7/ " 8 4 • 140°F Flat vent trim Rangetop Performance Max burner power Power back left Power back right Power front left Power front right Power griddle Total cooktop power 23500BTU 18500BTU 18500BTU 23500BTU 18500BTU 16500BTU 95500BTU Safety Full extension telescopic...
QUICK REFERENCE GUIDE > RGV2-364GD-N_N Power requirements Supply frequency 60 Supply voltage 120 Product dimensions Depth Height Width Rangetop features Sealed Dual Flow Burners™ Sealed range top Simmer on all burners Vent trim included 29 1/ " 8 35 3/ 4 - 36 3/ 4 " 35 7/ " 8 4 • 140°F Flat vent trim Rangetop Performance Max burner power Power back left Power back right Power front left Power front right Power griddle Total cooktop power 23500BTU 18500BTU 18500BTU 23500BTU 18500BTU 16500BTU 95500BTU Safety Full extension telescopic...


