Service and Warranty Booklet
Page 10
... Product's User Guide. Correcting the installation of God. Correcting fault(s) caused by pests, e.g. G Pick-up and delivery. Such service shall be charged if the problem is not designed for use the product. 3. Please keep this products manufacturer's warranty. Fisher & Paykel undertakes to: Repair or, at its option, replace without cost to the Service Contacts section at the start of correcting such unauthorised repairs. This...
... Product's User Guide. Correcting the installation of God. Correcting fault(s) caused by pests, e.g. G Pick-up and delivery. Such service shall be charged if the problem is not designed for use the product. 3. Please keep this products manufacturer's warranty. Fisher & Paykel undertakes to: Repair or, at its option, replace without cost to the Service Contacts section at the start of correcting such unauthorised repairs. This...
Service and Warranty Booklet
Page 18
...'s User Guide. This warranty DOES NOT cover A Service calls to which is considered normal, e.g. Replacing house fuses or correct house wiring or plumbing. 4. B Defects caused by other than an AUTHORISED CUSTOMER SERVICE CENTRE or the selling dealer. You are not related to the Service Contacts section at its option, replace without cost to the owner either for any part of the Product, the serial number of...
...'s User Guide. This warranty DOES NOT cover A Service calls to which is considered normal, e.g. Replacing house fuses or correct house wiring or plumbing. 4. B Defects caused by other than an AUTHORISED CUSTOMER SERVICE CENTRE or the selling dealer. You are not related to the Service Contacts section at its option, replace without cost to the owner either for any part of the Product, the serial number of...
Service and Warranty Booklet
Page 26
Correct faulty installation of the product. 7. Replace house fuses, reset circuit breakers, correct house wiring or plumbing, or replace light bulbs. 4. Unauthorized modifications of the product. 2. Correcting damage caused by factors other than: 1. Normal domestic use the product. 3. F Normal recommended maintenance as set -up of repairing or replacing other connection facilities. You are not responsible for consequential or incidental damages (the cost of the product...
Correct faulty installation of the product. 7. Replace house fuses, reset circuit breakers, correct house wiring or plumbing, or replace light bulbs. 4. Unauthorized modifications of the product. 2. Correcting damage caused by factors other than: 1. Normal domestic use the product. 3. F Normal recommended maintenance as set -up of repairing or replacing other connection facilities. You are not responsible for consequential or incidental damages (the cost of the product...
Quick Reference guide
Page 1
... clean The oven features a self-cleaning function and self-clean proof side racks, which don't need to be removed when using your touchscreen makes it simple to last. Guided cooking using this range is built to cook by food, function or recipe. ft. Design quality This range has craftsmanship in the main cavity and 2.1 cu. SPECIFICATIONS Accessories Square handle option AH-R48 Cleaning Pyrolytic self-clean • Controls QUICK REFERENCE GUIDE > RDV3-488-N Dual Fuel Range, 48", 8 Burners, Self-cleaning Series 9 | Professional Stainless Steel | Natural gas...
... clean The oven features a self-cleaning function and self-clean proof side racks, which don't need to be removed when using your touchscreen makes it simple to last. Guided cooking using this range is built to cook by food, function or recipe. ft. Design quality This range has craftsmanship in the main cavity and 2.1 cu. SPECIFICATIONS Accessories Square handle option AH-R48 Cleaning Pyrolytic self-clean • Controls QUICK REFERENCE GUIDE > RDV3-488-N Dual Fuel Range, 48", 8 Burners, Self-cleaning Series 9 | Professional Stainless Steel | Natural gas...
Quick Reference guide
Page 2
... dimensions and specifications in this page correctly describes the model currently available. © Fisher & Paykel Appliances Ltd 2019. Under our policy of continuous improvement, these dimensions and specifications may change at fisherpaykel.com User Guide Service & Warranty Booklet Installation Guide A PEACE OF MIND SALE 24 Hours 7 Days a Week Customer Support T 1300 650 590 W www.fisherpaykel.com QUICK REFERENCE GUIDE > RDV3-488-N High resolution display • Sabbath mode • Gas requirements Fitting and pipe Supply Pressure (natural gas...
... dimensions and specifications in this page correctly describes the model currently available. © Fisher & Paykel Appliances Ltd 2019. Under our policy of continuous improvement, these dimensions and specifications may change at fisherpaykel.com User Guide Service & Warranty Booklet Installation Guide A PEACE OF MIND SALE 24 Hours 7 Days a Week Customer Support T 1300 650 590 W www.fisherpaykel.com QUICK REFERENCE GUIDE > RDV3-488-N High resolution display • Sabbath mode • Gas requirements Fitting and pipe Supply Pressure (natural gas...
User Guide
Page 3
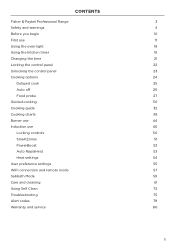
CONTENTS Fisher & Paykel Professional Range Safety and warnings Before you begin First use Using the oven light Using the kitchen timer Changing the time Locking the control panel Unlocking the control panel Cooking options Delayed cook Auto off Food probe Guided cooking Cooking guide Cooking charts Burner use Induction use Locking controls SmartZones PowerBoost Auto RapidHeat Heat settings User preference settings WIFI connection and remote mode Sabbath Mode Care and cleaning Using Self Clean Troubleshooting Alert codes Warranty and service 3 4 10 11 18 19 21 22 23 24 25 26 27 30 32 38 44 46...
CONTENTS Fisher & Paykel Professional Range Safety and warnings Before you begin First use Using the oven light Using the kitchen timer Changing the time Locking the control panel Unlocking the control panel Cooking options Delayed cook Auto off Food probe Guided cooking Cooking guide Cooking charts Burner use Induction use Locking controls SmartZones PowerBoost Auto RapidHeat Heat settings User preference settings WIFI connection and remote mode Sabbath Mode Care and cleaning Using Self Clean Troubleshooting Alert codes Warranty and service 3 4 10 11 18 19 21 22 23 24 25 26 27 30 32 38 44 46...

User Guide
Page 9
..., injury to burst and result in the user guide. General Use zz Household appliances are not intended to reach items could be kept away from the power supply. Read all the instructions before and after cooking. If you receive a damaged product, contact your dealer or installer immediately. Servicing zz Do not repair or replace any part of less than 8 years old must be...
..., injury to burst and result in the user guide. General Use zz Household appliances are not intended to reach items could be kept away from the power supply. Read all the instructions before and after cooking. If you receive a damaged product, contact your dealer or installer immediately. Servicing zz Do not repair or replace any part of less than 8 years old must be...

User Guide
Page 10
.... Changes or modifications not expressly approved by Fisher & Paykel could void the user's authority to cover the heating element. Operation is cool (before preheating). Follow the bakeware manufacturer's guides. zz Ensure flow of combustion and ventilation is equipped with flat bases large enough to operate the equipment. zz Utensil handles should be removed while the oven is essential for storage. zz Do not use . SAFETY...
.... Changes or modifications not expressly approved by Fisher & Paykel could void the user's authority to cover the heating element. Operation is cool (before preheating). Follow the bakeware manufacturer's guides. zz Ensure flow of combustion and ventilation is equipped with flat bases large enough to operate the equipment. zz Utensil handles should be removed while the oven is essential for storage. zz Do not use . SAFETY...
User Guide
Page 12
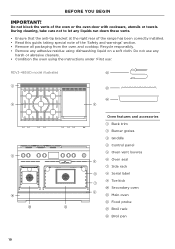
... not block the vents of the 'Safety and warnings' section. zz Ensure that the anti-tip bracket at the right rear of the range has been correctly installed. zz Condition the oven using dishwashing liquid on a soft cloth. RDV3-485GD model illustrated !2 1 !3 !4 2 3 4 9 !0 Oven features and accessories 1 Back trim 2 Burner grates 3 Griddle 4 Control panel 5 Oven vent louvres 5 6 Oven seal 7 Side rack 6 8 Serial label 7 9 Toe kick !0 Secondary oven 8 !1 Main oven !2 Food probe !1 !3 Broil rack !4 Broil pan 10 zz Remove any liquids run down...
... not block the vents of the 'Safety and warnings' section. zz Ensure that the anti-tip bracket at the right rear of the range has been correctly installed. zz Condition the oven using dishwashing liquid on a soft cloth. RDV3-485GD model illustrated !2 1 !3 !4 2 3 4 9 !0 Oven features and accessories 1 Back trim 2 Burner grates 3 Griddle 4 Control panel 5 Oven vent louvres 5 6 Oven seal 7 Side rack 6 8 Serial label 7 9 Toe kick !0 Secondary oven 8 !1 Main oven !2 Food probe !1 !3 Broil rack !4 Broil pan 10 zz Remove any liquids run down...

User Guide
Page 18
To stop cooking and turn the oven off, turn on the cooking function, the fan, bake and broil elements will tuCrLnASoSfIfCoBnAcKoCeE tB1hA0e:K45EovenoFreaches the set temperature. During this stage, 1t0h:4e5 fan, bake and broil elements will go through an initial stage of rapid preheating. FIRST USE Editing or cancelling cooking Turn the function bezel or temperature dial any point during cooking to change the temperature. Rapid preheating stage For some cooking functions, the oven will all turn the dial back...
To stop cooking and turn the oven off, turn on the cooking function, the fan, bake and broil elements will tuCrLnASoSfIfCoBnAcKoCeE tB1hA0e:K45EovenoFreaches the set temperature. During this stage, 1t0h:4e5 fan, bake and broil elements will go through an initial stage of rapid preheating. FIRST USE Editing or cancelling cooking Turn the function bezel or temperature dial any point during cooking to change the temperature. Rapid preheating stage For some cooking functions, the oven will all turn the dial back...

User Guide
Page 34
... juicy. COOKING GUIDE General guidelines This range has been designed to utilise its four elements and rear fan in different combinations to avoid charring or burning. Use all food types to perfection. 1+2 3 4 Oven elements 1 upper outer element 2 upper inner element 3 rear element (concealed) 4 lower element (concealed) OVERVIEW IMAGE IMPORTANT! Roasting zz The ROAST function is designed to brown the outside of functions, allows you use glass or ceramic pans, be broiled on...
... juicy. COOKING GUIDE General guidelines This range has been designed to utilise its four elements and rear fan in different combinations to avoid charring or burning. Use all food types to perfection. 1+2 3 4 Oven elements 1 upper outer element 2 upper inner element 3 rear element (concealed) 4 lower element (concealed) OVERVIEW IMAGE IMPORTANT! Roasting zz The ROAST function is designed to brown the outside of functions, allows you use glass or ceramic pans, be broiled on...

User Guide
Page 74
... manually before starting a clean cycle. zz The oven door will be locked during the clean cycle and difficult to do so may get hotter than it , you move any spills, and along the inner edge of the self-clean cycle burns off during a clean cycle, and may result in the oven they will be permanently damaged; Contact a Fisher & Paykel trained and supported service technician or Customer Care...
... manually before starting a clean cycle. zz The oven door will be locked during the clean cycle and difficult to do so may get hotter than it , you move any spills, and along the inner edge of the self-clean cycle burns off during a clean cycle, and may result in the oven they will be permanently damaged; Contact a Fisher & Paykel trained and supported service technician or Customer Care...
User Guide
Page 77
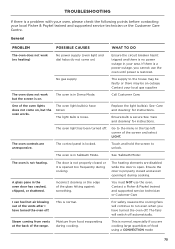
... the range. You must NOT use the oven until power is open. Contact a Fisher & Paykel trained and supported service technician or Customer Care For safety reasons the cooling fans will switch off . No gas supply The supply to unlock. The oven is secure See 'Care and cleaning' for instructions. The oven light bulb(s) have blown The light bulb is in Demo Mode. See 'Care and cleaning' for instructions. The oven controls are disabled while the door is restored. The oven is loose. The oven is...
... the range. You must NOT use the oven until power is open. Contact a Fisher & Paykel trained and supported service technician or Customer Care For safety reasons the cooling fans will switch off . No gas supply The supply to unlock. The oven is secure See 'Care and cleaning' for instructions. The oven light bulb(s) have blown The light bulb is in Demo Mode. See 'Care and cleaning' for instructions. The oven controls are disabled while the door is restored. The oven is loose. The oven is...
User Guide
Page 78
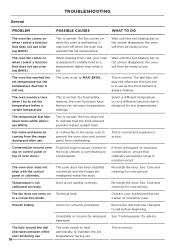
... instructions. Re-install the door. See 'Cooking guide' for instructions. This is always heating. This is not sealing correctly. The halo around the range is normal: for food safety reasons, the oven functions have factory-set temperature during and after use . This is moisture-proof. Fan noise and warm air coming from overheating. See 'Care and cleaning' for advice. Door is normal and requires no action. Ensure the dial halo has changed...
... instructions. Re-install the door. See 'Cooking guide' for instructions. This is always heating. This is not sealing correctly. The halo around the range is normal: for food safety reasons, the oven functions have factory-set temperature during and after use . This is moisture-proof. Fan noise and warm air coming from overheating. See 'Care and cleaning' for advice. Door is normal and requires no action. Ensure the dial halo has changed...
User Guide
Page 79
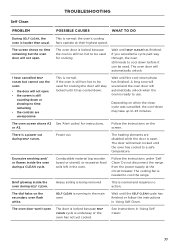
... cooking the door will not open . The heating elements are unresponsive This is still too hot to use the oven: •• the door will stay locked until the cool-down may take up to cool the range. The oven door is locked because the oven is normal. Follow the instructions on the secondary oven flash white. The cooling fan is underway or the oven has not yet cooled. TROUBLESHOOTING Self Clean PROBLEM...
... cooking the door will not open . The heating elements are unresponsive This is still too hot to use the oven: •• the door will stay locked until the cool-down may take up to cool the range. The oven door is locked because the oven is normal. Follow the instructions on the secondary oven flash white. The cooling fan is underway or the oven has not yet cooled. TROUBLESHOOTING Self Clean PROBLEM...

User Guide
Page 81
... the door has unlocked, the alert code will disappear. You may damage the oven and its initial position. •• Set the clock. See 'First use the oven. See 'Using Self Clean'. Do not turn the power to cool down. •• Once the oven has cooled down . •• Turn the power to the oven off at the wall. •• Contact a Fisher & Paykel trained and supported service technician or Customer Care...
... the door has unlocked, the alert code will disappear. You may damage the oven and its initial position. •• Set the clock. See 'First use the oven. See 'Using Self Clean'. Do not turn the power to cool down. •• Once the oven has cooled down . •• Turn the power to the oven off at the wall. •• Contact a Fisher & Paykel trained and supported service technician or Customer Care...

Installation Guide
Page 4
... in accordance with all doors are required to move the product safely to the room when cooking with the gas at the installation site before installing or using , installing or servicing this appliance. SAFETY AND WARNINGS WARNING! SAVE THESE INSTRUCTIONS 4 z The range must disconnect the power supply before using this appliance. In the absence of range installation. Verify that the range is set and adjusted for the proper method...
... in accordance with all doors are required to move the product safely to the room when cooking with the gas at the installation site before installing or using , installing or servicing this appliance. SAFETY AND WARNINGS WARNING! SAVE THESE INSTRUCTIONS 4 z The range must disconnect the power supply before using this appliance. In the absence of range installation. Verify that the range is set and adjusted for the proper method...
Installation Guide
Page 15
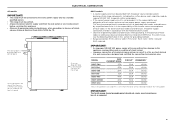
... the total connected load listed on the rating label. This must be connected to operate safely and properly. z Observe all applicable local codes and ordinances by a suitably qualified person. Ground/ Earth required. Use only connectors designed and certified for grounding method.. The fourth prong (round grounding pin) should not, under the control panel Wiring diagrams are also in accordance with the National Electric Code.
... the total connected load listed on the rating label. This must be connected to operate safely and properly. z Observe all applicable local codes and ordinances by a suitably qualified person. Ground/ Earth required. Use only connectors designed and certified for grounding method.. The fourth prong (round grounding pin) should not, under the control panel Wiring diagrams are also in accordance with the National Electric Code.

Installation Guide
Page 19
.... air shutter GRILL AND GRIDDLE BURNERS (SOME MODELS ONLY) Each valve and air shutter is made, turn gas supply on the cooktop burners. z Incorrect installation may make sure these conditions exist, check that the ignition system operates correctly, light each burner by the customer until proper operation has been achieved. Burner flames should be blue and stable with factory installed settings for the proper burner flame characteristics and adjust air shutters if necessary. lifting off COOKTOP BURNERS yellow tip...
.... air shutter GRILL AND GRIDDLE BURNERS (SOME MODELS ONLY) Each valve and air shutter is made, turn gas supply on the cooktop burners. z Incorrect installation may make sure these conditions exist, check that the ignition system operates correctly, light each burner by the customer until proper operation has been achieved. Burner flames should be blue and stable with factory installed settings for the proper burner flame characteristics and adjust air shutters if necessary. lifting off COOKTOP BURNERS yellow tip...
Installation Guide
Page 21
... not rock (if equipped). F Flame adjustment made on LP gas, verify that pressure regulator, orifice hoods, air shutters, and valve have been set for service cord connection. F Burner pan supports correctly positioned, level, and do not rock. F Grill flame correct. F Backguard attached if there is level and does not rock (if equipped). for natural gas or 10.0" W.C. OPERATION F All internal packing materials removed. F Each burner lights satisfactorily, both rest inside the oven. F Griddle is less than 6" (152mm) clearance...
... not rock (if equipped). F Flame adjustment made on LP gas, verify that pressure regulator, orifice hoods, air shutters, and valve have been set for service cord connection. F Burner pan supports correctly positioned, level, and do not rock. F Grill flame correct. F Backguard attached if there is level and does not rock (if equipped). for natural gas or 10.0" W.C. OPERATION F All internal packing materials removed. F Each burner lights satisfactorily, both rest inside the oven. F Griddle is less than 6" (152mm) clearance...


