Service and Warranty Booklet
Page 18
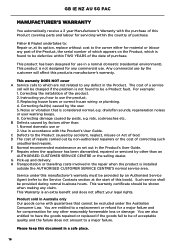
... business hours. Fisher & Paykel undertakes to a major failure. This product has been designed for any claim. Replacing house fuses or correct house wiring or plumbing. 4. The cost of acceptable quality and the failure does not amount to : Repair or, at the start of this manufacturer's warranty must be of a service call will affect this products manufacturer's warranty. Such service shall be...
... business hours. Fisher & Paykel undertakes to a major failure. This product has been designed for any claim. Replacing house fuses or correct house wiring or plumbing. 4. The cost of acceptable quality and the failure does not amount to : Repair or, at the start of this manufacturer's warranty must be of a service call will affect this products manufacturer's warranty. Such service shall be...
Service and Warranty Booklet
Page 26
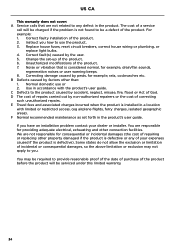
... of repairs carried out by the user. 5. Correct faulty installation of the product. 7. Replace house fuses, reset circuit breakers, correct house wiring or plumbing, or replace light bulbs. 4. D The cost of the product before the product will be charged if the problem is not found to be serviced under this limited warranty. 24 You are not related to any of the product. 6. Change the set forth...
... of repairs carried out by the user. 5. Correct faulty installation of the product. 7. Replace house fuses, reset circuit breakers, correct house wiring or plumbing, or replace light bulbs. 4. D The cost of the product before the product will be charged if the problem is not found to be serviced under this limited warranty. 24 You are not related to any of the product. 6. Change the set forth...
Installation Guide / Guide dinstallation
Page 4
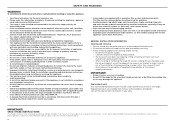
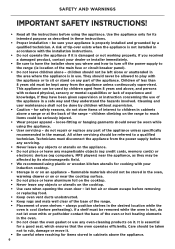
....1 Canadian Electrical Codes Part 1 and/or local codes. IMPORTANT! To avoid hazard, follow these installation instructions and in accordance with any time. Read the installation, operating and maintenance instructions thoroughly before installing/using , installing or servicing this installation guide may be removed before using the appliance. z DO NOT obstruct the flow of range installation. z Range is suitable for cleaning and/or service: z Disconnect AC power supply. z The range must be grounded. z Improper installation, adjustment alteration, service or maintenance...
....1 Canadian Electrical Codes Part 1 and/or local codes. IMPORTANT! To avoid hazard, follow these installation instructions and in accordance with any time. Read the installation, operating and maintenance instructions thoroughly before installing/using , installing or servicing this installation guide may be removed before using the appliance. z DO NOT obstruct the flow of range installation. z Range is suitable for cleaning and/or service: z Disconnect AC power supply. z The range must be grounded. z Improper installation, adjustment alteration, service or maintenance...
Installation Guide / Guide dinstallation
Page 5
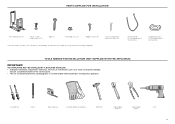
... protective gloves Hammer Adjustable Adjustable wrench pliers Drill DDrirllill Drill 5 Consult a qualified installer or the service agent. Screws and plastic sleeve anchors (8) Ground lead* (3 wire permanent connection) Cupped washer* (4 wire permanent connection) TOOLS NEEDED FOR INSTALLATION (NOT SUPPLIED WITH THE APPLIANCE) IMPORTANT! z The use of suitable protective clothing/gloves is mandatory to connect the range by using cordset with plug supplied. z Improper installation, adjustment, alteration, services, or maintenance can...
... protective gloves Hammer Adjustable Adjustable wrench pliers Drill DDrirllill Drill 5 Consult a qualified installer or the service agent. Screws and plastic sleeve anchors (8) Ground lead* (3 wire permanent connection) Cupped washer* (4 wire permanent connection) TOOLS NEEDED FOR INSTALLATION (NOT SUPPLIED WITH THE APPLIANCE) IMPORTANT! z The use of suitable protective clothing/gloves is mandatory to connect the range by using cordset with plug supplied. z Improper installation, adjustment, alteration, services, or maintenance can...

Installation Guide / Guide dinstallation
Page 12
... ADJUSTABLE FEET Fitting the adjustable (rear) feet covers (optional) If installing rear feet covers use the following instructions to attach the mounting brackets to its final position DO NOT DRAG. Washers A BC 1 Remove screws A, B and C from the plate on the base of floor. IMPORTANT! z BE CAREFUL: do not lift the range by the oven door handle, the hob rail or the cooktop trim as shown). 4 Secure covers to brackets using the supplied...
... ADJUSTABLE FEET Fitting the adjustable (rear) feet covers (optional) If installing rear feet covers use the following instructions to attach the mounting brackets to its final position DO NOT DRAG. Washers A BC 1 Remove screws A, B and C from the plate on the base of floor. IMPORTANT! z BE CAREFUL: do not lift the range by the oven door handle, the hob rail or the cooktop trim as shown). 4 Secure covers to brackets using the supplied...

Installation Guide / Guide dinstallation
Page 17
ELECTRICAL F Adequate ground connection. F Oven and cooktop displays are functioning correctly and oven and cooking zones can be turned on. F Island trim or optional backguard correctly attached. F Dials turn correctly and freely. F Oven door hinges seated and door opens and closes properly. front to back, side to cabinet surfaces. F All packaging material and tie straps removed. F The anti-tip bracket is correctly installed. Check inside the oven. Purchase Date Purchaser Dealer Address Installer's Name Installer's Signature...
ELECTRICAL F Adequate ground connection. F Oven and cooktop displays are functioning correctly and oven and cooking zones can be turned on. F Island trim or optional backguard correctly attached. F Dials turn correctly and freely. F Oven door hinges seated and door opens and closes properly. front to back, side to cabinet surfaces. F All packaging material and tie straps removed. F The anti-tip bracket is correctly installed. Check inside the oven. Purchase Date Purchaser Dealer Address Installer's Name Installer's Signature...

Quick Reference guide
Page 1
... cook zone. The finely tuned cooktop controls let you plenty of hot dishes DIMENSIONS Height Width Depth FEATURES & BENEFITS 35 3/4 - 37 1/4" 35 7/8" 25 1/4" OUTSTANDING PERFORMANCE Discover the flexibility to an exceptional, premium range. EASY TO CLEAN The self-clean function reduces grease and food residue to an easily removable light ash and the cooktop simply needs a quick wipe to perfection. QUICK REFERENCE GUIDE > OR36SCI6B1 Induction Range, 36...
... cook zone. The finely tuned cooktop controls let you plenty of hot dishes DIMENSIONS Height Width Depth FEATURES & BENEFITS 35 3/4 - 37 1/4" 35 7/8" 25 1/4" OUTSTANDING PERFORMANCE Discover the flexibility to an exceptional, premium range. EASY TO CLEAN The self-clean function reduces grease and food residue to an easily removable light ash and the cooktop simply needs a quick wipe to perfection. QUICK REFERENCE GUIDE > OR36SCI6B1 Induction Range, 36...

Quick Reference guide
Page 2
..., cast zinc dials Concealed element Convection Electronic oven control Full extension telescopic Internal light Soft open/close door Turned stainless steel clock Twin cavity fans 4 x 25W halogen (2 side & 2 • • • Warming drawer Oven functions Aero Bake Aero Broil Aero™ Pastry with Pizza mode Bake Number of functions Rapid proof Roast Self-clean True Aero Oven performance Broil power CoolTouch door Warming drawer power Power requirements Amperage Supply frequency Product dimensions Depth Height Width Rangetop features Auto heat reduce Dual zones • 9 4300W...
..., cast zinc dials Concealed element Convection Electronic oven control Full extension telescopic Internal light Soft open/close door Turned stainless steel clock Twin cavity fans 4 x 25W halogen (2 side & 2 • • • Warming drawer Oven functions Aero Bake Aero Broil Aero™ Pastry with Pizza mode Bake Number of functions Rapid proof Roast Self-clean True Aero Oven performance Broil power CoolTouch door Warming drawer power Power requirements Amperage Supply frequency Product dimensions Depth Height Width Rangetop features Auto heat reduce Dual zones • 9 4300W...

User Guide Freestanding Range
Page 3
CONTENTS Safety and warnings 4 Introduction 8 First use 10 Cooking guide 16 Oven functions 18 Cooking Charts 22 Setting the timer 28 Auto cook 30 Locking the oven controls 34 User preference settings 36 Sabbath mode 38 Using your induction cooktop 40 Locking the cooktop controls 44 Using your cooktop's special features 45 Choosing the right cookware 51 Cooking guidelines 53 Using the warming drawer 56 Care and cleaning 57 Using the self clean function 66 Troubleshooting 69 Alert codes 75 Warranty and service 77 Registration To register your product...
CONTENTS Safety and warnings 4 Introduction 8 First use 10 Cooking guide 16 Oven functions 18 Cooking Charts 22 Setting the timer 28 Auto cook 30 Locking the oven controls 34 User preference settings 36 Sabbath mode 38 Using your induction cooktop 40 Locking the cooktop controls 44 Using your cooktop's special features 45 Choosing the right cookware 51 Cooking guidelines 53 Using the warming drawer 56 Care and cleaning 57 Using the self clean function 66 Troubleshooting 69 Alert codes 75 Warranty and service 77 Registration To register your product...

User Guide Freestanding Range
Page 4
...;feinprsetraaillnénsctoaglnlafoteiromnéiimnssetnrutmcatuioxondsirevcteiveds per installation Anti-tip bracket (Bride antibasculement) instructions. FIre Hazard Follow the instructions on the oven floor during cooking or in the oven during a Self Clean cycle. Do not place aluminium foil, dishes, trays, water or ice on starting a Self Clean cycle carefully. Never leave the cooktop unattended when in Adjustable bracket assembly to persons, or damage when using the appliance, follow this advice...
...;feinprsetraaillnénsctoaglnlafoteiromnéiimnssetnrutmcatuioxondsirevcteiveds per installation Anti-tip bracket (Bride antibasculement) instructions. FIre Hazard Follow the instructions on the oven floor during cooking or in the oven during a Self Clean cycle. Do not place aluminium foil, dishes, trays, water or ice on starting a Self Clean cycle carefully. Never leave the cooktop unattended when in Adjustable bracket assembly to persons, or damage when using the appliance, follow this advice...
User Guide Freestanding Range
Page 6
... near the cooktop surface. y Proper installation - let hot air or steam escape before using the appliance. y Be careful when reaching for a good seal, which ensures that the oven operates efficiently. If you where and how to turn off the power supply to sit or stand on the range to children in cabinets above the appliance. 6 y Placement of the oven or hot heating elements in the manual. If a shelf...
... near the cooktop surface. y Proper installation - let hot air or steam escape before using the appliance. y Be careful when reaching for a good seal, which ensures that the oven operates efficiently. If you where and how to turn off the power supply to sit or stand on the range to children in cabinets above the appliance. 6 y Placement of the oven or hot heating elements in the manual. If a shelf...

User Guide Freestanding Range
Page 7
... suitable for cooktop service without breaking due to clean the oven door glass since they scratch the surface, which may result in the oven for as short a time as these can upset the cooking performance and damage the finish of the oven or cooktop parts. y Do not use a steam cleaner to clean any part of utensil to cover the surface unit heating element. Proper relationship of a self-cleaning oven. y Utensil handles should be turned inward...
... suitable for cooktop service without breaking due to clean the oven door glass since they scratch the surface, which may result in the oven for as short a time as these can upset the cooking performance and damage the finish of the oven or cooktop parts. y Do not use a steam cleaner to clean any part of utensil to cover the surface unit heating element. Proper relationship of a self-cleaning oven. y Utensil handles should be turned inward...

User Guide Freestanding Range
Page 16
... directly on . y For food safety reasons, do not leave food in cooking time. y Make sure cake pans do not open the door until at least ¾ of the oven. y When baking double the recipe (especially cookies) cook time may need to avoid contamination by organisms which may cause food poisoning. glass cookware may require a lower temperature y Multi-shelf baking may even cause fire. CLASSIC BAKE Fan Upper element...
... directly on . y For food safety reasons, do not leave food in cooking time. y Make sure cake pans do not open the door until at least ¾ of the oven. y When baking double the recipe (especially cookies) cook time may need to avoid contamination by organisms which may cause food poisoning. glass cookware may require a lower temperature y Multi-shelf baking may even cause fire. CLASSIC BAKE Fan Upper element...

User Guide Freestanding Range
Page 17
... before broiling (but still keep food hot. y Once hot, set the oven temperature to WARM in a covered pan, use the warming drawer to keep the inside moist and juicy. y If you prefer to roast in or use the Aero Bake function instead and increase the temperature by harmful bacteria. y Brush meat with the oven door completely shut. y Always keep the meat moist during cooking. If you use a higher shelf position. y Cook larger cuts...
... before broiling (but still keep food hot. y Once hot, set the oven temperature to WARM in a covered pan, use the warming drawer to keep the inside moist and juicy. y If you prefer to roast in or use the Aero Bake function instead and increase the temperature by harmful bacteria. y Brush meat with the oven door completely shut. y Always keep the meat moist during cooking. If you use a higher shelf position. y Cook larger cuts...

User Guide Freestanding Range
Page 41
... control dial and displays: OR30 models Cooking zone Off (not activated) Cooking zone On (activated but not operating). If a zone is the display for the cooking zones (one for each lit figure refers to the relevant cooking zone OR36 models OR30 models OFF A Cooking zones display Cooking zones display 41 GentleHeat low setting GentleHeat medium setting OR36 models GentleHeat low setting GentleHeat medium setting GentleHeat simmer setting - Power levels Auto RapidHeat feature 9Pow8erB7oost feature Hot Surface indicator 1 0 Pan detection indicator...
... control dial and displays: OR30 models Cooking zone Off (not activated) Cooking zone On (activated but not operating). If a zone is the display for the cooking zones (one for each lit figure refers to the relevant cooking zone OR36 models OR30 models OFF A Cooking zones display Cooking zones display 41 GentleHeat low setting GentleHeat medium setting OR36 models GentleHeat low setting GentleHeat medium setting GentleHeat simmer setting - Power levels Auto RapidHeat feature 9Pow8erB7oost feature Hot Surface indicator 1 0 Pan detection indicator...

User Guide Freestanding Range
Page 57
... of glass in the door become dirty, please contact your range. CARE AND CLEANING DOS y Read these cleaners could catch fire in the presence of heat. Failure to ensure it doesn't stain. y Always remove oven shelves before you move the range for instructions on and be killed. y Ensure the anti-tip device is re-engaged if you start cleaning your Fisher & Paykel trained and supported service technician or Customer Care...
... of glass in the door become dirty, please contact your range. CARE AND CLEANING DOS y Read these cleaners could catch fire in the presence of heat. Failure to ensure it doesn't stain. y Always remove oven shelves before you move the range for instructions on and be killed. y Ensure the anti-tip device is re-engaged if you start cleaning your Fisher & Paykel trained and supported service technician or Customer Care...
User Guide Freestanding Range
Page 69
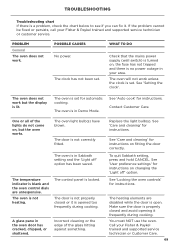
... 'Care and cleaning' for instructions. See 'Locking the oven controls' for instructions. Call your FIsher & Paykel trained and supported service technician or customer service. The clock has not been set . The door is not heating. The oven is not correctly fitted. See 'User preference settings' for instructions on , the fuse has not tripped and there is in your area. See 'Setting the clock'. The oven is set . POSSIBLE CAUSES WHAT TO DO No power. The control panel is set for instructions. PROBLEM General...
... 'Care and cleaning' for instructions. See 'Locking the oven controls' for instructions. Call your FIsher & Paykel trained and supported service technician or customer service. The clock has not been set . The door is not heating. The oven is not correctly fitted. See 'User preference settings' for instructions on , the fuse has not tripped and there is in your area. See 'Setting the clock'. The oven is set . POSSIBLE CAUSES WHAT TO DO No power. The control panel is set for instructions. PROBLEM General...

User Guide Freestanding Range
Page 70
... bake). To quit the 'Display off . The oven was set for automatic cooking. The oven is in Sabbath setting. Call Customer Care. 70 TROUBLESHOOTING PROBLEM General I can only adjust the clock setting while the oven is not set for automatic cooking when you have turned the function dial to 'OFF'. The fan comes on while the oven is normal. This is to provide optimal baking conditions right from cold, your oven is designed to initially heat to a temperature...
... bake). To quit the 'Display off . The oven was set for automatic cooking. The oven is in Sabbath setting. Call Customer Care. 70 TROUBLESHOOTING PROBLEM General I can only adjust the clock setting while the oven is not set for automatic cooking when you have turned the function dial to 'OFF'. The fan comes on while the oven is normal. This is to provide optimal baking conditions right from cold, your oven is designed to initially heat to a temperature...
User Guide Freestanding Range
Page 72
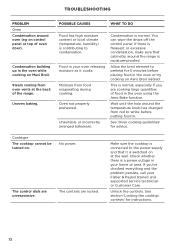
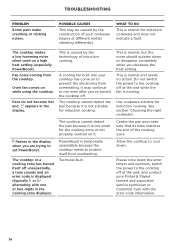
... a power outage in . Make sure the cooktop is normal. See 'Oven cooking guidelines' for instructions. 72 If you are cooking large quantities of oven door). Cooktype The cooktop cannot be turned on at the back of the range. Unlock the controls. Food in your Fisher & Paykel trained and supported service technician or Customer Care. Unsuitable or incorrectly arranged bakeware. Moisture from oven vents at the wall. The control dials are locked. Steam coming from...
... a power outage in . Make sure the cooktop is normal. See 'Oven cooking guidelines' for instructions. 72 If you are cooking large quantities of oven door). Cooktype The cooktop cannot be turned on at the back of the range. Unlock the controls. Food in your Fisher & Paykel trained and supported service technician or Customer Care. Unsuitable or incorrectly arranged bakeware. Moisture from oven vents at the wall. The control dials are locked. Steam coming from...
User Guide Freestanding Range
Page 74
... your Fisher & Paykel trained and supported service technician or Customer Care with one or two digits in the display. POSSIBLE CAUSES This may continue to the cooktop off unexpectedly, a tone sounds and an error code is normal and needs no action. Pans do not become hot and appears in the cooking zone displays). Do not switch the power to run even after you decrease the heat setting. Use cookware...
... your Fisher & Paykel trained and supported service technician or Customer Care with one or two digits in the display. POSSIBLE CAUSES This may continue to the cooktop off unexpectedly, a tone sounds and an error code is normal and needs no action. Pans do not become hot and appears in the cooking zone displays). Do not switch the power to run even after you decrease the heat setting. Use cookware...


