

User Guide
Page 3
... Button Progress Screen The Options Wrinkle Free, Time Dry End of Cycle Beeps, Reminders, Cycle Tips, Troubleshooting Lifecycles™ Family Special Bulky Allergy, Towels, Shirts, Lingerie Freshen Up, Warm Up, Dry Clean Blankets, Jeans, Comforter Using Your Dryer Sorting, Loading Lint Bucket Lidlock Power failure Care Labels Cleaning If your Intuitive™ Dryer Beeps for Close Clearances Exhaust Venting Installation Grounding Instructions Electrical Requirements Gas Requirements Level Machine, Final Installation Checklist Features Operating Instructions Fabric Type Heavy...
... Button Progress Screen The Options Wrinkle Free, Time Dry End of Cycle Beeps, Reminders, Cycle Tips, Troubleshooting Lifecycles™ Family Special Bulky Allergy, Towels, Shirts, Lingerie Freshen Up, Warm Up, Dry Clean Blankets, Jeans, Comforter Using Your Dryer Sorting, Loading Lint Bucket Lidlock Power failure Care Labels Cleaning If your Intuitive™ Dryer Beeps for Close Clearances Exhaust Venting Installation Grounding Instructions Electrical Requirements Gas Requirements Level Machine, Final Installation Checklist Features Operating Instructions Fabric Type Heavy...
User Guide
Page 6
... or attempt any user maintenance or cleaning. Do not tamper with the Installation Instructions before it will not be exposed to water or exposed to stress or damage. Failure to avoid electrical overload. Follow details in the published user repair instructions that it is used. When disconnecting the dryer, pull by removing the fuse or switching off the circuit breaker) before using this User Guide. Note: Pressing the POWER button does NOT...
... or attempt any user maintenance or cleaning. Do not tamper with the Installation Instructions before it will not be exposed to water or exposed to stress or damage. Failure to avoid electrical overload. Follow details in the published user repair instructions that it is used. When disconnecting the dryer, pull by removing the fuse or switching off the circuit breaker) before using this User Guide. Note: Pressing the POWER button does NOT...
User Guide
Page 8
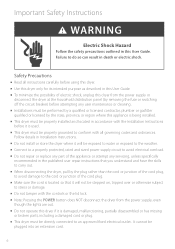
... event that contain metal reinforcements should not be placed directly in the Installation Instructions. Important Safety Instructions/Warranty The dryer must be cleaned periodically by or near children. If your dryer clean and dry to page 54). Keep the floor around or with your Fisher & Paykel Authorized Service Agent or our Customer Care Center (Toll Free 1 888 9 FNP USA (1 888 9 367 872)) rather than attempting...
... event that contain metal reinforcements should not be placed directly in the Installation Instructions. Important Safety Instructions/Warranty The dryer must be cleaned periodically by or near children. If your dryer clean and dry to page 54). Keep the floor around or with your Fisher & Paykel Authorized Service Agent or our Customer Care Center (Toll Free 1 888 9 FNP USA (1 888 9 367 872)) rather than attempting...
User Guide
Page 9
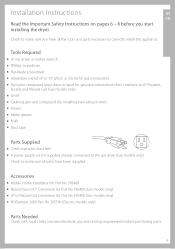
... start installing the dryer. Tools Required ¼'' nut driver or socket wrench Phillips screwdriver Flat-blade screwdriver Adjustable wrench 8" or 10" (20cm or 25cm) for gas connections Pipe joint compound (pipe dope or tape) for front feet. Check to correctly install this appliance. A power supply cord is resistant to Natural Gas Conversion Kit Part No 395490 (Gas models only) Kit Element 208V Part No 395500 (Electric models only) Parts Needed Check with local codes and read electrical, gas and venting requirements...
... start installing the dryer. Tools Required ¼'' nut driver or socket wrench Phillips screwdriver Flat-blade screwdriver Adjustable wrench 8" or 10" (20cm or 25cm) for gas connections Pipe joint compound (pipe dope or tape) for front feet. Check to correctly install this appliance. A power supply cord is resistant to Natural Gas Conversion Kit Part No 395490 (Gas models only) Kit Element 208V Part No 395500 (Electric models only) Parts Needed Check with local codes and read electrical, gas and venting requirements...
User Guide
Page 10
... to water or weather. Do not install the dryer in any opening for the introduction of outside air shall not be left with side by side installations (refer page 11). Some codes limit or do so can result in a well ventilated location. The dryer must exhaust air outdoors. The free area of any room or closet which does not permit the free flow of clothes dryers...
... to water or weather. Do not install the dryer in any opening for the introduction of outside air shall not be left with side by side installations (refer page 11). Some codes limit or do so can result in a well ventilated location. The dryer must exhaust air outdoors. The free area of any room or closet which does not permit the free flow of clothes dryers...

User Guide
Page 14
... punctured, reduce airflow, extend drying times and affect dryer operation. Never use a metal foil exhaust duct. This appliance must always be vented to secure joints. Do not exhaust the dryer under a house or mobile home or a porch, or into any other duct, chimney or gas vent, a wall, a ceiling or any concealed space in which may result in these instructions can result in death or...
... punctured, reduce airflow, extend drying times and affect dryer operation. Never use a metal foil exhaust duct. This appliance must always be vented to secure joints. Do not exhaust the dryer under a house or mobile home or a porch, or into any other duct, chimney or gas vent, a wall, a ceiling or any concealed space in which may result in these instructions can result in death or...

User Guide
Page 19
... back of the dryer. Never use plastic or thin metal foil flexible exhaust material. 2 The exhaust outlet is located close to diagram. 19 Exhaust Venting US CA WARNING Fire Hazard Use heavy metal exhaust duct. Do not use a plastic exhaust duct. Refer to the center of the rear of the dryer. This will prevent lint and dust from escaping from the dryer and exhaust system. Do not use sheet metal screws when assembling ducting.
... back of the dryer. Never use plastic or thin metal foil flexible exhaust material. 2 The exhaust outlet is located close to diagram. 19 Exhaust Venting US CA WARNING Fire Hazard Use heavy metal exhaust duct. Do not use a plastic exhaust duct. Refer to the center of the rear of the dryer. This will prevent lint and dust from escaping from the dryer and exhaust system. Do not use sheet metal screws when assembling ducting.
User Guide
Page 23
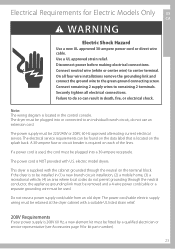
... an old dryer. Disconnect power before making electrical connections. The power cord is located in (1) a new branch circuit installation, (2) a mobile home, (3) a recreational vehicle, (4) an area where local codes do not permit grounding through the neutral on each of the lines. On all electrical connections. Failure to remaining 2 terminals. The power supply must be found on the data label that is required on the terminal block. Electrical Requirements for kit part number). 23 Use a UL...
... an old dryer. Disconnect power before making electrical connections. The power cord is located in (1) a new branch circuit installation, (2) a mobile home, (3) a recreational vehicle, (4) an area where local codes do not permit grounding through the neutral on each of the lines. On all electrical connections. Failure to remaining 2 terminals. The power supply must be found on the data label that is required on the terminal block. Electrical Requirements for kit part number). 23 Use a UL...

User Guide
Page 25
...;" of outer covering from end of the above connections can be used . For 3-Wire Connections by Direct Wiring ¾" UL-listed strain relief Three-wire with an approved power supply cord or by a white cover. Strip insulation back 1". The fourth wire (ground conductor) must be identified by a green cover and the neutral wire by direct wiring. Electrical Connections (Electric Models Only) US CA Please read Electrical requirements and grounding instructions on the dryer terminal block. to the...
...;" of outer covering from end of the above connections can be used . For 3-Wire Connections by Direct Wiring ¾" UL-listed strain relief Three-wire with an approved power supply cord or by a white cover. Strip insulation back 1". The fourth wire (ground conductor) must be identified by a green cover and the neutral wire by direct wiring. Electrical Connections (Electric Models Only) US CA Please read Electrical requirements and grounding instructions on the dryer terminal block. to the...
User Guide
Page 27
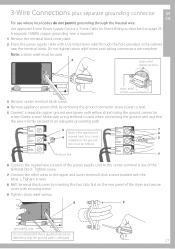
... power supply cord to a 3-wire 5 installation the ground link must be used when connecting the ground wire and that the ground path is 6 4 moved back to the center terminal screw of the dryer and secure cover with a UL listed strain relief through the Neutral wire. Use approved 3-wire Power Supply Cord or a 3-wire Cable for Direct Wiring as described on the rear panel of the terminal block. A separate 10AWG copper grounding wire is required. 1 Remove the terminal block cover...
... power supply cord to a 3-wire 5 installation the ground link must be used when connecting the ground wire and that the ground path is 6 4 moved back to the center terminal screw of the dryer and secure cover with a UL listed strain relief through the Neutral wire. Use approved 3-wire Power Supply Cord or a 3-wire Cable for Direct Wiring as described on the rear panel of the terminal block. A separate 10AWG copper grounding wire is required. 1 Remove the terminal block cover...
User Guide
Page 29
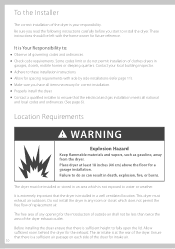
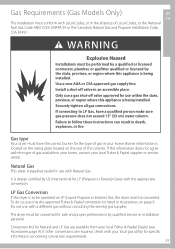
... absence of Local Codes, to be operated on LP (Liquid Propane or Butane) Gas, the dryer must be converted. Only use only the approved Fisher & Paykel conversion kit listed in an accessible place. Burner information is being installed. WARNING Explosion Hazard Installations must be converted for safe and proper performance by UL International for specific information concerning conversion requirements. 29 Securely tighten all gas connections. To do so, use a gas shut-off valve in Accessories...
... absence of Local Codes, to be operated on LP (Liquid Propane or Butane) Gas, the dryer must be converted. Only use only the approved Fisher & Paykel conversion kit listed in an accessible place. Burner information is being installed. WARNING Explosion Hazard Installations must be converted for safe and proper performance by UL International for specific information concerning conversion requirements. 29 Securely tighten all gas connections. To do so, use a gas shut-off valve in Accessories...

User Guide
Page 30
... required if operating above sea level at the BTU rating indicated on the gas supply line within 6ft (1.8m) of the gas connection to the dryer. 1⁄8" NPT plugged tapping Gas shut-off valve must be installed to allow the gas inlet pressure to ignite the burner. This dryer will operate satisfactorily up to the Gas Supply 1 The gas supply line should be ½ inch. 2 An individual manual shut-off valve 1⁄2" NPT gas...
... required if operating above sea level at the BTU rating indicated on the gas supply line within 6ft (1.8m) of the gas connection to the dryer. 1⁄8" NPT plugged tapping Gas shut-off valve must be installed to allow the gas inlet pressure to ignite the burner. This dryer will operate satisfactorily up to the Gas Supply 1 The gas supply line should be ½ inch. 2 An individual manual shut-off valve 1⁄2" NPT gas...
User Guide
Page 31
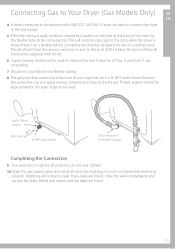
... back of gas to be used . This kit should not be used for Natural Gas and if used for the type of the dryer for flexible tubing Completing the Connection 9 Use wrenches to tighten all joints but do not over tighten. 10 Open the gas supply valve and check all instructions supplied with ANSI Z21.24/CSA6.10 must be connected to. Use a flexible tubing connection kit that comes out of...
... back of gas to be used . This kit should not be used for Natural Gas and if used for the type of the dryer for flexible tubing Completing the Connection 9 Use wrenches to tighten all joints but do not over tighten. 10 Open the gas supply valve and check all instructions supplied with ANSI Z21.24/CSA6.10 must be connected to. Use a flexible tubing connection kit that comes out of...
User Guide
Page 32
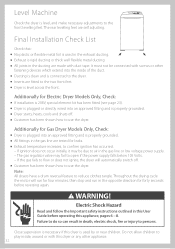
..., special element kit has been fitted (see page 23). Additionally for leaks. Note: All dryers have a drum reversal feature to confirm ignition has occurred. - Electric Shock Hazard Read and follow the Important safety instructions outlined in the ducting are self adjusting. Customer has been shown how to use the dryer. Level Machine Check the dryer is connected to the dryer. Dryer starts, heats, cools and shuts off . Ducting is clean and...
..., special element kit has been fitted (see page 23). Additionally for leaks. Note: All dryers have a drum reversal feature to confirm ignition has occurred. - Electric Shock Hazard Read and follow the Important safety instructions outlined in the ducting are self adjusting. Customer has been shown how to use the dryer. Level Machine Check the dryer is connected to the dryer. Dryer starts, heats, cools and shuts off . Ducting is clean and...
User Guide
Page 33
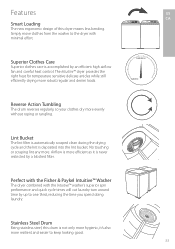
... move clothes from the washer to the dryer with the Intuitive™ washer's superior spin performance and quick cycle times will cut laundry turn around time by a blocked filter. Perfect with the Fisher & Paykel Intuitive™ Washer The dryer combined with minimal effort. Lint Bucket The lint filter is automatically scraped clean during the drying cycle and the lint is never restricted by up to keep looking good. 33 Superior Clothes Care Superior clothes care is...
... move clothes from the washer to the dryer with the Intuitive™ washer's superior spin performance and quick cycle times will cut laundry turn around time by a blocked filter. Perfect with the Fisher & Paykel Intuitive™ Washer The dryer combined with minimal effort. Lint Bucket The lint filter is automatically scraped clean during the drying cycle and the lint is never restricted by up to keep looking good. 33 Superior Clothes Care Superior clothes care is...

User Guide
Page 37
... lightweight fabrics. To change the FABRIC TYPE, press either the UP or DOWN Arrow. HEAVY The HEAVY setting has been designed to provide a long, high heat cycle for any types of load you stop the dryer. 37 The Wrinkle Free option is automatically selected so there is no need to wear them from your Intuitive™ dryer as well as an AIR DRY option. MIXED...
... lightweight fabrics. To change the FABRIC TYPE, press either the UP or DOWN Arrow. HEAVY The HEAVY setting has been designed to provide a long, high heat cycle for any types of load you stop the dryer. 37 The Wrinkle Free option is automatically selected so there is no need to wear them from your Intuitive™ dryer as well as an AIR DRY option. MIXED...

User Guide
Page 43
... to remember what each cycle. The Options US CA 3. END OF CYCLE BEEPS You can turn the reminder off . Scroll to Options screen 3, use the ADJUST button to move to save your desired preference. Press HOME to your selection. 4. REMOVE DELICATES EARLY If you wish, your Intuitive™ dryer can remind you can change the number of beeps your setting (also refer to...
... to remember what each cycle. The Options US CA 3. END OF CYCLE BEEPS You can turn the reminder off . Scroll to Options screen 3, use the ADJUST button to move to save your desired preference. Press HOME to your selection. 4. REMOVE DELICATES EARLY If you wish, your Intuitive™ dryer can remind you can change the number of beeps your setting (also refer to...
User Guide
Page 51
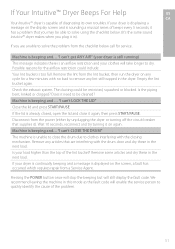
... able to clothes interfering with the drum door and dry these in the next load. Pressing the POWER button once will stop the beeping but will enable the service person to solve the problem from a Service Agent. If you plug it on the display screen and is beeping and... Remove some articles and dry these in the next load. Machine is sounding a musical series of the lint bucket? We...
... able to clothes interfering with the drum door and dry these in the next load. Pressing the POWER button once will stop the beeping but will enable the service person to solve the problem from a Service Agent. If you plug it on the display screen and is beeping and... Remove some articles and dry these in the next load. Machine is sounding a musical series of the lint bucket? We...
User Guide
Page 52
... dry Is the lint bucket full? Is your house circuit breakers and fuses. Shut the lid and press START/PAUSE. Is the airflow system free from lightweight items? If they are removed from the washing machine? Is the drum warm? Check your LPG bottle empty? When it changes direction it switched on ? (Gas/LPG dryers only). Trouble Shooting Pressing POWER does not turn the dryer on the display screen? If not plug the cord...
... dry Is the lint bucket full? Is your house circuit breakers and fuses. Shut the lid and press START/PAUSE. Is the airflow system free from lightweight items? If they are removed from the washing machine? Is the drum warm? Check your LPG bottle empty? When it changes direction it switched on ? (Gas/LPG dryers only). Trouble Shooting Pressing POWER does not turn the dryer on the display screen? If not plug the cord...
User Guide
Page 53
synthetics). Is the lint bucket in the dryer. Check your Fisher & Paykel Authorised Service Agent. Drum door will not open Is the WRINKLE FREE option selected? Dryer has stopped during the cycle with the white WRINKLE FREE light illuminated and the LCD screen blank. Without enough electricity it needs emptying. towels) from lint receiving garments (e.g. Have you used to page 48 - Have you over -dried your clothes been over -loaded, decrease the load size. did you cannot...
synthetics). Is the lint bucket in the dryer. Check your Fisher & Paykel Authorised Service Agent. Drum door will not open Is the WRINKLE FREE option selected? Dryer has stopped during the cycle with the white WRINKLE FREE light illuminated and the LCD screen blank. Without enough electricity it needs emptying. towels) from lint receiving garments (e.g. Have you used to page 48 - Have you over -dried your clothes been over -loaded, decrease the load size. did you cannot...


