
User Guide
Page 3
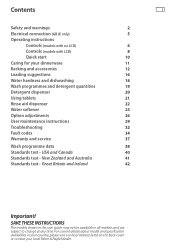
...Standards test - Great Britain and Ireland 42 Important! New Zealand and Australia 41 Standards test - SAVE THESE INSTRUCTIONS The models shown in this user guide may not be available in your country, please visit our local website listed on the ...1 Safety and warnings 2 Electrical connection (GB IE only) 5 Operating instructions Controls (models with no LCD) 6 Controls (models with LCD) 8 Quick start 10 Caring for your local Fisher & Paykel dealer. For current details about model and specification availability in all markets and are subject to change at any time.
...Standards test - Great Britain and Ireland 42 Important! New Zealand and Australia 41 Standards test - SAVE THESE INSTRUCTIONS The models shown in this user guide may not be available in your country, please visit our local website listed on the ...1 Safety and warnings 2 Electrical connection (GB IE only) 5 Operating instructions Controls (models with no LCD) 6 Controls (models with LCD) 8 Quick start 10 Caring for your local Fisher & Paykel dealer. For current details about model and specification availability in all markets and are subject to change at any time.
User Guide
Page 8
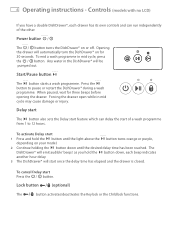
...® during a wash programme. Press the button to 12 hours. Any water in the DishDrawer® will automatically turn the DishDrawer® on your model. 2 Continue holding the button down , each drawer has its own controls and can delay the start 1 Press and hold the button until the desired ...delay time has been reached. To cancel Delay start once the delay time has elapsed and the drawer is closed. Controls (models with no LCD) If you hold the button down until the light above the button turns orange or purple, depending on for three beeps before...
...® during a wash programme. Press the button to 12 hours. Any water in the DishDrawer® will automatically turn the DishDrawer® on your model. 2 Continue holding the button down , each drawer has its own controls and can delay the start 1 Press and hold the button until the desired ...delay time has been reached. To cancel Delay start once the delay time has elapsed and the drawer is closed. Controls (models with no LCD) If you hold the button down until the light above the button turns orange or purple, depending on for three beeps before...

User Guide
Page 9
... is activated. The DishDrawer® will stop. Power failure If the DishDrawer® is on the DishDrawer®. The light above the / button disappears. Controls (models with no LCD) 7 Keylock The Keylock feature disables all the buttons.
... is activated. The DishDrawer® will stop. Power failure If the DishDrawer® is on the DishDrawer®. The light above the / button disappears. Controls (models with no LCD) 7 Keylock The Keylock feature disables all the buttons.
User Guide
Page 10
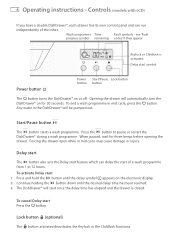
... the delay symbol appears on for three beeps before opening the drawer. To end a wash programme in mid cycle may cause damage or injury. Controls (models with LCD) If you have a double DishDrawer®, each drawer has its own control panel and can delay the start Press the button. Delay start...
... the delay symbol appears on for three beeps before opening the drawer. To end a wash programme in mid cycle may cause damage or injury. Controls (models with LCD) If you have a double DishDrawer®, each drawer has its own control panel and can delay the start Press the button. Delay start...
User Guide
Page 11
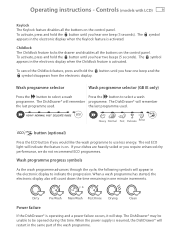
Controls (models with LCD) 9 Keylock The Keylock feature disables all the buttons on the control panel. the last programme used . Heavy Normal Fast Delicate Rinse / button (optional) ...
Controls (models with LCD) 9 Keylock The Keylock feature disables all the buttons on the control panel. the last programme used . Heavy Normal Fast Delicate Rinse / button (optional) ...
User Guide
Page 12
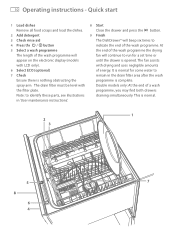
... Add detergent 3 Check rinse aid 4 Press the / button 5 Select a wash programme The length of the wash programme will appear on the electronic display (models with drying and uses negligible amounts of the wash programme. The fan assists with LCD only). 6 Select ECO (optional) 7 Check Ensure there is complete. ...Double models only: At the end of the wash programme the drying fan will beep six times to run for some water to remain in 'User maintenance...
... Add detergent 3 Check rinse aid 4 Press the / button 5 Select a wash programme The length of the wash programme will appear on the electronic display (models with drying and uses negligible amounts of the wash programme. The fan assists with LCD only). 6 Select ECO (optional) 7 Check Ensure there is complete. ...Double models only: At the end of the wash programme the drying fan will beep six times to run for some water to remain in 'User maintenance...

User Guide
Page 15
... container To optimise the cutlery space within the basket, the small items container can be enough water reaching items that are using tablets in these models would dissolve the tablet, reducing the cleaning power left for more information. The pre-wash cycle in USA and Canada... models. If laid flat, make sure the solid plastic side is best to leave the rack space directly above the container empty: there may not be ...
... container To optimise the cutlery space within the basket, the small items container can be enough water reaching items that are using tablets in these models would dissolve the tablet, reducing the cleaning power left for more information. The pre-wash cycle in USA and Canada... models. If laid flat, make sure the solid plastic side is best to leave the rack space directly above the container empty: there may not be ...

User Guide
Page 17
... that knife blades are facing down to fit larger dinner plates. Fold the racks away if you need the space. 1 2 3 Knife clip (supplied with some models only) This clips onto the adjustable racks and supports knives and other utensils during the wash. For optimum stability, place larger plates between the longer...
... that knife blades are facing down to fit larger dinner plates. Fold the racks away if you need the space. 1 2 3 Knife clip (supplied with some models only) This clips onto the adjustable racks and supports knives and other utensils during the wash. For optimum stability, place larger plates between the longer...
User Guide
Page 21
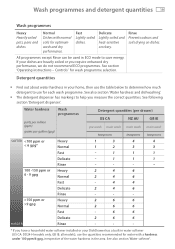
... in the area. See also section 'Water hardness and dishwashing'. All programmes except Rinse can be used in water softener (US CA: DD24-H models only, GB IE: all models), use for each wash programme. See following section 'Detergent dispenser'. See also section 'Water softener'. Delicate Lightly soiled and heat-sensitive crockery. Rinse...
... in the area. See also section 'Water hardness and dishwashing'. All programmes except Rinse can be used in water softener (US CA: DD24-H models only, GB IE: all models), use for each wash programme. See following section 'Detergent dispenser'. See also section 'Water softener'. Delicate Lightly soiled and heat-sensitive crockery. Rinse...
User Guide
Page 23
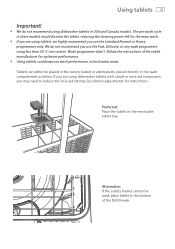
...either be used, place tablet in rinse aid component, you use the Fast, Delicate, or any wash programme using dishwasher tablets in these models would dissolve the tablet, reducing the cleaning power left for instructions. See 'Option adjustments' for the main wash. Using tablets 21 Important! ...The pre-wash cycle in USA and Canada models. Alternative: If the cutlery basket cannot be placed in the cutlery basket or alternatively, placed directly in hard water areas. If you are...
...either be used, place tablet in rinse aid component, you use the Fast, Delicate, or any wash programme using dishwasher tablets in these models would dissolve the tablet, reducing the cleaning power left for instructions. See 'Option adjustments' for the main wash. Using tablets 21 Important! ...The pre-wash cycle in USA and Canada models. Alternative: If the cutlery basket cannot be placed in the cutlery basket or alternatively, placed directly in hard water areas. If you are...
User Guide
Page 25
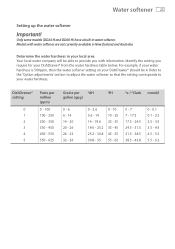
...the setting corresponds to your DishDrawer® should be able to provide you require for your DishDrawer® from the water hardness table below. Models with information. Identify the setting you with water softener are not currently available in water softener. For example, if your water hardness is 500ppm,... then the water softener setting on your water hardness. Only some models (DD24-H and DD60-H) have a built-in New Zealand and Australia. Water softener 23 Setting up the water softener Important!
...the setting corresponds to your DishDrawer® should be able to provide you require for your DishDrawer® from the water hardness table below. Models with information. Identify the setting you with water softener are not currently available in water softener. For example, if your water hardness is 500ppm,... then the water softener setting on your water hardness. Only some models (DD24-H and DD60-H) have a built-in New Zealand and Australia. Water softener 23 Setting up the water softener Important!

User Guide
Page 27
Models with granular salt made especially for the wash programme that will impair or diminish the life of cooking salt like table salt, rock salt or ...
Models with granular salt made especially for the wash programme that will impair or diminish the life of cooking salt like table salt, rock salt or ...

User Guide
Page 28
... display after a wash programme or if you cannot remember if they have been left in conjunction with the Closed drawer option. Clean dish indicator option (models with LCD only) By default, DishDrawer® is used in situations where household members regularly remove only a few clean dishes without emptying the drawer. End...
... display after a wash programme or if you cannot remember if they have been left in conjunction with the Closed drawer option. Clean dish indicator option (models with LCD only) By default, DishDrawer® is used in situations where household members regularly remove only a few clean dishes without emptying the drawer. End...

User Guide
Page 29
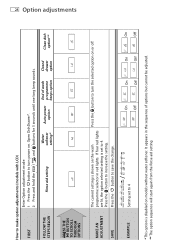
... power option purple / lit End of options but cannot be adjusted. ** The option sequence will start again from the Rinse aid setting. Press the on models without water softener. Open DishDrawer®. 2 Press and hold the / and / buttons for 5 seconds until one long beep sounds. Press the / button... setting. Press the / button to 4. If four red lights are lit, the option selected setting is shown on . How to make option adjustments (models with no LCD) FIRST Enter Option adjustment mode: 1 Press the / button to turn the selected option EXAMPLE / Setting set to save the change....
... power option purple / lit End of options but cannot be adjusted. ** The option sequence will start again from the Rinse aid setting. Press the on models without water softener. Open DishDrawer®. 2 Press and hold the / and / buttons for 5 seconds until one long beep sounds. Press the / button... setting. Press the / button to 4. If four red lights are lit, the option selected setting is shown on . How to make option adjustments (models with no LCD) FIRST Enter Option adjustment mode: 1 Press the / button to turn the selected option EXAMPLE / Setting set to save the change....
User Guide
Page 30
..., the option selected setting is set to 4 On On On On Off Off Off Off * This option is disabled on models without water softener. 28 Option adjustments How to make option adjustments (models with LCD) FIRST Enter Option adjustment mode: 1 Press the button to turn the selected option on or off. / Setting...
..., the option selected setting is set to 4 On On On On Off Off Off Off * This option is disabled on models without water softener. 28 Option adjustments How to make option adjustments (models with LCD) FIRST Enter Option adjustment mode: 1 Press the button to turn the selected option on or off. / Setting...

User Guide
Page 33
.... 14 Plug the DishDrawer back in or turn it on the motor assembly, as shown. (some 9 Orientate the filter plate and lower it into place: models only) make sure its kidney-shaped hole aligns with the matching recess in the DishDrawer base. 10 Ensure the filter plate lies flat in the... with each other and all three pin pairs firmly interlock, as shown. User maintenance instructions 31 To replace the filter plate and spray arm 8 Some models only: Before replacing the filter plate, ensure the O-ring is correctly O-ring positioned on at the power supply.
.... 14 Plug the DishDrawer back in or turn it on the motor assembly, as shown. (some 9 Orientate the filter plate and lower it into place: models only) make sure its kidney-shaped hole aligns with the matching recess in the DishDrawer base. 10 Ensure the filter plate lies flat in the... with each other and all three pin pairs firmly interlock, as shown. User maintenance instructions 31 To replace the filter plate and spray arm 8 Some models only: Before replacing the filter plate, ensure the O-ring is correctly O-ring positioned on at the power supply.

User Guide
Page 39
Fisher & Paykel Appliances Model Date of purchase Dealer Town Serial no. If after checking these points you still need assistance, please refer to the installation instructions and your user ...
Fisher & Paykel Appliances Model Date of purchase Dealer Town Serial no. If after checking these points you still need assistance, please refer to the installation instructions and your user ...
User Guide
Page 42
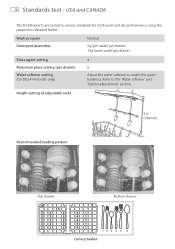
Refer to match the water hardness. USA and CANADA The DishDrawer®s are tested to various standards for DD24-H models only) 4 6 Adjust the water softener to the 'Water softener' and 'Option adjustments' section. Height setting of adjustable racks 5½" (140mm) Recommended loading pattern Top drawer 6 5 ...
Refer to match the water hardness. USA and CANADA The DishDrawer®s are tested to various standards for DD24-H models only) 4 6 Adjust the water softener to the 'Water softener' and 'Option adjustments' section. Height setting of adjustable racks 5½" (140mm) Recommended loading pattern Top drawer 6 5 ...

User Guide
Page 48
You should therefore check with your Dealer to the specific products and models described at any time. F&P PN - 590030 A 04.2010 Under our policy of continuous product improvement, these specifications may change at the date of issue. www.fisherpaykel.com www.fisherpaykel.ca www.fisherpaykel.co.nz www.fisherpaykel.com.au www.fisherpaykel.co.uk www.fisherpaykel.ie US CA NZ AU GB IE Copyright © Fisher & Paykel 2010. All rights reserved. The product specifications in this booklet apply to ensure this booklet correctly describes the product currently available.
You should therefore check with your Dealer to the specific products and models described at any time. F&P PN - 590030 A 04.2010 Under our policy of continuous product improvement, these specifications may change at the date of issue. www.fisherpaykel.com www.fisherpaykel.ca www.fisherpaykel.co.nz www.fisherpaykel.com.au www.fisherpaykel.co.uk www.fisherpaykel.ie US CA NZ AU GB IE Copyright © Fisher & Paykel 2010. All rights reserved. The product specifications in this booklet apply to ensure this booklet correctly describes the product currently available.

