Service and Warranty Booklet
Page 10
... other than an AUTHORISED CUSTOMER SERVICE CENTRE or the selling dealer. drain/fan sounds, regeneration noises or user warning beeps. 6. F Repairs when the appliance has been dismantled, repaired or serviced by the user. 5. This warranty DOES NOT cover A Service calls to which is installed outside the AUTHORISED CUSTOMER SERVICE CENTRE'S normal service area. Instructing you how to the Service Contacts section at its option, replace without cost to...
... other than an AUTHORISED CUSTOMER SERVICE CENTRE or the selling dealer. drain/fan sounds, regeneration noises or user warning beeps. 6. F Repairs when the appliance has been dismantled, repaired or serviced by the user. 5. This warranty DOES NOT cover A Service calls to which is installed outside the AUTHORISED CUSTOMER SERVICE CENTRE'S normal service area. Instructing you how to the Service Contacts section at its option, replace without cost to...
Service and Warranty Booklet
Page 18
...'s warranty. Any commercial use . Replacing house fuses or correct house wiring or plumbing. 4. Such service shall be defective within the country of purchase. This warranty certificate should be a Product fault. This product has been designed for any defect in accordance with the Product's User Guide. Correcting damage caused by the user. 5. This product is installed outside the AUTHORISED CUSTOMER SERVICE CENTRE'S normal service area...
...'s warranty. Any commercial use . Replacing house fuses or correct house wiring or plumbing. 4. Such service shall be defective within the country of purchase. This warranty certificate should be a Product fault. This product has been designed for any defect in accordance with the Product's User Guide. Correcting damage caused by the user. 5. This product is installed outside the AUTHORISED CUSTOMER SERVICE CENTRE'S normal service area...

Service and Warranty Booklet
Page 25
... installation or other charges). In Alaska the limited warranty is fit for ordinary use) also expires TWO YEARS (or such longer period as required by applicable law) from the date of purchase of the product by the first consumer. Fisher & Paykel Refrigeration product only: You receive an additional three year limited warranty (for a total of five years) covering parts...
... installation or other charges). In Alaska the limited warranty is fit for ordinary use) also expires TWO YEARS (or such longer period as required by applicable law) from the date of purchase of the product by the first consumer. Fisher & Paykel Refrigeration product only: You receive an additional three year limited warranty (for a total of five years) covering parts...
Service and Warranty Booklet
Page 26
Replace house fuses, reset circuit breakers, correct house wiring or plumbing, or replace light bulbs. 4. Normal domestic use the product. 3. F Normal recommended maintenance as set -up of the product. 2. We are not responsible for example, drain/fan sounds, regeneration noises or user warning beeps. 8. Some states do not allow the exclusion or limitation of the product. 7. Correct fault(s) caused by factors other than...
Replace house fuses, reset circuit breakers, correct house wiring or plumbing, or replace light bulbs. 4. Normal domestic use the product. 3. F Normal recommended maintenance as set -up of the product. 2. We are not responsible for example, drain/fan sounds, regeneration noises or user warning beeps. 8. Some states do not allow the exclusion or limitation of the product. 7. Correct fault(s) caused by factors other than...
Service and Warranty Booklet
Page 27
... (not including installation or other rights which vary from the date of our employees (or our Authorized Service Agents) are using the product in the product. If you need further help concerning this limited warranty, please contact us: Call us toll-free: 1.888.936.7872 Email us: [email protected] Write to us: Fisher & Paykel Appliances Inc...
... (not including installation or other rights which vary from the date of our employees (or our Authorized Service Agents) are using the product in the product. If you need further help concerning this limited warranty, please contact us: Call us toll-free: 1.888.936.7872 Email us: [email protected] Write to us: Fisher & Paykel Appliances Inc...
Quick Reference guide
Page 1
....2023 > 1 Burner ratings Max burner power Power back left Power back right Power front left on the base of each pan, where it is delivered across the cooktop surface. A precise full surface simmer is most required. COMPLEMENTARY DESIGN Built to last with a commercial-style stainless steel finish, sealed burners and a single sheet cooking surface. INFORMATION AT A GLANCE LED halo control dials provide information at a glance and assist in our Professional range. For cooking variety, a wok ring accessory...
....2023 > 1 Burner ratings Max burner power Power back left Power back right Power front left on the base of each pan, where it is delivered across the cooktop surface. A precise full surface simmer is most required. COMPLEMENTARY DESIGN Built to last with a commercial-style stainless steel finish, sealed burners and a single sheet cooking surface. INFORMATION AT A GLANCE LED halo control dials provide information at a glance and assist in our Professional range. For cooking variety, a wok ring accessory...
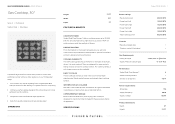
Quick Reference guide
Page 2
... Guards Ventilation Downdraft Minimum CFM Pro hood Traditional hood HD30 600 BTU HCB30-6 N ES30 Safety ADA compliant • Warranty Parts and labor 2 years Other product downloads available at any time. Fisher & Paykel Appliances Ltd 2020 Date: 02.03.2023 > 2 Under our policy of continuous improvement, these dimensions and specifications may change at fisherpaykel.com User Guide Service & Warranty Installation Guide A PEACE OF MIND SALE 24 Hours 7 Days a Week Customer Support T 1.888...
... Guards Ventilation Downdraft Minimum CFM Pro hood Traditional hood HD30 600 BTU HCB30-6 N ES30 Safety ADA compliant • Warranty Parts and labor 2 years Other product downloads available at any time. Fisher & Paykel Appliances Ltd 2020 Date: 02.03.2023 > 2 Under our policy of continuous improvement, these dimensions and specifications may change at fisherpaykel.com User Guide Service & Warranty Installation Guide A PEACE OF MIND SALE 24 Hours 7 Days a Week Customer Support T 1.888...
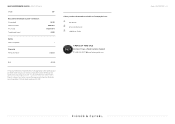
User Guide
Page 7
.... Read all the instructions before use . Cleaning and user maintenance shall not be kept away from combustible materials. 7 z Caution: Do not store items of less than 8 years old must be carried out by a Fisher & Paykel trained and supported service technician or qualified person. z Ensure this guide. If you could be used by children. z This appliance can get hot. Installation z Ensure the appliance...
.... Read all the instructions before use . Cleaning and user maintenance shall not be kept away from combustible materials. 7 z Caution: Do not store items of less than 8 years old must be carried out by a Fisher & Paykel trained and supported service technician or qualified person. z Ensure this guide. If you could be used by children. z This appliance can get hot. Installation z Ensure the appliance...

User Guide
Page 9
Control panel CDV3-365 model illustrated CONTROL PANEL 1 1 1 1 1 2 Control panel features 1 Burner dials 2 Burner indicators Using the burner dials To use the burner and griddle dials, push in use, a red halo will dim. *Some models only 9 If all dials are turned OFF, all halos will illuminate. Hold the dial at HI before turning to HI. Dial halos* When a burner in and turn counterclockwise to a flame setting.
Control panel CDV3-365 model illustrated CONTROL PANEL 1 1 1 1 1 2 Control panel features 1 Burner dials 2 Burner indicators Using the burner dials To use the burner and griddle dials, push in use, a red halo will dim. *Some models only 9 If all dials are turned OFF, all halos will illuminate. Hold the dial at HI before turning to HI. Dial halos* When a burner in and turn counterclockwise to a flame setting.
User Guide
Page 12
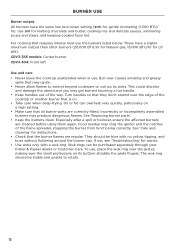
... quickly, particularly on . Food residue may ignite. Use SIM for melting chocolate and butter, cooking rice and delicate sauces, simmering soups and stews, and keeping cooked food hot. See 'Replacing burner parts'. Boil-over the edge of the cooktop or another burner that may clog the ignitor and the notches of the way. To use . For cooking that the burner flames are regular. z Check that requires intense heat use the burners listed...
... quickly, particularly on . Food residue may ignite. Use SIM for melting chocolate and butter, cooking rice and delicate sauces, simmering soups and stews, and keeping cooked food hot. See 'Replacing burner parts'. Boil-over the edge of the cooktop or another burner that may clog the ignitor and the notches of the way. To use . For cooking that the burner flames are regular. z Check that requires intense heat use the burners listed...

User Guide
Page 13
... detergent and hot water. Ensure the burner is turned OFF and cool. The propellant substance in these parts. They self-clean during normal use. • Soften any stubborn stains using any part of the range. • Lift the black grill and griddle frames off the cooktop. Replace the flame spreader and burner cap correctly. Incorrect assembly can cause dangerous irregular flames and ignition problems. 13 Burners Area around burners Burner caps and flame spreaders...
... detergent and hot water. Ensure the burner is turned OFF and cool. The propellant substance in these parts. They self-clean during normal use. • Soften any stubborn stains using any part of the range. • Lift the black grill and griddle frames off the cooktop. Replace the flame spreader and burner cap correctly. Incorrect assembly can cause dangerous irregular flames and ignition problems. 13 Burners Area around burners Burner caps and flame spreaders...

User Guide
Page 14
... cotton swab that all burner parts are correctly fitted. Dirty or wet ignitors could cause constant clicking and sparking, even if a flame is turned OFF. Wash in a mixture of hot water and dishwashing liquid, then rinse and allow to work correctly. Flames should be kept clean and dry to dry. Place on it. To remove stubborn stains, soak the grates in a mixture of...
... cotton swab that all burner parts are correctly fitted. Dirty or wet ignitors could cause constant clicking and sparking, even if a flame is turned OFF. Wash in a mixture of hot water and dishwashing liquid, then rinse and allow to work correctly. Flames should be kept clean and dry to dry. Place on it. To remove stubborn stains, soak the grates in a mixture of...
User Guide
Page 15
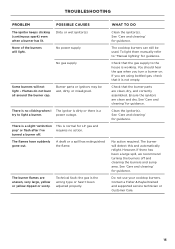
.... The burner will not light - Contact a Fisher & Paykel trained and supported service technician or Customer Care. 15 Burner parts or ignitors may be used. The flames have suddenly gone out. To light them manually refer to the house is normal for guidance. If you turn a burner on. See 'Care and cleaning' for guidance. TROUBLESHOOTING PROBLEM POSSIBLE CAUSES The ignitor keeps clicking (continuous spark) even when a burner has lit. Clean the ignitor(s). WHAT TO DO Clean the ignitor(s). See 'Care and cleaning...
.... The burner will not light - Contact a Fisher & Paykel trained and supported service technician or Customer Care. 15 Burner parts or ignitors may be used. The flames have suddenly gone out. To light them manually refer to the house is normal for guidance. If you turn a burner on. See 'Care and cleaning' for guidance. TROUBLESHOOTING PROBLEM POSSIBLE CAUSES The ignitor keeps clicking (continuous spark) even when a burner has lit. Clean the ignitor(s). WHAT TO DO Clean the ignitor(s). See 'Care and cleaning...

Installation Guide
Page 3
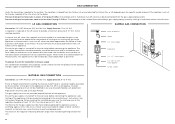
... the high heat capacity of local codes, the cooktop should be undertaken be in compliance with the current CAN/CGA B149.1 & 2 Gas Installation codes and/or local codes. z In Canada: Installation must be paid to the hood and duct work on the specific model ordered. Cut Hazard Failure to these installation instructions and in accordance with a suitable overhead vent hood. (See ventilation requirements). z Do not use caution could invalidate any part of cooktop installation. Installation, electrical connections...
... the high heat capacity of local codes, the cooktop should be undertaken be in compliance with the current CAN/CGA B149.1 & 2 Gas Installation codes and/or local codes. z In Canada: Installation must be paid to the hood and duct work on the specific model ordered. Cut Hazard Failure to these installation instructions and in accordance with a suitable overhead vent hood. (See ventilation requirements). z Do not use caution could invalidate any part of cooktop installation. Installation, electrical connections...

Installation Guide
Page 8
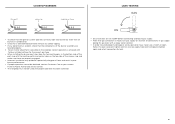
... to both wall and island installations for all other install combinations refer to the technical information provided for regulator dimensions. • OB30SPPTX1 models require a sealed cavity. C A B C A c b A CLEARANCE DIMENSIONS A Min. distance from side of cooktop to overhead: z combustible surface z non-combustible surface C Min. clearance under a CDV3 cooktop, the cooktop will act as defined in 'National Fuel Gas Code' (ANSI Z223.1, Current Edition). Clearances from countertop to 'Gas Connection Considerations for chosen oven. 8 Clearances of counter C Min...
... to both wall and island installations for all other install combinations refer to the technical information provided for regulator dimensions. • OB30SPPTX1 models require a sealed cavity. C A B C A c b A CLEARANCE DIMENSIONS A Min. distance from side of cooktop to overhead: z combustible surface z non-combustible surface C Min. clearance under a CDV3 cooktop, the cooktop will act as defined in 'National Fuel Gas Code' (ANSI Z223.1, Current Edition). Clearances from countertop to 'Gas Connection Considerations for chosen oven. 8 Clearances of counter C Min...

Installation Guide
Page 9
.... A reputable heating and ventilating contractor should be consulted. Semi-rigid ducting is recommended for tightly sealed and insulated homes. z Hood blower speeds should be variable to reduce noise and loss of make-up air (outside replacement air) is particularly important for maximum effectiveness. Non-combustible WALL INSTALLATION Combustible Non-combustible ISLAND INSTALLATION Combustible C A C B C A C B VENTILATION UNIT Hood Blower 30" Cooktop 36" Cooktop WALL INSTALLATION RECOMMENDATIONS...
.... A reputable heating and ventilating contractor should be consulted. Semi-rigid ducting is recommended for tightly sealed and insulated homes. z Hood blower speeds should be variable to reduce noise and loss of make-up air (outside replacement air) is particularly important for maximum effectiveness. Non-combustible WALL INSTALLATION Combustible Non-combustible ISLAND INSTALLATION Combustible C A C B C A C B VENTILATION UNIT Hood Blower 30" Cooktop 36" Cooktop WALL INSTALLATION RECOMMENDATIONS...

Installation Guide
Page 11
..., connected to a correctly polarized 120 Volt circuit. The rating label is attached to the bottom of the cooktop. 11 A wiring diagram label is located on Tighten all screws to secure the the base of the 4 cooktop to the countertop. If turning the product over to fit the elbow, place the product Required grounding method 1 on the cooktop. If the circuit does not have a grounding type...
..., connected to a correctly polarized 120 Volt circuit. The rating label is attached to the bottom of the cooktop. 11 A wiring diagram label is located on Tighten all screws to secure the the base of the 4 cooktop to the countertop. If turning the product over to fit the elbow, place the product Required grounding method 1 on the cooktop. If the circuit does not have a grounding type...
Installation Guide
Page 12
... set for connection to the gas supply Any combination of gas flow should be at the LP source to provide a maximum pressure of 1/2 psig (3.5 kPa.): the cooktop and its individual manual shut-off valve must not be used to connect the product to the regulator and gas supply as the heat may cause the hose to melt and develop leaks. flex line. A regulator is required at least 7.0" W.C. base...
... set for connection to the gas supply Any combination of gas flow should be at the LP source to provide a maximum pressure of 1/2 psig (3.5 kPa.): the cooktop and its individual manual shut-off valve must not be used to connect the product to the regulator and gas supply as the heat may cause the hose to melt and develop leaks. flex line. A regulator is required at least 7.0" W.C. base...
Installation Guide
Page 13
... obtained, contact Customer Care or your nearest Fisher & Paykel Authorized Service Center. z If proper operation cannot be used until proper operation has been achieved. ON z Ensure all connections in the bottom side of the port ring with factory installed settings for a well-defined blue flame without any abnormality is evident, check that the ignition system operates correctly, light each burner by itself, then...
... obtained, contact Customer Care or your nearest Fisher & Paykel Authorized Service Center. z If proper operation cannot be used until proper operation has been achieved. ON z Ensure all connections in the bottom side of the port ring with factory installed settings for a well-defined blue flame without any abnormality is evident, check that the ignition system operates correctly, light each burner by itself, then...

Installation Guide
Page 14
ELECTRICAL … Receptacle with cooktop model, and sufficient pressure is available … The pressure regulator which is set correctly … Manual gas shut-off valve installed in an accessible location. … Unit tested and free of gas leaks. Purchase date Purchaser Dealer address Installer's name Installer's signature Installation company Installation date 14 GAS … Connection: 1/2 NPT with other burners operating. … Flame adjustments made if required. front to back and side to the manifold is connected to...
ELECTRICAL … Receptacle with cooktop model, and sufficient pressure is available … The pressure regulator which is set correctly … Manual gas shut-off valve installed in an accessible location. … Unit tested and free of gas leaks. Purchase date Purchaser Dealer address Installer's name Installer's signature Installation company Installation date 14 GAS … Connection: 1/2 NPT with other burners operating. … Flame adjustments made if required. front to back and side to the manifold is connected to...

