Quick Start Guide
Page 1
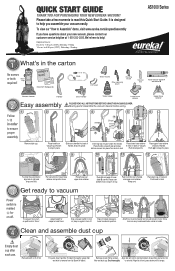
... Safeguards Turbo nozzle Extra belt Filter cleaning brush Dusting brush Crevice tool WAND 1 WAND 2 A B Hose release wand A and wand B Vacuum cleaner Handle 2STEP Easy assembly 1 2 Follow 1-12 in place. Place over upper hose retainer. Rinse screen, Align tab with slot to turn air path knob to snap into position. Dry thoroughly. Assemble the vacuum cleaner before using. 3 4 5 B Snap! slide B over A. Step on back of lower hose retainer and position hose. QUICK START GUIDE THANK YOU FOR PURCHASING YOUR NEW EUREKA VACUUM! Place lower hose retainer...
... Safeguards Turbo nozzle Extra belt Filter cleaning brush Dusting brush Crevice tool WAND 1 WAND 2 A B Hose release wand A and wand B Vacuum cleaner Handle 2STEP Easy assembly 1 2 Follow 1-12 in place. Place over upper hose retainer. Rinse screen, Align tab with slot to turn air path knob to snap into position. Dry thoroughly. Assemble the vacuum cleaner before using. 3 4 5 B Snap! slide B over A. Step on back of lower hose retainer and position hose. QUICK START GUIDE THANK YOU FOR PURCHASING YOUR NEW EUREKA VACUUM! Place lower hose retainer...

Owner's Guide
Page 2
... register your new Eureka vacuum cleaner for assembly and use accessories 3 2-position wand, crevice tool, dusting brush, turbo nozzle, bare floor nozzle, and stair hose. For instructions regarding any shipping damage, call Eureka Customer Service HELPLINE 1-800-282-2886 immediately. How to use . How to clear a blockage. Where to find important vacuum information Keep this symbol. Refer to Quick Start Guide for shipping damage. Inspection: Carefully unpack and inspect your product visit www.eureka.com and...
... register your new Eureka vacuum cleaner for assembly and use accessories 3 2-position wand, crevice tool, dusting brush, turbo nozzle, bare floor nozzle, and stair hose. For instructions regarding any shipping damage, call Eureka Customer Service HELPLINE 1-800-282-2886 immediately. How to use . How to clear a blockage. Where to find important vacuum information Keep this symbol. Refer to Quick Start Guide for shipping damage. Inspection: Carefully unpack and inspect your product visit www.eureka.com and...

Owner's Guide
Page 3
... electrical cord when not in use outdoors or on floor with the handle in a cool, dry area. • Keep your work area well lighted. • Unplug electrical appliances before vacuuming them. • Unplug before connecting turbo nozzle. Place vacuum cleaner on wet surfaces. ! • Do not leave vacuum cleaner when plugged in a polarized outlet only one blade is not working as cigarettes, matches, or hot ashes. • Do not use without dust cup, filter...
... electrical cord when not in use outdoors or on floor with the handle in a cool, dry area. • Keep your work area well lighted. • Unplug electrical appliances before vacuuming them. • Unplug before connecting turbo nozzle. Place vacuum cleaner on wet surfaces. ! • Do not leave vacuum cleaner when plugged in a polarized outlet only one blade is not working as cigarettes, matches, or hot ashes. • Do not use without dust cup, filter...

Owner's Guide
Page 4
...models) Filter and screen (located inside dust cup) Dust cup Exhaust/HEPA filter compartment (located behind dust cup) Height adjustment knob Brush roll cover Turbo cover Turbo nozzle Hose Crevice tool Power switch Handle release Upper cord retainer Upper hose retainer Dusting brush Carry handle and cord wrap Lower cord retainer (on carry handle) Wand Power cord Quick release cord wrap Lower hose retainer Base hose Maintenance schedule Maintenance Schedule is noticeably declining Brush roll Remove dust cup. Shake dust from lid. Check filter regularly. Empty after each use Filter...
...models) Filter and screen (located inside dust cup) Dust cup Exhaust/HEPA filter compartment (located behind dust cup) Height adjustment knob Brush roll cover Turbo cover Turbo nozzle Hose Crevice tool Power switch Handle release Upper cord retainer Upper hose retainer Dusting brush Carry handle and cord wrap Lower cord retainer (on carry handle) Wand Power cord Quick release cord wrap Lower hose retainer Base hose Maintenance schedule Maintenance Schedule is noticeably declining Brush roll Remove dust cup. Shake dust from lid. Check filter regularly. Empty after each use Filter...

Owner's Guide
Page 5
... using tools. Brush roll will continue to turn when vacuum is turned on and handle is below you, pushed against the bottom step. 1) Attach stair hose to end of hose or wand. 2) Attach turbo nozzle to 'tools.' Do not tilt vacuum forward while using accessories. Attach tool to highest carpet setting. TOOLS FLOORS Crevice tool Use for furniture and stairs. Bare floor nozzle and wand (with some models or available for purchase) Use for purchase) Make sure vacuum is in upright position to 2) Turn air...
... using tools. Brush roll will continue to turn when vacuum is turned on and handle is below you, pushed against the bottom step. 1) Attach stair hose to end of hose or wand. 2) Attach turbo nozzle to 'tools.' Do not tilt vacuum forward while using accessories. Attach tool to highest carpet setting. TOOLS FLOORS Crevice tool Use for furniture and stairs. Bare floor nozzle and wand (with some models or available for purchase) Use for purchase) Make sure vacuum is in upright position to 2) Turn air...

Owner's Guide
Page 6
... replace brush roll or belt • Step on left end of base hose. Fig. 3 Fig. 4 • Rotate brush roll 2 turns to loosen any blockage (Fig.1). • Remove dust cup. Flex the hose to center belt. • Replace brush roll cover (Fig. 3). • Replace 4 screws (Fig. 6). Maintain brush roll Motor pulley can become hot with normal use. Do not remove end caps. ! Use finger to check for debris (Fig 2). • Base hose - Thread new belt around motor shaft and brush roll...
... replace brush roll or belt • Step on left end of base hose. Fig. 3 Fig. 4 • Rotate brush roll 2 turns to loosen any blockage (Fig.1). • Remove dust cup. Flex the hose to center belt. • Replace brush roll cover (Fig. 3). • Replace 4 screws (Fig. 6). Maintain brush roll Motor pulley can become hot with normal use. Do not remove end caps. ! Use finger to check for debris (Fig 2). • Base hose - Thread new belt around motor shaft and brush roll...

Owner's Guide
Page 7
... Obtaining warranty service outside your community You must return the vacuum or vacuum part along with your purchase or use of the vacuum. Your relief for the breach of this warranty. Some states do not allow the exclusion or limitation of incidental or consequential damages, so the above . under normal use such as disposable dust bags, filters, drive belts, light bulbs, brush roll, bristles, impellers and cleaning. •...
... Obtaining warranty service outside your community You must return the vacuum or vacuum part along with your purchase or use of the vacuum. Your relief for the breach of this warranty. Some states do not allow the exclusion or limitation of incidental or consequential damages, so the above . under normal use such as disposable dust bags, filters, drive belts, light bulbs, brush roll, bristles, impellers and cleaning. •...

Owner's Guide
Page 8
... service helpline. Problem Motor will not turn (on power switch to turn selector knob to 'tools.' • Adjust knob to a higher position. • Replace a worn, cut -off Dust cup and filter No suction at least 30 minutes before attempting to page 2 for debris. Cause Power plug Solution • Push plug securely into hose retainer. Air path selector Belt Hose Bare floor setting Carpet height setting Dust cup and filter Air path selector Hose Turbo nozzle will not turn . brush roll will not start. Page 4 • Remove clogs...
... service helpline. Problem Motor will not turn (on power switch to turn selector knob to 'tools.' • Adjust knob to a higher position. • Replace a worn, cut -off Dust cup and filter No suction at least 30 minutes before attempting to page 2 for debris. Cause Power plug Solution • Push plug securely into hose retainer. Air path selector Belt Hose Bare floor setting Carpet height setting Dust cup and filter Air path selector Hose Turbo nozzle will not turn . brush roll will not start. Page 4 • Remove clogs...


