
User Manual
Page 5
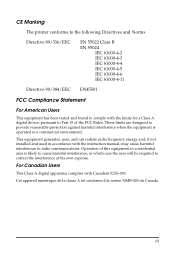
... expense. For Canadian Users This Class A digital apparatus complies with the instruction manual, may cause harmful interference to radio communications. iii This equipment generates, uses, and can radiate radio frequency energy and, if not installed and used in accordance with Canadian ICES-003. CE Marking The printer conforms to the following Directives and Norms Directive 89/336/EEC EN...
... expense. For Canadian Users This Class A digital apparatus complies with the instruction manual, may cause harmful interference to radio communications. iii This equipment generates, uses, and can radiate radio frequency energy and, if not installed and used in accordance with Canadian ICES-003. CE Marking The printer conforms to the following Directives and Norms Directive 89/336/EEC EN...

User Manual
Page 7
... check printing pattern. Ct Movable platen for slip paper. a Two validation/slip paper entrances: from above for validation paper and from the front for easy paper insertion. Q ASB (Automatic Status Back) function that automatically transmits printer status changes. Cl EPSON display module series connection (for two drawers. About This Manual Setting up , setting the DIP switches, and adjusting the paper near end detector. CI Chapter 2 contains information on using...
... check printing pattern. Ct Movable platen for slip paper. a Two validation/slip paper entrances: from above for validation paper and from the front for easy paper insertion. Q ASB (Automatic Status Back) function that automatically transmits printer status changes. Cl EPSON display module series connection (for two drawers. About This Manual Setting up , setting the DIP switches, and adjusting the paper near end detector. CI Chapter 2 contains information on using...
User Manual
Page 9
... self-test with validation paper l-19 Setting the DIP Switches l-20 TM-U375 DIP-switch functions l-21 TM-U375P DIP-switch functions l-22 Adjusting the Paper Roll End Sensing Position l-23 Using the Power Switch Cover l-25 Chapter 2 Using the Printer Operating the Control Panel 2-2 Buttons 2-2 Indicator lights 2-2 Slip Paper Handling 2-4 Validation Paper Handling 2-4 Replacing the Paper Roll 2-5 Replacing the Ribbon Cassette 2-6 Removing the ribbon cassette 2-7 Installing the ribbon cassette 2-8 Aerosol sprayer caution 2-9 vii
... self-test with validation paper l-19 Setting the DIP Switches l-20 TM-U375 DIP-switch functions l-21 TM-U375P DIP-switch functions l-22 Adjusting the Paper Roll End Sensing Position l-23 Using the Power Switch Cover l-25 Chapter 2 Using the Printer Operating the Control Panel 2-2 Buttons 2-2 Indicator lights 2-2 Slip Paper Handling 2-4 Validation Paper Handling 2-4 Replacing the Paper Roll 2-5 Replacing the Ribbon Cassette 2-6 Removing the ribbon cassette 2-7 Installing the ribbon cassette 2-8 Aerosol sprayer caution 2-9 vii
User Manual
Page 10
... Troubleshooting 3-2 General problems 3-2 Printing problems 3-2 Paper handling problems 3-4 Hexadecimal Dumping 3-6 Starting hexadecimal dumping 3-6 Ending hexadecimal dumping 3-7 Chapter 4 Reference Information Printing Specifications 4-2 Character Specifications 4-2 Paper Specifications 4-3 Electrical Specifications 4-6 Safety and EMI Standards Applied 4-6 Safety Standarsd s 4-6 Electrostatic Protection (measured based on the IEC801-2 test conditions) . 4-6 Reliability 4-6 Environmental Specifications 4-7 Interface Specifications 4-8 Printing on Cut Sheets 4-8 Example print...
... Troubleshooting 3-2 General problems 3-2 Printing problems 3-2 Paper handling problems 3-4 Hexadecimal Dumping 3-6 Starting hexadecimal dumping 3-6 Ending hexadecimal dumping 3-7 Chapter 4 Reference Information Printing Specifications 4-2 Character Specifications 4-2 Paper Specifications 4-3 Electrical Specifications 4-6 Safety and EMI Standards Applied 4-6 Safety Standarsd s 4-6 Electrostatic Protection (measured based on the IEC801-2 test conditions) . 4-6 Reliability 4-6 Environmental Specifications 4-7 Interface Specifications 4-8 Printing on Cut Sheets 4-8 Example print...
User Manual
Page 14
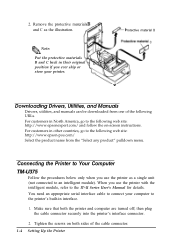
...: http://www.epson-pos.com/ Select the product name from one of the cable connector. 1-4 Setting Up the Printer Tighten the screws on -screen instructions. When you ever ship or store your computer to the IT-U Series User's Manual for details. 2. Protective material B C Downloading Drivers, Utilities, and Manuals Drivers, utilities, and manuals can be downloaded from the "Select any product" pulldown menu. then plug the cable connector securely into...
...: http://www.epson-pos.com/ Select the product name from one of the cable connector. 1-4 Setting Up the Printer Tighten the screws on -screen instructions. When you ever ship or store your computer to the IT-U Series User's Manual for details. 2. Protective material B C Downloading Drivers, Utilities, and Manuals Drivers, utilities, and manuals can be downloaded from the "Select any product" pulldown menu. then plug the cable connector securely into...

User Manual
Page 25
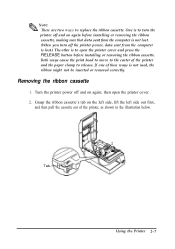
Repeat steps 2, 3 and 4 above to remove the ribbon cassette, grasp the cassette's tab on the left side, lift the left side out first, and then pull the cassette out of the printer. Make sure that the ribbon is not installed correctly, to install the ribbon cassette again. Tab Setting Up the Printer 1 - 1 5 Print head * Note: Q3.l If the ribbon is installed between the print head and the ribbon mask without wrinkles or creases, as shown below. 2 or 3 more times Knob 4.
Repeat steps 2, 3 and 4 above to remove the ribbon cassette, grasp the cassette's tab on the left side, lift the left side out first, and then pull the cassette out of the printer. Make sure that the ribbon is not installed correctly, to install the ribbon cassette again. Tab Setting Up the Printer 1 - 1 5 Print head * Note: Q3.l If the ribbon is installed between the print head and the ribbon mask without wrinkles or creases, as shown below. 2 or 3 more times Knob 4.
User Manual
Page 28
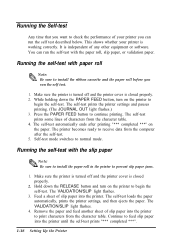
... mode switches to feed slip paper into the printer until the self-test prints "*** completed ***". 1-18 Setting Up the Printer The VALIDATION/SLIP light flashes. 4. Make sure the printer is turned off and the printer cover is closed properly. 2. Feed a sheet of slip paper into the printer to print characters from the computer after printing "*** completed ***" on the printer to begin the self-test. Hold down the PAPER FEED button, turn on the paper. Remove the paper...
... mode switches to feed slip paper into the printer until the self-test prints "*** completed ***". 1-18 Setting Up the Printer The VALIDATION/SLIP light flashes. 4. Make sure the printer is turned off and the printer cover is closed properly. 2. Feed a sheet of slip paper into the printer to print characters from the computer after printing "*** completed ***" on the printer to begin the self-test. Hold down the PAPER FEED button, turn on the paper. Remove the paper...
User Manual
Page 29
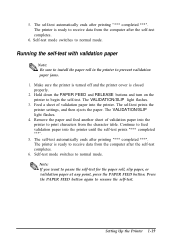
... the printer to feed validation paper into the printer. Remove the paper and feed another sheet of validation paper into the printer until the self-test prints "*** completed ***". 5. Make sure the printer is turned off and the printer cover is closed properly. 2. The self-test automatically ends after printing "*** completed ***". The self-test prints the printer settings, and then ejects the paper. Continue to prevent validation paper jams. 1. The VALIDATION/SLIP light flashes. 4. 5. Feed a sheet...
... the printer to feed validation paper into the printer. Remove the paper and feed another sheet of validation paper into the printer until the self-test prints "*** completed ***". 5. Make sure the printer is turned off and the printer cover is closed properly. 2. The self-test automatically ends after printing "*** completed ***". The self-test prints the printer settings, and then ejects the paper. Continue to prevent validation paper jams. 1. The VALIDATION/SLIP light flashes. 4. 5. Feed a sheet...
User Manual
Page 31
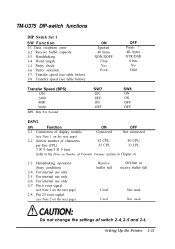
... ON OFF 2-l Connection of display module Connected Not connected (see Note 1 on the next page) 2-2 Selects number of characters 42 CPL/ 40 CPU per line (CPL) 35 CPL 33 CPL 7 X 9 font/5 X 9 font (refer to the Notes on Number of Printable Columns section in Chapter 4) 2-3 Handshaking operation (busy condition) 2-4 For internal use only. 2-5 For internal use only. 2-6 For internal use only. 2-7 Pin 6 reset signal (see Note 2 on...
... ON OFF 2-l Connection of display module Connected Not connected (see Note 1 on the next page) 2-2 Selects number of characters 42 CPL/ 40 CPU per line (CPL) 35 CPL 33 CPL 7 X 9 font/5 X 9 font (refer to the Notes on Number of Printable Columns section in Chapter 4) 2-3 Handshaking operation (busy condition) 2-4 For internal use only. 2-5 For internal use only. 2-6 For internal use only. 2-7 Pin 6 reset signal (see Note 2 on...
User Manual
Page 32
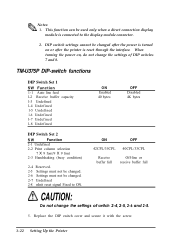
... Function 2-1 Undefined 2-2 Print column selection 7 X 9 font/9 X 9 font 2-3 Handshaking (busy condition) 2-4 Reserved. 2-5 Settings must not be changed. 2-6 Settings must not be changed after the power is turned on , do not change the settings of DIP switches 7 and 8. DIP switch settings cannot be used only when a direct connection display module is reset through the interface. When turning the power on or after the printer is connected to ON. * Notes: Qh 1. Replace the DIP...
... Function 2-1 Undefined 2-2 Print column selection 7 X 9 font/9 X 9 font 2-3 Handshaking (busy condition) 2-4 Reserved. 2-5 Settings must not be changed. 2-6 Settings must not be changed after the power is turned on , do not change the settings of DIP switches 7 and 8. DIP switch settings cannot be used only when a direct connection display module is reset through the interface. When turning the power on or after the printer is connected to ON. * Notes: Qh 1. Replace the DIP...

User Manual
Page 33
...printer cover and remove the take-up spool. 2. Setting Up the Printer 1-23 Adjusting the Paper Roll End Sensing Position The paper near end detector detects when the paper is almost gone by measuring the diameter of the paper roll core is almost gone. If you want to stop printing when the paper...work properly. 1. Then measure the distance A shown in the illustration below to adjust the paper near end detector. , Note: % If the inner diameter of the paper roll. Software programs can use the ESC c 4 command to change the amount of paper remaining when the printer stops printing,...
...printer cover and remove the take-up spool. 2. Setting Up the Printer 1-23 Adjusting the Paper Roll End Sensing Position The paper near end detector detects when the paper is almost gone by measuring the diameter of the paper roll core is almost gone. If you want to stop printing when the paper...work properly. 1. Then measure the distance A shown in the illustration below to adjust the paper near end detector. , Note: % If the inner diameter of the paper roll. Software programs can use the ESC c 4 command to change the amount of paper remaining when the printer stops printing,...
User Manual
Page 38
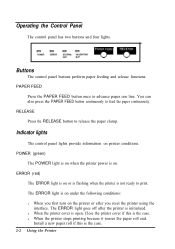
... turn on the printer or after you reset the printer using the interface. l When the printer cover is the case. Close the printer cover if this is on when the printer power is the case. 2-2 Using the Printer Install a new paper roll if this is open. POWER (green) The POWER light is on . ERROR (red) The ERROR light is on printer conditions. Operating the Control Panel The control panel has two buttons and four lights. PAPER FEED...
... turn on the printer or after you reset the printer using the interface. l When the printer cover is the case. Close the printer cover if this is on when the printer power is the case. 2-2 Using the Printer Install a new paper roll if this is open. POWER (green) The POWER light is on . ERROR (red) The ERROR light is on printer conditions. Operating the Control Panel The control panel has two buttons and four lights. PAPER FEED...
User Manual
Page 41
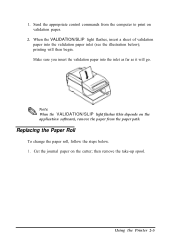
... VALIDATION/SLIP light flashes, insert a sheet of validation paper into the inlet as far as it will then begin. then remove the take-up spool. printing will go. * Note: Qb When the VALIDATION/SLIP light flashes (this depends on the cutter; Replacing the Paper Roll To change the paper roll, follow the steps below ); 1. Send the appropriate control commands from the paper path. Using the Printer 2-5
... VALIDATION/SLIP light flashes, insert a sheet of validation paper into the inlet as far as it will then begin. then remove the take-up spool. printing will go. * Note: Qb When the VALIDATION/SLIP light flashes (this depends on the cutter; Replacing the Paper Roll To change the paper roll, follow the steps below ); 1. Send the appropriate control commands from the paper path. Using the Printer 2-5
User Manual
Page 43
... the RELEASE button before installing or removing the ribbon cassette. Turn the printer power off and on again before installing or removing the ribbon cassette, making sure that data sent from the computer is not lost. (When you turn the printer off the printer power, data sent from the computer is lost.) The other is not used, the ribbon might not be inserted or removed correctly. Using the Printer 2-7 Both ways cause the print head to move...
... the RELEASE button before installing or removing the ribbon cassette. Turn the printer power off and on again before installing or removing the ribbon cassette, making sure that data sent from the computer is not lost. (When you turn the printer off the printer power, data sent from the computer is lost.) The other is not used, the ribbon might not be inserted or removed correctly. Using the Printer 2-7 Both ways cause the print head to move...
User Manual
Page 48
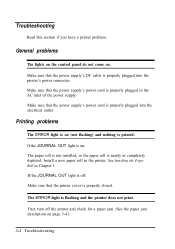
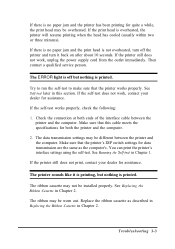
... power supply. Printing problems The ERROR light is on : The paper roll is not installed, or the paper roll is nearly or completely depleted. Install a new paper roll in Chapter 1. If the JOURNAL OUT light is off the printer and check for a paper jam. (See the paper jam description on . First, turn off : Make sure that the power supply's power cord is printed. Make sure that the power supply's DC cable is flashing and the printer does not print. The ERROR light is properly plugged...
... power supply. Printing problems The ERROR light is on : The paper roll is not installed, or the paper roll is nearly or completely depleted. Install a new paper roll in Chapter 1. If the JOURNAL OUT light is off the printer and check for a paper jam. (See the paper jam description on . First, turn off : Make sure that the power supply's power cord is printed. Make sure that the power supply's DC cable is flashing and the printer does not print. The ERROR light is properly plugged...
User Manual
Page 49
... the same as described in Replacing the Ribbon Cassette in this cable meets the specifications for assistance. Troubleshooting 3-3 The ERROR light is off the printer and turn off but nothing is printed. If the self-test does not work , unplug the power supply cord from the outlet immediately. Make sure that this section. The data transmission settings may be different between the printer and the computer. If the...
... the same as described in Replacing the Ribbon Cassette in this cable meets the specifications for assistance. Troubleshooting 3-3 The ERROR light is off the printer and turn off but nothing is printed. If the self-test does not work , unplug the power supply cord from the outlet immediately. Make sure that this section. The data transmission settings may be different between the printer and the computer. If the...
User Manual
Page 52
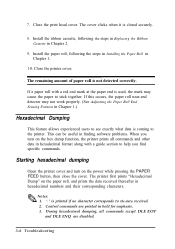
..., all commands and other data in hexadecimal numbers and their corresponding characters. , Notes: Q&L 1. If a paper roll with a guide section to stick together. The printer first prints "Hexadecimal Dump" on the power while pressing the PAPER FEED button, then close the cover. Install the paper roll, following the steps in Replacing the Ribbon Cassette in Chapter 1. 10. Install the ribbon cassette, following the steps in Installing the Paper Roll in Chapter 2. 9. Close...
..., all commands and other data in hexadecimal numbers and their corresponding characters. , Notes: Q&L 1. If a paper roll with a guide section to stick together. The printer first prints "Hexadecimal Dump" on the power while pressing the PAPER FEED button, then close the cover. Install the paper roll, following the steps in Replacing the Ribbon Cassette in Chapter 1. 10. Install the ribbon cassette, following the steps in Installing the Paper Roll in Chapter 2. 9. Close...

User Manual
Page 61
...: Package: Epson standard package Height: 60 cm (23.62") Directions: 1 corner, 3 edges, and 6 surfaces No external or internal damage should be damaged after it (for all 4 edges). Environmental Specifications Temperature: Operating: 5° to 40°C (41° to 104°F) Storage: - 10° to 50°C (14° to 122°F) (excluding paper and ribbon) Humidity: Operating: 20...
...: Package: Epson standard package Height: 60 cm (23.62") Directions: 1 corner, 3 edges, and 6 surfaces No external or internal damage should be damaged after it (for all 4 edges). Environmental Specifications Temperature: Operating: 5° to 40°C (41° to 104°F) Storage: - 10° to 50°C (14° to 122°F) (excluding paper and ribbon) Humidity: Operating: 20...
User Manual
Page 62
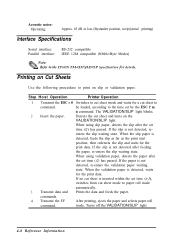
...-enters the validation paper waiting state. The VALIDATION/SLIP light blinks. 2 Insert the paper. When the slip paper is inserted within the set by the ESC f m n command. If no cut sheet mode to paper roll mode automatically. 3 Transmit data and Prints the data and feeds the paper. be loaded, according to print on the VALIDATION/SLIP light. Acoustic noise: Operating: Approx. 65 dB or less (Bystander position, receipt/journal printing) Interface Specifications Serial interface: RS...
...-enters the validation paper waiting state. The VALIDATION/SLIP light blinks. 2 Insert the paper. When the slip paper is inserted within the set by the ESC f m n command. If no cut sheet mode to paper roll mode automatically. 3 Transmit data and Prints the data and feeds the paper. be loaded, according to print on the VALIDATION/SLIP light. Acoustic noise: Operating: Approx. 65 dB or less (Bystander position, receipt/journal printing) Interface Specifications Serial interface: RS...
User Manual
Page 65
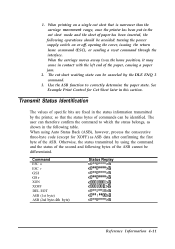
... status transmitted by using Auto Status Back (ASB), however, process the consecutive three-byte code (except for Cut Sheet later in the following operations should be identified. The cut sheet mode and the sheet of the paper, causing a paper jam. 2. See Example Print Control for XOFF) as shown in this section. 1. The user can be avoided: turning the power supply switch on a single cut sheet that...
... status transmitted by using Auto Status Back (ASB), however, process the consecutive three-byte code (except for Cut Sheet later in the following operations should be identified. The cut sheet mode and the sheet of the paper, causing a paper jam. 2. See Example Print Control for XOFF) as shown in this section. 1. The user can be avoided: turning the power supply switch on a single cut sheet that...
