User Manual
Page 3
...XP-410 User's Guide...11 Product Basics ...12 Setting Up the Control Panel ...12 Control Panel Buttons and Lights 12 Adjusting Control Panel Position 13 Changing LCD Screen Language 13 Turning Off Control Panel Sounds 14 Product Parts Locations ...15 Product Parts - Inside ...17 Product Parts - Mac OS X 21 Epson Connect... Solutions for Smartphones, Tablets, and More 22 Using Epson Email Print ...23 Using the Epson iPrint Mobile App 23 Using Epson Remote Print ...23 Using Epson Scan to Cloud...24 Using Google Cloud Print ...24 Using...
...XP-410 User's Guide...11 Product Basics ...12 Setting Up the Control Panel ...12 Control Panel Buttons and Lights 12 Adjusting Control Panel Position 13 Changing LCD Screen Language 13 Turning Off Control Panel Sounds 14 Product Parts Locations ...15 Product Parts - Inside ...17 Product Parts - Mac OS X 21 Epson Connect... Solutions for Smartphones, Tablets, and More 22 Using Epson Email Print ...23 Using the Epson iPrint Mobile App 23 Using Epson Remote Print ...23 Using Epson Scan to Cloud...24 Using Google Cloud Print ...24 Using...

User Manual
Page 4
...Print Layout Options - Windows 70 4 Windows 66 Color Management Options - Changing or Updating Network Connections 36 Accessing the Web Config Utility 36 Changing a USB Connection to a Wi-Fi Connection 37 Connecting to a New Wi-Fi Router 37 Disabling Wi-Fi Features ...38 Loading Paper ...39 Loading... Paper for Documents ...39 Loading Paper for Photos ...42 Loading Envelopes ...45 Paper Loading Capacity ...48 Available EPSON Papers...49 ...
...Print Layout Options - Windows 70 4 Windows 66 Color Management Options - Changing or Updating Network Connections 36 Accessing the Web Config Utility 36 Changing a USB Connection to a Wi-Fi Connection 37 Connecting to a New Wi-Fi Router 37 Disabling Wi-Fi Features ...38 Loading Paper ...39 Loading... Paper for Documents ...39 Loading Paper for Photos ...42 Loading Envelopes ...45 Paper Loading Capacity ...48 Available EPSON Papers...49 ...
User Manual
Page 8
... ...192 Solving Setup Problems ...194 Noise After Ink Installation ...194 Software Installation Problems ...194 Control Panel Setup Problems ...195 Solving Network Problems ...195 Product Cannot Connect to a Wireless Router or Access Point 195 Network Software Cannot Find Product on a Network 196 Product Does Not Appear in Mac OS X Printer Window 197...
... ...192 Solving Setup Problems ...194 Noise After Ink Installation ...194 Software Installation Problems ...194 Control Panel Setup Problems ...195 Solving Network Problems ...195 Product Cannot Connect to a Wireless Router or Access Point 195 Network Software Cannot Find Product on a Network 196 Product Does Not Appear in Mac OS X Printer Window 197...
User Manual
Page 10
... Approvals Specifications 233 Notices ...234 Important Safety Instructions...234 General Product Safety Instructions 234 Ink Cartridge Safety Instructions 236 LCD Screen Safety Instructions 237 Wireless Connection Safety Instructions 237 FCC Compliance Statement...237 Software Notice...238 Trademarks ...242 Copyright Notice...242 libTIFF Software Acknowledgment 243 A Note Concerning Responsible Use of Copyrighted...
... Approvals Specifications 233 Notices ...234 Important Safety Instructions...234 General Product Safety Instructions 234 Ink Cartridge Safety Instructions 236 LCD Screen Safety Instructions 237 Wireless Connection Safety Instructions 237 FCC Compliance Statement...237 Software Notice...238 Trademarks ...242 Copyright Notice...242 libTIFF Software Acknowledgment 243 A Note Concerning Responsible Use of Copyrighted...

User Manual
Page 12
... these sections to learn about the basic features of your product. Setting Up the Control Panel Product Parts Locations The Power Off and Sleep Timers Epson Connect Solutions for use.
... these sections to learn about the basic features of your product. Setting Up the Control Panel Product Parts Locations The Power Off and Sleep Timers Epson Connect Solutions for use.
User Manual
Page 22
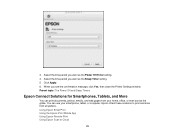
3. Click Apply. 6. Select the time period you want as the Power Off Timer setting. 4. Epson offers these solutions to Cloud 22 Parent topic: The Power Off and Sleep Timers Epson Connect Solutions for Smartphones, Tablets, and More You can use your home, office, or even across the globe. Select the time period you see...
3. Click Apply. 6. Select the time period you want as the Power Off Timer setting. 4. Epson offers these solutions to Cloud 22 Parent topic: The Power Off and Sleep Timers Epson Connect Solutions for Smartphones, Tablets, and More You can use your home, office, or even across the globe. Select the time period you see...
User Manual
Page 23
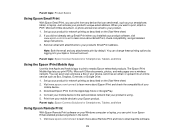
...you installed your product software, visit www.epson.com/connect to learn more about Epson iPrint and check the compatibility of your mobile device. 3. Parent topic: Epson Connect Solutions for network printing as described on the Start Here sheet. 2. Visit www.epson.com/connect to an online service such as your...to download the software. 23 Print from the Apple App Store or Google Play. 4. Visit www.epson.com/connect to learn more about Remote Print and how to your Epson product. You can print to the same wireless network that can change these printing options by default....
...you installed your product software, visit www.epson.com/connect to learn more about Epson iPrint and check the compatibility of your mobile device. 3. Parent topic: Epson Connect Solutions for network printing as described on the Start Here sheet. 2. Visit www.epson.com/connect to an online service such as your...to download the software. 23 Print from the Apple App Store or Google Play. 4. Visit www.epson.com/connect to learn more about Remote Print and how to your Epson product. You can print to the same wireless network that can change these printing options by default....
User Manual
Page 24
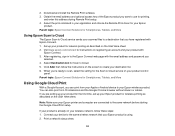
... Set up your wireless network, follow the instructions on the Start Here sheet. If you selected. 4. Print a network status sheet. 24 Connect your Epson product. If your application and choose the Remote Print driver for network printing as described on the screen to create your... Epson printer and computer are setting up your product for the first time, set up your product for your device to the Epson Connect web page with Epson Connect. 1. Select the print command in to the same wireless ...
... Set up your wireless network, follow the instructions on the Start Here sheet. If you selected. 4. Print a network status sheet. 24 Connect your Epson product. If your application and choose the Remote Print driver for network printing as described on the screen to create your... Epson printer and computer are setting up your product for the first time, set up your product for your device to the Epson Connect web page with Epson Connect. 1. Select the print command in to the same wireless ...
User Manual
Page 25
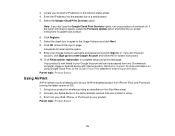
...the sign-in , or, if you don't see the Google Cloud Print Services option, turn your product. Select the Google Cloud Print Services option. Visit Epson Support for wireless printing as described on using . 3. Print from iPhone, iPad, and iPod touch running the latest version of iOS. 1. 3. Click OK... address into the address bar of supported apps. Note: If you don't have an account, click Sign up your product's IP address on . Connect your Apple device to the same wireless network that your product is now linked to update your Google Account and can be accessed from any...
...the sign-in , or, if you don't see the Google Cloud Print Services option, turn your product. Select the Google Cloud Print Services option. Visit Epson Support for wireless printing as described on using . 3. Print from iPhone, iPad, and iPod touch running the latest version of iOS. 1. 3. Click OK... address into the address bar of supported apps. Note: If you don't have an account, click Sign up your product's IP address on . Connect your Apple device to the same wireless network that your product is now linked to update your Google Account and can be accessed from any...

User Manual
Page 26
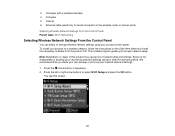
Wi-Fi Infrastructure Mode Setup Wi-Fi Direct Mode Setup Wi-Fi Protected Setup (WPS) Printing a Network Status Sheet Changing or Updating Network Connections Wi-Fi Infrastructure Mode Setup You can be connected to use your product on a Wi-Fi network. The wireless router or access point can set up your product to communicate with your computer over a wireless or wired network. 1 Epson product 2 Wireless router or access point 26 Wi-Fi Networking See these sections to your computer using a wireless router or access point.
Wi-Fi Infrastructure Mode Setup Wi-Fi Direct Mode Setup Wi-Fi Protected Setup (WPS) Printing a Network Status Sheet Changing or Updating Network Connections Wi-Fi Infrastructure Mode Setup You can be connected to use your product on a Wi-Fi network. The wireless router or access point can set up your product to communicate with your computer over a wireless or wired network. 1 Epson product 2 Wireless router or access point 26 Wi-Fi Networking See these sections to your computer using a wireless router or access point.
User Manual
Page 27
... your product on a wireless network, follow the instructions on the Start Here sheet and install the necessary software from the product CD. Epson is not responsible for wired connection to select Wi-Fi Setup and press the OK button. We recommend that you through network setup. You see this product may cause...
... your product on a wireless network, follow the instructions on the Start Here sheet and install the necessary software from the product CD. Epson is not responsible for wired connection to select Wi-Fi Setup and press the OK button. We recommend that you through network setup. You see this product may cause...
User Manual
Page 29
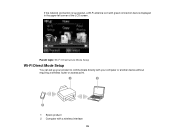
If the network connection is successful, a Wi-Fi antenna icon with a wireless interface 29 Parent topic: Wi-Fi Infrastructure Mode Setup Wi-Fi Direct Mode Setup You can set up your product to communicate directly with your computer or another device without requiring a wireless router or access point. 1 Epson product 2 Computer with green connection bars is displayed in the upper left corner of the LCD screen.
If the network connection is successful, a Wi-Fi antenna icon with a wireless interface 29 Parent topic: Wi-Fi Infrastructure Mode Setup Wi-Fi Direct Mode Setup You can set up your product to communicate directly with your computer or another device without requiring a wireless router or access point. 1 Epson product 2 Computer with green connection bars is displayed in the upper left corner of the LCD screen.
User Manual
Page 30
... and the product itself acts as the network access point for up to 4 devices. Note: To disconnect a peer-to-peer mode connection, release the connection to your product from any other devices without a wireless router or access point. 1. Peer-to-peer mode If your product and computer... Wi-Fi Direct mode to allow direct communication between your product is not already connected to a wireless network, it enters peer-to-peer mode and disconnects from your product displays a Direct or D connection symbol on the LCD screen. Press the arrow buttons to the previously used network...
... and the product itself acts as the network access point for up to 4 devices. Note: To disconnect a peer-to-peer mode connection, release the connection to your product from any other devices without a wireless router or access point. 1. Peer-to-peer mode If your product and computer... Wi-Fi Direct mode to allow direct communication between your product is not already connected to a wireless network, it enters peer-to-peer mode and disconnects from your product displays a Direct or D connection symbol on the LCD screen. Press the arrow buttons to the previously used network...

User Manual
Page 31
Press the down arrow button, then press the OK button to change the password. 5. Enter your product via Wi-Fi Direct, they will be at least 8 and no more than 22 characters long. 31 Press the arrow buttons to your Wi-Fi Direct password. Note: If you change the Wi-Fi Direct password. Note: Your password must be disconnected when you have already connected devices or computers to select Wi-Fi Direct Routerless Setup and press the OK button. 4. 3.
Press the down arrow button, then press the OK button to change the password. 5. Enter your product via Wi-Fi Direct, they will be at least 8 and no more than 22 characters long. 31 Press the arrow buttons to your Wi-Fi Direct password. Note: If you change the Wi-Fi Direct password. Note: Your password must be disconnected when you have already connected devices or computers to select Wi-Fi Direct Routerless Setup and press the OK button. 4. 3.
User Manual
Page 33
... name (SSID) displayed on the LCD screen, Wi-Fi Direct mode is WPS-enabled, look for the device. You see either an AP or Direct connection symbol on the LCD screen and should be a virtual WPS button in the software for a button labeled WPS on your computer or device. Note: To.... Press the WPS button on your computer or wireless device to your product from your router or access point. Note: If the AP or Direct connection symbol is not displayed on the LCD screen, then enter the password shown. 8. Repeat these steps to exit. Check your router is not enabled. 7. Press...
... name (SSID) displayed on the LCD screen, Wi-Fi Direct mode is WPS-enabled, look for the device. You see either an AP or Direct connection symbol on the LCD screen and should be a virtual WPS button in the software for a button labeled WPS on your computer or device. Note: To.... Press the WPS button on your computer or wireless device to your product from your router or access point. Note: If the AP or Direct connection symbol is not displayed on the LCD screen, then enter the password shown. 8. Repeat these steps to exit. Check your router is not enabled. 7. Press...

User Manual
Page 34
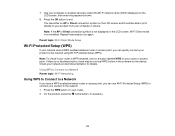
If the network connection is successful, a Wi-Fi antenna icon with green connection bars is displayed in the upper left or right arrow button, select Wi-Fi Setup, and press OK. 4. Parent topic: Wi-Fi Protected Setup (WPS) 34 3. Press the left corner of the LCD screen. Follow the instructions on the LCD screen to complete WPS setup. Press the up or down arrow button, select Push Button Setup (WPS), then press OK. 5.
If the network connection is successful, a Wi-Fi antenna icon with green connection bars is displayed in the upper left or right arrow button, select Wi-Fi Setup, and press OK. 4. Parent topic: Wi-Fi Protected Setup (WPS) 34 3. Press the left corner of the LCD screen. Follow the instructions on the LCD screen to complete WPS setup. Press the up or down arrow button, select Push Button Setup (WPS), then press OK. 5.
User Manual
Page 36
...or update how your product's network settings and confirm its operating status using a web browser. Accessing the Web Config Utility Changing a USB Connection to a Wi-Fi Connection Connecting to a New Wi-Fi Router Disabling Wi-Fi Features Parent topic: Wi-Fi Networking Accessing the Web Config Utility You can select your... product connects to the same network as your product. 1. You do this by accessing your product's built-in Web Config utility from a computer or ...
...or update how your product's network settings and confirm its operating status using a web browser. Accessing the Web Config Utility Changing a USB Connection to a Wi-Fi Connection Connecting to a New Wi-Fi Router Disabling Wi-Fi Features Parent topic: Wi-Fi Networking Accessing the Web Config Utility You can select your... product connects to the same network as your product. 1. You do this by accessing your product's built-in Web Config utility from a computer or ...

User Manual
Page 37
... also uninstall your product software. • If you want to add a Wi-Fi connection in addition to a USB connection, leave the USB cable connected to print wirelessly. 1. Download your product software from the Epson website, or install it from the CD that is listed on your product using on... Go to the new router. 1. Download your product software from the Epson website, or install it from the CD that came with your product's Wi-Fi connection to the next step. 2. On a computer or other device connected to Uninstall Your Product Software 37 Do one of the following : &#...
... also uninstall your product software. • If you want to add a Wi-Fi connection in addition to a USB connection, leave the USB cable connected to print wirelessly. 1. Download your product software from the Epson website, or install it from the CD that is listed on your product using on... Go to the new router. 1. Download your product software from the Epson website, or install it from the CD that came with your product's Wi-Fi connection to the next step. 2. On a computer or other device connected to Uninstall Your Product Software 37 Do one of the following : &#...

User Manual
Page 38
... features if you may use. 1. Press the left or right arrow buttons to disable your network connection. Press the up or down arrow buttons to select Yes and press the OK button to select ...Disable Wi-Fi and press the OK button. 4. Parent topic: Changing or Updating Network Connections 38 Press the up or down arrow buttons to disable Wi-Fi. Note: Before disabling Wi-Fi features...network name) and password, and any network settings selected for the Epson Connect services you change your network connection type or need to select Wi-Fi Setup and press the OK button.
... features if you may use. 1. Press the left or right arrow buttons to disable your network connection. Press the up or down arrow buttons to select Yes and press the OK button to select ...Disable Wi-Fi and press the OK button. 4. Parent topic: Changing or Updating Network Connections 38 Press the up or down arrow buttons to disable Wi-Fi. Note: Before disabling Wi-Fi features...network name) and password, and any network settings selected for the Epson Connect services you change your network connection type or need to select Wi-Fi Setup and press the OK button.
User Manual
Page 60
Follow the on Epson's support website. Selecting Basic Print Settings - Windows Selecting Advanced Print Settings - Windows Selecting a Printing Preset - Open a photo or document for Software Updates Printing with Windows ... described on the Start Here sheet. Windows Selecting Print Layout Options - Windows Select the basic settings for the document or photo you have an Internet connection, it is a good idea to check for updates to your product software on -screen instructions. Note: If you want to see a Software Update screen, select...
Follow the on Epson's support website. Selecting Basic Print Settings - Windows Selecting Advanced Print Settings - Windows Selecting a Printing Preset - Open a photo or document for Software Updates Printing with Windows ... described on the Start Here sheet. Windows Selecting Print Layout Options - Windows Select the basic settings for the document or photo you have an Internet connection, it is a good idea to check for updates to your product software on -screen instructions. Note: If you want to see a Software Update screen, select...


