User Manual
Page 7
... (Auto Answer 195 Receiving Faxes Manually...195 Using Memory Cards With Your Product 197 Inserting a Memory Card ...197 Memory Card Types ...198 Memory Card File Specifications 198 Removing a Memory Card...199 Printing from a Connected Telephone 186 Broadcasting a Fax ...187 Fax Sending Options ...189 Sending Faxes Using the Fax Utility - Fax Report...
... (Auto Answer 195 Receiving Faxes Manually...195 Using Memory Cards With Your Product 197 Inserting a Memory Card ...197 Memory Card Types ...198 Memory Card File Specifications 198 Removing a Memory Card...199 Printing from a Connected Telephone 186 Broadcasting a Fax ...187 Fax Sending Options ...189 Sending Faxes Using the Fax Utility - Fax Report...
User Manual
Page 8
... Computer 211 Using an External Device with Your Product 213 Printing from a USB Flash Drive or External Device 218 USB Device File Specifications 218 Connecting and Using a USB Flash Drive or External Device 218 Charging a USB Device Using Your Product 219 Printing Personalized Projects...Screen 224 Checking Cartridge and Maintenance Box Status With Windows 225 Checking Cartridge and Maintenance Box Status With Mac OS X 228 Purchase Epson Ink Cartridges and Maintenance Box 229 Ink Cartridge and Maintenance Box Part Numbers 229 Removing and Installing Ink Cartridges 230 8 Printing ...
... Computer 211 Using an External Device with Your Product 213 Printing from a USB Flash Drive or External Device 218 USB Device File Specifications 218 Connecting and Using a USB Flash Drive or External Device 218 Charging a USB Device Using Your Product 219 Printing Personalized Projects...Screen 224 Checking Cartridge and Maintenance Box Status With Windows 225 Checking Cartridge and Maintenance Box Status With Mac OS X 228 Purchase Epson Ink Cartridges and Maintenance Box 229 Ink Cartridge and Maintenance Box Part Numbers 229 Removing and Installing Ink Cartridges 230 8 Printing ...
User Manual
Page 11
... X 304 Where to Uninstall Your Product Software 303 Uninstalling Product Software - Windows 303 Uninstalling Product Software - Scanning Software Does Not Operate Correctly 295 Cannot Start Epson Scan ...295 Solving Scanned Image Quality Problems 296 Image Consists of a Few Dots Only 297 Line of Dots Appears in All Scanned Images 297 Straight... Card 302 Cannot Transfer Photos To or From a Memory Card 302 Cannot Access Memory Card From a Networked Mac 303 When to Get Help...305 Technical Specifications ...307 Windows System Requirements ...307 Mac System Requirements ...308 Printing...
... X 304 Where to Uninstall Your Product Software 303 Uninstalling Product Software - Windows 303 Uninstalling Product Software - Scanning Software Does Not Operate Correctly 295 Cannot Start Epson Scan ...295 Solving Scanned Image Quality Problems 296 Image Consists of a Few Dots Only 297 Line of Dots Appears in All Scanned Images 297 Straight... Card 302 Cannot Transfer Photos To or From a Memory Card 302 Cannot Access Memory Card From a Networked Mac 303 When to Get Help...305 Technical Specifications ...307 Windows System Requirements ...307 Mac System Requirements ...308 Printing...
User Manual
Page 12
... Specifications ...314 Interface Specifications ...314 External USB Device Specifications 315 Memory Card Specifications ...315 Network Interface Specifications ...316 Safety and Approvals Specifications 317 Notices ...318 FCC Compliance Statement...318 Software Notice...320 Trademarks ...323 Copyright Notice...323 libTIFF Software Acknowledgment 324 A Note Concerning Responsible Use of Copyrighted Materials 324 Default Delay Times for Power Management for Epson...
... Specifications ...314 Interface Specifications ...314 External USB Device Specifications 315 Memory Card Specifications ...315 Network Interface Specifications ...316 Safety and Approvals Specifications 317 Notices ...318 FCC Compliance Statement...318 Software Notice...320 Trademarks ...323 Copyright Notice...323 libTIFF Software Acknowledgment 324 A Note Concerning Responsible Use of Copyrighted Materials 324 Default Delay Times for Power Management for Epson...

User Manual
Page 54
Slide the ADF edge guide outward. 2. Caution: Make sure your stack of originals and tap them . Make sure the originals meet the Automatic Document Feeder specifications before loading them gently on a flat surface to even the edges. 54 Fan your originals are not creased or folded, and do not contain holes, staples, tape, or other materials that could obstruct the feeder. 1. Related topics Copying Faxing Scanning Placing Originals in the Automatic Document Feeder You can place multi-page original documents in the Automatic Document Feeder (ADF).
Slide the ADF edge guide outward. 2. Caution: Make sure your stack of originals and tap them . Make sure the originals meet the Automatic Document Feeder specifications before loading them gently on a flat surface to even the edges. 54 Fan your originals are not creased or folded, and do not contain holes, staples, tape, or other materials that could obstruct the feeder. 1. Related topics Copying Faxing Scanning Placing Originals in the Automatic Document Feeder You can place multi-page original documents in the Automatic Document Feeder (ADF).

User Manual
Page 56
Parent topic: Placing Originals on the Product Related references Automatic Document Feeder (ADF) Specifications Related topics Copying Faxing Scanning 56
Parent topic: Placing Originals on the Product Related references Automatic Document Feeder (ADF) Specifications Related topics Copying Faxing Scanning 56
User Manual
Page 74
... size of the your document or photo as the Output Paper setting. • Select the Zoom to option to customize your document or photo by a specific percentage. Select any of the available options in the % menu. 2. Custom Color Correction Options - Windows Image Options and Additional Settings - Windows You can select any...
... size of the your document or photo as the Output Paper setting. • Select the Zoom to option to customize your document or photo by a specific percentage. Select any of the available options in the % menu. 2. Custom Color Correction Options - Windows Image Options and Additional Settings - Windows You can select any...

User Manual
Page 85
Select the Paper Source you wish to print from the pop-up menu. 7. Select Print Settings from . 85 Select any application-specific settings that appear on the screen, such as those shown in the image above for the Preview application. 8. You see these settings: 9.
Select the Paper Source you wish to print from the pop-up menu. 7. Select Print Settings from . 85 Select any application-specific settings that appear on the screen, such as those shown in the image above for the Preview application. 8. You see these settings: 9.

User Manual
Page 110
Office Mode You can select the entire image area or a portion of different areas. You can select a specific area in your product for double-sided scanning. Document Table Selects the scanner glass as the location where the originals are placed on your scanned ... placed on your preview image to click inside the scan area before selecting the settings. 110 You can even select multiple scan areas to select specific Image Adjustments settings for a scanned image. ADF -
Office Mode You can select the entire image area or a portion of different areas. You can select a specific area in your product for double-sided scanning. Document Table Selects the scanner glass as the location where the originals are placed on your scanned ... placed on your preview image to click inside the scan area before selecting the settings. 110 You can even select multiple scan areas to select specific Image Adjustments settings for a scanned image. ADF -

User Manual
Page 115
... Image Preview Guidelines Scan Resolution Guidelines Selecting a Scan Area - Epson Scan previews your scanned image. Select any of different areas (Normal Preview mode only). 115 You can select the entire image area or a portion of the image adjustment settings you can select a specific area in a separate Preview window. 7. You see the file...
... Image Preview Guidelines Scan Resolution Guidelines Selecting a Scan Area - Epson Scan previews your scanned image. Select any of different areas (Normal Preview mode only). 115 You can select the entire image area or a portion of the image adjustment settings you can select a specific area in a separate Preview window. 7. You see the file...

User Manual
Page 116
Just be sure to select specific Image Adjustments settings for a scanned image. Do one corner of the following to select your cursor in the Preview image: • Thumbnail preview: Your scan area is selected automatically, but you can also use the scan area to click inside the scan area before selecting the settings. 1. You can change it. Place your scan area in one of the desired scan area, then click and drag the cursor to the opposite corner to create a marquee (dotted line) on the preview image. 116
Just be sure to select specific Image Adjustments settings for a scanned image. Do one corner of the following to select your cursor in the Preview image: • Thumbnail preview: Your scan area is selected automatically, but you can also use the scan area to click inside the scan area before selecting the settings. 1. You can change it. Place your scan area in one of the desired scan area, then click and drag the cursor to the opposite corner to create a marquee (dotted line) on the preview image. 116

User Manual
Page 119
...and line art are delineated, improving text recognition in OCR (Optical Character Recognition) programs. Parent topic: Scanning in the correct proportions. 1. In the Epson Scan window, select the size you need to be from photos that size on your image as a common photo size like 4 × 6 inches.... Click the Preview button to help crop the image in Home Mode Selecting a Scan Size - Home Mode You can also select a specific scan size, such as you can use it to preview your originals automatically. Dust Removal Removes dust marks from the graphics. Contrast Adjusts ...
...and line art are delineated, improving text recognition in OCR (Optical Character Recognition) programs. Parent topic: Scanning in the correct proportions. 1. In the Epson Scan window, select the size you need to be from photos that size on your image as a common photo size like 4 × 6 inches.... Click the Preview button to help crop the image in Home Mode Selecting a Scan Size - Home Mode You can also select a specific scan size, such as you can use it to preview your originals automatically. Dust Removal Removes dust marks from the graphics. Contrast Adjusts ...

User Manual
Page 123
...Double-sided. Select the Resolution setting you can view and print the image, if desired. Click Scan. Available Document Source Settings - Select the specific type of your original, such as the Image Type setting. 6. If you chose ADF-Double-sided as the Document Source setting. 12. Select...Document or Photo. 5. Note: You cannot select a scan area if you want to reduce or enlarge your original into the ADF. 9. Epson Scan previews your scan. 7. If you placed your original, and saves the file in the selected folder or opens it scanned as Reflective for...
...Double-sided. Select the Resolution setting you can view and print the image, if desired. Click Scan. Available Document Source Settings - Select the specific type of your original, such as the Image Type setting. 6. If you chose ADF-Double-sided as the Document Source setting. 12. Select...Document or Photo. 5. Note: You cannot select a scan area if you want to reduce or enlarge your original into the ADF. 9. Epson Scan previews your scan. 7. If you placed your original, and saves the file in the selected folder or opens it scanned as Reflective for...

User Manual
Page 125
... icon to click inside the scan area before selecting the settings. Selecting a Scan Area - You can even select multiple scan areas to select specific Image Adjustments settings for a scanned image. To use the scan area to create multiple scanned images of different areas (Normal Preview mode only). ...image again. 1. Just be sure to create a marquee (dotted line) on the preview image. 125 Do one of it. You can select a specific area in your preview image to preview your scan area in your scanned image. Note: In Professional Mode, the default Preview mode is Normal mode.
... icon to click inside the scan area before selecting the settings. Selecting a Scan Area - You can even select multiple scan areas to select specific Image Adjustments settings for a scanned image. To use the scan area to create multiple scanned images of different areas (Normal Preview mode only). ...image again. 1. Just be sure to create a marquee (dotted line) on the preview image. 125 Do one of it. You can select a specific area in your preview image to preview your scan area in your scanned image. Note: In Professional Mode, the default Preview mode is Normal mode.

User Manual
Page 130
... (dotted line) appears on the preview image so you selected. 130 In the Epson Scan window, select the size you scan. You can reduce or enlarge the size of your image. 2. Professional Mode You can also select a specific scan size, such as you want your scanned image to preview your image as...
... (dotted line) appears on the preview image so you selected. 130 In the Epson Scan window, select the size you scan. You can reduce or enlarge the size of your image. 2. Professional Mode You can also select a specific scan size, such as you want your scanned image to preview your image as...
User Manual
Page 197
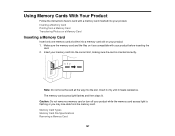
...: Do not force the card all the way into a memory card slot on your product before inserting the card. 2. Memory Card Types Memory Card File Specifications Removing a Memory Card 197 Insert it only until it are compatible with a memory card inserted into your memory card into the correct slot, making sure...
...: Do not force the card all the way into a memory card slot on your product before inserting the card. 2. Memory Card Types Memory Card File Specifications Removing a Memory Card 197 Insert it only until it are compatible with a memory card inserted into your memory card into the correct slot, making sure...
User Manual
Page 198
...; SDXC • SDHC • SD • miniSDHC* • miniSD* • microSDXC* • microSDHC* • microSD* Parent topic: Inserting a Memory Card Memory Card File Specifications You can insert these specifications. File format Image size Number of memory cards in your product. Parent topic: Using Memory Cards With Your Product Memory Card Types You...
...; SDXC • SDHC • SD • miniSDHC* • miniSD* • microSDXC* • microSDHC* • microSD* Parent topic: Inserting a Memory Card Memory Card File Specifications You can insert these specifications. File format Image size Number of memory cards in your product. Parent topic: Using Memory Cards With Your Product Memory Card Types You...

User Manual
Page 206
... photo data) Adjust individual qualities in the subject's face. If your camera's PRINT Image Matching or Exif Print adjustments Optimizes the Fix Photo adjustments for specific types of the photo based on the Scene Detection setting that include faces. Photo adjustment settings Fix Photo Available options Fix Photo On Fix Photo...
... photo data) Adjust individual qualities in the subject's face. If your camera's PRINT Image Matching or Exif Print adjustments Optimizes the Fix Photo adjustments for specific types of the photo based on the Scene Detection setting that include faces. Photo adjustment settings Fix Photo Available options Fix Photo On Fix Photo...

User Manual
Page 216
... includes a face with an intentional color cast, such as a statue, you may want to retain the special color effects. Parent topic: Selecting Print Settings for specific types of the photo based on but not printing. 216 Photo adjustment settings Fix Photo Available options Fix Photo On Fix Photo Off P.I.M Scene Detection...
... includes a face with an intentional color cast, such as a statue, you may want to retain the special color effects. Parent topic: Selecting Print Settings for specific types of the photo based on but not printing. 216 Photo adjustment settings Fix Photo Available options Fix Photo On Fix Photo Off P.I.M Scene Detection...
User Manual
Page 218
...storage device, such as an external hard drive or CD/DVD burner. Insert your product. USB Device File Specifications Connecting and Using a USB Flash Drive or External Device Parent topic: Using an External Device with your ...the front of your USB thumb drive or the USB cable that came with Your Product USB Device File Specifications You can view and print photos from the product. 2. USB port on your drive. 1. Note: ... Device You can print external device files that meet these specifications. Note: Epson cannot guarantee the compatibility of files JPEG with the product.
...storage device, such as an external hard drive or CD/DVD burner. Insert your product. USB Device File Specifications Connecting and Using a USB Flash Drive or External Device Parent topic: Using an External Device with your ...the front of your USB thumb drive or the USB cable that came with Your Product USB Device File Specifications You can view and print photos from the product. 2. USB port on your drive. 1. Note: ... Device You can print external device files that meet these specifications. Note: Epson cannot guarantee the compatibility of files JPEG with the product.


