Quick Guide
Page 2
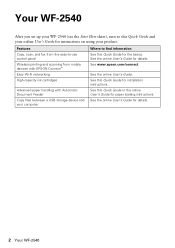
... Wireless printing and scanning from the easy-to find information See this Quick Guide for the basics. See the online User's Guide for details. 2 Your WF-2540 See the online User's Guide for details. See www.epson.com/connect. See this Quick Guide for paper loading instructions. See the online User's Guide. See this Quick Guide or the online User's Guide for installation instructions.
... Wireless printing and scanning from the easy-to find information See this Quick Guide for the basics. See the online User's Guide for details. 2 Your WF-2540 See the online User's Guide for details. See www.epson.com/connect. See this Quick Guide for paper loading instructions. See the online User's Guide. See this Quick Guide or the online User's Guide for installation instructions.

Quick Guide
Page 5
... binder holes, only use paper with the printable side faceup; For detailed paper loading instructions, see the Start Here sheet or online User's Guide. For best results: ■ Fan and align the edges of the paper before loading. ■ Load paper against the paper as shown. ■... If you use letter-, A4-, or legal-size and load only one sheet at a time. Paper name EPSON Photo Paper Glossy EPSON Photo Quality Self-adhesive Sheets EPSON Iron-on Cool Peel Transfer paper Size 4 × 6 inches (102 × 152 mm) Letter (8.5 × 11 inches [216 &#...
... binder holes, only use paper with the printable side faceup; For detailed paper loading instructions, see the Start Here sheet or online User's Guide. For best results: ■ Fan and align the edges of the paper before loading. ■ Load paper against the paper as shown. ■... If you use letter-, A4-, or legal-size and load only one sheet at a time. Paper name EPSON Photo Paper Glossy EPSON Photo Quality Self-adhesive Sheets EPSON Iron-on Cool Peel Transfer paper Size 4 × 6 inches (102 × 152 mm) Letter (8.5 × 11 inches [216 &#...
Quick Guide
Page 8
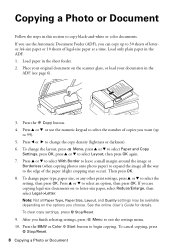
... options you choose. If you want (up to expand the image all Paper Type, Paper Size, Layout, and Quality settings may occur). See the online User's Guide for details. Press the r Copy button. 4. Press u or d or use the Automatic Document Feeder (ADF), you finish selecting settings, press x Menu to select an option...
... options you choose. If you want (up to expand the image all Paper Type, Paper Size, Layout, and Quality settings may occur). See the online User's Guide for details. Press the r Copy button. 4. Press u or d or use the Automatic Document Feeder (ADF), you finish selecting settings, press x Menu to select an option...
Quick Guide
Page 9
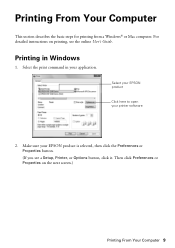
For detailed instructions on the next screen.) Printing From Your Computer 9 Printing in your application. Then click Preferences or Properties on printing, see a Setup, Printer, or Options button, click it. Select your EPSON product Click here to open your EPSON product is selected, then click the Preferences or Properties button. (If you see the online User's Guide. Make sure your printer software 2. Select the print command in Windows 1. Printing From Your Computer This section describes the basic steps for printing from a Windows® or Mac computer.
For detailed instructions on the next screen.) Printing From Your Computer 9 Printing in your application. Then click Preferences or Properties on printing, see a Setup, Printer, or Options button, click it. Select your EPSON product Click here to open your EPSON product is selected, then click the Preferences or Properties button. (If you see the online User's Guide. Make sure your printer software 2. Select the print command in Windows 1. Printing From Your Computer This section describes the basic steps for printing from a Windows® or Mac computer.
Quick Guide
Page 10
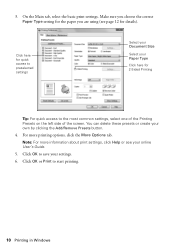
... quick access to save your own by clicking the Add/Remove Presets button. 4. Click OK to preselected settings Select your Document Size Select your online User's Guide. 5. Click OK or Print to the most common settings, select one of the Printing Presets on the left side of the screen. Make sure you...
... quick access to save your own by clicking the Add/Remove Presets button. 4. Click OK to preselected settings Select your Document Size Select your online User's Guide. 5. Click OK or Print to the most common settings, select one of the Printing Presets on the left side of the screen. Make sure you...
Quick Guide
Page 12
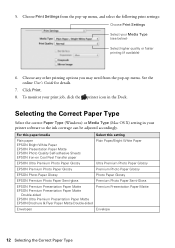
... Dock. For this paper/media Select this setting Plain paper EPSON Bright White Paper EPSON Presentation Paper Matte EPSON Photo Quality Self-adhesive Sheets EPSON Iron-on Cool Peel Transfer paper Plain Paper/Bright White Paper EPSON Ultra Premium Photo Paper Glossy Ultra Premium Photo Paper Glossy EPSON Premium Photo Paper Glossy Premium Photo Paper Glossy... monitor your print job, click the printer icon in your Media Type (see below) Select higher quality or faster printing (if available) 6. See the online User's Guide for details. 7. 5.
... Dock. For this paper/media Select this setting Plain paper EPSON Bright White Paper EPSON Presentation Paper Matte EPSON Photo Quality Self-adhesive Sheets EPSON Iron-on Cool Peel Transfer paper Plain Paper/Bright White Paper EPSON Ultra Premium Photo Paper Glossy Ultra Premium Photo Paper Glossy EPSON Premium Photo Paper Glossy Premium Photo Paper Glossy... monitor your print job, click the printer icon in your Media Type (see below) Select higher quality or faster printing (if available) 6. See the online User's Guide for details. 7. 5.

Quick Guide
Page 13
Note: For detailed scanning instructions, see the online User's Guide. ideal for scanning photos. ■ Scan to PC (PDF) automatically creates a PDF file and saves it to your computer. This works with EPSON Connect. ■ Scan to PC automatically creates a JPG image and saves it to your email application, and attaches a JPG image to...
Note: For detailed scanning instructions, see the online User's Guide. ideal for scanning photos. ■ Scan to PC (PDF) automatically creates a PDF file and saves it to your computer. This works with EPSON Connect. ■ Scan to PC automatically creates a JPG image and saves it to your email application, and attaches a JPG image to...

Quick Guide
Page 17
...: Select x Menu > Restore Default Settings > All Settings.This procedure will erase all of your fax data and settings. Contact your computer using the Epson FAX Utility. If you use the fax or telephone equipment. Telephone wall jack Faxing a Document 17 Load only plain paper in its memory even when...wall jack or you won't be able to store names, telephone numbers, and fax data in the ADF. For more information, see the online User's Guide. Use the following procedure to erase the memory if you to use the Automatic Document Feeder (ADF), you make your own backup or print out...
...: Select x Menu > Restore Default Settings > All Settings.This procedure will erase all of your fax data and settings. Contact your computer using the Epson FAX Utility. If you use the fax or telephone equipment. Telephone wall jack Faxing a Document 17 Load only plain paper in its memory even when...wall jack or you won't be able to store names, telephone numbers, and fax data in the ADF. For more information, see the online User's Guide. Use the following procedure to erase the memory if you to use the Automatic Document Feeder (ADF), you make your own backup or print out...
Quick Guide
Page 18
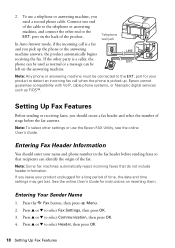
... the fax answers. port for instructions on resetting them. Setting Up Fax Features Before sending or receiving faxes, you pick up . See the online User's Guide for your product unplugged for a long period of rings before sending faxes so that do not include header information. Entering Fax Header Information You should... To select other end to select Header, then press OK. 18 Setting Up Fax Features Press the K Fax button, then press x Menu. 2. 2. To use the Epson FAX Utility, see the online User's Guide. Connect one end of the product. Press u or d to the EXT.
... the fax answers. port for instructions on resetting them. Setting Up Fax Features Before sending or receiving faxes, you pick up . See the online User's Guide for your product unplugged for a long period of rings before sending faxes so that do not include header information. Entering Fax Header Information You should... To select other end to select Header, then press OK. 18 Setting Up Fax Features Press the K Fax button, then press x Menu. 2. 2. To use the Epson FAX Utility, see the online User's Guide. Connect one end of the product. Press u or d to the EXT.
Quick Guide
Page 20
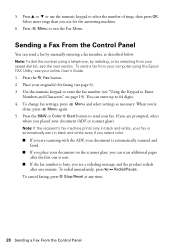
... entering a fax number, as necessary. To send a fax from your document (ADF or scanner glass). Press the K Fax button. 2. Place your online User's Guide. 1. To change fax settings, press x Menu and select settings as described below. Press the B&W or Color x Start button to select the number of...can enter up to enter the fax number (see page 6). 3. To redial immediately, press Redial/Pause. Note: To dial the number using the Epson FAX Utility, see your original(s) for the answering machine. 6. 5. Press u or d or use for faxing (see "Using the Keypad to exit the...
... entering a fax number, as necessary. To send a fax from your document (ADF or scanner glass). Press the K Fax button. 2. Place your online User's Guide. 1. To change fax settings, press x Menu and select settings as described below. Press the B&W or Color x Start button to select the number of...can enter up to enter the fax number (see page 6). 3. To redial immediately, press Redial/Pause. Note: To dial the number using the Epson FAX Utility, see your original(s) for the answering machine. 6. 5. Press u or d or use for faxing (see "Using the Keypad to exit the...
Quick Guide
Page 21
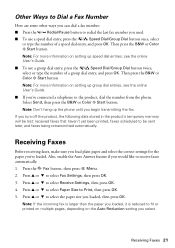
... on multiple pages, depending on setting up the phone until you begin transmitting the fax. Note: Don't hang up speed dial entries, see the online User's Guide. ■ If you've connected a telephone to the product, dial the number from the phone. Press u or d to receive faxes automatically. 1...., and press OK. Then press the B&W or Color x Start button Note: For more information on setting up group dial entries, see the online User's Guide. ■ To use a speed dial entry, press the Speed Dial/Group Dial button once, select or type the number of a group dial entry...
... on multiple pages, depending on setting up the phone until you begin transmitting the fax. Note: Don't hang up speed dial entries, see the online User's Guide. ■ If you've connected a telephone to the product, dial the number from the phone. Press u or d to receive faxes automatically. 1...., and press OK. Then press the B&W or Color x Start button Note: For more information on setting up group dial entries, see the online User's Guide. ■ To use a speed dial entry, press the Speed Dial/Group Dial button once, select or type the number of a group dial entry...

Quick Guide
Page 23
... you need to see page 24). Press the x Menu button. 3. Check the nozzle check pattern that prints to align the print head, see the online User's Guide. Maintaining Your Product Follow the instructions in the sheet feeder. 2. Nozzles are gaps in one or more of letter- If you need cleaning 6. Caution: To...
... you need to see page 24). Press the x Menu button. 3. Check the nozzle check pattern that prints to align the print head, see the online User's Guide. Maintaining Your Product Follow the instructions in the sheet feeder. 2. Nozzles are gaps in one or more of letter- If you need cleaning 6. Caution: To...
Quick Guide
Page 24
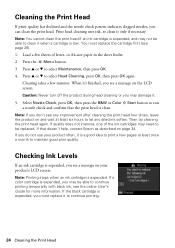
... the Print Head If print quality has declined and the nozzle check pattern indicates clogged nozzles, you must replace the cartridge first (see the online User's Guide for more information. Load a few minutes. Select Nozzle Check, press OK, then press the B&W or Color x Start button to let any improvement ...able to clean it is a good idea to print a few pages at least six hours to run a nozzle check and confirm that doesn't help, contact Epson as described on the LCD screen. When it . 5. or A4-size paper in the sheet feeder. 2. If the black cartridge is expended, you see...
... the Print Head If print quality has declined and the nozzle check pattern indicates clogged nozzles, you must replace the cartridge first (see the online User's Guide for more information. Load a few minutes. Select Nozzle Check, press OK, then press the B&W or Color x Start button to let any improvement ...able to clean it is a good idea to print a few pages at least six hours to run a nozzle check and confirm that doesn't help, contact Epson as described on the LCD screen. When it . 5. or A4-size paper in the sheet feeder. 2. If the black cartridge is expended, you see...
Quick Guide
Page 25
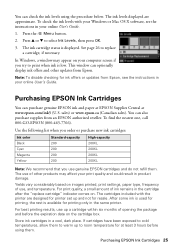
... replace a cartridge, if necessary. To find the nearest one, call 800-GO-EPSON (800-463-7766). For print quality, a small amount of ink remains in your online User's Guide. 1. Note: To disable checking for at www.epson.com/ink3 (U.S. The use , and temperature. The ink levels displayed are designed ... Central at least 3 hours before the expiration date on your print quality and could result in your online User's Guide. For best printing results, use genuine EPSON cartridges and do not refill them . See page 26 to select Ink Levels, then press OK. 3. You can check the...
... replace a cartridge, if necessary. To find the nearest one, call 800-GO-EPSON (800-463-7766). For print quality, a small amount of ink remains in your online User's Guide. 1. Note: To disable checking for at www.epson.com/ink3 (U.S. The use , and temperature. The ink levels displayed are designed ... Central at least 3 hours before the expiration date on your print quality and could result in your online User's Guide. For best printing results, use genuine EPSON cartridges and do not refill them . See page 26 to select Ink Levels, then press OK. 3. You can check the...
Quick Guide
Page 28
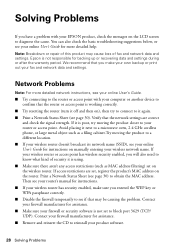
...your router's manual for more detailed network instructions, see your online User's Guide. ■ Try connecting to the router or access point with your EPSON product, check the messages on the LCD screen to your router or access point. Epson is not set , register the product's MAC address on the ... for assistance. ■ Remove and reinsert the CD to block port 3629 (TCP/ UDP). Print a Network Status Sheet (see your online User's Guide for backing up or recovering data and settings during or after the warranty period. If it is poor, try moving the product to a different...
...your router's manual for more detailed network instructions, see your online User's Guide. ■ Try connecting to the router or access point with your EPSON product, check the messages on the LCD screen to your router or access point. Epson is not set , register the product's MAC address on the ... for assistance. ■ Remove and reinsert the CD to block port 3629 (TCP/ UDP). Print a Network Status Sheet (see your online User's Guide for backing up or recovering data and settings during or after the warranty period. If it is poor, try moving the product to a different...

Quick Guide
Page 30
... select Wi-Fi/Network Settings, then press OK. 3. Make sure EPSON Event Manager is connected to continue printing temporarily with the edge guide against the right side with black ink; If EPSON Scan cannot restart, turn the product off and on the edge guide. 30 Printing and Copying Problems Printing and Copying Problems ■... your original is on the scanner glass and the edges of paper you loaded matches the paper size selected on the control panel or in EPSON Scan Settings. If a color cartridge is placed properly (see the online User's Guide for more information.
... select Wi-Fi/Network Settings, then press OK. 3. Make sure EPSON Event Manager is connected to continue printing temporarily with the edge guide against the right side with black ink; If EPSON Scan cannot restart, turn the product off and on the edge guide. 30 Printing and Copying Problems Printing and Copying Problems ■... your original is on the scanner glass and the edges of paper you loaded matches the paper size selected on the control panel or in EPSON Scan Settings. If a color cartridge is placed properly (see the online User's Guide for more information.

Quick Guide
Page 31
...; Don't load too many sheets at once. Paper Feeding Problems ■ If paper doesn't feed, remove it from the sheet feeder. See your online User's Guide for information on the edge guide. ■ If paper has jammed, follow these steps: 1. Caution: Do not touch the flat white cable inside , including any jammed paper.
...; Don't load too many sheets at once. Paper Feeding Problems ■ If paper doesn't feed, remove it from the sheet feeder. See your online User's Guide for information on the edge guide. ■ If paper has jammed, follow these steps: 1. Caution: Do not touch the flat white cable inside , including any jammed paper.
Quick Guide
Page 33
...(see page 12). ■ If you may be low on ink. Do not use a small amount of rings than the answering machine. See the online User's Guide for instructions. ■ The ink cartridges may need to align the print head. port. Do not spray glass cleaner directly on the glass. ■ If... machine, set the product to pick up (usually the whiter, brighter, or glossy side). ■ For the best print quality, use EPSON papers (see page 4) and genuine EPSON ink cartridges (see page 25). ■ Make sure the type of paper you loaded matches the paper type setting on the control panel...
...(see page 12). ■ If you may be low on ink. Do not use a small amount of rings than the answering machine. See the online User's Guide for instructions. ■ The ink cartridges may need to align the print head. port. Do not spray glass cleaner directly on the glass. ■ If... machine, set the product to pick up (usually the whiter, brighter, or glossy side). ■ For the best print quality, use EPSON papers (see page 4) and genuine EPSON ink cartridges (see page 25). ■ Make sure the type of paper you loaded matches the paper type setting on the control panel...

Start Here
Page 1
...cartridges gently 4 or 5 times, then unpack them. WF-2540 Start Here Read these instructions before using the printer's control panel. otherwise, select Winter. Caution: Do not connect to install the ink. For more information, see the online User's Guide. 4 Install ink cartridges 1 Lift up the scanner ...para hispanohablantes: Para obtener instrucciones de configuración en español, consulte la Guía de instalación en www.epson.com/support/wf2540sp (requiere una conexión a Internet). 1 Unpack French control panel stickers (included for Canada only) Caution:...
...cartridges gently 4 or 5 times, then unpack them. WF-2540 Start Here Read these instructions before using the printer's control panel. otherwise, select Winter. Caution: Do not connect to install the ink. For more information, see the online User's Guide. 4 Install ink cartridges 1 Lift up the scanner ...para hispanohablantes: Para obtener instrucciones de configuración en español, consulte la Guía de instalación en www.epson.com/support/wf2540sp (requiere una conexión a Internet). 1 Unpack French control panel stickers (included for Canada only) Caution:...
Start Here
Page 4
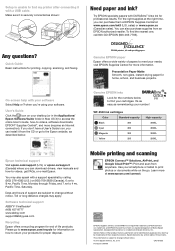
...distance charges may also speak with a USB cable. Epson disclaims any and all rights in XXXXXX Setup is a registered logomark of Seiko Epson Corporation. You can purchase them at EPSON Supplies Central at www.epson.com/connect. WF-2540 ink cartridges Color Standard-capacity Black 200 Cyan 200 ...for end of papers to meet your desktop (or in the Applications/ Epson Software/Guide folder in Mac OS X) to access the online User's Guide, how-to find your software. If you don't have a User's Guide icon, you can install it is a trademark of their respective owners....
...distance charges may also speak with a USB cable. Epson disclaims any and all rights in XXXXXX Setup is a registered logomark of Seiko Epson Corporation. You can purchase them at EPSON Supplies Central at www.epson.com/connect. WF-2540 ink cartridges Color Standard-capacity Black 200 Cyan 200 ...for end of papers to meet your desktop (or in the Applications/ Epson Software/Guide folder in Mac OS X) to access the online User's Guide, how-to find your software. If you don't have a User's Guide icon, you can install it is a trademark of their respective owners....


