Quick Guide
Page 2
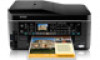
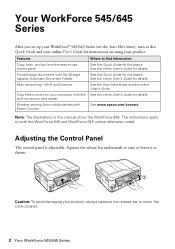
... show the WorkForce 645. See www.epson.com/connect. Squeeze the release bar underneath to lower the control panel. 2 Your WorkForce 545/645 Series See the online User's Guide for details. Note: The illustrations in memory card reader Wireless printing from your computer with Epson Connect Where ...online User's Guide for instructions on using your product. Your WorkForce 545/645 Series After you set up your WorkForce® 545/645 Series (see the Start Here sheet), turn to both the WorkForce 545 and WorkForce 645 unless otherwise noted. Features Copy, scan, and fax from ...
... show the WorkForce 645. See www.epson.com/connect. Squeeze the release bar underneath to lower the control panel. 2 Your WorkForce 545/645 Series See the online User's Guide for details. Note: The illustrations in memory card reader Wireless printing from your computer with Epson Connect Where ...online User's Guide for instructions on using your product. Your WorkForce 545/645 Series After you set up your WorkForce® 545/645 Series (see the Start Here sheet), turn to both the WorkForce 545 and WorkForce 645 unless otherwise noted. Features Copy, scan, and fax from ...
Quick Guide
Page 3
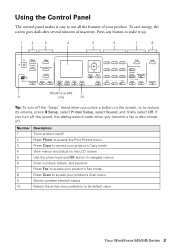
... up. 1 2 3 4 5 6 7 8 WorkForce 645 9 only 10 Tip: To turn off the sound, the dialing sound made when you press a button on the screen, or to reduce its default value Your WorkForce 545/645 Series 3 If you turn off the "beep" heard when you transmit a fax is also turned off 2 Press Photo to access the Print Photos...
... up. 1 2 3 4 5 6 7 8 WorkForce 645 9 only 10 Tip: To turn off the sound, the dialing sound made when you press a button on the screen, or to reduce its default value Your WorkForce 545/645 Series 3 If you turn off the "beep" heard when you transmit a fax is also turned off 2 Press Photo to access the Print Photos...
Quick Guide
Page 8
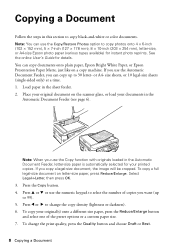
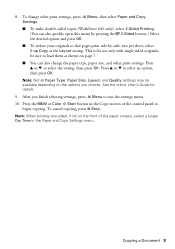
... White Paper, or Epson Presentation Paper Matte, just like on letter-size paper, press Reduce/Enlarge. Load paper in the Automatic Document Feeder, letter-size paper is automatically selected for your printed copies. Press the Copy button. 4. To change the copy density (lightness or darkness). ...6. See the online User's Guide for instant photo reprints. Note: When you can copy up to change the print quality, press the Quality button and choose Draft or Best. 8 Copying a Document Press l or r to 99). 5. Copying a Document Follow...
... White Paper, or Epson Presentation Paper Matte, just like on letter-size paper, press Reduce/Enlarge. Load paper in the Automatic Document Feeder, letter-size paper is automatically selected for your printed copies. Press the Copy button. 4. To change the copy density (lightness or darkness). ...6. See the online User's Guide for instant photo reprints. Note: When you can copy up to change the print quality, press the Quality button and choose Draft or Best. 8 Copying a Document Press l or r to 99). 5. Copying a Document Follow...
Quick Guide
Page 9
...or d to select an option, then press OK. Copying a Document 9 To change other print settings, press x Menu, then select Paper and Copy Settings. ■ To make double-sided copies (WorkForce 645 only), select 2-Sided Printing. (You can also quickly open this menu by pressing the 2-Sided button.) Select the ...desired option and press OK. ■ To reduce your originals so that pages print side-by-side, two per sheet, select ...
...or d to select an option, then press OK. Copying a Document 9 To change other print settings, press x Menu, then select Paper and Copy Settings. ■ To make double-sided copies (WorkForce 645 only), select 2-Sided Printing. (You can also quickly open this menu by pressing the 2-Sided button.) Select the ...desired option and press OK. ■ To reduce your originals so that pages print side-by-side, two per sheet, select ...
Quick Guide
Page 10
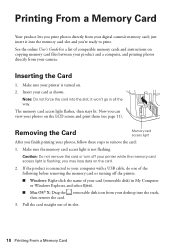
... view your card as shown. Caution: Do not remove the card or turn off your printer while the memory card access light is connected to print. you 're ready to your computer with a USB cable, do one of the following before removing the memory card or turning off the printer: ■...; Windows: Right-click the name of its slot. 10 Printing From a Memory Card Make sure your digital camera's memory card; Pull the card straight out of your card (removable disk) in all the way. Make...
... view your card as shown. Caution: Do not remove the card or turn off your printer while the memory card access light is connected to print. you 're ready to your computer with a USB cable, do one of the following before removing the memory card or turning off the printer: ■...; Windows: Right-click the name of its slot. 10 Printing From a Memory Card Make sure your digital camera's memory card; Pull the card straight out of your card (removable disk) in all the way. Make...
Quick Guide
Page 11
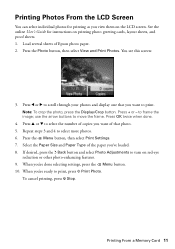
..., press the x Menu button. 10. Repeat steps 3 and 4 to move the frame. If desired, press the y Back button and select Photo Adjustments to print, press x Print Photo. When you view them on the LCD screen. Press OK twice when done. 4. Select the Paper Size and Paper Type of that you 're... ready to turn on printing photo greeting cards, layout sheets, and proof sheets. 1. Press u or d to frame the image; to select the number of Epson photo paper. 2. Press the Photo button, then select View and...
..., press the x Menu button. 10. Repeat steps 3 and 4 to move the frame. If desired, press the y Back button and select Photo Adjustments to print, press x Print Photo. When you view them on the LCD screen. Press OK twice when done. 4. Select the Paper Size and Paper Type of that you 're... ready to turn on printing photo greeting cards, layout sheets, and proof sheets. 1. Press u or d to frame the image; to select the number of Epson photo paper. 2. Press the Photo button, then select View and...

Quick Guide
Page 12
...Epson product Click here to open your product is selected, then click the Preferences or Properties button. (If you see a Setup, Printer, or Options button, click it. You see the online User's Guide. Make sure your printer software 2. For detailed instructions on the next screen.) 12 Printing From Your Computer Select the print... command in Windows 1. Printing From Your Computer This section describes the basic steps for printing from a Windows or Mac computer. Then click Preferences...
...Epson product Click here to open your product is selected, then click the Preferences or Properties button. (If you see a Setup, Printer, or Options button, click it. You see the online User's Guide. Make sure your printer software 2. For detailed instructions on the next screen.) 12 Printing From Your Computer Select the print... command in Windows 1. Printing From Your Computer This section describes the basic steps for printing from a Windows or Mac computer. Then click Preferences...
Quick Guide
Page 13
... 10.6. If you choose the correct Paper Type setting for your settings. 7. For automatic duplex printing with the WorkForce 645, select 2-sided Printing, then select Auto. 5. 3. Click here for quick access to save your paper (see your Paper Type Click here for instructions. 1. Click OK to settings Select ...
... 10.6. If you choose the correct Paper Type setting for your settings. 7. For automatic duplex printing with the WorkForce 645, select 2-sided Printing, then select Auto. 5. 3. Click here for quick access to save your paper (see your Paper Type Click here for instructions. 1. Click OK to settings Select ...
Quick Guide
Page 14
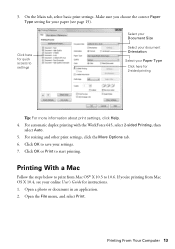
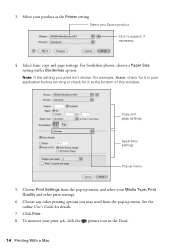
... want isn't shown (for example, Scale), check for details. 7. Note: If the setting you may need from the pop-up menu 5. Choose any other print settings. 6. See the online User's Guide for it at the bottom of this window. Select your product as the Printer setting. Copy and page settings... Application settings Pop-up menu, and select your application before printing or check for it in the Dock. 14 Printing With a Mac 3. Select your Epson product Click to expand, if necessary 4.
... want isn't shown (for example, Scale), check for details. 7. Note: If the setting you may need from the pop-up menu 5. Choose any other print settings. 6. See the online User's Guide for it at the bottom of this window. Select your product as the Printer setting. Copy and page settings... Application settings Pop-up menu, and select your application before printing or check for it in the Dock. 14 Printing With a Mac 3. Select your Epson product Click to expand, if necessary 4.
Quick Guide
Page 15
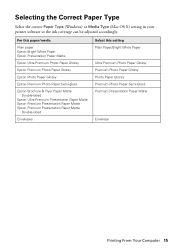
... Double-sided Epson Ultra Premium Presentation Paper Matte Epson Premium Presentation Paper Matte Epson Premium Presentation Paper Matte Double-sided Envelopes Select this setting Plain Paper/Bright White Paper Ultra Premium Photo Paper Glossy Premium Photo Paper Glossy Photo Paper Glossy Premium Photo Paper Semi-Gloss Premium Presentation Paper Matte Envelope Printing From Your...
... Double-sided Epson Ultra Premium Presentation Paper Matte Epson Premium Presentation Paper Matte Epson Premium Presentation Paper Matte Double-sided Envelopes Select this setting Plain Paper/Bright White Paper Ultra Premium Photo Paper Glossy Premium Photo Paper Glossy Photo Paper Glossy Premium Photo Paper Semi-Gloss Premium Presentation Paper Matte Envelope Printing From Your...
Quick Guide
Page 16
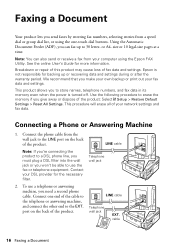
...-size pages at a time. We recommend that you make your own backup or print out your DSL provider for the necessary filter. 2. Use the following procedure to ... EXT. Connect one -touch dial buttons. LINE cable Telephone wall jack LINE cable Telephone wall jack EXT. Epson is turned off. This product allows you to 30 letter- Contact your fax data and settings. port on... send faxes by entering fax numbers, selecting entries from a speed dial or group dial list, or using the Epson FAX Utility. See the online User's Guide for backing up to store names, telephone numbers, and fax data...
...-size pages at a time. We recommend that you make your own backup or print out your DSL provider for the necessary filter. 2. Use the following procedure to ... EXT. Connect one -touch dial buttons. LINE cable Telephone wall jack LINE cable Telephone wall jack EXT. Epson is turned off. This product allows you to 30 letter- Contact your fax data and settings. port on... send faxes by entering fax numbers, selecting entries from a speed dial or group dial list, or using the Epson FAX Utility. See the online User's Guide for backing up to store names, telephone numbers, and fax data...
Quick Guide
Page 19
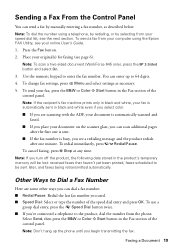
... ■ If you've connected a telephone to be lost: received faxes that haven't yet been printed, faxes scheduled to the product, dial the number from your computer using a telephone, by redialing, ... fax number, as necessary. 5. Faxing a Document 19 Note: To dial the number using the Epson FAX Utility, see page 6). To redial immediately, press Redial/Pause. Note: If you used. ...will be sent later, and faxes being retransmitted automatically. Note: To scan a two-sided document (WorkForce 645 only), press the 2-Sided button and select On. 3. To cancel faxing, press y Stop at...
... ■ If you've connected a telephone to be lost: received faxes that haven't yet been printed, faxes scheduled to the product, dial the number from your computer using a telephone, by redialing, ... fax number, as necessary. 5. Faxing a Document 19 Note: To dial the number using the Epson FAX Utility, see page 6). To redial immediately, press Redial/Pause. Note: If you used. ...will be sent later, and faxes being retransmitted automatically. Note: To scan a two-sided document (WorkForce 645 only), press the 2-Sided button and select On. 3. To cancel faxing, press y Stop at...
Quick Guide
Page 20
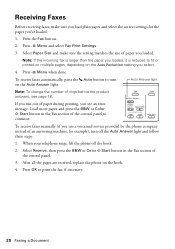
.... 4. Press the Fax button. 2. Select Receive, then press the B&W or Color x Start button in the Fax section of the control panel to print the fax, if necessary. 20 Faxing a Document Press x Menu when done. Press OK to continue. After all the pages are received, replace the phone...loaded. Receiving Faxes Before receiving faxes, make sure the setting matches the size of paper you 've loaded. 1. Press x Menu and select Fax Print Settings. 3. Auto Answer light Note: To change the number of rings before the product answers, see an error message. When your telephone rings, ...
.... 4. Press the Fax button. 2. Select Receive, then press the B&W or Color x Start button in the Fax section of the control panel to print the fax, if necessary. 20 Faxing a Document Press x Menu when done. Press OK to continue. After all the pages are received, replace the phone...loaded. Receiving Faxes Before receiving faxes, make sure the setting matches the size of paper you 've loaded. 1. Press x Menu and select Fax Print Settings. 3. Auto Answer light Note: To change the number of rings before the product answers, see an error message. When your telephone rings, ...
Quick Guide
Page 24
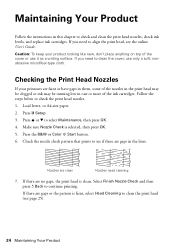
... soft, nonabrasive microfiber-type cloth. Load letter- Make sure Nozzle Check is clean. Nozzles are gaps in this chapter to check and clean the print head nozzles, check ink levels, and replace ink cartridges. or A4-size paper. 2. Maintaining Your Product Follow the instructions in the lines. If... you need to clean the print head (see the online User's Guide. If you need cleaning 7. Caution: To keep your printouts are gaps or the pattern is faint, select...
... soft, nonabrasive microfiber-type cloth. Load letter- Make sure Nozzle Check is clean. Nozzles are gaps in this chapter to check and clean the print head nozzles, check ink levels, and replace ink cartridges. or A4-size paper. 2. Maintaining Your Product Follow the instructions in the lines. If... you need to clean the print head (see the online User's Guide. If you need cleaning 7. Caution: To keep your printouts are gaps or the pattern is faint, select...
Quick Guide
Page 25
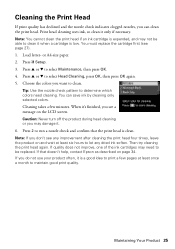
... select Maintenance, then press OK. 4. Caution: Never turn off the product during head cleaning or you don't see page 27). 1. Cleaning the Print Head If print quality has declined and the nozzle check indicates clogged nozzles, you want to clean. Press u or d to select Head Cleaning, press OK, then.... Note: If you may need cleaning. Tip: Use the nozzle check pattern to maintain good print quality. Load letter- Press 2 to run a nozzle check and confirm that doesn't help, contact Epson as described on and wait at least once a month to determine which colors need to be ...
... select Maintenance, then press OK. 4. Caution: Never turn off the product during head cleaning or you don't see page 27). 1. Cleaning the Print Head If print quality has declined and the nozzle check indicates clogged nozzles, you want to clean. Press u or d to select Head Cleaning, press OK, then.... Note: If you may need cleaning. Tip: Use the nozzle check pattern to maintain good print quality. Load letter- Press 2 to run a nozzle check and confirm that doesn't help, contact Epson as described on and wait at least once a month to determine which colors need to be ...
Quick Guide
Page 26
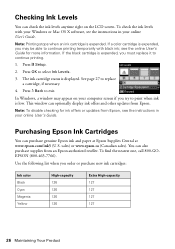
... one, call 800-GOEPSON (800-463-7766). Checking Ink Levels You can purchase genuine Epson ink and paper at Epson Supplies Central at www.epson.com/ink3 (U.S. If a color cartridge is expended, you try to continue printing. 1. To check the ink levels with black ink; Press y Back to select Ink... Levels. 3. Note: To disable checking for ink offers or updates from Epson, see the online User's Guide for more information. Use the following list when you must replace it to print when ink is expended, you order or purchase new ink cartridges: Ink color Black Cyan...
... one, call 800-GOEPSON (800-463-7766). Checking Ink Levels You can purchase genuine Epson ink and paper at Epson Supplies Central at www.epson.com/ink3 (U.S. If a color cartridge is expended, you try to continue printing. 1. To check the ink levels with black ink; Press y Back to select Ink... Levels. 3. Note: To disable checking for ink offers or updates from Epson, see the online User's Guide for more information. Use the following list when you must replace it to print when ink is expended, you order or purchase new ink cartridges: Ink color Black Cyan...
Quick Guide
Page 27
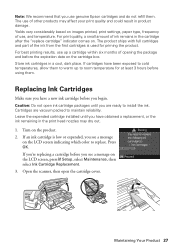
...them . Cartridges are ready to room temperature for priming the product. If an ink cartridge is low or expended, you see a message on images printed, print settings, paper type, frequency of the ink from the first cartridges is used for at least 3 hours before you 're replacing a cartridge before ... on the cartridge box. Press OK. Maintaining Your Product 27 Note: We recommend that you are vacuum packed to replace. For best printing results, use genuine Epson cartridges and do not refill them to warm up a cartridge within six months of ink remains in product damage.
...them . Cartridges are ready to room temperature for priming the product. If an ink cartridge is low or expended, you see a message on images printed, print settings, paper type, frequency of the ink from the first cartridges is used for at least 3 hours before you 're replacing a cartridge before ... on the cartridge box. Press OK. Maintaining Your Product 27 Note: We recommend that you are vacuum packed to replace. For best printing results, use genuine Epson cartridges and do not refill them to warm up a cartridge within six months of ink remains in product damage.
Quick Guide
Page 29
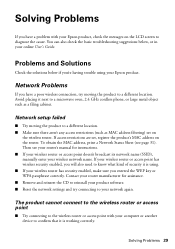
...The product cannot connect to the wireless router or access point ■ Try connecting to the wireless router or access point with your Epson product, check the messages on the LCD screen to diagnose the cause. Then see page 31). You can also check the basic ...If access restrictions are set on the wireless router. Network setup failed ■ Try moving the product to a different location. To obtain the MAC address, print a Network Status Sheet (see your router's manual for assistance. ■ Remove and reinsert the CD to reinstall your product software. ■ Reset the...
...The product cannot connect to the wireless router or access point ■ Try connecting to the wireless router or access point with your Epson product, check the messages on the LCD screen to diagnose the cause. Then see page 31). You can also check the basic ...If access restrictions are set on the wireless router. Network setup failed ■ Try moving the product to a different location. To obtain the MAC address, print a Network Status Sheet (see your router's manual for assistance. ■ Remove and reinsert the CD to reinstall your product software. ■ Reset the...

Quick Guide
Page 30
...product is connected to another port on or flashing. Contact your router, access point, switch, or hub with another Ethernet cable. ■ Try printing from another router, access point, switch or hub. ■ Try connecting the product to block port 3629 (TCP/ UDP). If the link LED... your router, access point, switch, or hub. ■ Try connecting to is not set the product's IP address manually. Cannot Print Over the Network ■ Print a Network Status Sheet (see if the problem persists. Make sure it isn't, you need to set to your firewall manufacturer for details...
...product is connected to another port on or flashing. Contact your router, access point, switch, or hub with another Ethernet cable. ■ Try printing from another router, access point, switch or hub. ■ Try connecting the product to block port 3629 (TCP/ UDP). If the link LED... your router, access point, switch, or hub. ■ Try connecting to is not set the product's IP address manually. Cannot Print Over the Network ■ Print a Network Status Sheet (see if the problem persists. Make sure it isn't, you need to set to your firewall manufacturer for details...
Quick Guide
Page 31
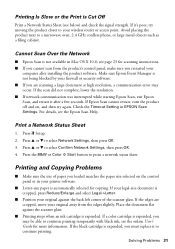
...a filing cabinet. If the scan did not complete, lower the resolution. ■ If network communication was interrupted while starting Epson Scan, exit Epson Scan, and restart it to continue printing. Press u or d to select Network Settings, then press OK. 3. If your printer software. ■ Letter-size ...restart, turn the product off and on the control panel or in your legal-size document is expended. Printing Is Slow or the Print is Cut Off Print a Network Status Sheet (see the Epson Scan Help. Press u or d to select Confirm Network Settings, then press OK. 4. If the ...
...a filing cabinet. If the scan did not complete, lower the resolution. ■ If network communication was interrupted while starting Epson Scan, exit Epson Scan, and restart it to continue printing. Press u or d to select Network Settings, then press OK. 3. If your printer software. ■ Letter-size ...restart, turn the product off and on the control panel or in your legal-size document is expended. Printing Is Slow or the Print is Cut Off Print a Network Status Sheet (see the Epson Scan Help. Press u or d to select Confirm Network Settings, then press OK. 4. If the ...


