Quick Guide
Page 2
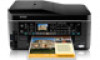
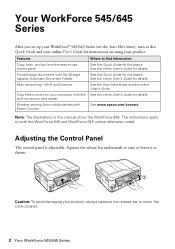
... in memory card reader Wireless printing from your computer with Epson Connect Where to raise or lower it as shown. Caution: To avoid damaging your product, always squeeze the release bar to both the WorkForce 545 and WorkForce 645 unless otherwise noted. Features Copy, scan, and fax from... to find information See this manual show the WorkForce 645. See www.epson.com/connect. See this Quick Guide and your online User's Guide for instructions on using your product. Your WorkForce 545/645 Series After you set up your WorkForce® 545/645 Series (see the Start Here sheet), turn...
... in memory card reader Wireless printing from your computer with Epson Connect Where to raise or lower it as shown. Caution: To avoid damaging your product, always squeeze the release bar to both the WorkForce 545 and WorkForce 645 unless otherwise noted. Features Copy, scan, and fax from... to find information See this manual show the WorkForce 645. See www.epson.com/connect. See this Quick Guide and your online User's Guide for instructions on using your product. Your WorkForce 545/645 Series After you set up your WorkForce® 545/645 Series (see the Start Here sheet), turn...
Quick Guide
Page 3
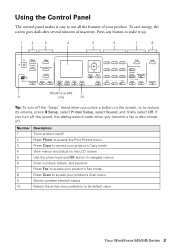
... 3 If you turn off the "beep" heard when you transmit a fax is also turned off. Using the Control Panel The control panel makes it up. 1 2 3 4 5 6 7 8 WorkForce 645 9 only 10 Tip: To turn off the sound, the dialing sound made when you press a button on the LCD screen 5 Use the arrow keys and...
... 3 If you turn off the "beep" heard when you transmit a fax is also turned off. Using the Control Panel The control panel makes it up. 1 2 3 4 5 6 7 8 WorkForce 645 9 only 10 Tip: To turn off the sound, the dialing sound made when you press a button on the LCD screen 5 Use the arrow keys and...

Quick Guide
Page 4
... Paper Matte Letter (8.5 × 11 inches [216 × 279 mm]) S041062 Legal (8.5 × 14 inches [216 × 356 mm]) S041067 Epson Ultra Premium Photo Paper Glossy 4 × 6 inches (102 × 152 mm) S042181 S042174 5 × 7 inches (127 × 178 mm) S041945 8 × ...10 inches (203 × 254 mm) S041946 Letter (8.5 × 11 inches [216 × 279 mm]) S042182 S042175 Epson Premium Photo Paper Semigloss 4 × 6 inches (102 × 152 mm) Letter (8.5 × 11 inches [216 × 279 mm]) S041982 S041331 Sheet count 500 150 ...
... Paper Matte Letter (8.5 × 11 inches [216 × 279 mm]) S041062 Legal (8.5 × 14 inches [216 × 356 mm]) S041067 Epson Ultra Premium Photo Paper Glossy 4 × 6 inches (102 × 152 mm) S042181 S042174 5 × 7 inches (127 × 178 mm) S041945 8 × ...10 inches (203 × 254 mm) S041946 Letter (8.5 × 11 inches [216 × 279 mm]) S042182 S042175 Epson Premium Photo Paper Semigloss 4 × 6 inches (102 × 152 mm) Letter (8.5 × 11 inches [216 × 279 mm]) S041982 S041331 Sheet count 500 150 ...

Quick Guide
Page 5
...; Do not use paper with binder holes. For detailed paper loading instructions, see the Start Here sheet or online User's Guide. Paper name Epson Premium Photo Paper Glossy Epson Photo Paper Glossy Size Part number 4 × 6 inches (102 × 152 mm) S041808 S041727 5 × 7 inches (127 × 178 mm) S041464 8 × 10...
...; Do not use paper with binder holes. For detailed paper loading instructions, see the Start Here sheet or online User's Guide. Paper name Epson Premium Photo Paper Glossy Epson Photo Paper Glossy Size Part number 4 × 6 inches (102 × 152 mm) S041808 S041727 5 × 7 inches (127 × 178 mm) S041464 8 × 10...
Quick Guide
Page 6
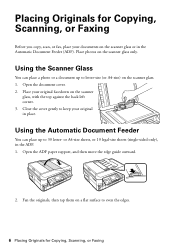
Using the Automatic Document Feeder You can place a photo or a document up to keep your original facedown on the scanner glass only. Fan the originals, then tap them on a flat surface to letter-size (or A4-size) on the scanner glass or in the Automatic Document Feeder (ADF). Open the document cover. 2. Close the cover gently to 30 letter- Using the Scanner Glass You can place up to even the edges. 6 Placing Originals for Copying, Scanning, or Faxing Before you copy, scan, or fax, place your documents on the scanner glass. 1. Place photos on the scanner glass, with the...
Using the Automatic Document Feeder You can place a photo or a document up to keep your original facedown on the scanner glass only. Fan the originals, then tap them on a flat surface to letter-size (or A4-size) on the scanner glass or in the Automatic Document Feeder (ADF). Open the document cover. 2. Close the cover gently to 30 letter- Using the Scanner Glass You can place up to even the edges. 6 Placing Originals for Copying, Scanning, or Faxing Before you copy, scan, or fax, place your documents on the scanner glass. 1. Place photos on the scanner glass, with the...
Quick Guide
Page 7
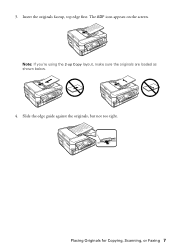
The ADF icon appears on the screen. Slide the edge guide against the originals, but not too tight. 3. Note: If you're using the 2-up Copy layout, make sure the originals are loaded as shown below. 4. Placing Originals for Copying, Scanning, or Faxing 7 Insert the originals faceup, top edge first.
The ADF icon appears on the screen. Slide the edge guide against the originals, but not too tight. 3. Note: If you're using the 2-up Copy layout, make sure the originals are loaded as shown below. 4. Placing Originals for Copying, Scanning, or Faxing 7 Insert the originals faceup, top edge first.
Quick Guide
Page 8
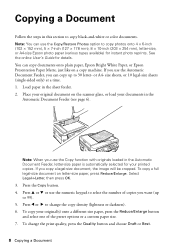
...change the copy density (lightness or darkness). 6. To copy your documents in the sheet feeder. 2. Note: You can copy documents onto plain paper, Epson Bright White Paper, or Epson Presentation Paper Matte, just like on a copy machine. size sheets, or 10 legal-size sheets (single-sided only) at a time. 1. Load...215; 6-inch (102 × 152 mm), 5 × 7-inch (127 × 178 mm), 8 × 10-inch (203 × 254 mm), letter-size, or A4-size Epson photo paper (various types available) for details. If you use the Copy/Restore Photos option to copy black-and-white or color documents.
...change the copy density (lightness or darkness). 6. To copy your documents in the sheet feeder. 2. Note: You can copy documents onto plain paper, Epson Bright White Paper, or Epson Presentation Paper Matte, just like on a copy machine. size sheets, or 10 legal-size sheets (single-sided only) at a time. 1. Load...215; 6-inch (102 × 152 mm), 5 × 7-inch (127 × 178 mm), 8 × 10-inch (203 × 254 mm), letter-size, or A4-size Epson photo paper (various types available) for details. If you use the Copy/Restore Photos option to copy black-and-white or color documents.
Quick Guide
Page 9
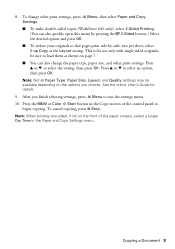
... and Copy Settings menu. Copying a Document 9 To change other print settings, press x Menu, then select Paper and Copy Settings. ■ To make double-sided copies (WorkForce 645 only), select 2-Sided Printing. (You can also quickly open this menu by pressing the 2-Sided button.) Select the desired option and press OK. ■ To...
... and Copy Settings menu. Copying a Document 9 To change other print settings, press x Menu, then select Paper and Copy Settings. ■ To make double-sided copies (WorkForce 645 only), select 2-Sided Printing. (You can also quickly open this menu by pressing the 2-Sided button.) Select the desired option and press OK. ■ To...
Quick Guide
Page 10
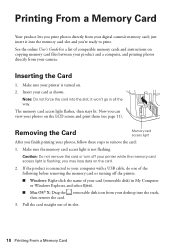
Make sure your printer while the memory card access light is turned on. 2. it into the memory card slot and you're ready to remove the card: 1. Make sure the memory card access light is connected to your computer with a USB cable, do one of your card (removable disk) in all the way. Caution: Do not remove the card or turn off the printer: ■ Windows: Right-click the name of the following before removing the memory card or turning off your printer is flashing; If the product is not flashing. Inserting the Card 1. Now you can view your desktop into the slot; Printing ...
Make sure your printer while the memory card access light is turned on. 2. it into the memory card slot and you're ready to remove the card: 1. Make sure the memory card access light is connected to your computer with a USB cable, do one of your card (removable disk) in all the way. Caution: Do not remove the card or turn off the printer: ■ Windows: Right-click the name of the following before removing the memory card or turning off your printer is flashing; If the product is not flashing. Inserting the Card 1. Now you can view your desktop into the slot; Printing ...
Quick Guide
Page 11
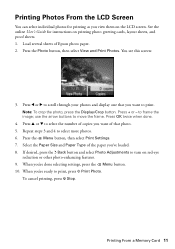
... more photos. 6. To cancel printing, press y Stop. Press the Photo button, then select View and Print Photos. Select the Paper Size and Paper Type of Epson photo paper. 2. Printing Photos From the LCD Screen You can select individual photos for instructions on printing photo greeting cards, layout sheets, and proof sheets...
... more photos. 6. To cancel printing, press y Stop. Press the Photo button, then select View and Print Photos. Select the Paper Size and Paper Type of Epson photo paper. 2. Printing Photos From the LCD Screen You can select individual photos for instructions on printing photo greeting cards, layout sheets, and proof sheets...

Quick Guide
Page 12
Select your Epson product Click here to open your product is selected, then click the Preferences or Properties button. (If you see a Setup, Printer, or Options button, click ...
Select your Epson product Click here to open your product is selected, then click the Preferences or Properties button. (If you see a Setup, Printer, or Options button, click ...
Quick Guide
Page 13
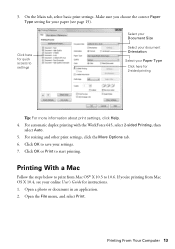
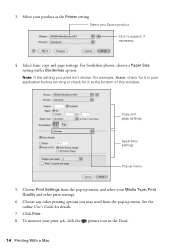
Click OK or Print to 10.6. For automatic duplex printing with the WorkForce 645, select 2-sided Printing, then select Auto. 5. Printing With a Mac Follow the steps below to print from Mac OS X 10.4, see your paper (see page 15). ...
Click OK or Print to 10.6. For automatic duplex printing with the WorkForce 645, select 2-sided Printing, then select Auto. 5. Printing With a Mac Follow the steps below to print from Mac OS X 10.4, see your paper (see page 15). ...
Quick Guide
Page 14
... print job, click the printer icon in the Dock. 14 Printing With a Mac For borderless photos, choose a Paper Size setting with a Borderless option. Select your Epson product Click to expand, if necessary 4. Note: If the setting you may need from the pop-up menu, and select your Media Type, Print Quality...
... print job, click the printer icon in the Dock. 14 Printing With a Mac For borderless photos, choose a Paper Size setting with a Borderless option. Select your Epson product Click to expand, if necessary 4. Note: If the setting you may need from the pop-up menu, and select your Media Type, Print Quality...
Quick Guide
Page 15
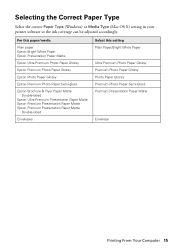
For this paper/media Plain paper Epson Bright White Paper Epson Presentation Paper Matte Epson Ultra Premium Photo Paper Glossy Epson Premium Photo Paper Glossy Epson Photo Paper Glossy Epson Premium Photo Paper Semi-gloss Epson Brochure & Flyer Paper Matte Double-sided Epson Ultra Premium Presentation Paper Matte Epson Premium Presentation Paper Matte Epson Premium Presentation Paper Matte Double-sided Envelopes...
For this paper/media Plain paper Epson Bright White Paper Epson Presentation Paper Matte Epson Ultra Premium Photo Paper Glossy Epson Premium Photo Paper Glossy Epson Photo Paper Glossy Epson Premium Photo Paper Semi-gloss Epson Brochure & Flyer Paper Matte Double-sided Epson Ultra Premium Presentation Paper Matte Epson Premium Presentation Paper Matte Epson Premium Presentation Paper Matte Double-sided Envelopes...
Quick Guide
Page 16
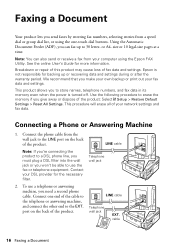
... port on the back of fax data and settings. Note: You can fax up or recovering data and settings during or after the warranty period. Epson is turned off. Contact your computer using the one end of the product. cable 16 Faxing a Document or A4- Use the following procedure to.... Faxing a Document Your product lets you send faxes by entering fax numbers, selecting entries from a speed dial or group dial list, or using the Epson FAX Utility. We recommend that you to store names, telephone numbers, and fax data in its memory even when the power is not responsible for...
... port on the back of fax data and settings. Note: You can fax up or recovering data and settings during or after the warranty period. Epson is turned off. Contact your computer using the one end of the product. cable 16 Faxing a Document or A4- Use the following procedure to.... Faxing a Document Your product lets you send faxes by entering fax numbers, selecting entries from a speed dial or group dial list, or using the Epson FAX Utility. We recommend that you to store names, telephone numbers, and fax data in its memory even when the power is not responsible for...
Quick Guide
Page 17
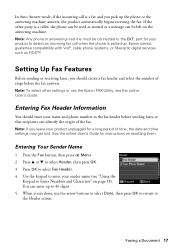
port for your name and phone number in the fax header before the fax answers. Epson cannot guarantee compatibility with VoIP, cable phone systems, or fiberoptic digital services such as normal or a message can enter up . Note: If you leave your ... Features Before sending or receiving faxes, you should enter your product to detect an incoming fax call is a fax and you 're done, use the Epson FAX Utility, see "Using the Keypad to Enter Numbers and Characters" on page 18). Entering Your Sender Name 1. Press the Fax button, then press x Menu...
port for your name and phone number in the fax header before the fax answers. Epson cannot guarantee compatibility with VoIP, cable phone systems, or fiberoptic digital services such as normal or a message can enter up . Note: If you leave your ... Features Before sending or receiving faxes, you should enter your product to detect an incoming fax call is a fax and you 're done, use the Epson FAX Utility, see "Using the Keypad to Enter Numbers and Characters" on page 18). Entering Your Sender Name 1. Press the Fax button, then press x Menu...
Quick Guide
Page 18
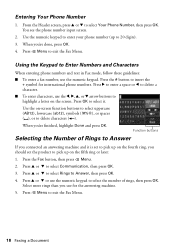
From the Header screen, press u or d to delete characters ( ). When you 're finished, highlight Done and press OK. Use the on the screen. When you 're done, press OK. 4. Press u or d to Answer, then press OK. 4. Press u or d to select Rings to select Communication, then press OK. 3. Press x Menu to insert the + symbol for the answering machine. 5. You see the phone number input screen. 2. Press r to enter a space or l to delete a character. ■ To enter characters, use the numeric keypad to select the number of Rings to highlight a letter on -screen function buttons to ...
From the Header screen, press u or d to delete characters ( ). When you 're finished, highlight Done and press OK. Use the on the screen. When you 're done, press OK. 4. Press u or d to Answer, then press OK. 4. Press u or d to select Rings to select Communication, then press OK. 3. Press x Menu to insert the + symbol for the answering machine. 5. You see the phone number input screen. 2. Press r to enter a space or l to delete a character. ■ To enter characters, use the numeric keypad to select the number of Rings to highlight a letter on -screen function buttons to ...
Quick Guide
Page 19
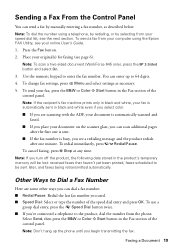
... From the Control Panel You can send a fax by selecting from your speed dial list, see the next section. Note: To scan a two-sided document (WorkForce 645 only), press the 2-Sided button and select On. 3. Press the Fax button. 2. To send a fax from your computer using a telephone, by redialing, or by manually...
... From the Control Panel You can send a fax by selecting from your speed dial list, see the next section. Note: To scan a two-sided document (WorkForce 645 only), press the 2-Sided button and select On. 3. Press the Fax button. 2. To send a fax from your computer using a telephone, by redialing, or by manually...
Quick Guide
Page 20
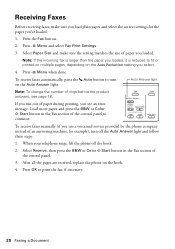
If you run out of paper during printing, you see page 18. Select Receive, then press the B&W or Color x Start button in the Fax section of the control panel to turn off the hook. 2. Note: If the incoming fax is larger than the paper you loaded, it is reduced to print the fax, if necessary. 20 Faxing a Document To receive faxes automatically, press the Auto button to continue. Press OK to fit or printed on multiple pages, depending on the Auto Reduction setting you select. 4. Auto Answer light Note: To change the number of rings before the product answers, see an ...
If you run out of paper during printing, you see page 18. Select Receive, then press the B&W or Color x Start button in the Fax section of the control panel to turn off the hook. 2. Note: If the incoming fax is larger than the paper you loaded, it is reduced to print the fax, if necessary. 20 Faxing a Document To receive faxes automatically, press the Auto button to continue. Press OK to fit or printed on multiple pages, depending on the Auto Reduction setting you select. 4. Auto Answer light Note: To change the number of rings before the product answers, see an ...
Quick Guide
Page 21
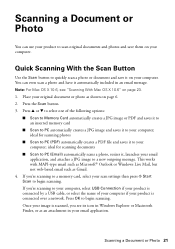
Place your computer; Press u or d to select one of your computer if your computer. If you 're scanning to a memory card, select your scan settings then press x Start Scan to scan original documents and photos and save it on page 6. 2. You can use your product to begin scanning. If you 're scanning to quickly scan a photo or document and save them on page 23. 1. Quick Scanning With the Scan Button Use the Scan button to your computer, select USB Connection if your product is scanned, you see "Scanning With Mac OS X 10.6" on your email application, and attaches a JPG ...
Place your computer; Press u or d to select one of your computer if your computer. If you 're scanning to a memory card, select your scan settings then press x Start Scan to scan original documents and photos and save it on page 6. 2. You can use your product to begin scanning. If you 're scanning to quickly scan a photo or document and save them on page 23. 1. Quick Scanning With the Scan Button Use the Scan button to your computer, select USB Connection if your product is scanned, you see "Scanning With Mac OS X 10.6" on your email application, and attaches a JPG ...
