
Brochure
Page 1
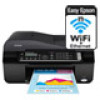
...- uses up to your paper supply with Easy Epson Wi-Fi2 • Save energy - Features and Benefits Fast • Get performance - connect to 180 pages • Instant-dry inks - save up to 50% of your wireless network in Wi-Fi - WorkForce® 520 Print | Copy | Scan | Fax | Wi-Fi...® Engineered for the life of the product4 Hassle-free • Easy wireless printing - as fast as much - phone support, without charge, for Business. speed dial ...
...- uses up to your paper supply with Easy Epson Wi-Fi2 • Save energy - Features and Benefits Fast • Get performance - connect to 180 pages • Instant-dry inks - save up to 50% of your wireless network in Wi-Fi - WorkForce® 520 Print | Copy | Scan | Fax | Wi-Fi...® Engineered for the life of the product4 Hassle-free • Easy wireless printing - as fast as much - phone support, without charge, for Business. speed dial ...
Brochure
Page 2
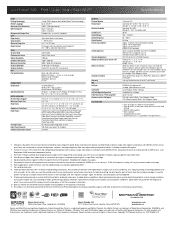
.... 3771 Victoria Park Avenue, Toronto, Ontario M1W 3Z5 www.epson.com www.epson.ca Epson and MicroPiezo are trademarks and/or registered trademarks of Seiko Epson Corporation. CPD-32658 5/10 WorkForce® 520 Print | Copy | Scan | Fax | Wi-Fi® Specifications PRINT Printing Technology Printer Language Maximum Print Resolution ISO Print Speed† Minimum Ink Droplet Size COPY Copy Quality Copy...
.... 3771 Victoria Park Avenue, Toronto, Ontario M1W 3Z5 www.epson.com www.epson.ca Epson and MicroPiezo are trademarks and/or registered trademarks of Seiko Epson Corporation. CPD-32658 5/10 WorkForce® 520 Print | Copy | Scan | Fax | Wi-Fi® Specifications PRINT Printing Technology Printer Language Maximum Print Resolution ISO Print Speed† Minimum Ink Droplet Size COPY Copy Quality Copy...
Quick Guide
Page 1
WorkForce® 520/525 Series Quick Guide Network Setup Basic Copying, Printing, Scanning, and Faxing Maintenance Solving Problems
WorkForce® 520/525 Series Quick Guide Network Setup Basic Copying, Printing, Scanning, and Faxing Maintenance Solving Problems

Quick Guide
Page 2
... the Automatic Document Feeder 28 Copying a Document or Photo 30 Copying a Document or Photo 30 Printing From Your Computer 32 Printing in Windows 32 Printing With a Macintosh 33 Selecting the Correct Paper Type 35 Faxing a Document 36 Connecting a Phone... or Answering Machine 36 Setting Up Fax Features 37 Sending a Fax From the Control Panel 39 Receiving Faxes 40 Scanning a Document or Photo 41 Quick Scanning With the Scan Button 41 Scanning With Epson...
... the Automatic Document Feeder 28 Copying a Document or Photo 30 Copying a Document or Photo 30 Printing From Your Computer 32 Printing in Windows 32 Printing With a Macintosh 33 Selecting the Correct Paper Type 35 Faxing a Document 36 Connecting a Phone... or Answering Machine 36 Setting Up Fax Features 37 Sending a Fax From the Control Panel 39 Receiving Faxes 40 Scanning a Document or Photo 41 Quick Scanning With the Scan Button 41 Scanning With Epson...
Quick Guide
Page 3
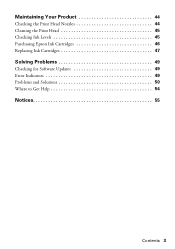
Maintaining Your Product 44 Checking the Print Head Nozzles 44 Cleaning the Print Head 45 Checking Ink Levels 45 Purchasing Epson Ink Cartridges 46 Replacing Ink Cartridges 47 Solving Problems 49 Checking for Software Updates 49 Error Indicators 49 Problems and Solutions 50 Where to Get Help 54 Notices 55 Contents 3
Maintaining Your Product 44 Checking the Print Head Nozzles 44 Cleaning the Print Head 45 Checking Ink Levels 45 Purchasing Epson Ink Cartridges 46 Replacing Ink Cartridges 47 Solving Problems 49 Checking for Software Updates 49 Error Indicators 49 Problems and Solutions 50 Where to Get Help 54 Notices 55 Contents 3
Quick Guide
Page 4
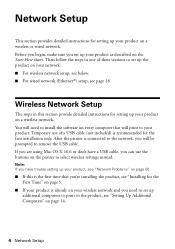
.... Wireless Network Setup The steps in one of a USB cable (not included) is the first time that will need to set up additional computers to print to install the software on the Start Here sheet. You will...
.... Wireless Network Setup The steps in one of a USB cable (not included) is the first time that will need to set up additional computers to print to install the software on the Start Here sheet. You will...
Quick Guide
Page 10
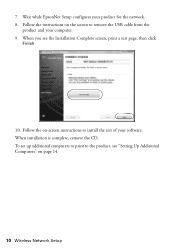
When installation is complete, remove the CD. Follow the on-screen instructions to the product, see the Installation Complete screen, print a test page, then click Finish. 10. Wait while EpsonNet Setup configures your computer. 9. When you see "Setting Up Additional Computers" on the screen to remove the USB cable from the product and your product for the network. 8. To set up additional computers to print to install the rest of your software. 7. Follow the instructions on page 14. 10 Wireless Network Setup
When installation is complete, remove the CD. Follow the on-screen instructions to the product, see the Installation Complete screen, print a test page, then click Finish. 10. Wait while EpsonNet Setup configures your computer. 9. When you see "Setting Up Additional Computers" on the screen to remove the USB cable from the product and your product for the network. 8. To set up additional computers to print to install the rest of your software. 7. Follow the instructions on page 14. 10 Wireless Network Setup
Quick Guide
Page 13
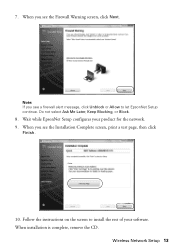
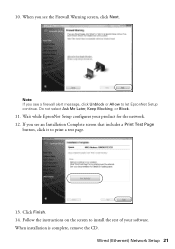
When you see the Firewall Warning screen, click Next. When installation is complete, remove the CD. Do not select Ask Me Later, Keep Blocking, or Block. 8. Wait while EpsonNet Setup configures your software. Wireless Network Setup 13 Follow the instructions on the screen to let EpsonNet Setup continue. When you see a firewall alert message, click Unblock or Allow to install the rest of your product for the network. 9. Note: If you see the Installation Complete screen, print a test page, then click Finish. 10. 7.
When you see the Firewall Warning screen, click Next. When installation is complete, remove the CD. Do not select Ask Me Later, Keep Blocking, or Block. 8. Wait while EpsonNet Setup configures your software. Wireless Network Setup 13 Follow the instructions on the screen to let EpsonNet Setup continue. When you see a firewall alert message, click Unblock or Allow to install the rest of your product for the network. 9. Note: If you see the Installation Complete screen, print a test page, then click Finish. 10. 7.
Quick Guide
Page 14
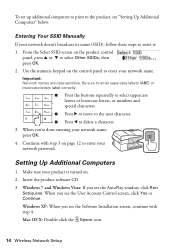
...: If you 're done entering your network name, press OK. 4. Windows XP: When you see "Setting Up Additional Computers" below. Mac OS X: Double-click the Epson icon. 14 Wireless Network Setup From the Select SSID screen on page 12 to the product, see the User Account Control screen, click Yes or... with step 4. Make sure your product is turned on the control panel to select Other SSIDs, then press OK. 2. To set up additional computers to print to enter your network password.
...: If you 're done entering your network name, press OK. 4. Windows XP: When you see "Setting Up Additional Computers" below. Mac OS X: Double-click the Epson icon. 14 Wireless Network Setup From the Select SSID screen on page 12 to the product, see the User Account Control screen, click Yes or... with step 4. Make sure your product is turned on the control panel to select Other SSIDs, then press OK. 2. To set up additional computers to print to enter your network password.

Quick Guide
Page 17
Follow the instructions on the screen to set up, then click Next. 11. Wireless Network Setup 17 When you see a screen like this one, select the product you see the Installation Complete screen, print a test page, then click Finish. 13. If you would like to install the rest of your product for the network. 12. 10. Wait while EpsonNet Setup configures your software. When installation is complete, remove the CD.
Follow the instructions on the screen to set up, then click Next. 11. Wireless Network Setup 17 When you see a screen like this one, select the product you see the Installation Complete screen, print a test page, then click Finish. 13. If you would like to install the rest of your product for the network. 12. 10. Wait while EpsonNet Setup configures your software. When installation is complete, remove the CD.
Quick Guide
Page 18
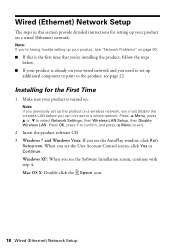
...■ If your product is turned on page 50. ■ If this section provide detailed instructions for the First Time 1. Mac OS X: Double-click the Epson icon. 18 Wired (Ethernet) Network Setup Installing for setting up your product is already on a wired (Ethernet) network. Press x Menu, press u or ...d to exit. 2. When you need to set up additional computers to print to a wired network. Make sure your product on your wired network and you see the User Account Control screen, click Yes or Continue. Wired (...
...■ If your product is turned on page 50. ■ If this section provide detailed instructions for the First Time 1. Mac OS X: Double-click the Epson icon. 18 Wired (Ethernet) Network Setup Installing for setting up your product is already on a wired (Ethernet) network. Press x Menu, press u or ...d to exit. 2. When you need to set up additional computers to print to a wired network. Make sure your product on your wired network and you see the User Account Control screen, click Yes or Continue. Wired (...
Quick Guide
Page 21
Note: If you see an Installation Complete screen that includes a Print Test Page button, click it to print a test page. 13. Wait while EpsonNet Setup configures your software. Click Finish. 14. Follow the instructions on the screen to let EpsonNet Setup continue. Do ...
Note: If you see an Installation Complete screen that includes a Print Test Page button, click it to print a test page. 13. Wait while EpsonNet Setup configures your software. Click Finish. 14. Follow the instructions on the screen to let EpsonNet Setup continue. Do ...

Quick Guide
Page 24
10. If you would like this one, select the product you see an Installation Complete screen that includes a Print Test Page button, click it to install the rest of your product for the network. 12. Follow the instructions on the screen to print a test page. 13. Click Finish. 14. When installation is complete, remove the CD. 24 Wired (Ethernet) Network Setup If you see a screen like to set up, then click Next. 11. Wait while EpsonNet Setup configures your software.
10. If you would like this one, select the product you see an Installation Complete screen that includes a Print Test Page button, click it to install the rest of your product for the network. 12. Follow the instructions on the screen to print a test page. 13. Click Finish. 14. When installation is complete, remove the CD. 24 Wired (Ethernet) Network Setup If you see a screen like to set up, then click Next. 11. Wait while EpsonNet Setup configures your software.
Quick Guide
Page 25
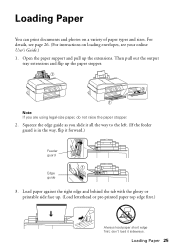
... flip up the extensions. Squeeze the edge guide as you are using legal-size paper, do not raise the paper stopper. 2. Loading Paper You can print documents and photos on loading envelopes, see your online User's Guide.) 1. don't load it forward.) Feeder guard Edge guide 3. Open the paper support and... the paper stopper. Load paper against the right edge and behind the tab with the glossy or printable side face up. (Load letterhead or pre-printed paper top edge first.) Always load paper short edge first; For details, see page 26. (For instructions on a variety of paper types and sizes...
... flip up the extensions. Squeeze the edge guide as you are using legal-size paper, do not raise the paper stopper. 2. Loading Paper You can print documents and photos on loading envelopes, see your online User's Guide.) 1. don't load it forward.) Feeder guard Edge guide 3. Open the paper support and... the paper stopper. Load paper against the right edge and behind the tab with the glossy or printable side face up. (Load letterhead or pre-printed paper top edge first.) Always load paper short edge first; For details, see page 26. (For instructions on a variety of paper types and sizes...
Quick Guide
Page 26
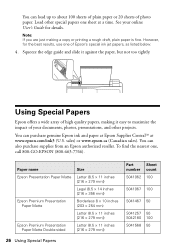
... a wide array of your online User's Guide for the best results, use one , call 800-GO-EPSON (800-463-7766). You can load up to maximize the impact of high quality papers, making a copy or printing a rough draft, plain paper is fine. To find the nearest one of photo paper. You can... also purchase supplies from an Epson authorized reseller. Note: If you are just making it against the paper, but not too...
... a wide array of your online User's Guide for the best results, use one , call 800-GO-EPSON (800-463-7766). You can load up to maximize the impact of high quality papers, making a copy or printing a rough draft, plain paper is fine. To find the nearest one of photo paper. You can... also purchase supplies from an Epson authorized reseller. Note: If you are just making it against the paper, but not too...

Quick Guide
Page 30
... press r Copy, press x Menu, press u or d to fit. To copy a full legal-size document on the scanner glass, or load your printed copies. Select Sound, then select Off and press OK. Copying a Document or Photo Follow the instructions in the sheet feeder (see page 28). Note: To... OK. Copying a Document or Photo You can copy a photo onto 4 × 6-inch, 5 × 7-inch, letter-size, or A4-size Epson photo paper (various types available) for your documents in the Automatic Document Feeder, letter-size paper is automatically selected for instant photo reprints. 1. If you...
... press r Copy, press x Menu, press u or d to fit. To copy a full legal-size document on the scanner glass, or load your printed copies. Select Sound, then select Off and press OK. Copying a Document or Photo Follow the instructions in the sheet feeder (see page 28). Note: To... OK. Copying a Document or Photo You can copy a photo onto 4 × 6-inch, 5 × 7-inch, letter-size, or A4-size Epson photo paper (various types available) for your documents in the Automatic Document Feeder, letter-size paper is automatically selected for instant photo reprints. 1. If you...

Quick Guide
Page 31
To change the layout, press x Menu, then press OK. See the online User's Guide for details. 7. it is printing; Note: You cannot print borderless on the options you choose. Note: Not all the way to the edge of copies you finish selecting settings, press x Menu to select ... u or d to select With Border to leave a small margin around the image or Borderless to 99). 5. To change paper type, paper size, or any other print settings, press u or d to exit the settings menu. 8. Press u or d to begin copying. To cancel copying, press y Stop/Clear Settings. Note: Do not pull ...
To change the layout, press x Menu, then press OK. See the online User's Guide for details. 7. it is printing; Note: You cannot print borderless on the options you choose. Note: Not all the way to the edge of copies you finish selecting settings, press x Menu to select ... u or d to select With Border to leave a small margin around the image or Borderless to 99). 5. To change paper type, paper size, or any other print settings, press u or d to exit the settings menu. 8. Press u or d to begin copying. To cancel copying, press y Stop/Clear Settings. Note: Do not pull ...

Quick Guide
Page 32
...your paper Type Select your paper Size Click here for your paper (see page 35). Printing From Your Computer This section describes the basic steps for updates to check for printing from a Windows or Macintosh® computer. To resize your product, then click the ...Preferences or Properties button. 3. Printing in a printing program, open the File menu, and select Print. 2. Select your printout or print double-sided, click the Page Layout tab. 32 Printing From Your Computer Tip: It's a good idea to your Epson product software; On the Main tab, select ...
...your paper Type Select your paper Size Click here for your paper (see page 35). Printing From Your Computer This section describes the basic steps for updates to check for printing from a Windows or Macintosh® computer. To resize your product, then click the ...Preferences or Properties button. 3. Printing in a printing program, open the File menu, and select Print. 2. Select your printout or print double-sided, click the Page Layout tab. 32 Printing From Your Computer Tip: It's a good idea to your Epson product software; On the Main tab, select ...

Quick Guide
Page 33
.... Click the arrow to save your settings. 7. Click OK or Print to expand 3. Select your print job. Cancel printing Printing With a Macintosh Follow the steps below to 10.6. Select your online User's Guide for instructions. 1. Note: If you're printing from Mac OS X 10.5 to print from Mac OS X 10.4, see your Epson product Click to start...
.... Click the arrow to save your settings. 7. Click OK or Print to expand 3. Select your print job. Cancel printing Printing With a Macintosh Follow the steps below to 10.6. Select your online User's Guide for instructions. 1. Note: If you're printing from Mac OS X 10.5 to print from Mac OS X 10.4, see your Epson product Click to start...

Quick Guide
Page 34
...- Borderless option. Copy and page settings Application settings 5. Note: If the setting you may need from the pop-up menu. Choose any other printing options you want isn't shown (for example, Scale), check for it at the bottom of this window. Choose... Print Settings from the pop-up menu, and select these print settings: Choose Print Settings Select your application before printing or check for details. 34 Printing With a Macintosh 4. Select basic copy and page settings. See the online User's Guide...
...- Borderless option. Copy and page settings Application settings 5. Note: If the setting you may need from the pop-up menu. Choose any other printing options you want isn't shown (for example, Scale), check for it at the bottom of this window. Choose... Print Settings from the pop-up menu, and select these print settings: Choose Print Settings Select your application before printing or check for details. 34 Printing With a Macintosh 4. Select basic copy and page settings. See the online User's Guide...


