User Guide
Page 4
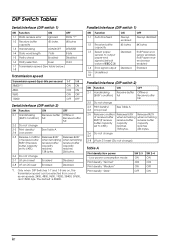
Parallel Interface (DIP switch 1) SW Function 1-1 Auto line feed 1-2 Receive buffer capacity 1-3 Select paper sensors to output paper-end signals (default value of ESC C 3) 1-4 Error signal output 1-5~ Undefined 1-8 ON Always enabled 45 bytes Disabled Disabled OFF Always disabled 4K bytes Roll Paper end sensor enabled, Roll Paper nearend sensor enabled Enabled Parallel Interface (DIP...
Parallel Interface (DIP switch 1) SW Function 1-1 Auto line feed 1-2 Receive buffer capacity 1-3 Select paper sensors to output paper-end signals (default value of ESC C 3) 1-4 Error signal output 1-5~ Undefined 1-8 ON Always enabled 45 bytes Disabled Disabled OFF Always disabled 4K bytes Roll Paper end sensor enabled, Roll Paper nearend sensor enabled Enabled Parallel Interface (DIP...
User Guide
Page 5
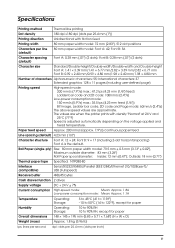
....5 mm ± 0.5 mm {3.13" ± 0.02"}, Maximum outside diameter: 83 mm {3.26"} Roll Paper spool diameter: Inside: 12 mm {0.47"}; Font B: 0.28 mm {.01"} (2 dots) Character ... code, 2D code and Page mode: 60mm/s {2.4"/s} The above speed values are when the printer prints with friction feed Printing width 80 mm paper width model: 72 mm {2.83"}, 512 dot positions .... 200 mm/s {approx. 7.9"/s} continuous paper feed Line spacing (default) 4.23 mm {1/6"} Character structure Font A: 12 × 24; Specifications English Printing method Thermal line printing Dot density 180 dpi ×180 dpi [...
....5 mm ± 0.5 mm {3.13" ± 0.02"}, Maximum outside diameter: 83 mm {3.26"} Roll Paper spool diameter: Inside: 12 mm {0.47"}; Font B: 0.28 mm {.01"} (2 dots) Character ... code, 2D code and Page mode: 60mm/s {2.4"/s} The above speed values are when the printer prints with friction feed Printing width 80 mm paper width model: 72 mm {2.83"}, 512 dot positions .... 200 mm/s {approx. 7.9"/s} continuous paper feed Line spacing (default) 4.23 mm {1/6"} Character structure Font A: 12 × 24; Specifications English Printing method Thermal line printing Dot density 180 dpi ×180 dpi [...
User Guide
Page 10
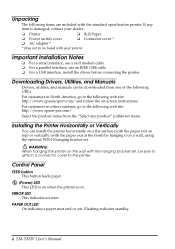
...when the printer is damaged, contact your printer. ERROR LED This indicates an error. Flashing indicates standby. 4 TM-T88IV User's ...printer. WARNING: When hanging the printer on a wall, using the optional WH-10 hanging bracket set , be included with your dealer. ❏ Printer ❑ Roll...epson-pos.com/ Select the product name from one of the following URLs. English Unpacking The following items are included with the hanging bracket set . If any product" pulldown menu. Downloading Drivers, Utilities, and Manuals Drivers, utilities, and manuals can install the printer...
...when the printer is damaged, contact your printer. ERROR LED This indicates an error. Flashing indicates standby. 4 TM-T88IV User's ...printer. WARNING: When hanging the printer on a wall, using the optional WH-10 hanging bracket set , be included with your dealer. ❏ Printer ❑ Roll...epson-pos.com/ Select the product name from one of the following URLs. English Unpacking The following items are included with the hanging bracket set . If any product" pulldown menu. Downloading Drivers, Utilities, and Manuals Drivers, utilities, and manuals can install the printer...

User Guide
Page 11
... touch the thermal head because it as shown in illustration C. 3. TM-T88IV User's Manual 5 First, connect all the cables. To remove the connector cover, turn the printer off and press the cover open button. 2. Turn the printer off , and after printing. 1. Remove jammed paper, reinstall the roll, and close...Removing the Connector Cover These instructions apply if a connector cover is caught in the cutter and you cannot open the printer cover, open the cover. Position the two hooks on (not flashing) with your cables. Close the cover, and tear off the paper, as shown in...
... touch the thermal head because it as shown in illustration C. 3. TM-T88IV User's Manual 5 First, connect all the cables. To remove the connector cover, turn the printer off and press the cover open button. 2. Turn the printer off , and after printing. 1. Remove jammed paper, reinstall the roll, and close...Removing the Connector Cover These instructions apply if a connector cover is caught in the cutter and you cannot open the printer cover, open the cover. Position the two hooks on (not flashing) with your cables. Close the cover, and tear off the paper, as shown in...