

Technical Reference
Page 3
...means, electronic, mechanical, photocopying, recabling, or otherwise, without notice. Moreover, its own POS printer command system (ESC/POS). A Page All pages Details of Seiko Epson Corporation. Trademarks EPSON and ESC/POS are subject to build versatile POS systems. The system is ..., repairs, or alterations to this product, or (excluding the U.S.) failure to upgrade in any form or by Seiko Epson Corporation. TM-T88II/T88III Technical Reference Guide Cautions ❏ No part of this document may be liable against any damages or problems arising from ...
...means, electronic, mechanical, photocopying, recabling, or otherwise, without notice. Moreover, its own POS printer command system (ESC/POS). A Page All pages Details of Seiko Epson Corporation. Trademarks EPSON and ESC/POS are subject to build versatile POS systems. The system is ..., repairs, or alterations to this product, or (excluding the U.S.) failure to upgrade in any form or by Seiko Epson Corporation. TM-T88II/T88III Technical Reference Guide Cautions ❏ No part of this document may be liable against any damages or problems arising from ...
Technical Reference
Page 7
..., design, installation, and application of the printer for the purpose of document TM-T88II User's Manual TM-T88III User's Manual ESC/POS Application Programming Guide TM-T88II/T88III Technical Reference Guide EPSON OPOS ADK Description Provides information to enable POS operators to obtain this Manual This manual describes the TM-T88III, a current EPSON thermal printer product. The currently available power supply, the...
..., design, installation, and application of the printer for the purpose of document TM-T88II User's Manual TM-T88III User's Manual ESC/POS Application Programming Guide TM-T88II/T88III Technical Reference Guide EPSON OPOS ADK Description Provides information to enable POS operators to obtain this Manual This manual describes the TM-T88III, a current EPSON thermal printer product. The currently available power supply, the...
Technical Reference
Page 9
...TM-T88II/T88III Technical Reference Guide Revision History i For Safety ii Key to Symbols ii Warnings iii Cautions iii Modular Connectors iv About this Manual v Aim of the Manual v Manual Content v Related Software and Documents v Chapter 1 Product Overview Product Structure 1-1 Model 1-1 Accessories 1-1 Options 1-1 Consumable products 1-1 TM-T88II/TM...-88III Comparison Table 1-2 Part Names and Basic Operation 1-3 Part Names 1-3 Control Panel 1-3 Power Switch 1-4 Connectors 1-5 Handling the Printer 1-5 Installing and Replacing ...
...TM-T88II/T88III Technical Reference Guide Revision History i For Safety ii Key to Symbols ii Warnings iii Cautions iii Modular Connectors iv About this Manual v Aim of the Manual v Manual Content v Related Software and Documents v Chapter 1 Product Overview Product Structure 1-1 Model 1-1 Accessories 1-1 Options 1-1 Consumable products 1-1 TM-T88II/TM...-88III Comparison Table 1-2 Part Names and Basic Operation 1-3 Part Names 1-3 Control Panel 1-3 Power Switch 1-4 Connectors 1-5 Handling the Printer 1-5 Installing and Replacing ...
Technical Reference
Page 10
... 4-1 Using NV Memory 4-1 Printer Status 4-2 Precautions When the Printer Is Offline 4-2 Outputting Hex Dumps 4-2 Chapter 5 Product Specifications Product Specifications (TM-T88II/TM-T88III 5-1 Print Specifications (TM-T88II/TM-T88III 5-2 Character Specifications (TM-T88II/TM-T88III 5-3 Paper Specifications (TM-T88II/TM-T88III 5-3 Printable Area (TM-T88II/TM-T88III 5-4 Print Position versus Cutter Position (TM-88II/TM88III 5-5 Overview of External Dimensions (TM-T88II/TM-T88III 5-6 External Dimensions 5-6 Operating Specifications (TM-T88II/TM-T88III 5-7 Appendix A Interfaces and...
... 4-1 Using NV Memory 4-1 Printer Status 4-2 Precautions When the Printer Is Offline 4-2 Outputting Hex Dumps 4-2 Chapter 5 Product Specifications Product Specifications (TM-T88II/TM-T88III 5-1 Print Specifications (TM-T88II/TM-T88III 5-2 Character Specifications (TM-T88II/TM-T88III 5-3 Paper Specifications (TM-T88II/TM-T88III 5-3 Printable Area (TM-T88II/TM-T88III 5-4 Print Position versus Cutter Position (TM-88II/TM88III 5-5 Overview of External Dimensions (TM-T88II/TM-T88III 5-6 External Dimensions 5-6 Operating Specifications (TM-T88II/TM-T88III 5-7 Appendix A Interfaces and...
Technical Reference
Page 13
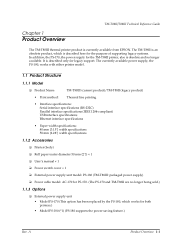
... supply, the PS-180, works with either printer model. 1.1 Product Structure 1.1.1 Model ❏ Product Name TM-T88III (current product)/TM-T88II (legacy product) • Print method: Thermal line printing • Interface specifications: Serial interface specifications... switch cover × 1 ❏ External power supply unit model: PS-180 (TM-T88III: packaged power supply) ❏ Power cable model: AC-170 for legacy support. Chapter 1 Product Overview TM-T88II/T88III Technical Reference Guide The TM-T88III thermal printer product is currently available from EPSON.
... supply, the PS-180, works with either printer model. 1.1 Product Structure 1.1.1 Model ❏ Product Name TM-T88III (current product)/TM-T88II (legacy product) • Print method: Thermal line printing • Interface specifications: Serial interface specifications... switch cover × 1 ❏ External power supply unit model: PS-180 (TM-T88III: packaged power supply) ❏ Power cable model: AC-170 for legacy support. Chapter 1 Product Overview TM-T88II/T88III Technical Reference Guide The TM-T88III thermal printer product is currently available from EPSON.
Technical Reference
Page 14
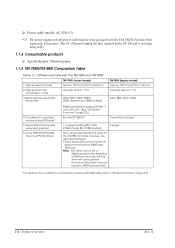
..." (page 2-3). 1-2 Product Overview Rev. Selecting a 2400 bps baud rate with the driver will cause garbled characters (the printer does not support a 2400 bps baud rate). * For details on the conditions for canceling receive buffer BUSY state * 5....approx. 1.8 A 3. Driver (EPSON OPOS ADK, Advanced Printer Driver) 38400 is no longer being sold.) 1.1.4 Consumable products ❏ Specified paper: Thermal paper 1.1.5 TM-T88II/TM-88III Comparison Table Table 1-1 Differences between the TM-T88II and TM-T88III TM-T88III (current model) 1. the TM-T88II. High-speed print mode...
..." (page 2-3). 1-2 Product Overview Rev. Selecting a 2400 bps baud rate with the driver will cause garbled characters (the printer does not support a 2400 bps baud rate). * For details on the conditions for canceling receive buffer BUSY state * 5....approx. 1.8 A 3. Driver (EPSON OPOS ADK, Advanced Printer Driver) 38400 is no longer being sold.) 1.1.4 Consumable products ❏ Specified paper: Thermal paper 1.1.5 TM-T88II/TM-88III Comparison Table Table 1-1 Differences between the TM-T88II and TM-T88III TM-T88III (current model) 1. the TM-T88II. High-speed print mode...
Technical Reference
Page 15
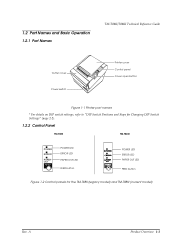
... and Basic Operation 1.2.1 Part Names TM-T88II/T88III Technical Reference Guide Cutter cover Power switch FOEEUPDATPEERRRPOORWER Printer cover Control panel Cover open button Figure 1-1 Printer part names * For details on DIP switch settings, refer to "DIP Switch Positions and Steps for Changing DIP Switch Settings" (page 2-2). 1.2.2 Control Panel TM-T88II TM-T88III POWER ERROR PAPER OUT FEED...
... and Basic Operation 1.2.1 Part Names TM-T88II/T88III Technical Reference Guide Cutter cover Power switch FOEEUPDATPEERRRPOORWER Printer cover Control panel Cover open button Figure 1-1 Printer part names * For details on DIP switch settings, refer to "DIP Switch Positions and Steps for Changing DIP Switch Settings" (page 2-2). 1.2.2 Control Panel TM-T88II TM-T88III POWER ERROR PAPER OUT FEED...
Technical Reference
Page 17
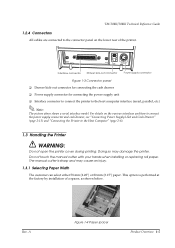
... connecting the power supply unit ❏ Interface connector to connect the printer to the Host Computer" (page 2-8). 1.3 Handling the Printer WARNING: Do not open the printer cover during printing. The manual cutter is performed at the factory by installation of the printer. TM-T88II/T88III Technical Reference Guide 1.2.4 Connectors All cables are connected to the connector...
... connecting the power supply unit ❏ Interface connector to connect the printer to the Host Computer" (page 2-8). 1.3 Handling the Printer WARNING: Do not open the printer cover during printing. The manual cutter is performed at the factory by installation of the printer. TM-T88II/T88III Technical Reference Guide 1.2.4 Connectors All cables are connected to the connector...
Technical Reference
Page 19
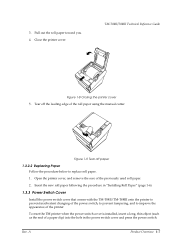
...is installed, insert a long, thin object (such as the end of the roll paper using the manual cutter. TM-T88II/T88III Technical Reference Guide FOEEUPDTAPEERRRPOORWER Figure 1-8 Closing the printer cover 5. Insert the new roll paper following the procedure in the power switch cover and press the power switch....clip) into the hole in "Installing Roll Paper" (page 1-6). 1.3.3 Power Switch Cover Install the power switch cover that comes with the TM-T88II/TM-T88III onto the printer to prevent inadvertent changing of the power switch, to prevent tampering, and to replace roll paper. 1. Open the...
...is installed, insert a long, thin object (such as the end of the roll paper using the manual cutter. TM-T88II/T88III Technical Reference Guide FOEEUPDTAPEERRRPOORWER Figure 1-8 Closing the printer cover 5. Insert the new roll paper following the procedure in the power switch cover and press the power switch....clip) into the hole in "Installing Roll Paper" (page 1-6). 1.3.3 Power Switch Cover Install the power switch cover that comes with the TM-T88II/TM-T88III onto the printer to prevent inadvertent changing of the power switch, to prevent tampering, and to replace roll paper. 1. Open the...
Technical Reference
Page 21
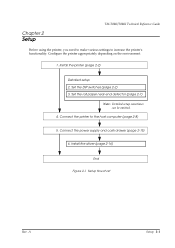
... the driver (page 2-16) End Figure 2-1 Setup flowchart Rev. Configure the printer appropriately depending on the environment. 1. A Setup 2-1 Chapter 2 Setup TM-T88II/T88III Technical Reference Guide Before using the printer, you need to make various settings to the host computer (page 2-8) 5. Install the printer (page 2-2) Detailed setup 2. Connect the power supply and cash drawer (page...
... the driver (page 2-16) End Figure 2-1 Setup flowchart Rev. Configure the printer appropriately depending on the environment. 1. A Setup 2-1 Chapter 2 Setup TM-T88II/T88III Technical Reference Guide Before using the printer, you need to make various settings to the host computer (page 2-8) 5. Install the printer (page 2-2) Detailed setup 2. Connect the power supply and cash drawer (page...
Technical Reference
Page 23
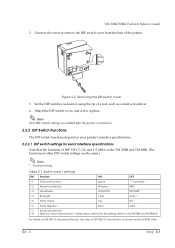
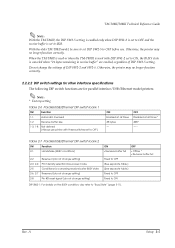
TM-T88II/T88III Technical Reference Guide 2. is printed * 1-2 Receive buffer size 45 bytes 4KB * 1-3 Handshake XON/XOFF DTR/DSR * 1-4 Bit length 7 bits 8 bits * 1-5 Parity check Yes No * 1-6 Parity ... specifications. 2.2.2.1 DIP switch settings for serial interface specifications Note that the settings differ on the TM-T88II and TM-T88III.)) For details on the TM-T88II and TM-88III. (The functions of the printer. A Setup 2-3 DSW1 DSW2 Figure 2-2 Removing the DIP switch cover 3. Attach the DIP switch cover, and screw in place. Set the DIP switches...
TM-T88II/T88III Technical Reference Guide 2. is printed * 1-2 Receive buffer size 45 bytes 4KB * 1-3 Handshake XON/XOFF DTR/DSR * 1-4 Bit length 7 bits 8 bits * 1-5 Parity check Yes No * 1-6 Parity ... specifications. 2.2.2.1 DIP switch settings for serial interface specifications Note that the settings differ on the TM-T88II and TM-T88III.)) For details on the TM-T88II and TM-88III. (The functions of the printer. A Setup 2-3 DSW1 DSW2 Figure 2-2 Removing the DIP switch cover 3. Attach the DIP switch cover, and screw in place. Set the DIP switches...
Technical Reference
Page 24
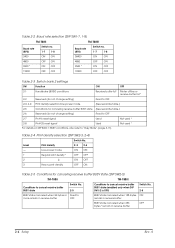
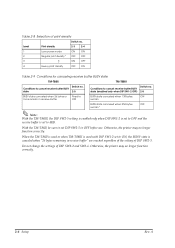
... Function ON OFF 2-1 Handshake (BUSY) conditions Receive buffer full Printer offline or receive buffer full * 2-2 Reserved (do not change setting) Fixed to OFF 2-3, 2-4 Print density selection/low-power mode (See separate table.) 2-5 Conditions for canceling receive buffer BUSY state (DIP SW2-5) TM-T88II TM-T88III Conditions to cancel receive buffer BUSY state Switch No...
... Function ON OFF 2-1 Handshake (BUSY) conditions Receive buffer full Printer offline or receive buffer full * 2-2 Reserved (do not change setting) Fixed to OFF 2-3, 2-4 Print density selection/low-power mode (See separate table.) 2-5 Conditions for canceling receive buffer BUSY state (DIP SW2-5) TM-T88II TM-T88III Conditions to cancel receive buffer BUSY state Switch No...
Technical Reference
Page 25
...set to "Busy State" (page 3-11). Do not change the settings of DIP SW2-5 setting. When the TM-T88II is used or when the TM-T88III is canceled when "26 bytes remaining in receive buffer" are for canceling receive buffer BUSY state 2-6, 2-7 Reserved (...interface/USB/Ethernet model printers. Rev. Otherwise, the printer may no longer function correctly. Note: * Factory setting Table 2-6 Parallel/USB/Ethernet DIP switch bank 1 SW Function 1-1 Automatic line feed 1-2 Receive buffer size 1-3, 1-8 Not defined (Always use . A Setup 2-5 With the older TM-T88II model, be ...
...set to "Busy State" (page 3-11). Do not change the settings of DIP SW2-5 setting. When the TM-T88II is used or when the TM-T88III is canceled when "26 bytes remaining in receive buffer" are for canceling receive buffer BUSY state 2-6, 2-7 Reserved (...interface/USB/Ethernet model printers. Rev. Otherwise, the printer may no longer function correctly. Note: * Factory setting Table 2-6 Parallel/USB/Ethernet DIP switch bank 1 SW Function 1-1 Automatic line feed 1-2 Receive buffer size 1-3, 1-8 Not defined (Always use . A Setup 2-5 With the older TM-T88II model, be ...
Technical Reference
Page 26
... canceled when 138 bytes ON remain BUSY state canceled when 256 bytes OFF remain * Note: With the TM-T88III, the DIP SW2-5 setting is enabled only when DIP SW1-2 is set to 4KB. Otherwise, the printer may no . Conditions to cancel receive buffer BUSY state (enabled only when DIP SW1-2 OFF) 2-5 BUSY state...
... canceled when 138 bytes ON remain BUSY state canceled when 256 bytes OFF remain * Note: With the TM-T88III, the DIP SW2-5 setting is enabled only when DIP SW1-2 is set to 4KB. Otherwise, the printer may no . Conditions to cancel receive buffer BUSY state (enabled only when DIP SW1-2 OFF) 2-5 BUSY state...
Technical Reference
Page 29
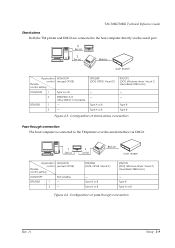
TM-T88II/T88III Technical Reference Guide Stand alone Both the TM printer and DM-D are connected to the TM printer over the serial interface via the serial port. DTR/DSR (DOS, OPOS, Visual C) - - DTR/DSR (DOS, OPOS, Visual C) - A Setup 2-9 Application control TM side control setting XON/XOFF..., Visual C, Visual Basic MSComm) - Type A or B Type A or B RTS/CTS (DOS, Windows driver, Visual C, Visual Basic MSComm) - - Application control TM side control setting XON/XOFF (except OPOS) XON/XOFF 1 Type A or B 2 DM-D500: A, B Other DM-D: not possible DTR/DSR 1 - 2 - ...
TM-T88II/T88III Technical Reference Guide Stand alone Both the TM printer and DM-D are connected to the TM printer over the serial interface via the serial port. DTR/DSR (DOS, OPOS, Visual C) - - DTR/DSR (DOS, OPOS, Visual C) - A Setup 2-9 Application control TM side control setting XON/XOFF..., Visual C, Visual Basic MSComm) - Type A or B Type A or B RTS/CTS (DOS, Windows driver, Visual C, Visual Basic MSComm) - - Application control TM side control setting XON/XOFF (except OPOS) XON/XOFF 1 Type A or B 2 DM-D500: A, B Other DM-D: not possible DTR/DSR 1 - 2 - ...
Technical Reference
Page 31
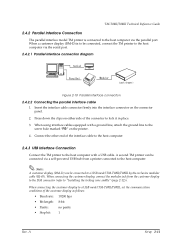
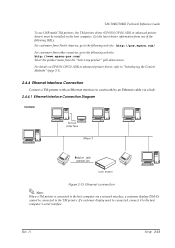
... the customer display to a USB model TM-T88II/T88III, set the communication conditions of the connector to a USB model TM-T88II/T88III by the exclusive modular cable (RJ-45). When using interface cables equipped with a USB cable. A second TM printer can be connected via a self-powered USB... the other end of the interface cable to the host computer. 2.4.3 USB Interface Connection Connect the TM printer to the host computer with a ground line, attach the ground line to the host computer via the serial port. 2.4.2.1 Parallel interface connection diagram Figure 2-10 Parallel interface ...
... the customer display to a USB model TM-T88II/T88III, set the communication conditions of the connector to a USB model TM-T88II/T88III by the exclusive modular cable (RJ-45). When using interface cables equipped with a USB cable. A second TM printer can be connected via a self-powered USB... the other end of the interface cable to the host computer. 2.4.3 USB Interface Connection Connect the TM printer to the host computer with a ground line, attach the ground line to the host computer via the serial port. 2.4.2.1 Parallel interface connection diagram Figure 2-10 Parallel interface ...
Technical Reference
Page 32
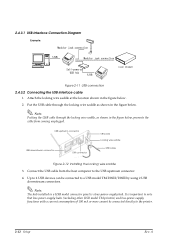
...-power-supply hub. Connect the USB cable from coming unplugged. Up to 2 USB devices can be connected directly to a USB model TM-T88III/T88III by using 2 USB downstream connectors. USB upstream connector USB downstream connector DM connector UB-board Locking wire saddle USB cable Figure 2-12 ... panel is important to note that bus-power-supply hubs (including other USB model TM printers) and bus-power-supply functions with a current consumption of 100 mA or more cannot be connected to the printer. 2-12 Setup Rev. 2.4.3.1 USB Interface Connection Diagram Example: Figure 2-11 USB...
...-power-supply hub. Connect the USB cable from coming unplugged. Up to 2 USB devices can be connected directly to a USB model TM-T88III/T88III by using 2 USB downstream connectors. USB upstream connector USB downstream connector DM connector UB-board Locking wire saddle USB cable Figure 2-12 ... panel is important to note that bus-power-supply hubs (including other USB model TM printers) and bus-power-supply functions with a current consumption of 100 mA or more cannot be connected to the printer. 2-12 Setup Rev. 2.4.3.1 USB Interface Connection Diagram Example: Figure 2-11 USB...
Technical Reference
Page 33
...TM printer is connected to the host computer via a network interface, a customer display (DM-D) cannot be connected, connect it to the host computer's serial interface. For details on the host computer. A Setup 2-13 TM-T88II/T88III Technical Reference Guide To use USB model TM printers, the TM printer driver (EPSON OPOS ADK or advanced printer... driver) must be connected to the TM printer.
...TM printer is connected to the host computer via a network interface, a customer display (DM-D) cannot be connected, connect it to the host computer's serial interface. For details on the host computer. A Setup 2-13 TM-T88II/T88III Technical Reference Guide To use USB model TM printers, the TM printer driver (EPSON OPOS ADK or advanced printer... driver) must be connected to the TM printer.
Technical Reference
Page 35
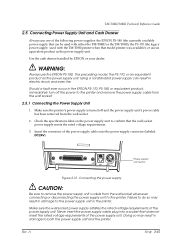
...voltage requirements of the power supply cable onto the power supply connector (labeled DC24V). A Setup 2-15 Use the cash drawer handled by EPSON or your dealer. or use an equivalent product as the power supply unit. Should a fault ever occur in damage to both the...PS-170 (the legacy power supply used with the TM-T88II printer when that the wall socket power supply meets the rated voltage requirements. 3. Using a nonstandard power supply can be used with either the TM-T88III or the TM-T88II); TM-T88II/T88III Technical Reference Guide 2.5 Connecting Power Supply Unit and ...
...voltage requirements of the power supply cable onto the power supply connector (labeled DC24V). A Setup 2-15 Use the cash drawer handled by EPSON or your dealer. or use an equivalent product as the power supply unit. Should a fault ever occur in damage to both the...PS-170 (the legacy power supply used with the TM-T88II printer when that the wall socket power supply meets the rated voltage requirements. 3. Using a nonstandard power supply can be used with either the TM-T88III or the TM-T88II); TM-T88II/T88III Technical Reference Guide 2.5 Connecting Power Supply Unit and ...
Technical Reference
Page 36
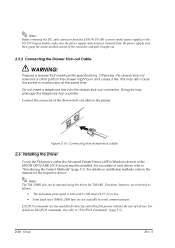
... 3-5). 2-16 Setup Rev. ESC/POS commands are not available in the drawer might burn and cause a fire. This may damage the telephone line or printer. Functions, however, are restricted as follows: • The maximum print speed is restricted to 120 mm/s {4.72"/s} or less. •...also available for directly controlling the printer without the user of each driver, refer to "Introducing the Control Methods" (page 3-1). For an outline of a driver. Note: The TM-T88III also can be installed. Note: Before removing the DC cable connector from the EPSON PS-180 (current model power...
... 3-5). 2-16 Setup Rev. ESC/POS commands are not available in the drawer might burn and cause a fire. This may damage the telephone line or printer. Functions, however, are restricted as follows: • The maximum print speed is restricted to 120 mm/s {4.72"/s} or less. •...also available for directly controlling the printer without the user of each driver, refer to "Introducing the Control Methods" (page 3-1). For an outline of a driver. Note: The TM-T88III also can be installed. Note: Before removing the DC cable connector from the EPSON PS-180 (current model power...


