Product Brochure
Page 2
... Black ink cartridge and three 125 Standard-capacity color ink cartridges: Cyan, Magenta, Yellow) Epson printer driver, Web to Page, Epson Scan One-year limited warranty in the U.S. Actual yields will vary according to media, printed...Epson Stylus NX420 color all prints under glass in indoor display conditions; Epson does not guarantee the longevity of their respective companies. eco.epson.com Epson America, Inc. 3840 Kilroy Airport Way, Long Beach, CA 90806 Epson Canada, Ltd. 3771 Victoria Park Avenue, Toronto, Ontario M1W 3Z5 www.epson.com www.epson.ca Epson, Epson Stylus...
... Black ink cartridge and three 125 Standard-capacity color ink cartridges: Cyan, Magenta, Yellow) Epson printer driver, Web to Page, Epson Scan One-year limited warranty in the U.S. Actual yields will vary according to media, printed...Epson Stylus NX420 color all prints under glass in indoor display conditions; Epson does not guarantee the longevity of their respective companies. eco.epson.com Epson America, Inc. 3840 Kilroy Airport Way, Long Beach, CA 90806 Epson Canada, Ltd. 3771 Victoria Park Avenue, Toronto, Ontario M1W 3Z5 www.epson.com www.epson.ca Epson, Epson Stylus...
Quick Guide
Page 2
... Paper Type 31 Scanning a Document or Photo 32 Quick Scanning With the Scan Button 32 Scanning With Epson Scan Software 33 Scanning with Mac OS X 10.6 34 Restoring and Correcting Photos 35 Maintaining Your Printer 36 Checking the Print Head Nozzles 36 Cleaning the Print Head 37 Checking Ink Levels 38 Purchasing...
... Paper Type 31 Scanning a Document or Photo 32 Quick Scanning With the Scan Button 32 Scanning With Epson Scan Software 33 Scanning with Mac OS X 10.6 34 Restoring and Correcting Photos 35 Maintaining Your Printer 36 Checking the Print Head Nozzles 36 Cleaning the Print Head 37 Checking Ink Levels 38 Purchasing...
Quick Guide
Page 4
... First Time Before you begin, make sure that you're installing the printer, follow the steps in the space provided below . ■ If your printer is the first time that you 're having trouble setting up your wireless printer, see "Network Problems" on page 44. ■ If this is... or lowercase (abc) letters, be sure to the printer, see the User Account Control screen, click Yes or Continue. Insert the printer software CD. 2. Windows XP: When you need to set up your printer on page 14. Mac OS® X: Double-click the Epson icon. 4 Wireless Network Setup Windows® 7 and...
... First Time Before you begin, make sure that you're installing the printer, follow the steps in the space provided below . ■ If your printer is the first time that you 're having trouble setting up your wireless printer, see "Network Problems" on page 44. ■ If this is... or lowercase (abc) letters, be sure to the printer, see the User Account Control screen, click Yes or Continue. Insert the printer software CD. 2. Windows XP: When you need to set up your printer on page 14. Mac OS® X: Double-click the Epson icon. 4 Wireless Network Setup Windows® 7 and...
Quick Guide
Page 6
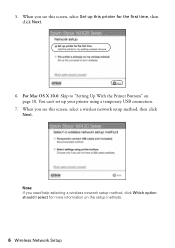
When you need help selecting a wireless network setup method, click Which option should I select for the first time, then click Next. 6. Note: If you see this printer for more information on page 10. When you see this screen, select Set up your printer using a temporary USB connection. 7. You can't set up this screen, select a wireless network setup method, then click Next. 5. For Mac OS X 10.6: Skip to "Setting Up With the Printer Buttons" on the setup methods. 6 Wireless Network Setup
When you need help selecting a wireless network setup method, click Which option should I select for the first time, then click Next. 6. Note: If you see this printer for more information on page 10. When you see this screen, select Set up your printer using a temporary USB connection. 7. You can't set up this screen, select a wireless network setup method, then click Next. 5. For Mac OS X 10.6: Skip to "Setting Up With the Printer Buttons" on the setup methods. 6 Wireless Network Setup
Quick Guide
Page 7
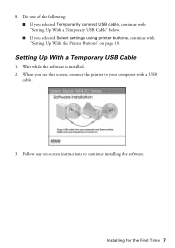
Do one of the following: ■ If you selected Temporarily connect USB cable, continue with "Setting Up With a Temporary USB Cable" below. ■ If you see this screen, connect the printer to continue installing the software. Wait while the software is installed. 2. 8. Installing for the First Time 7 Follow any on-screen instructions to your computer with "Setting Up With the Printer Buttons" on page 10. When you selected Select settings using printer buttons, continue with a USB cable. 3. Setting Up With a Temporary USB Cable 1.
Do one of the following: ■ If you selected Temporarily connect USB cable, continue with "Setting Up With a Temporary USB Cable" below. ■ If you see this screen, connect the printer to continue installing the software. Wait while the software is installed. 2. 8. Installing for the First Time 7 Follow any on-screen instructions to your computer with "Setting Up With the Printer Buttons" on page 10. When you selected Select settings using printer buttons, continue with a USB cable. 3. Setting Up With a Temporary USB Cable 1.
Quick Guide
Page 9
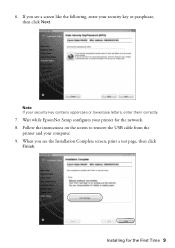
If you see a screen like the following, enter your printer for the First Time 9 When you see the Installation Complete screen, print a test page, then click Finish. Note: If your computer. 9. Installing for the network. 8. Wait while EpsonNet Setup configures your security key or passphrase, then click Next. 6. Follow the instructions on the screen to remove the USB cable from the printer and your security key contains uppercase or lowercase letters, enter them correctly. 7.
If you see a screen like the following, enter your printer for the First Time 9 When you see the Installation Complete screen, print a test page, then click Finish. Note: If your computer. 9. Installing for the network. 8. Wait while EpsonNet Setup configures your security key or passphrase, then click Next. 6. Follow the instructions on the screen to remove the USB cable from the printer and your security key contains uppercase or lowercase letters, enter them correctly. 7.
Quick Guide
Page 10
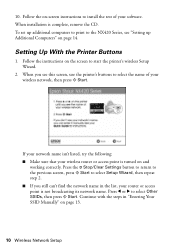
To set up additional computers to print to the NX420 Series, see this screen, use the printer's buttons to start the printer's wireless Setup Wizard. 2. Follow the on-screen instructions to install the rest of your wireless router or access point is turned on the screen to .... Press the y Stop/Clear Settings button to return to the previous screen, press x Start to select Other SSIDs, then press x Start. Setting Up With the Printer Buttons 1. When you still can't find the network name in "Entering Your SSID Manually" on page 14. Continue with the steps in the list, your...
To set up additional computers to print to the NX420 Series, see this screen, use the printer's buttons to start the printer's wireless Setup Wizard. 2. Follow the on-screen instructions to install the rest of your wireless router or access point is turned on the screen to .... Press the y Stop/Clear Settings button to return to the previous screen, press x Start to select Other SSIDs, then press x Start. Setting Up With the Printer Buttons 1. When you still can't find the network name in "Entering Your SSID Manually" on page 14. Continue with the steps in the list, your...
Quick Guide
Page 11
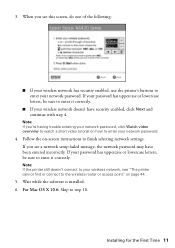
... settings. If you see this screen, do one of the following: ■ If your wireless network has security enabled, use the printer's buttons to your network password. 3. Note: If the printer still doesn't connect to enter your wireless network, see a network setup failed message, the network password may have security enabled, click...
... settings. If you see this screen, do one of the following: ■ If your wireless network has security enabled, use the printer's buttons to your network password. 3. Note: If the printer still doesn't connect to enter your wireless network, see a network setup failed message, the network password may have security enabled, click...
Quick Guide
Page 12
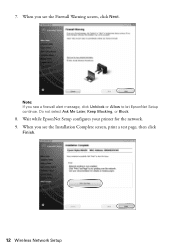
Do not select Ask Me Later, Keep Blocking, or Block. 8. Wait while EpsonNet Setup configures your printer for the network. 9. Note: If you see the Installation Complete screen, print a test page, then click Finish. 12 Wireless Network Setup When you see the Firewall Warning screen, click Next. When you see a firewall alert message, click Unblock or Allow to let EpsonNet Setup continue. 7.
Do not select Ask Me Later, Keep Blocking, or Block. 8. Wait while EpsonNet Setup configures your printer for the network. 9. Note: If you see the Installation Complete screen, print a test page, then click Finish. 12 Wireless Network Setup When you see the Firewall Warning screen, click Next. When you see a firewall alert message, click Unblock or Allow to let EpsonNet Setup continue. 7.
Quick Guide
Page 13
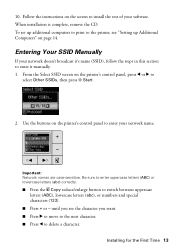
...names are case-sensitive. Installing for the First Time 13 When installation is complete, remove the CD. Follow the instructions on the screen to the printer, see the character you want. ■ Press r to move to the next character. ■ Press l to delete a character. To set... up Additional Computers" on the printer's control panel, press l or r to switch between uppercase letters (ABC), lowercase letters (abc), or numbers and special characters (123). ■ Press + or...
...names are case-sensitive. Installing for the First Time 13 When installation is complete, remove the CD. Follow the instructions on the screen to the printer, see the character you want. ■ Press r to move to the next character. ■ Press l to delete a character. To set... up Additional Computers" on the printer's control panel, press l or r to switch between uppercase letters (ABC), lowercase letters (abc), or numbers and special characters (123). ■ Press + or...
Quick Guide
Page 14
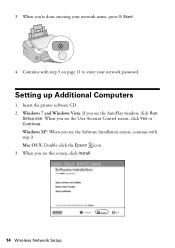
Windows XP: When you see the Software Installation screen, continue with step 3 on page 11 to enter your network name, press x Start. 4. Insert the printer software CD. 2. When you see the User Account Control screen, click Yes or Continue. Setting up Additional Computers 1. Mac OS X: Double-click the Epson icon. 3. Continue with step 3. When you 're done entering your network password. 3. When you see the AutoPlay window, click Run Setup.exe. Windows 7 and Windows Vista: If you see this screen, click Install. 14 Wireless Network Setup
Windows XP: When you see the Software Installation screen, continue with step 3 on page 11 to enter your network name, press x Start. 4. Insert the printer software CD. 2. When you see the User Account Control screen, click Yes or Continue. Setting up Additional Computers 1. Mac OS X: Double-click the Epson icon. 3. Continue with step 3. When you 're done entering your network password. 3. When you see the AutoPlay window, click Run Setup.exe. Windows 7 and Windows Vista: If you see this screen, click Install. 14 Wireless Network Setup
Quick Guide
Page 15
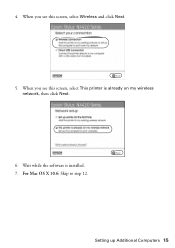
For Mac OS X 10.6: Skip to step 12. When you see this screen, select This printer is installed. 7. Setting up Additional Computers 15 When you see this screen, select Wireless and click Next. 5. 4. Wait while the software is already on my wireless network, then click Next. 6.
For Mac OS X 10.6: Skip to step 12. When you see this screen, select This printer is installed. 7. Setting up Additional Computers 15 When you see this screen, select Wireless and click Next. 5. 4. Wait while the software is already on my wireless network, then click Next. 6.
Quick Guide
Page 16
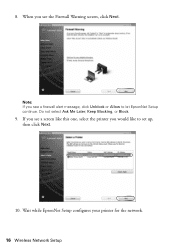
If you see a firewall alert message, click Unblock or Allow to set up, then click Next. 10. Wait while EpsonNet Setup configures your printer for the network. 16 Wireless Network Setup Do not select Ask Me Later, Keep Blocking, or Block. 9. 8. Note: If you see a screen like this one, select the printer you see the Firewall Warning screen, click Next. When you would like to let EpsonNet Setup continue.
If you see a firewall alert message, click Unblock or Allow to set up, then click Next. 10. Wait while EpsonNet Setup configures your printer for the network. 16 Wireless Network Setup Do not select Ask Me Later, Keep Blocking, or Block. 9. 8. Note: If you see a screen like this one, select the printer you see the Firewall Warning screen, click Next. When you would like to let EpsonNet Setup continue.
Quick Guide
Page 19
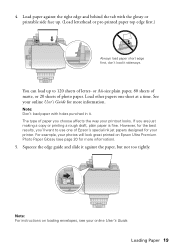
...of photo paper. Note: Don't load paper with the glossy or printable side face up to use one sheet at a time. The type of Epson's special ink jet papers designed for more information. Loading Paper 19 If you choose affects the way your online User's Guide. Note: For instructions ...other papers one of paper you are just making a copy or printing a rough draft, plain paper is fine. However, for more information). 5. See your printer. Load paper against the paper, but not too tightly. Squeeze the edge guide and slide it against the right edge and behind the tab with...
...of photo paper. Note: Don't load paper with the glossy or printable side face up to use one sheet at a time. The type of Epson's special ink jet papers designed for more information. Loading Paper 19 If you choose affects the way your online User's Guide. Note: For instructions ...other papers one of paper you are just making a copy or printing a rough draft, plain paper is fine. However, for more information). 5. See your printer. Load paper against the paper, but not too tightly. Squeeze the edge guide and slide it against the right edge and behind the tab with...
Quick Guide
Page 24
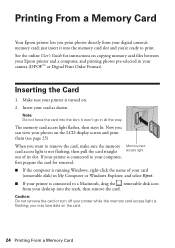
Make sure your card as shown. Insert your printer is turned on copying memory card files between your Epson printer and a computer, and printing photos pre-selected...your card (removable disk) in My Computer or Windows Explorer, and select Eject. ■ If your printer is connected to your computer, first prepare the card for instructions on . 2. Caution: Do not ...remove the card or turn off your digital camera's memory card; Printing From a Memory Card Your Epson printer lets you print photos directly from your desktop into the trash, then remove the card. Inserting the Card...
Make sure your card as shown. Insert your printer is turned on copying memory card files between your Epson printer and a computer, and printing photos pre-selected...your card (removable disk) in My Computer or Windows Explorer, and select Eject. ■ If your printer is connected to your computer, first prepare the card for instructions on . 2. Caution: Do not ...remove the card or turn off your digital camera's memory card; Printing From a Memory Card Your Epson printer lets you print photos directly from your desktop into the trash, then remove the card. Inserting the Card...
Quick Guide
Page 26
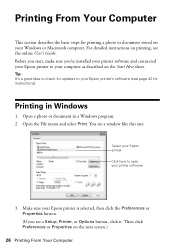
... the next screen.) 26 Printing From Your Computer Make sure your Epson printer is selected, then click the Preferences or Properties button. (If you 've installed your printer software and connected your Epson printer to your Epson printer's software (see a window like this one: Select your Epson printer Click here to open your Windows or Macintosh computer. Printing in...
... the next screen.) 26 Printing From Your Computer Make sure your Epson printer is selected, then click the Preferences or Properties button. (If you 've installed your printer software and connected your Epson printer to your Epson printer's software (see a window like this one: Select your Epson printer Click here to open your Windows or Macintosh computer. Printing in...
Quick Guide
Page 28
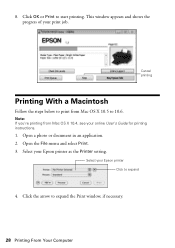
... X 10.5 to print from Mac OS X 10.4, see your print job. Cancel printing Printing With a Macintosh Follow the steps below to 10.6. Select your Epson printer as the Printer setting. This window appears and shows the progress of your online User's Guide for printing instructions. 1. Open a photo or document in an application. 2. Open...
... X 10.5 to print from Mac OS X 10.4, see your print job. Cancel printing Printing With a Macintosh Follow the steps below to 10.6. Select your Epson printer as the Printer setting. This window appears and shows the progress of your online User's Guide for printing instructions. 1. Open a photo or document in an application. 2. Open...
Quick Guide
Page 31
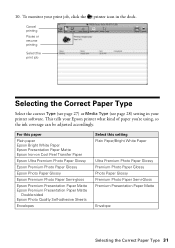
... Type Select the correct Type (see page 27) or Media Type (see page 28) setting in the dock. To monitor your print job, click the printer icon in your Epson printer what kind of paper you're using, so the ink coverage can be adjusted accordingly. 10. For this paper Plain paper...
... Type Select the correct Type (see page 27) or Media Type (see page 28) setting in the dock. To monitor your print job, click the printer icon in your Epson printer what kind of paper you're using, so the ink coverage can be adjusted accordingly. 10. For this paper Plain paper...
Quick Guide
Page 33
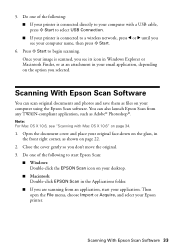
...as shown on your image is connected to select USB Connection. ■ If your printer is scanned, you see "Scanning with Mac OS X 10.6" on your desktop. ■ Macintosh: Double-click EPSON Scan in your email application, depending on the option you see your application. Open the... document cover and place your Epson printer. Scanning With Epson Scan Software 33 Once your computer using the Epson Scan software. Then open the File menu, choose Import or Acquire, and select your original face-down ...
...as shown on your image is connected to select USB Connection. ■ If your printer is scanned, you see "Scanning with Mac OS X 10.6" on your desktop. ■ Macintosh: Double-click EPSON Scan in your email application, depending on the option you see your application. Open the... document cover and place your Epson printer. Scanning With Epson Scan Software 33 Once your computer using the Epson Scan software. Then open the File menu, choose Import or Acquire, and select your original face-down ...
Quick Guide
Page 36
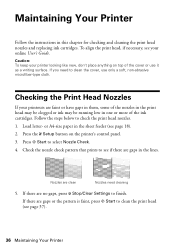
...). 2. Checking the Print Head Nozzles If your online User's Guide. Press x Start to clean the cover, use it as a writing surface. Caution: To keep your printer looking like new, don't place anything on the printer's control panel. 3. Nozzles are no gaps, press y Stop/Clear Settings to see page 37). 36 Maintaining Your...
...). 2. Checking the Print Head Nozzles If your online User's Guide. Press x Start to clean the cover, use it as a writing surface. Caution: To keep your printer looking like new, don't place anything on the printer's control panel. 3. Nozzles are no gaps, press y Stop/Clear Settings to see page 37). 36 Maintaining Your...


