Product Brochure
Page 1
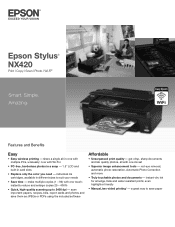
... touchable photos and documents - scan important papers, recipes, bills, report cards and photos and save paper Epson Stylus® NX420 Print | Copy | Scan | Photo | Wi-Fi® Smart. Simple. Features and Benefits Easy • Easy wireless printing - individual ink cartridges, available in card slots • Replace only the color you need - instant-dry...
... touchable photos and documents - scan important papers, recipes, bills, report cards and photos and save paper Epson Stylus® NX420 Print | Copy | Scan | Photo | Wi-Fi® Smart. Simple. Features and Benefits Easy • Easy wireless printing - individual ink cartridges, available in card slots • Replace only the color you need - instant-dry...
Product Brochure
Page 2
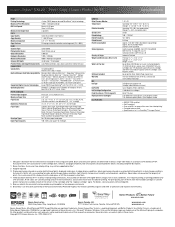
... UL60950, CSA C22.2 No. 60950 EMI FCC Part 15 subpart B class B, CAN/CSA-CEI/IEC CISPR 22 class B Indonesia/Thailand Printing: 17.7" x 21.3" x 11.7" Storage: 17.7" x 13.5" x 7.2" Weight: 12.3 lb Epson Stylus NX420 color all-in-one, instruction booklets, CD-ROM with drivers, power cord, 4 DURABrite® Ultra Ink cartridges (one 125 Standard-capacity...
... UL60950, CSA C22.2 No. 60950 EMI FCC Part 15 subpart B class B, CAN/CSA-CEI/IEC CISPR 22 class B Indonesia/Thailand Printing: 17.7" x 21.3" x 11.7" Storage: 17.7" x 13.5" x 7.2" Weight: 12.3 lb Epson Stylus NX420 color all-in-one, instruction booklets, CD-ROM with drivers, power cord, 4 DURABrite® Ultra Ink cartridges (one 125 Standard-capacity...
Quick Guide
Page 1
Epson Stylus® NX420 Series Quick Guide Wireless Network Setup Basic Copying, Printing, and Scanning Maintenance Solving Problems
Epson Stylus® NX420 Series Quick Guide Wireless Network Setup Basic Copying, Printing, and Scanning Maintenance Solving Problems
Quick Guide
Page 2
...Inserting the Card 24 Printing Photos From the LCD Screen 25 Printing From Your Computer 26 Printing in Windows 26 Printing With a Macintosh 28 Selecting the Correct Paper Type 31 Scanning a Document or Photo 32 Quick Scanning With the Scan Button 32 Scanning With Epson Scan Software 33 Scanning... with Mac OS X 10.6 34 Restoring and Correcting Photos 35 Maintaining Your Printer 36 Checking the Print Head Nozzles 36 Cleaning the Print Head 37 Checking Ink Levels 38 Purchasing Epson Ink Cartridges 38 Replacing Ink ...
...Inserting the Card 24 Printing Photos From the LCD Screen 25 Printing From Your Computer 26 Printing in Windows 26 Printing With a Macintosh 28 Selecting the Correct Paper Type 31 Scanning a Document or Photo 32 Quick Scanning With the Scan Button 32 Scanning With Epson Scan Software 33 Scanning... with Mac OS X 10.6 34 Restoring and Correcting Photos 35 Maintaining Your Printer 36 Checking the Print Head Nozzles 36 Cleaning the Print Head 37 Checking Ink Levels 38 Purchasing Epson Ink Cartridges 38 Replacing Ink ...
Quick Guide
Page 4
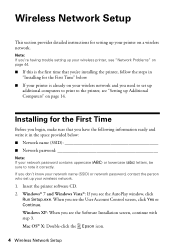
Mac OS® X: Double-click the Epson icon. 4 Wireless Network Setup Insert the printer software CD. 2. Windows XP: When you have the following information ready and write it correctly. Note: If you'... window, click Run Setup.exe. If you don't know your network name (SSID) or network password, contact the person who set up additional computers to print to note it in "Installing for setting up your printer on page 14. Windows® 7 and Windows Vista®: If you need to set up...
Mac OS® X: Double-click the Epson icon. 4 Wireless Network Setup Insert the printer software CD. 2. Windows XP: When you have the following information ready and write it correctly. Note: If you'... window, click Run Setup.exe. If you don't know your network name (SSID) or network password, contact the person who set up additional computers to print to note it in "Installing for setting up your printer on page 14. Windows® 7 and Windows Vista®: If you need to set up...
Quick Guide
Page 9
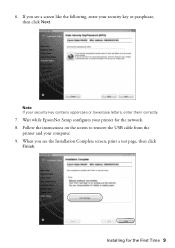
6. If you see a screen like the following, enter your security key contains uppercase or lowercase letters, enter them correctly. 7. Follow the instructions on the screen to remove the USB cable from the printer and your printer for the First Time 9 When you see the Installation Complete screen, print a test page, then click Finish. Wait while EpsonNet Setup configures your computer. 9. Note: If your security key or passphrase, then click Next. Installing for the network. 8.
6. If you see a screen like the following, enter your security key contains uppercase or lowercase letters, enter them correctly. 7. Follow the instructions on the screen to remove the USB cable from the printer and your printer for the First Time 9 When you see the Installation Complete screen, print a test page, then click Finish. Wait while EpsonNet Setup configures your computer. 9. Note: If your security key or passphrase, then click Next. Installing for the network. 8.
Quick Guide
Page 10
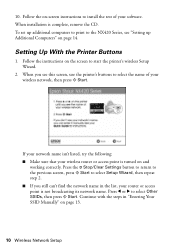
When installation is turned on page 13. 10 Wireless Network Setup Setting Up With the Printer Buttons 1. To set up additional computers to print to the NX420 Series, see this screen, use the printer's buttons to select the name of your router or access point is not broadcasting its network name. Press l ...
When installation is turned on page 13. 10 Wireless Network Setup Setting Up With the Printer Buttons 1. To set up additional computers to print to the NX420 Series, see this screen, use the printer's buttons to select the name of your router or access point is not broadcasting its network name. Press l ...
Quick Guide
Page 12
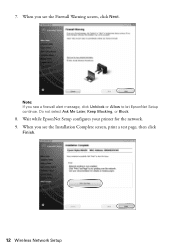
7. Do not select Ask Me Later, Keep Blocking, or Block. 8. Wait while EpsonNet Setup configures your printer for the network. 9. When you see a firewall alert message, click Unblock or Allow to let EpsonNet Setup continue. Note: If you see the Firewall Warning screen, click Next. When you see the Installation Complete screen, print a test page, then click Finish. 12 Wireless Network Setup
7. Do not select Ask Me Later, Keep Blocking, or Block. 8. Wait while EpsonNet Setup configures your printer for the network. 9. When you see a firewall alert message, click Unblock or Allow to let EpsonNet Setup continue. Note: If you see the Firewall Warning screen, click Next. When you see the Installation Complete screen, print a test page, then click Finish. 12 Wireless Network Setup
Quick Guide
Page 13
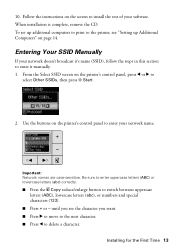
Entering Your SSID Manually If your software. 10. To set up additional computers to print to the printer, see the character you see "Setting up Additional Computers" on the printer's control panel to switch between uppercase letters (ABC), lowercase letters (...
Entering Your SSID Manually If your software. 10. To set up additional computers to print to the printer, see the character you see "Setting up Additional Computers" on the printer's control panel to switch between uppercase letters (ABC), lowercase letters (...
Quick Guide
Page 17
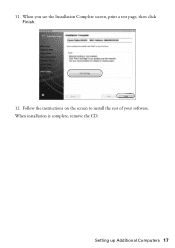
Follow the instructions on the screen to install the rest of your software. When installation is complete, remove the CD. Setting up Additional Computers 17 When you see the Installation Complete screen, print a test page, then click Finish. 12. 11.
Follow the instructions on the screen to install the rest of your software. When installation is complete, remove the CD. Setting up Additional Computers 17 When you see the Installation Complete screen, print a test page, then click Finish. 12. 11.

Quick Guide
Page 18
For details, see page 20. 1. Open the output tray, pull out the extensions, and raise the paper stopper. Squeeze the edge guide as you 're using legal-size paper, don't raise the paper stopper. 3. Note: If you slide it all the way to the left. 18 Loading Paper Open the paper support and pull up the extensions. 2. Loading Paper You can print documents and photos on a variety of paper types and sizes.
For details, see page 20. 1. Open the output tray, pull out the extensions, and raise the paper stopper. Squeeze the edge guide as you 're using legal-size paper, don't raise the paper stopper. 3. Note: If you slide it all the way to the left. 18 Loading Paper Open the paper support and pull up the extensions. 2. Loading Paper You can print documents and photos on a variety of paper types and sizes.
Quick Guide
Page 19
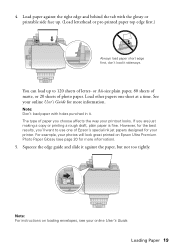
...for more information). 5. Loading Paper 19 You can load up . (Load letterhead or pre-printed paper top edge first.) Always load paper short edge first, don't load it . Note: For instructions on Epson Ultra Premium Photo Paper Glossy (see your online User's Guide for more information. Squeeze the edge...120 sheets of photo paper. However, for your printout looks. Load paper against the paper, but not too tightly. The type of Epson's special ink jet papers designed for the best results, you are just making a copy or printing a rough draft, plain paper is fine. 4.
...for more information). 5. Loading Paper 19 You can load up . (Load letterhead or pre-printed paper top edge first.) Always load paper short edge first, don't load it . Note: For instructions on Epson Ultra Premium Photo Paper Glossy (see your online User's Guide for more information. Squeeze the edge...120 sheets of photo paper. However, for your printout looks. Load paper against the paper, but not too tightly. The type of Epson's special ink jet papers designed for the best results, you are just making a copy or printing a rough draft, plain paper is fine. 4.
Quick Guide
Page 23
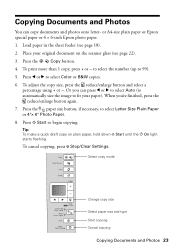
... and photos onto letter- Press x Start to select Letter Size Plain Paper or 4"× 6" Photo Paper. 8. or A4-size plain paper or Epson special paper or 4 × 6-inch Epson photo paper. 1. Press the paper size button, if necessary, to begin copying. Tip: To make a quick draft copy on the scanner glass (see... your original document on plain paper, hold down x Start until the P On light starts flashing. Load paper in the sheet feeder (see page 22). 3. To print more than 1 copy, press + or -
... and photos onto letter- Press x Start to select Letter Size Plain Paper or 4"× 6" Photo Paper. 8. or A4-size plain paper or Epson special paper or 4 × 6-inch Epson photo paper. 1. Press the paper size button, if necessary, to begin copying. Tip: To make a quick draft copy on the scanner glass (see... your original document on plain paper, hold down x Start until the P On light starts flashing. Load paper in the sheet feeder (see page 22). 3. To print more than 1 copy, press + or -
Quick Guide
Page 24
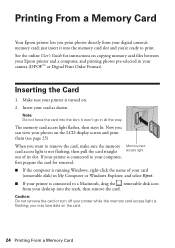
...your computer, first prepare the card for instructions on copying memory card files between your Epson printer and a computer, and printing photos pre-selected in your printer is turned on the card. 24 Printing From a Memory Card Caution: Do not remove the card or turn off your ...desktop into the trash, then remove the card. you want to print. The memory card access light flashes, then stays lit. Printing From a Memory Card Your Epson printer lets you print photos directly from your printer while the memory card access light is flashing; Insert your...
...your computer, first prepare the card for instructions on copying memory card files between your Epson printer and a computer, and printing photos pre-selected in your printer is turned on the card. 24 Printing From a Memory Card Caution: Do not remove the card or turn off your ...desktop into the trash, then remove the card. you want to print. The memory card access light flashes, then stays lit. Printing From a Memory Card Your Epson printer lets you print photos directly from your printer while the memory card access light is flashing; Insert your...
Quick Guide
Page 25
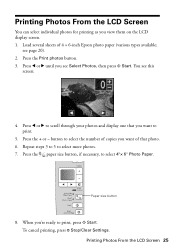
...select the number of copies you want to print, press x Start. Press l or r until you view them on the LCD display screen. 1. Load several sheets of that you 're ready to print. 5. Paper size button 8. When you want of 4 × 6-inch Epson photo paper (various types available; Press ...l or r to scroll through your photos and display one that photo. 6. Printing Photos From the LCD Screen You can select individual ...
...select the number of copies you want to print, press x Start. Press l or r until you view them on the LCD display screen. 1. Load several sheets of that you 're ready to print. 5. Paper size button 8. When you want of 4 × 6-inch Epson photo paper (various types available; Press ...l or r to scroll through your photos and display one that photo. 6. Printing Photos From the LCD Screen You can select individual ...
Quick Guide
Page 26
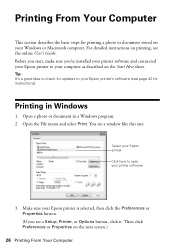
... is selected, then click the Preferences or Properties button. (If you 've installed your printer software and connected your Epson printer to open your computer as described on printing, see a Setup, Printer, or Options button, click it. Before you start, make sure you see the online... Properties on your Epson printer's software (see a window like this one: Select your Epson printer Click here to your printer software 3. Tip: It's a good idea to check for updates to your Windows or Macintosh computer. Open a photo or document in Windows 1. Printing From Your Computer This...
... is selected, then click the Preferences or Properties button. (If you 've installed your printer software and connected your Epson printer to open your computer as described on printing, see a Setup, Printer, or Options button, click it. Before you start, make sure you see the online... Properties on your Epson printer's software (see a window like this one: Select your Epson printer Click here to your printer software 3. Tip: It's a good idea to check for updates to your Windows or Macintosh computer. Open a photo or document in Windows 1. Printing From Your Computer This...

Quick Guide
Page 27
...setting for the paper you want to reduce or enlarge your online User's Guide. 7. You can create your settings. 4. For more information about print settings, click Help or see page 31 for pictures) Select your paper Type Select your paper Size Select your document Orientation Note: For quick ... own presets by clicking the Save Settings button on the Advanced tab. 5. On the Main tab, select the basic print settings. If you are using (see your printout, or print double-sided, click the Page Layout tab and select settings as necessary. 6. Click OK to the most common settings,...
...setting for the paper you want to reduce or enlarge your online User's Guide. 7. You can create your settings. 4. For more information about print settings, click Help or see page 31 for pictures) Select your paper Type Select your paper Size Select your document Orientation Note: For quick ... own presets by clicking the Save Settings button on the Advanced tab. 5. On the Main tab, select the basic print settings. If you are using (see your printout, or print double-sided, click the Page Layout tab and select settings as necessary. 6. Click OK to the most common settings,...
Quick Guide
Page 28
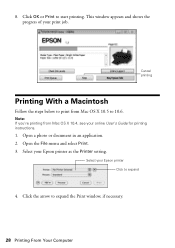
... your Epson printer as the Printer setting. This window appears and shows the progress of your online User's Guide for printing instructions. 1. Open a photo or document in an application. 2. 8. Note: If you're printing from Mac OS X 10.5 to start printing. Open the File menu and select Print. 3. Click OK or Print to 10.6. Cancel printing Printing With...
... your Epson printer as the Printer setting. This window appears and shows the progress of your online User's Guide for printing instructions. 1. Open a photo or document in an application. 2. 8. Note: If you're printing from Mac OS X 10.5 to start printing. Open the File menu and select Print. 3. Click OK or Print to 10.6. Cancel printing Printing With...
Quick Guide
Page 29
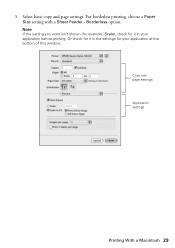
For borderless printing, choose a Paper Size setting with a Sheet Feeder - Borderless option. Or check for your application before printing. Note: If the setting you want isn't shown (for example, Scale), check for it in the settings for it in your application at the bottom of this window. Select basic copy and page settings. 5. Copy and page settings Application settings Printing With a Macintosh 29
For borderless printing, choose a Paper Size setting with a Sheet Feeder - Borderless option. Or check for your application before printing. Note: If the setting you want isn't shown (for example, Scale), check for it in the settings for it in your application at the bottom of this window. Select basic copy and page settings. 5. Copy and page settings Application settings Printing With a Macintosh 29

Quick Guide
Page 30
Choose any other printing options you may need from the pop-up menu. See the online User's Guide for details. 8. Click Print. 30 Printing From Your Computer Click the Advanced button to change additional settings. Note: For more information on advanced settings click ?. 9. 6. Choose Print Settings from the pop-up menu, and select the following print settings: Choose Print Settings Select your Media Type (see page 31) Select Color or Black/Grayscale Select higher quality or faster printing (if available) 7.
Choose any other printing options you may need from the pop-up menu. See the online User's Guide for details. 8. Click Print. 30 Printing From Your Computer Click the Advanced button to change additional settings. Note: For more information on advanced settings click ?. 9. 6. Choose Print Settings from the pop-up menu, and select the following print settings: Choose Print Settings Select your Media Type (see page 31) Select Color or Black/Grayscale Select higher quality or faster printing (if available) 7.


