

Quick Setup
Page 2
...blank screen If you see a blank screen or the No signal message after pressing it squarely toward the screen. PowerLite and PrivateLine are a registered trademarks of Seiko Epson Corporation. You may also speak with your product for identification purposes only and may be trademarks of support are ... common problems Control projector volume Navigate projector menus Where to get help Manual For more than one side The projector is set at www.epson.com/webreg. Internet Support Visit Epson's support website at epson.com/support and select your projector or register online at an angle...
...blank screen If you see a blank screen or the No signal message after pressing it squarely toward the screen. PowerLite and PrivateLine are a registered trademarks of Seiko Epson Corporation. You may also speak with your product for identification purposes only and may be trademarks of support are ... common problems Control projector volume Navigate projector menus Where to get help Manual For more than one side The projector is set at www.epson.com/webreg. Internet Support Visit Epson's support website at epson.com/support and select your projector or register online at an angle...

User's Guide
Page 18
... HDMI cable. One may be included with your video equipment. ■ To receive a component video signal from Epson. Unpacking the Projector After unpacking the projector, make sure you have all these parts: Projector PDF manual and registration CD-ROM Component-to-VGA video adapter Power cord Carrying case Remote control and batteries...
... HDMI cable. One may be included with your video equipment. ■ To receive a component video signal from Epson. Unpacking the Projector After unpacking the projector, make sure you have all these parts: Projector PDF manual and registration CD-ROM Component-to-VGA video adapter Power cord Carrying case Remote control and batteries...
User's Guide
Page 30
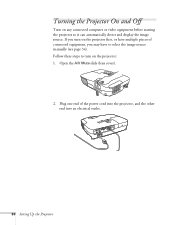
If you may have to select the image source manually (see page 34). Open the A/V Mute slide (lens cover). 2. Follow these steps to turn on any connected computer or video equipment before starting the projector so it can automatically detect and display the image source. Plug one end of connected equipment, you turn on the projector: 1. Turning the Projector On and Off Turn on the projector first, or have multiple pieces of the power cord into the projector, and the other end into an electrical outlet. 30 Setting Up the Projector
If you may have to select the image source manually (see page 34). Open the A/V Mute slide (lens cover). 2. Follow these steps to turn on any connected computer or video equipment before starting the projector so it can automatically detect and display the image source. Plug one end of connected equipment, you turn on the projector: 1. Turning the Projector On and Off Turn on the projector first, or have multiple pieces of the power cord into the projector, and the other end into an electrical outlet. 30 Setting Up the Projector
User's Guide
Page 49
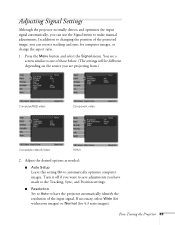
... settings will be different depending on the source you have made to the Tracking, Sync, and Position settings. ■ Resolution Set to Auto to make manual adjustments. Press the Menu button and select the Signal menu.
... settings will be different depending on the source you have made to the Tracking, Sync, and Position settings. ■ Resolution Set to Auto to make manual adjustments. Press the Menu button and select the Signal menu.

User's Guide
Page 75
... message Not Supported is displayed. ■ Make sure the correct input signal is supported by the projector (see page 49). ■ Make sure your notebook's manual or online help for details. If you 're using a PC notebook: ■ Hold down the Fn key on the keyboard and press the function key...
... message Not Supported is displayed. ■ Make sure the correct input signal is supported by the projector (see page 49). ■ Make sure your notebook's manual or online help for details. If you 're using a PC notebook: ■ Hold down the Fn key on the keyboard and press the function key...
User's Guide
Page 78
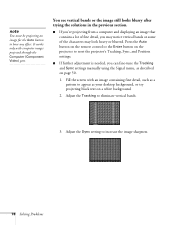
.... ■ If further adjustment is needed, you may notice vertical bands or some of fine detail, you can fine-tune the Tracking and Sync settings manually using the Signal menu, as your desktop background, or try projecting black text on page 50. 1. Fill the screen with computer images projected through the...
.... ■ If further adjustment is needed, you may notice vertical bands or some of fine detail, you can fine-tune the Tracking and Sync settings manually using the Signal menu, as your desktop background, or try projecting black text on page 50. 1. Fill the screen with computer images projected through the...
User's Guide
Page 83
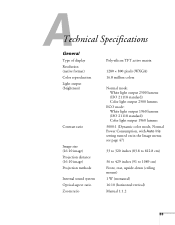
... 320 inches (83.8 to 812.8 cm) 36 to 429 inches (91 to 1089 cm) Front, rear, upside-down (ceiling mount) 1 W (monaural) 16:10 (horizontal:vertical) Manual 1:1.2 83 A Technical Specifications General Type of display Resolution (native format) Color reproduction Light output (brightness) Contrast ratio Image size (16:10 image) Projection distance (16...
... 320 inches (83.8 to 812.8 cm) 36 to 429 inches (91 to 1089 cm) Front, rear, upside-down (ceiling mount) 1 W (monaural) 16:10 (horizontal:vertical) Manual 1:1.2 83 A Technical Specifications General Type of display Resolution (native format) Color reproduction Light output (brightness) Contrast ratio Image size (16:10 image) Projection distance (16...

User's Guide
Page 84
... Control Range Batteries (2) Dimensions Height Width Depth Weight Electrical Rated frequency Power supply Power consumption 29 dB in ECO mode 37 dB in Normal mode Manual: ±30° vertical Auto Keystone: 0 to 11° vertical UHE (Ultra High Efficiency) 200 W Approx. 4000 hours (Normal mode) Approx. 5000 hours (ECO mode...
... Control Range Batteries (2) Dimensions Height Width Depth Weight Electrical Rated frequency Power supply Power consumption 29 dB in ECO mode 37 dB in Normal mode Manual: ±30° vertical Auto Keystone: 0 to 11° vertical UHE (Ultra High Efficiency) 200 W Approx. 4000 hours (Normal mode) Approx. 5000 hours (ECO mode...

User's Guide
Page 95
... to 73 Living Room color mode, 37 Locking buttons, 56 to 57 projector, 57 Logo, saving on projector, 54 to 56 M Macintosh display problems, 75 Manuals, 10 Menus changing settings, 46 default settings, restoring, 47 Extended, 52 to 53 Image, 47 to 48 Info, 65 to 66 Reset, 47, 65 Settings...
... to 73 Living Room color mode, 37 Locking buttons, 56 to 57 projector, 57 Logo, saving on projector, 54 to 56 M Macintosh display problems, 75 Manuals, 10 Menus changing settings, 46 default settings, restoring, 47 Extended, 52 to 53 Image, 47 to 48 Info, 65 to 66 Reset, 47, 65 Settings...

