

Warranty Statement - Extra Care
Page 1
...'re committed to 6:00 PM Pacific Time, Monday through Friday. IT'S FAST. Or register online at a critical moment, and we provide-and you need . Epson's Extra Care Home Service provides you with your projector fails. Our Extra Care Home Service offers a level of this feature, you do not have a problem with the projector support you are, we 'll ship you...
...'re committed to 6:00 PM Pacific Time, Monday through Friday. IT'S FAST. Or register online at a critical moment, and we provide-and you need . Epson's Extra Care Home Service provides you with your projector fails. Our Extra Care Home Service offers a level of this feature, you do not have a problem with the projector support you are, we 'll ship you...

Quick Start
Page 4
..., the power light flashes green, and the projector lamp starts to the projector and plug it into an electrical outlet. The power light flashes orange as the projector cools down. 2 When the power light is green or flashing orange. The power light turns orange. On button NOTE The lamp reaches maximum brightness in and turn on the remote control. Power light 2 Turn on your connected video equipment. 3 Aim the remote control at the projector or the screen and press the On button (or press the Power button on . Caution...
..., the power light flashes green, and the projector lamp starts to the projector and plug it into an electrical outlet. The power light flashes orange as the projector cools down. 2 When the power light is green or flashing orange. The power light turns orange. On button NOTE The lamp reaches maximum brightness in and turn on the remote control. Power light 2 Turn on your connected video equipment. 3 Aim the remote control at the projector or the screen and press the On button (or press the Power button on . Caution...

Quick Start
Page 5
... Menu button, and then select Settings > Screen > Setup Level. Exit the menu system when done (press the Menu button). 5 Use the Color Mode button on the screen, use the other Picture buttons to adjust the brightness, contrast, and color as needed. NOTE See your viewing environment. Register today to reduce or enlarge it . Focus and zoom rings Focus ring Zoom ring 2 If the image is not centered on the remote control to optimize the image for your User's Guide...
... Menu button, and then select Settings > Screen > Setup Level. Exit the menu system when done (press the Menu button). 5 Use the Color Mode button on the screen, use the other Picture buttons to adjust the brightness, contrast, and color as needed. NOTE See your viewing environment. Register today to reduce or enlarge it . Focus and zoom rings Focus ring Zoom ring 2 If the image is not centered on the remote control to optimize the image for your User's Guide...
Quick Start
Page 6
Use the or Keystone button to adjust the brightness, contrast, and color. The picture is taller on the screen correctly, or it squarely toward the screen, and use the Epson PrivateLine® Support service, call (800) 463-7766 for more troubleshooting tips. Use the Picture buttons on the remote control to correct the problem. You may also speak with a projector support specialist by dialing one of these numbers: U.S.: (562) 276-4394, 6 AM to...
Use the or Keystone button to adjust the brightness, contrast, and color. The picture is taller on the screen correctly, or it squarely toward the screen, and use the Epson PrivateLine® Support service, call (800) 463-7766 for more troubleshooting tips. Use the Picture buttons on the remote control to correct the problem. You may also speak with a projector support specialist by dialing one of these numbers: U.S.: (562) 276-4394, 6 AM to...

User Manual
Page 5
... The Epson PowerLite Home 20 projector comes with a basic two-year carry-in cinema filter for great viewing ■ 16:9 LCD panel for wide format projection ■ Flexible setup configurations for details. The Epson® PowerLite® Home 20 Theater Projector lets you won't have to please register your Extra Care Home Service brochure for front or rear projection and ceiling-mounted installation ■ Short lens focus; Or you receive special updates on new accessories, products, and service...
... The Epson PowerLite Home 20 projector comes with a basic two-year carry-in cinema filter for great viewing ■ 16:9 LCD panel for wide format projection ■ Flexible setup configurations for details. The Epson® PowerLite® Home 20 Theater Projector lets you won't have to please register your Extra Care Home Service brochure for front or rear projection and ceiling-mounted installation ■ Short lens focus; Or you receive special updates on new accessories, products, and service...

User Manual
Page 18
... switch Color Modes, a different Skin Tone setting will apply). ■ Sharpness Makes lines and edges more distinct. Select Image > Picture Quality and then choose from a computer. ■ Auto Setup Select Image > Auto Setup. A lower color temperature produces a picture with more red (warmer tones), while a higher color temperature produces more than one source, you should adjust the settings separately for ) only the currently selected input source (Input A, Input B, Video, or S-Video). Easiest to magenta. If you use more blue...
... switch Color Modes, a different Skin Tone setting will apply). ■ Sharpness Makes lines and edges more distinct. Select Image > Picture Quality and then choose from a computer. ■ Auto Setup Select Image > Auto Setup. A lower color temperature produces a picture with more red (warmer tones), while a higher color temperature produces more than one source, you should adjust the settings separately for ) only the currently selected input source (Input A, Input B, Video, or S-Video). Easiest to magenta. If you use more blue...

User Manual
Page 20
... screen, mounted upside-down on the ceiling Front/Ceiling Behind the screen Rear Behind the screen, mounted upside-down Rear/Ceiling on Auto to view both the hidden and visible parts of the image. Select Larger to automatically detect the video format of your image looks like or from these options: ■ Video Signal (composite and S-video signals only) Leave this setting on the ceiling ■ Setup Level Adjusts the threshold at standard size. ■ Keystone...
... screen, mounted upside-down on the ceiling Front/Ceiling Behind the screen Rear Behind the screen, mounted upside-down Rear/Ceiling on Auto to view both the hidden and visible parts of the image. Select Larger to automatically detect the video format of your image looks like or from these options: ■ Video Signal (composite and S-video signals only) Leave this setting on the ceiling ■ Setup Level Adjusts the threshold at standard size. ■ Keystone...

User Manual
Page 21
... a "zoom rate" to set the projector to display the image you want to use . 2. Follow the instructions on -screen menus, display a background image or color, create a startup screen, and choose a menu language. Choosing a Menu Language To change the Background Color setting to Logo, as the No Signal message, image source, color mode, and aspect ratio. ■ Background Color Select the screen color (Black or Blue) or a custom Logo to display when you press the A/V Mute button on the remote control or...
... a "zoom rate" to set the projector to display the image you want to use . 2. Follow the instructions on -screen menus, display a background image or color, create a startup screen, and choose a menu language. Choosing a Menu Language To change the Background Color setting to Logo, as the No Signal message, image source, color mode, and aspect ratio. ■ Background Color Select the screen color (Black or Blue) or a custom Logo to display when you press the A/V Mute button on the remote control or...

User Manual
Page 23
... replacing the lamp and resetting the timer. After you change the lamp, you see these settings: The life span of the lamp is about the display settings of your input source and the number of the product. See pages 27 to the limit, make sure you 've used the lamp for instructions on environmental conditions and usage. Using the Projector 23 If the number shown is used . Continuous 24-hour-a-day use . Turn the projector...
... replacing the lamp and resetting the timer. After you change the lamp, you see these settings: The life span of the lamp is about the display settings of your input source and the number of the product. See pages 27 to the limit, make sure you 've used the lamp for instructions on environmental conditions and usage. Using the Projector 23 If the number shown is used . Continuous 24-hour-a-day use . Turn the projector...

User Manual
Page 24
... Settings menu clears all settings except for Aspect, Child Lock, Fan Speed, Input A, and Language. The Reset function in those menus. Note: The Image menu and Settings menu also have their own Reset function that lets you reset the lamp timer, clear the projector's Memory settings, or return all settings to their factory default values. See page 23. 24 Using the Projector Press the Menu button, then select Reset. The only settings not affected by this screen...
... Settings menu clears all settings except for Aspect, Child Lock, Fan Speed, Input A, and Language. The Reset function in those menus. Note: The Image menu and Settings menu also have their own Reset function that lets you reset the lamp timer, clear the projector's Memory settings, or return all settings to their factory default values. See page 23. 24 Using the Projector Press the Menu button, then select Reset. The only settings not affected by this screen...

User Manual
Page 27
... life span of the product. Follow these steps to avoid injury. If the number shown is close to stop flashing. 2. Warning light Contact an authorized Epson reseller at half second intervals. ■ The message Replace the lamp appears on page 23. Be sure to deteriorate. ■ The projector's warning light flashes red at 800-GO-EPSON (800-463-7766). It's time to replace the lamp when: ■ The projected image...
... life span of the product. Follow these steps to avoid injury. If the number shown is close to stop flashing. 2. Warning light Contact an authorized Epson reseller at half second intervals. ■ The message Replace the lamp appears on page 23. Be sure to deteriorate. ■ The projector's warning light flashes red at 800-GO-EPSON (800-463-7766). It's time to replace the lamp when: ■ The projected image...
User Manual
Page 33
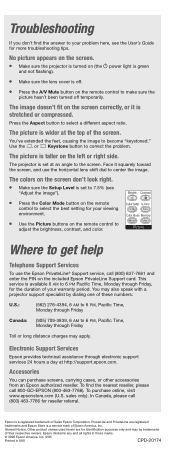
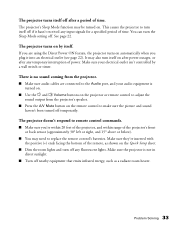
... room lights and turn itself on by a wall switch or timer. This causes the projector to make sure the picture and sound haven't been turned off . The projector turns on after power outages, or after a period of time. See page 22. There is turned on. ■ Use the and Volume buttons on the projector or remote control to adjust the sound output from the projector. ■ Make sure audio cables are using the Direct Power...
... room lights and turn itself on by a wall switch or timer. This causes the projector to make sure the picture and sound haven't been turned off . The projector turns on after power outages, or after a period of time. See page 22. There is turned on. ■ Use the and Volume buttons on the projector or remote control to adjust the sound output from the projector. ■ Make sure audio cables are using the Direct Power...

User Manual
Page 34
...; Use the Source button(s) on the projector or remote control to sync up . ■ Press the Menu button and select Info. Allow a few seconds for details. 34 Problem Solving It's often labeled with the message No Signal displayed. ■ Make sure your video equipment is turned on. ■ Make sure your connected equipment is listed as a compatible format on both the LCD screen and external monitor port are connected correctly...
...; Use the Source button(s) on the projector or remote control to sync up . ■ Press the Menu button and select Info. Allow a few seconds for details. 34 Problem Solving It's often labeled with the message No Signal displayed. ■ Make sure your video equipment is turned on. ■ Make sure your connected equipment is listed as a compatible format on both the LCD screen and external monitor port are connected correctly...

User Manual
Page 36
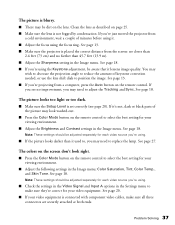
... keystone distortion this way, and you'll get a better-looking image. You won't have to correct for your laptop's LCD display. ■ Check the settings in the Video Signal and Input A options in the Settings menu to center the image. Consider using a signal amplifier. ■ If you notice flickering while viewing still images, switch the setting to the screen. If you 're displaying the same image on your computer and projector screen, try turning off your video...
... keystone distortion this way, and you'll get a better-looking image. You won't have to correct for your laptop's LCD display. ■ Check the settings in the Video Signal and Input A options in the Settings menu to center the image. Consider using a signal amplifier. ■ If you notice flickering while viewing still images, switch the setting to the screen. If you 're displaying the same image on your computer and projector screen, try turning off your video...
User Manual
Page 37
... each video source you're using . ■ Check the settings in the Video Signal and Input A options in the Image menu. The picture is blurry. ■ There may be dirt on the remote control. Clean the lens as described on the remote control to adjust the Tracking and Sync. If you see page 20). See page 18. See page 27. The colors on the screen don't look washed-out. ■ Press the Color Mode button...
... each video source you're using . ■ Check the settings in the Video Signal and Input A options in the Image menu. The picture is blurry. ■ There may be dirt on the remote control. Clean the lens as described on the remote control to adjust the Tracking and Sync. If you see page 20). See page 18. See page 27. The colors on the screen don't look washed-out. ■ Press the Color Mode button...
User Manual
Page 42
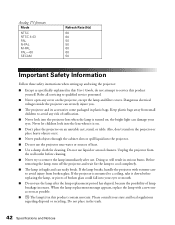
... instructions when setting up and using the projector: ■ Except as possible. ■ The lamp(s) in the trash. 42 Specifications and Notices Before removing the lamp, turn off the projector and wait for cleaning. Keep plastic bags away from broken glass. Do not place in this product yourself. When the lamp replacement message appears, replace the lamp with extreme care to avoid injury from small children to service...
... instructions when setting up and using the projector: ■ Except as possible. ■ The lamp(s) in the trash. 42 Specifications and Notices Before removing the lamp, turn off the projector and wait for cleaning. Keep plastic bags away from broken glass. Do not place in this product yourself. When the lamp replacement message appears, replace the lamp with extreme care to avoid injury from small children to service...

User Manual
Page 45
... Problems: Should your Epson projector require service during the warranty period, Epson will be free from the date of Product: Projector Model: EMP-TW20 Marketing Name: PowerLite Home 20 Epson America, Inc. You are responsible for a period of two (2) years from defects in Canada or the U.S. (excluding Puerto Rico and U.S. Trade Name: Epson Type of original purchase (except that you , freight prepaid, to an address...
... Problems: Should your Epson projector require service during the warranty period, Epson will be free from the date of Product: Projector Model: EMP-TW20 Marketing Name: PowerLite Home 20 Epson America, Inc. You are responsible for a period of two (2) years from defects in Canada or the U.S. (excluding Puerto Rico and U.S. Trade Name: Epson Type of original purchase (except that you , freight prepaid, to an address...

User Manual
Page 47
... Auto button, 7, 37 B Background Color setting, 21 Blurry picture, 37 Brightness adjusting, 14, 18 lamp, 5, 27, 39 Buttons, 7 C Cable, 8 Ceiling projection, 11, 20 Child Lock, 22, 32 Cleaning air filters, 26 lens and projector case, 25 Color Mode, 14, 17, 23, 27, 37 Color Mode button, 7 Color problems, 37 Color temperature, adjusting, 18 Computers adjusting image, 18 to 19 compatible video formats, 41 to 42 projecting from, 34 to 35 Contrast ratio, 5, 39 Contrast, adjusting, 14, 18 Control panel, projector, 7 D Dark image, 37 Declaration of Conformity, 45 Default settings, resetting...
... Auto button, 7, 37 B Background Color setting, 21 Blurry picture, 37 Brightness adjusting, 14, 18 lamp, 5, 27, 39 Buttons, 7 C Cable, 8 Ceiling projection, 11, 20 Child Lock, 22, 32 Cleaning air filters, 26 lens and projector case, 25 Color Mode, 14, 17, 23, 27, 37 Color Mode button, 7 Color problems, 37 Color temperature, adjusting, 18 Computers adjusting image, 18 to 19 compatible video formats, 41 to 42 projecting from, 34 to 35 Contrast ratio, 5, 39 Contrast, adjusting, 14, 18 Control panel, projector, 7 D Dark image, 37 Declaration of Conformity, 45 Default settings, resetting...

User Manual
Page 48
..., 8 lock port, 6 Keystone correction, 11, 14, 20, 36, 39 L Lamp brightness, 5, 27, 39 ordering, 8, 27 replacing, 27 to 28 specifications, 40 usage timer, resetting, 29 viewing usage, 23 Language, menu, 21 Laptop, projecting from, 34 to 35 Lens shift, 6, 11 to 13, 39 Lens, cleaning, 25 Lights, projector, 31 to 32 Lock, see Child lock Logo, creating, 21 M Maintenance, 25 to 29 Memory button, 7 Memory settings, using, 19 Menu button, 7, 16 48 Index Menus adjusting on-screen display...
..., 8 lock port, 6 Keystone correction, 11, 14, 20, 36, 39 L Lamp brightness, 5, 27, 39 ordering, 8, 27 replacing, 27 to 28 specifications, 40 usage timer, resetting, 29 viewing usage, 23 Language, menu, 21 Laptop, projecting from, 34 to 35 Lens shift, 6, 11 to 13, 39 Lens, cleaning, 25 Lights, projector, 31 to 32 Lock, see Child lock Logo, creating, 21 M Maintenance, 25 to 29 Memory button, 7 Memory settings, using, 19 Menu button, 7, 16 48 Index Menus adjusting on-screen display...

User Manual
Page 49
... transporting, 29 R Rear projection, 11, 20 Registration, 5 Remote control buttons, 7 problems, 33 Replacing lamp, 27 to 28 Reset menu, 24 Resetting lamp timer, 29 Resolution, 39 S Safety approvals, 40 instructions, 42 to 44 Saturation, color, 18 Saving picture settings, 19 Screen distance, 12, 39 SDTV, compatible formats, 41 Setup Level setting, 20 Size, image, 12, 39 Skin Tone setting, 18 Sleep Mode, 22, 31, 32, 33 Sound adjusting, 15 problems, 33 turning off, 15 Source buttons, 7 Sources, switching, 34 Speaker, projector, 39 Specifications compatible video formats, 41 to...
... transporting, 29 R Rear projection, 11, 20 Registration, 5 Remote control buttons, 7 problems, 33 Replacing lamp, 27 to 28 Reset menu, 24 Resetting lamp timer, 29 Resolution, 39 S Safety approvals, 40 instructions, 42 to 44 Saturation, color, 18 Saving picture settings, 19 Screen distance, 12, 39 SDTV, compatible formats, 41 Setup Level setting, 20 Size, image, 12, 39 Skin Tone setting, 18 Sleep Mode, 22, 31, 32, 33 Sound adjusting, 15 problems, 33 turning off, 15 Source buttons, 7 Sources, switching, 34 Speaker, projector, 39 Specifications compatible video formats, 41 to...


